- команда file в Linux с примерами
- 5 Commands to View the Content of a File in Linux Command Line
- 5 commands to view files in Linux
- 1. Cat
- 3. Less
- 4. Head
- 5. Tail
- Bonus: Strings command
- Fstab File ( /etc/fstab ) Entry Options in Linux
- fstab Options
- • The first field (device)
- • The second field (mounting_directory)
- • Third field (filesystem_type)
- • The fourth field (options)
- • The fifth field (dump)
- • The sixth field (fsck)
команда file в Linux с примерами
Команда file используется для определения типа файла. Тип .file может быть читаемым человеком (например, «текст ASCII») или MIME-типом (например, «text / plain; charset = us-ascii»). Эта команда проверяет каждый аргумент в попытке классифицировать его.
Он имеет три набора тестов следующим образом:
- Тест файловой системы: Этот тест основан на результате, который возвращается из системного вызова stat . Программа проверяет это, если файл пуст или это какой-то особый файл. Этот тест приводит к печати типа файла.
- магический тест: эти тесты используются для проверки файлов с данными в определенных фиксированных форматах.
- языковой тест: этот тест ищет определенные строки, которые могут появляться в любом месте в первых нескольких блоках файла.
Синтаксис:
Пример: команда отображает тип файла

Параметры:
- -b, –brief: используется для отображения только типа файла в кратком режиме.
Синтаксис:
Пример:

Здесь мы видим этот тип файла без имени файла.
* опция: команда отображает тип файла всех файлов.

Вывод показывает все файлы в домашнем каталоге
опция directoryname / *: используется для отображения всех типов файлов файлов в определенном каталоге.
Синтаксис:
Пример:

Вывод показывает все файлы в определенном каталоге.
опция [диапазон] *: для отображения типа файлов в определенном диапазоне.
Синтаксис:
Пример:

Вывод показывает диапазон файлов.
-c опция: вызвать контрольную распечатку проанализированной формы магического файла. Этот параметр обычно используется вместе с флагом -m для отладки нового магического файла перед его установкой.
Пример:

Опция -f: прочитать имена файлов, которые нужно проверить, по имени файла (по одному на строку) перед списком аргументов. Должен присутствовать либо имя файла, либо, по крайней мере, один аргумент имени файла; чтобы проверить стандартный ввод, используйте «-» в качестве аргумента имени файла.
Синтаксис:

-F опция: Файл и тип файла разделяются :. Но мы можем изменить разделитель, используя опцию -F
Синтаксис:
Пример:

Вывод показывает, что файл и типы файлов разделены — и + .
-i опция: для просмотра файла MIME.
Синтаксис:
Пример:

-N опция: не дополняйте имена файлов, чтобы они выровнялись в выходных данных.
Пример:

опция -s: для специальных файлов
Синтаксис:
Пример:

имена файлов: отображает типы файлов нескольких файлов
Синтаксис:
Пример:

Опция -z: Попробуйте заглянуть внутрь сжатых файлов.
Пример:

Опция –help: распечатать справочное сообщение и выйти.
Источник
5 Commands to View the Content of a File in Linux Command Line
If you are new to Linux and you are confined to a terminal, you might wonder how to view a file in the command line.
Reading a file in Linux terminal is not the same as opening file in Notepad. Since you are in the command line mode, you should use commands to read file in Linux.
Don’t worry. It’s not at all complicated to display a file in Linux. It’s easy as well essential that you learn how to read files in the line.
Here are five commands that let you view the content of a file in Linux terminal.
5 commands to view files in Linux
Before you how to view a file in Unix like systems, let me clarify that when I am referring to text files here. There are different tools and commands if you want to read binary files.
1. Cat
This is the simplest and perhaps the most popular command to view a file in Linux.
Cat simply prints the content of the file to standard display i.e. your screen. It cannot be simpler than this, can it?
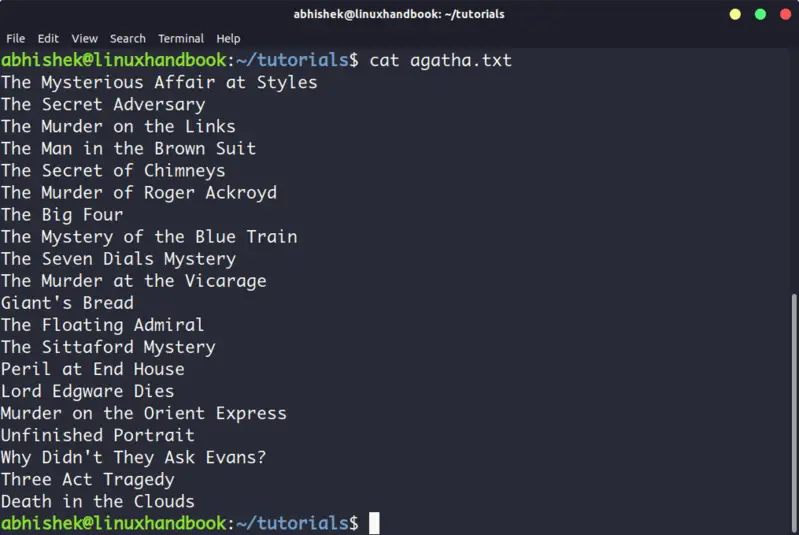 cat displays the content of the file on the screen
Cat becomes a powerful command when used with its options. I recommend reading this detailed tutorial on using cat command.
The problem with cat command is that it displays the text on the screen. Imagine if you use cat command with a file that has 2000 lines. Your entire screen will be flooded with the 200 lines and that’s not the ideal situation.
So, what do you do in such a case? Use less command in Linux (explained later).
The nl command is almost like the cat command. The only difference is that it prepends line numbers while displaying the text in the terminal.
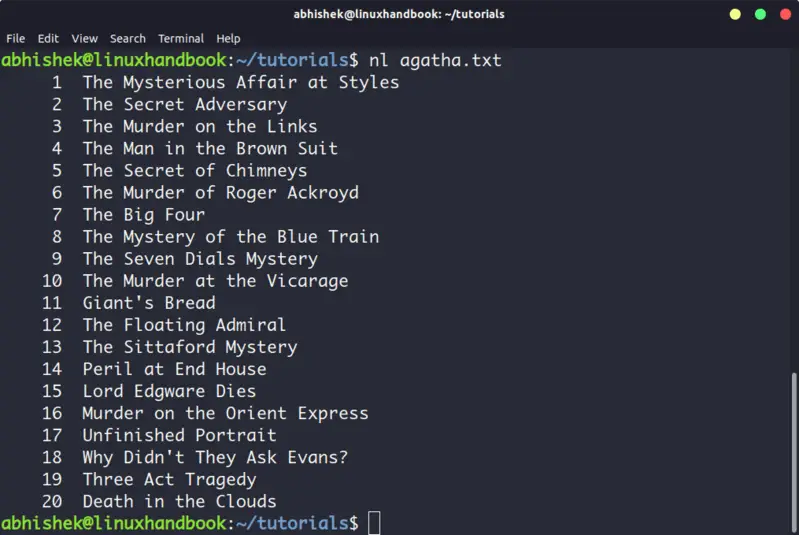 nl command displays text with line numbers
There are a few options with nl command that allows you to control the numbering. You can check its man page for more details.
3. Less
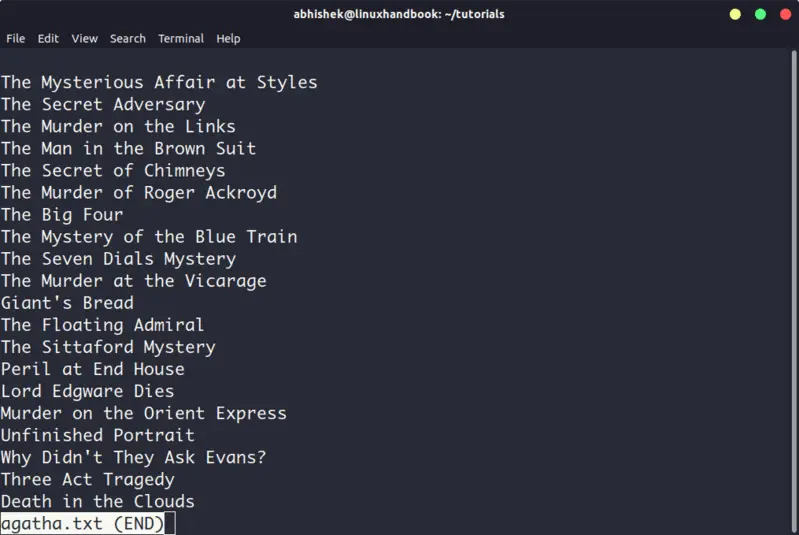
Less command views the file one page at a time. The best thing is that you exit less (by pressing q), there are no lines displayed on the screen. Your terminal remains clean and pristine.
I strongly recommend learning a few options of the Less command so that you can use it more effectively.
There is also more command which was used in olden days but less command has more friendly features. This is why you might come across the humorous term ‘less is more’.
4. Head
Head command is another way of viewing text file but with a slight difference. The head command displays the first 10 lines of a text file by default.
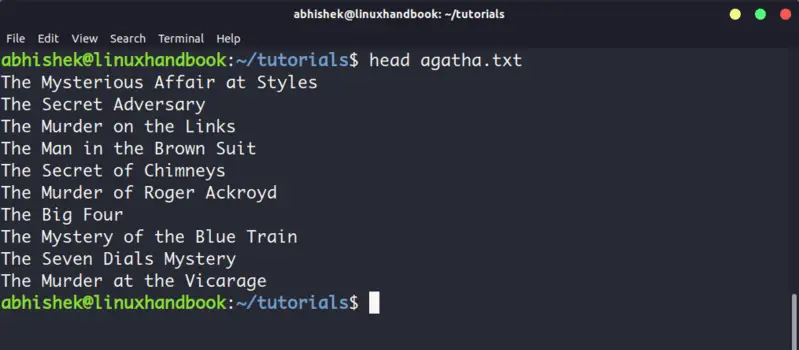
You can change this behavior by using options with head command but the fundamental principle remains the same: head command starts operating from the head (beginning) of the file.
5. Tail
Tail command in Linux is similar and yet opposite to the head command. While head command displays file from the beginning, the tail command displays file from the end.
By default, tail command displays the last 10 lines of a file.

Head and Tail commands can be combined to display selected lines from a file. You can also use tail command to see the changes made to a file in real time.
Bonus: Strings command
Okay! I promised to show only the commands for viewing text file. And this one deals with both text and binary files.
Strings command displays the readable text from a binary file.
No, it doesn’t convert binary files into text files. If the binary file consists of actual readable text, strings command displays those text on your screen. You can use the file command to find the type of a file in Linux.
Conclusion
Some Linux users use Vim to view the text file but I think that’s overkill. My favorite command to open a file in Linux is the less command. It leaves the screen clear and has several options that makes viewing text file a lot easier.
Since you now know ways to view files, maybe you would be interested in knowing how to edit text files in Linux. Cut and Paste are two such commands that you can use for editing text in Linux terminal. You may also read about creating files in Linux command line.
Источник
Fstab File ( /etc/fstab ) Entry Options in Linux

The ‘/etc/fstab’ file is one of the important configuration file used by Linux machines which specify the devices and partitions available and where/how to use these partitions. This file will be created/updated during the system installation. You need to modify or maintain it in the way you need to use the devices/partitions.
In Linux each device is available as a directory in ‘/dev’ folder. That is, when you connect a floppy drive or plug in any external device to a Linux machine, it will be showing up in /dev folder. But, you won’t be able to use the device or access contents from it using that device file. You need to mount the device in order to make it available for use. The fstab file allows you to specify how and what options need to be used for mounting a particular device or partition, so that it will be using that options every time you mount it. This file is read each time when the system is booted and the specified filesystem is mounted accordingly. You could also comment out the specified lines and can manually mount filesystem after reboot.
As an example, if your fstab file (/etc/fstab) contains the following entry,
You just need to issue the following command to mount cdrom after inserting a CD into the CD drive.
This will mount the CDROM to the folder /cdrom with the options ‘rw, noauto and user’ (we will go through the various options in detail later) and you will be browse the contents of the CD through the directory /cdrom.
fstab Options
Each line in fstab corresponds to a particular device or partitions. A sample entry on fstab file is as follows.
• The first field (device)
corresponds to the device name. If you have plugged in an external device and confused about the device name, you need to use ‘dmesg’ or ‘tail –f /var/log/messages’ to find the device name. For SCSI hard disks, devices will be names like /dev/sda (first drive), /dev/sdb (second drive).
• The second field (mounting_directory)
mentions the mount point on which the device needs to be mounted. This directory should exist. That is, you need to create th directory before using mount command.
• Third field (filesystem_type)
is the filesystem type. The various important file system types are,
— ext2 and ext3: Commonly all latest Linux partitions are Ext3. Ext3 is a newer filesystem type that differs from Ext2 in that it’s journaled, meaning that if you turn the computer off without properly shutting down, you shouldn’t lose any data and your system shouldn’t spend ages doing filesystem checks the next time you boot up.
— reiserfs — ReiserFS is a journaled filesystem, but it’s much more advanced than Ext3. Many Linux distros (including SuSE) have started using ReiserFS as their default filesystem for Linux partitions.
— Swap- The filesystem type «swap» is used in your swap partitions.
— vfat and ntfs : The USB stick is most likely formatted as Vfat (more widely known as FAT32). The Windows partitions are probably either Vfat or NTFS.
— ISO 9660 – This is a common format that target Compact Discs, DVDs and Blu-ray discs.
— Auto- The option «auto» simply means that the filesystem type is detected automatically. Normally floppy or CDROMs will be given this option as their filesystem type may vary.
• The fourth field (options)
Describes the mount options. There are few number of mount options available. We will go through the important options that a server admin should be aware of.
— auto and noauto : auto specifies that the device/partition should be automatically mounted on boot time and ‘noauto’ specifies that the device should be explicitly mounted. When you execute ‘mount –a’ all partition that has ‘auto’ value set will get mounted automatically. The root partitions should have the ‘auto’ option set so that the partition will get mounted automatically.
— exec and noexec : The option ‘exec’ specifies that the files residing in that device will be able to execute and ‘noexec’ remove the execute feature. The partitions which are intended to keep non executable files like /var or /tmp can have noexec feature enabled for better security.
— user and nouser : The ‘user’ option specifies that the users will be able to mount the partitions and ‘nouser’ specifies that only root user can mount any partitions. The ‘user’ option should be set for devices like ‘floppy or cdrom’ so that the users will be able to mount the device rather than being root.
This will allow user to mount to directory other than root. Make sure you enabled permission on mountpoint directory for the required user before mounting. On a mounted directory even if you set permission it normally don’t work.
Other options, here you can explicitly set owner and group name
— ro and rw : The option ‘ro’ specifies that the filesystem should be mounted as read-only and the option ‘rw’ enables read-write.
— sync and async – This specifies how the input and output to the filesystem should be done. sync means it should be done synchronously. That is, when you copy a file to the floppy, the changes are physically written to the floppy at the same time you issue the copy command. For ‘async’, the changes will be written only at the time of unmounting the floppy.
— suid / nosuid – The option ‘suid’ permit the operation of suid, and sgid bits and the option ‘nosuid’ block the operation of suid and sgid bits.
— Defaults — The normal default for Ext3 file systems is equivalent to rw,suid,dev,exec,auto,nouser,async(no acl support).
• The fifth field (dump)
Specifies the option that need to be used by the dump (backup utility) program. If the value is set to 0, then the partition is excluded from taking backup and if the option is a nonzero value, the filesystem will be backed up.
• The sixth field (fsck)
Mentions the fsck option. That is if the value is set to zero, the device or partition will be excluded from fsck check and if it is nonzero the fsck check will be run in the order in which the value is set.
The root partition will have this value set to one (1) so that it will be checked first by fsck. If you set to two (2) that means the system to do fsck on all rest partition marked ‘2’ in sequence on system reboot.
If you face any troubles on mounting a partition, the file /etc/fstab should be checked for any misconfiguration.
Источник


