- Use an Azure file share with Windows
- Prerequisites
- Using an Azure file share with Windows
- Mount the Azure file share
- Mount the Azure file share with File Explorer
- Accessing share snapshots from Windows
- List previous versions
- Restore from a previous version
- Securing Windows/Windows Server
- Auditing SMB 1 usage
- Removing SMB 1 from Windows Server
- Removing SMB 1 from Windows client
- Disabling SMB 1 on legacy versions of Windows/Windows Server
- SMB resources
- Next steps
- How to Best Organize Your Computer Files, Folders & Documents
- How to Organize Computer Files: Decide on a Structure
- 1. Project or Client-Based File Organization System
- 2. Date-Based File Organization System
- 3. File Type-Based File Organization System
- One Is None and Two Is One: Backups
- Best Practices For Organizing Computer Files
- Wrapping Up
Use an Azure file share with Windows
Azure Files is Microsoft’s easy-to-use cloud file system. Azure file shares can be seamlessly used in Windows and Windows Server. This article discusses the considerations for using an Azure file share with Windows and Windows Server.
In order to use an Azure file share outside of the Azure region it is hosted in, such as on-premises or in a different Azure region, the OS must support SMB 3.0.
You can use Azure file shares on a Windows installation that is running either in an Azure VM or on-premises. The following table illustrates which OS versions support accessing file shares in which environment:
| Windows version | SMB version | Mountable in Azure VM | Mountable on-premises |
|---|---|---|---|
| Windows Server 2019 | SMB 3.0 | Yes | Yes |
| Windows 10 1 | SMB 3.0 | Yes | Yes |
| Windows Server semi-annual channel 2 | SMB 3.0 | Yes | Yes |
| Windows Server 2016 | SMB 3.0 | Yes | Yes |
| Windows 8.1 | SMB 3.0 | Yes | Yes |
| Windows Server 2012 R2 | SMB 3.0 | Yes | Yes |
| Windows Server 2012 | SMB 3.0 | Yes | Yes |
| Windows 7 3 | SMB 2.1 | Yes | No |
| Windows Server 2008 R2 3 | SMB 2.1 | Yes | No |
1 Windows 10, versions 1507, 1607, 1803, 1809, 1903, 1909, and 2004.
2 Windows Server, versions 1809, 1903, 1909, 2004.
3 Regular Microsoft support for Windows 7 and Windows Server 2008 R2 has ended. It is possible to purchase additional support for security updates only through the Extended Security Update (ESU) program. We strongly recommend migrating off of these operating systems.
We always recommend taking the most recent KB for your version of Windows.
Prerequisites
Ensure port 445 is open: The SMB protocol requires TCP port 445 to be open; connections will fail if port 445 is blocked. You can check if your firewall is blocking port 445 with the Test-NetConnection cmdlet. To learn about ways to work around a blocked 445 port, see the Cause 1: Port 445 is blocked section of our Windows troubleshooting guide.
Using an Azure file share with Windows
To use an Azure file share with Windows, you must either mount it, which means assigning it a drive letter or mount point path, or access it via its UNC path.
This article uses the storage account key to access the file share. A storage account key is an administrator key for a storage account, including administrator permissions to all files and folders within the file share you’re accessing, and for all file shares and other storage resources (blobs, queues, tables, etc.) contained within your storage account. If this is not sufficient for your workload, Azure File Sync may be used, or you may use identity-based authentication over SMB.
A common pattern for lifting and shifting line-of-business (LOB) applications that expect an SMB file share to Azure is to use an Azure file share as an alternative for running a dedicated Windows file server in an Azure VM. One important consideration for successfully migrating a line-of-business application to use an Azure file share is that many line-of-business applications run under the context of a dedicated service account with limited system permissions rather than the VM’s administrative account. Therefore, you must ensure that you mount/save the credentials for the Azure file share from the context of the service account rather than your administrative account.
Mount the Azure file share
The Azure portal provides you with a script that you can use to mount your file share directly to a host. We recommend using this provided script.
To get this script:
Navigate to the storage account that contains the file share you’d like to mount.
Select File shares.
Select the file share you’d like to mount.
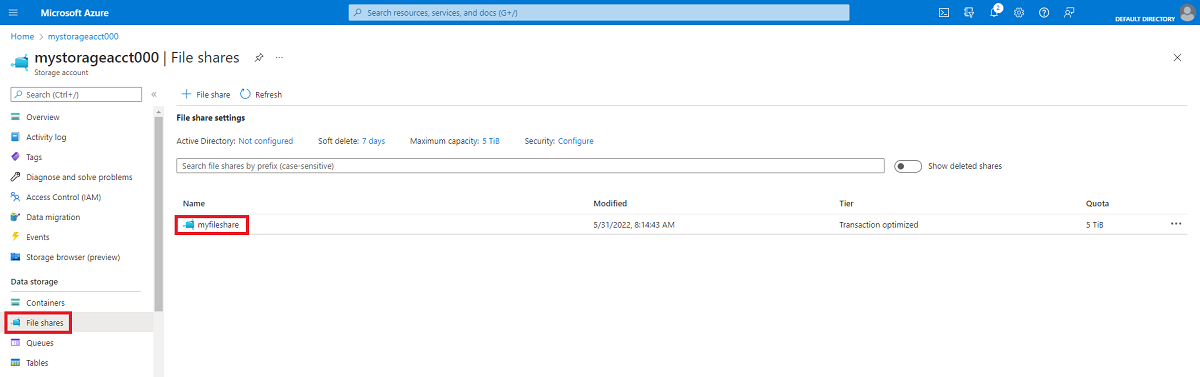
Select Connect.
Select the drive letter to mount the share to.
Copy the provided script.
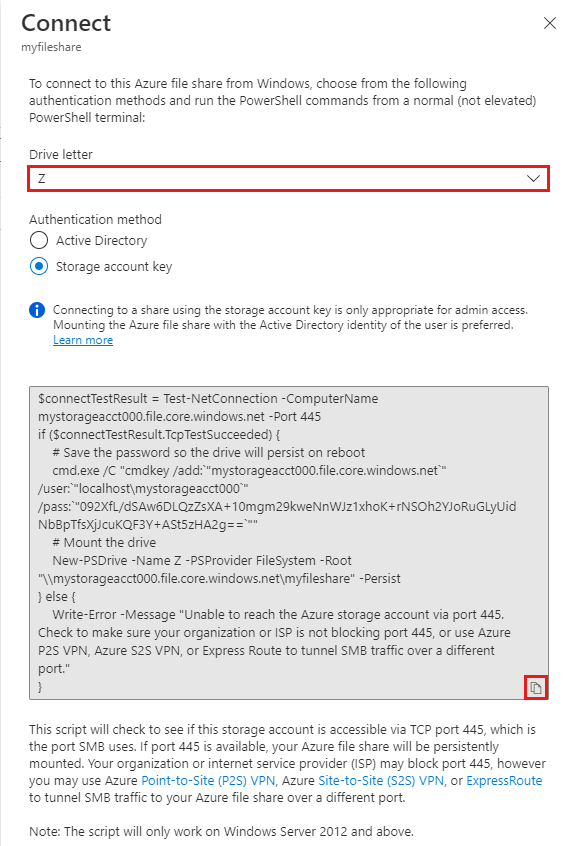
Paste the script into a shell on the host you’d like to mount the file share to, and run it.
You have now mounted your Azure file share.
Mount the Azure file share with File Explorer
Note that the following instructions are shown on Windows 10 and may differ slightly on older releases.
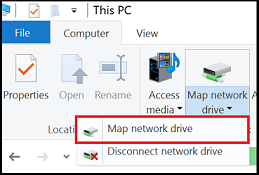
Open File Explorer. This can be done by opening from the Start Menu, or by pressing Win+E shortcut.
Navigate to This PC on the left-hand side of the window. This will change the menus available in the ribbon. Under the Computer menu, select Map network drive.
Select the drive letter and enter the UNC path, the UNC path format is \\ .file.core.windows.net\ . For example: \\anexampleaccountname.file.core.windows.net\example-share-name .

Use the storage account name prepended with AZURE\ as the username and a storage account key as the password.

Use Azure file share as desired.
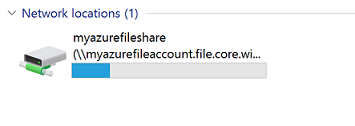
When you are ready to dismount the Azure file share, you can do so by right-clicking on the entry for the share under the Network locations in File Explorer and selecting Disconnect.
Accessing share snapshots from Windows
If you have taken a share snapshot, either manually or automatically through a script or service like Azure Backup, you can view previous versions of a share, a directory, or a particular file from file share on Windows. You can take a share snapshot using Azure PowerShell, Azure CLI, or the Azure portal.
List previous versions
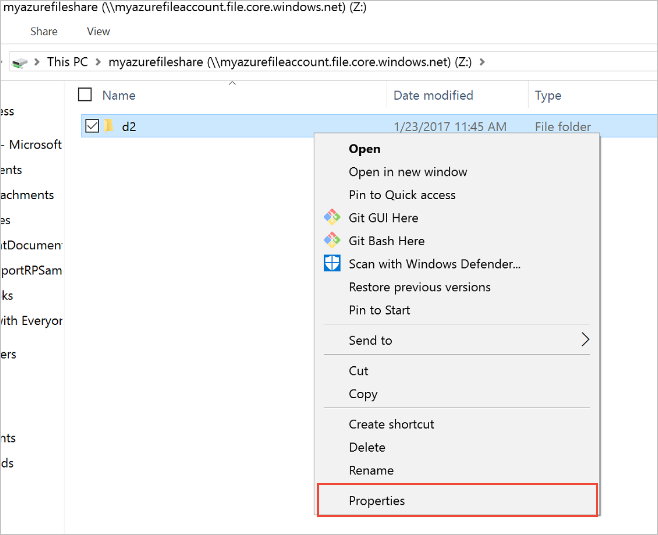
Browse to the item or parent item that needs to be restored. Double-click to go to the desired directory. Right-click and select Properties from the menu.
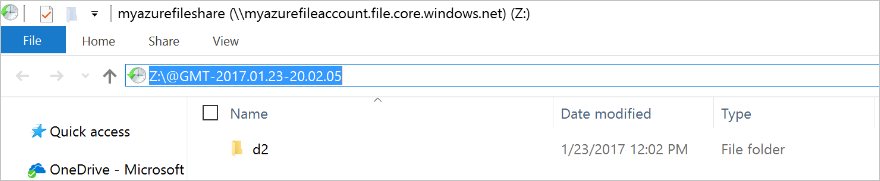
Select Previous Versions to see the list of share snapshots for this directory. The list might take a few seconds to load, depending on the network speed and the number of share snapshots in the directory.

You can select Open to open a particular snapshot.
Restore from a previous version
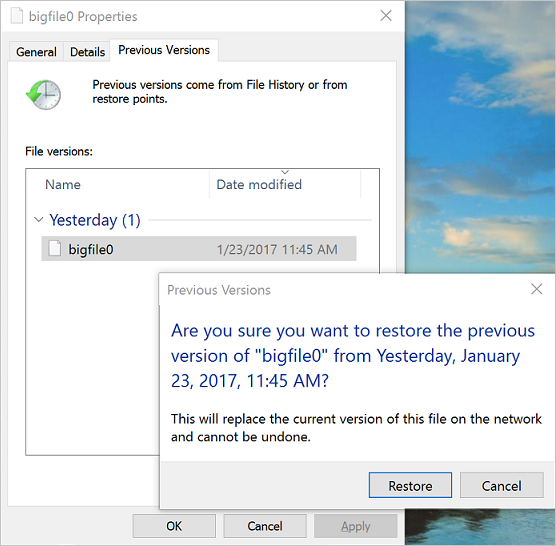
Select Restore to copy the contents of the entire directory recursively at the share snapshot creation time to the original location.
Securing Windows/Windows Server
In order to mount an Azure file share on Windows, port 445 must be accessible. Many organizations block port 445 because of the security risks inherent with SMB 1. SMB 1, also known as CIFS (Common Internet File System), is a legacy file system protocol included with Windows and Windows Server. SMB 1 is an outdated, inefficient, and most importantly insecure protocol. The good news is that Azure Files does not support SMB 1, and all supported versions of Windows and Windows Server make it possible to remove or disable SMB 1. We always strongly recommend removing or disabling the SMB 1 client and server in Windows before using Azure file shares in production.
The following table provides detailed information on the status of SMB 1 each version of Windows:
| Windows version | SMB 1 default status | Disable/Remove method |
|---|---|---|
| Windows Server 2019 | Disabled | Remove with Windows feature |
| Windows Server, versions 1709+ | Disabled | Remove with Windows feature |
| Windows 10, versions 1709+ | Disabled | Remove with Windows feature |
| Windows Server 2016 | Enabled | Remove with Windows feature |
| Windows 10, versions 1507, 1607, and 1703 | Enabled | Remove with Windows feature |
| Windows Server 2012 R2 | Enabled | Remove with Windows feature |
| Windows 8.1 | Enabled | Remove with Windows feature |
| Windows Server 2012 | Enabled | Disable with Registry |
| Windows Server 2008 R2 | Enabled | Disable with Registry |
| Windows 7 | Enabled | Disable with Registry |
Auditing SMB 1 usage
Applies to Windows Server 2019, Windows Server semi-annual channel (versions 1709 and 1803), Windows Server 2016, Windows 10 (versions 1507, 1607, 1703, 1709, and 1803), Windows Server 2012 R2, and Windows 8.1
Before removing SMB 1 in your environment, you may wish to audit SMB 1 usage to see if any clients will be broken by the change. If any requests are made against SMB shares with SMB 1, an audit event will be logged in the event log under Applications and Services Logs > Microsoft > Windows > SMBServer > Audit .
To enable auditing support on Windows Server 2012 R2 and Windows 8.1, install at least KB4022720.
To enable auditing, execute the following cmdlet from an elevated PowerShell session:
Removing SMB 1 from Windows Server
Applies to Windows Server 2019, Windows Server semi-annual channel (versions 1709 and 1803), Windows Server 2016, Windows Server 2012 R2
To remove SMB 1 from a Windows Server instance, execute the following cmdlet from an elevated PowerShell session:
To complete the removal process, restart your server.
Starting with Windows 10 and Windows Server version 1709, SMB 1 is not installed by default and has separate Windows features for the SMB 1 client and SMB 1 server. We always recommend leaving both the SMB 1 server ( FS-SMB1-SERVER ) and the SMB 1 client ( FS-SMB1-CLIENT ) uninstalled.
Removing SMB 1 from Windows client
Applies to Windows 10 (versions 1507, 1607, 1703, 1709, and 1803) and Windows 8.1
To remove SMB 1 from your Windows client, execute the following cmdlet from an elevated PowerShell session:
To complete the removal process, restart your PC.
Disabling SMB 1 on legacy versions of Windows/Windows Server
Applies to Windows Server 2012, Windows Server 2008 R2, and Windows 7
SMB 1 cannot be completely removed on legacy versions of Windows/Windows Server, but it can be disabled through the Registry. To disable SMB 1, create a new registry key SMB1 of type DWORD with a value of 0 under HKEY_LOCAL_MACHINE > SYSTEM > CurrentControlSet > Services > LanmanServer > Parameters .
You can easily accomplish this with the following PowerShell cmdlet as well:
After creating this registry key, you must restart your server to disable SMB 1.
SMB resources
Next steps
See these links for more information about Azure Files:
How to Best Organize Your Computer Files, Folders & Documents
If you’re reading this, there’s a good chance your computer is a mess. You’ve got files all over your desktop, a Downloads folder crammed with app installers from two years ago, and who knows where the file that Jason from Billings needed yesterday is. Let’s look at how to fix it.
Now, before diving in we need to address the biggest problem with any file organization system: you. There’s no point setting up an intricate file system where every folder is colour coded, tagged, and cross referenced with every other folder. It’ll last about three minutes.
Your first priority, then, is to implement a system you can actually stick to. I want you to go and look in your closet; if everything is neatly organized, great, you can start with the advanced stuff. On the other hand, if you can’t even keep your shirts and your socks separate, then you need to start with a really simple set up that you’ll be able to stick to. Remember, like with any goal—and we’ve got a full guide to goal setting you should check out—consistency is the most important thing. You can add more complexity later.
With that out of the way, are you ready to learn about organizing folders? Let’s get started.
How to Organize Computer Files: Decide on a Structure
There are three main ways you can structure your file system: project or client-based, date-based, and file type-based. There are pros and cons to each method of organizing folders and you can use a combination, for example grouping everything by project but within each project grouping things by file type or grouping everything by year but within each year grouping it by client.
Let’s look each way to organize computer files. You should pick the method that seems to fit your workflow best and stick to it.
1. Project or Client-Based File Organization System

A project or client-based structure is perhaps the simplest to stick to. Every project or client—how you split things up really depends on what sort of work you do—gets its own dedicated folder. Within each project or client folder, you keep all the relevant files and documents.
What makes a project or client set up work so well is that it’s brainless. If file A is to do with client X, it goes in folder X. If file B is to do with client Y, then, shockingly, it goes in folder Y.
If you’ve got multiple projects for the same clients, you can either give each project its own top-level folder or have individual project folders within each client folder.
Where a project or client-based file system starts to fall apart is when you deal with a lot of general files that have to do with multiple projects or the organization as a whole. You can shave a “General” project file folder, but that can quickly create more problems than it solves. Similarly, duplicate files are almost never the answer.
The other time you might run into difficulties with a project or client set up is when there are lots of different files so each folder is a total mess. The solution there is to use one of the two following set ups within your project or client folders.
In general, I’d recommend going with a project or client set up by default. It’s so simple to stick to and it’ll give your computer a bit of much needed organization. Even if each project or client folder is a little bit messy, things will be a lot better than they were.
2. Date-Based File Organization System

With a date-based structure, you normally have a folder for each year with a subfolder for each month. Depending on how many files you work with, you can also have further subfolders for each week although it’s probably over kill.
The nice thing about a date-based structure is it makes it very easy to find files from a certain period, for example, to look at last year’s financials for January.
A date-based structure is at its best when you do the same few tasks or work with similar files on a regular basis. If you get weekly financial or marketing reports that are the same document just with different numbers then it’s ideal. You can’t really group that sort of files by project since you’ll quickly have 200 reports sitting in each folder—and everything is the same project anyway—so you’re back to square one.
A date-based structure’s problems are related to its strengths. Unless you’ve got a large number of similar files then it’s overkill and you won’t be bothered to stick with it. Also, it doesn’t work very well if you’re working on the same file for an extended period of time. Do you leave the marketing presentation in the folder for the month it was created in? The month you finished it in? The month you last used it in?
Think over what kind of work you do. It’ll probably be very obvious if a date-based system is right for you or not.
3. File Type-Based File Organization System
A file type-based system groups everything into folders based on what kind of file it is. This doesn’t strictly have to be by computer file type, but instead can use folders with names like:
- marketing
- presentations
- financials
- and the like
Within each folder, you put all the files of that kind.
File type-based structures don’t normally work great as your top-level structure unless you only work for one company—or yourself—and don’t have too many files to handle. I actually use one since my work is largely grouped into writing, photographing, and invoicing.
For most people, a file type-based structure works best when it’s within a client or project-based or date-based structure. If your client folders are getting messy, adding file type-based subfolders is a great way to sort things out.
Again, think about what kind of work you do. If it’s just a few things over and over again, then a file type method of organizing folders might be right for you. Otherwise, stick to using it for subfolders.
One Is None and Two Is One: Backups
Now that you’ve decided how you’re going to organize your files and folders, we need to talk about something very important: backups. Hard drives can—and do—fail. You can walk into your office one morning, hear a strange crunching sound from your PC, and never be able to access the files on it again. Or you could get your laptop snatched from your hand on a train platform while you take a sip of your morning coffee. Just having your files well organized isn’t enough, you need to keep them safe.
We’ve got a full guide on how to create a foolproof back up plan as well as specific articles on backing up your PC or Mac, using Time Machine, so check those articles out for specific instructions. I’m just going to give a general overview here.
When it comes to good backups, you need multiple layers of security. It’s all well and good to back your computer up to an external hard drive, but what happens if your house burns down with both your computer and backup drive inside? All your data is gone. This is where offsite backups and cloud backups come in.
My preferred system is to keep all my important files in my Dropbox—although you can also use Google Drive or Microsoft OneDrive—so that as soon as I save them, they’re saved to the cloud. This isn’t a true backup since there’s no versioning and limited recovery options, but it’s a great first layer. If you’ve got a fast internet connection, are allowed by corporate policy, and don’t work with terabytes of data, then just keeping all the files you work on in a cloud service is a great way to keep it safe. It also has the benefit of making your files accessible from anywhere.
As well as using Dropbox to keep my data secure, I also use a dedicated cloud backup service. I’d recommend you check out Backblaze. Not only does this mean I’ve got two offsite copies of all my files, but I’ve got the option to restore previous versions and restore everything if needs be.
Finally, when I’m doing something where there’s a chance I might lose a lot of data—like updating my computer—I create a local backup so I can quickly restore things without having to wait for them to download from the internet.
You don’t have to copy my exact backup plan but you really should have one offsite, automatic backup of all your important files in place. If you don’t, you risk losing all your data.
Best Practices For Organizing Computer Files
As I stressed at the top of this article, the most important thing about creating an organized file structure is that you stick to it. Here are some best practices for doing just that and also using your new, neat set up.
- Skip the Desktop. Never ever store files on your Desktop. It just looks messy and cluttered. It’s okay to drag a file from a USB key to your Desktop, but then it should be filed away immediately.
- Skip Downloads. Don’t let files sit in your Downloads folder. Either file them where they belong or delete them.
- File things immediately. If you wait to file things they’ll get out of hand. As soon as you create or receive a file, put it in its proper place.
- Sort everything once a week. With that said, either every Monday morning or Friday evening, look through the files you’ve worked on that week and make sure they’re in the right place. Tidy things up, delete any unnecessary files, and generally stop things getting messy before they get too bad. If you use a Mac, there are apps like Hazel that can automate it for you.
- Use descriptive names. When you’re naming your files, give them descriptive names. “Marketing plan” is bad. “Marketing Plan — Client X — January” is much better.
- Search is powerful. The Search feature within modern operating systems is really powerful. If you can’t find a file by looking, try searching for it. If you’ve named your files and folders correctly, it will be easy to find.
- Don’t use too many folders. Having too many nested folders gets annoying. Each folder should have a minimum of about 10 files in it. If you only have two or three files in each folder, you need to reconsider your structure.
- Stick with it. Don’t just give up after a few days. It always takes a little time to adapt to something new. Commit to using your file structure for a couple of weeks before scrapping it.
- Keep tweaking. Top down systems are stupid; they rarely work. Start with one of the structures I recommend and then tweak it as you go. Adapt it to your workflow rather than trying to force your workflow to adapt to a rigid file structure.
Wrapping Up
An organized computer is much more pleasant to use. If you know where every file is stored then it’s no longer a nightmare when someone comes and asks for such-and-such file from two years ago; it’s sitting in a folder and subfolder called 2016 > Marketing Materials or the like.
And once you’ve got a file organization system in place it’s really not that hard to stick to. Just take a few hours one afternoon to set it up and you’ll be good to go.


