- Take Ownership of a File or Folder by Command in Windows
- How to Change Ownership of a File or Folder in Windows
- About the Ownership of Files and Folders
- How to Get Access
- How to Get Full Access
- Change Ownership of a File or Folder Using Takeown Command-Line Tool
- Contents
- Additional Info
- Taking ownership of a file
- Assign File Permissions
- Taking ownership of a folder
- Change ownership recursively:
- Assign Folder Permissions
- Command-line help:
- Easier Methods for Taking Ownership
- Command Script
- Add the “Take Ownership” command to the right-click menu
- Additional Information
- icacls.exe also can change ownership of a file or folder!
- Change ownership of a file or folder using icacls.exe
- Examples: Set #1: Change ownership of a single file or folder
- Example #2: Change ownership for a folder (subfolder, and files) recursively
- Revert the Ownership back to TrustedInstaller
- Using icacls.exe command to set TrustedInstaller as the owner of a file
- icacls /setowner access denied?
- Using SetACL.exe to take ownership and assign permissions
- SetACL: Command-line arguments
- Examples: Change ownership of a single file or folder:
- Examples: Change ownership recursively:
- Examples: Assign the required permissions for a file or folder:
- Examples: Assign the required permissions recursively:
Take Ownership of a File or Folder by Command in Windows
Taking ownership of files in Windows is necessary to edit or delete system or program files that you have no access to by default. There are multiple ways to achieve that goal, like doing everything manually through the Properties menu, applying a registry tweak or, as described here, executing a command in the Command Prompt. Note that taking ownership will not let you edit every system file. Windows has set precautions so that you don’t edit any of the most important files which may be helpful in some cases but can be really, really annoying in other.
To start off, you need an elevated command prompt which is simply a command prompt opened as administrator. In Windows 8 you can open that by right-clicking the bottom left corner of the screen and selecting Command Prompt (Admin). In Windows 7 and previous, search the main menu for cmd, right-click it and select Open as administrator.
You need two commands now: one to actually take ownership of the file or folder and one to grant yourself access rights. These are the two commands you will want to use:
For folders, use:
takeown /f folder_name /r /d y
icacls folder_name /grant username_or_usergroup:F /t /q
takeown /f file_name /d y
icacls file_name /grant username_or_usergroup:F /q
The commands basically only differ in a few switches that make the folder procession run recursively. If you want to edit only one folder instead of the whole recursive lot, remove the /r and /t switches from the commands. For more info on the commands, simply enter takeown /? or icacls /? into the command prompt.
If I wanted to take control of my Program Files folder, I’d need to enter the following:
takeown /f «C:\Program Files» /r /d y
icacls «C:\Program Files» /grant christian:F /t /q
How to Change Ownership of a File or Folder in Windows
So you can make changes as you please
Having full control over a user account on your system means you can make changes to that account owner’s files. But before you can have that control, there’s no shortcut: you need to own it.
Don’t know how to go about this? Don’t worry. We’ll walk through the process.
In this post, you’ll learn how to change the ownership of files and folders on Windows. This way, you can make modifications as you please. Note that if a file or folder is owned by TrustedInstaller, you need to follow a different procedure, mentioned in the link.
About the Ownership of Files and Folders
If you have no administrative privileges, Windows 10 won’t give you permission to make changes. That is why you need to make this happen.
Getting 100% control over the files and folders means you can access them — and do whatever you want. This is useful if you need to access old user accounts so you can make major changes to the operating system.
How to Get Access
This is the first part of the process. Completing this means you can access another user account.
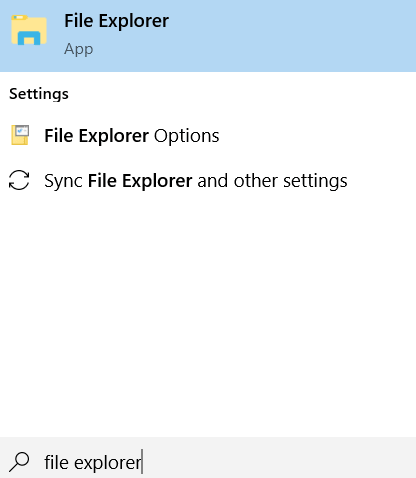
First, press the Windows key and search for File Explorer.
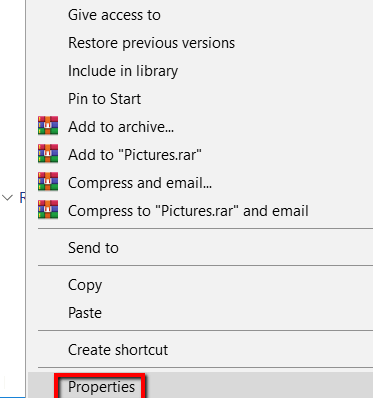
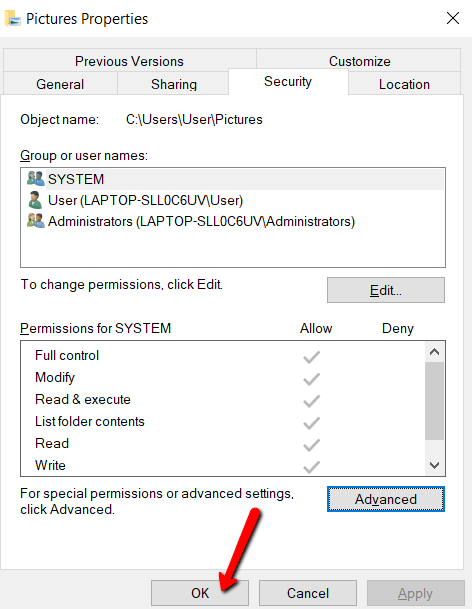
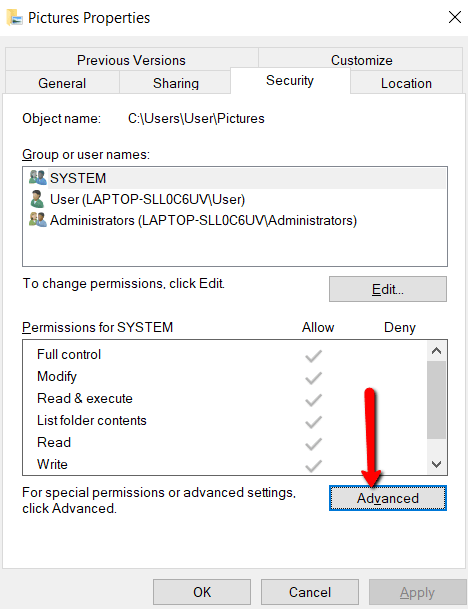
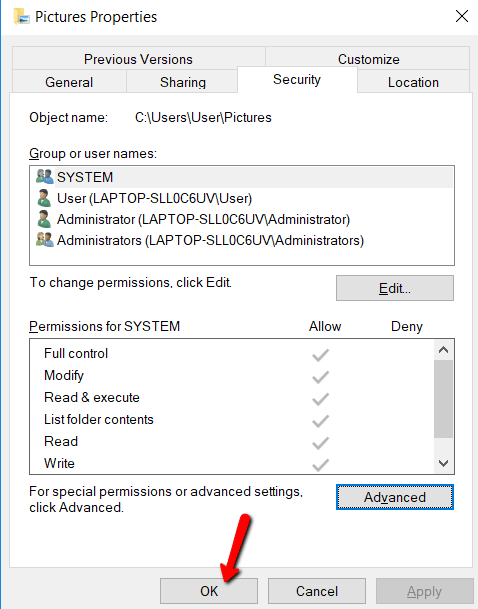
Open the explorer. Then, right-click on the files or folders that you want to access and select Properties from the drop-down menu.
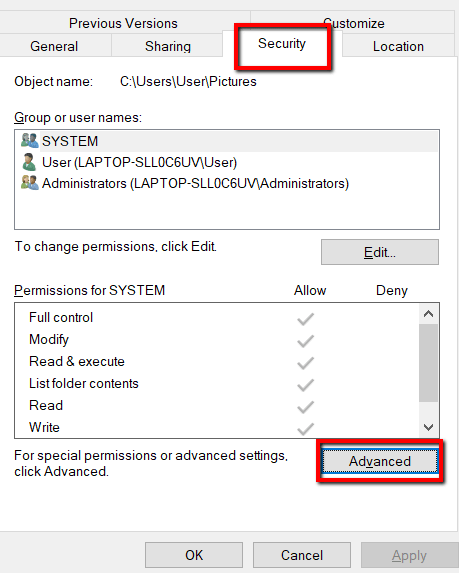
There, go to the Security tab and click the Advanced button. Doing this allows you to tweak the files or folders with special consideration.
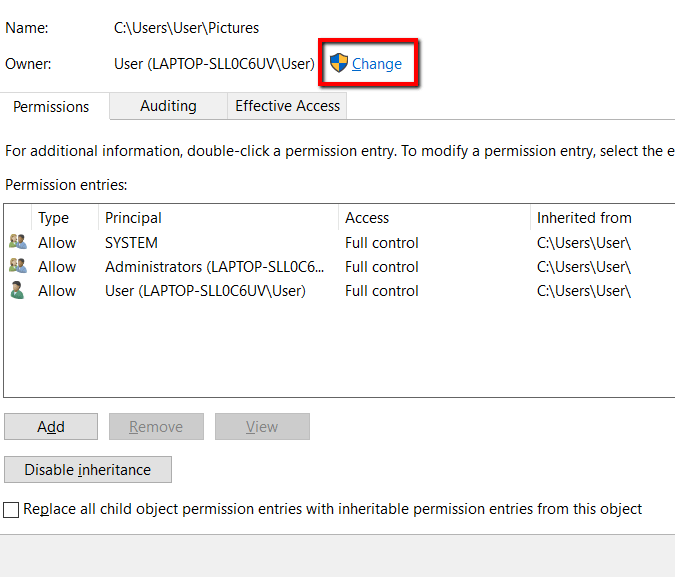
Here, focus on Owner. It will specify the user account that owns that file or folder. At the end of it, click Change.
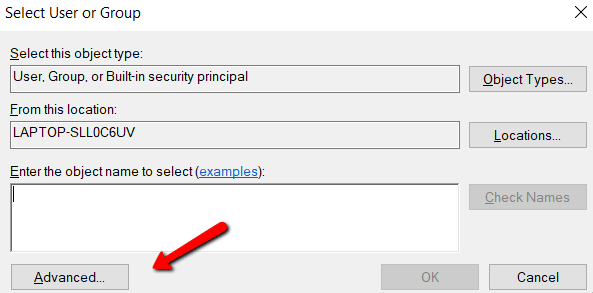
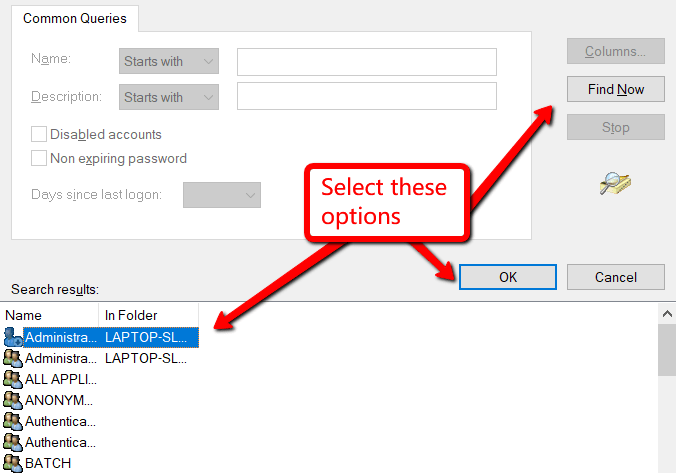
Under the Select User or Group window, choose the Advanced button. Doing this lets you open more advanced settings.
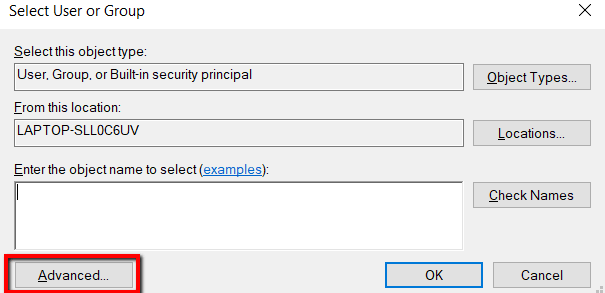
Here, click the Find Now buttonto load the Search results. And under the Search results, choose your user account. Then, hit OK.
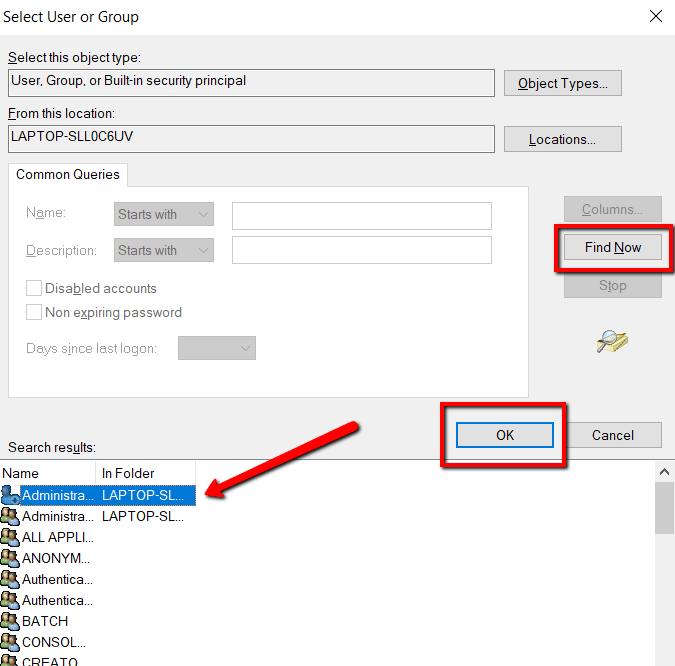
You will then land back on the Select User or Group window. Once you see your user account, click OK.

Once more, you will land on an old window. Here, click OK again.
Then again, do the same for the last time.
How to Get Full Access
This is the second part of the process. You may have access to another account already. But you might not use it to make major changes. After all, you’re yet to be its owner.
Only once you’re the owner of a user account, you can get full access.
So here’s how you do this:
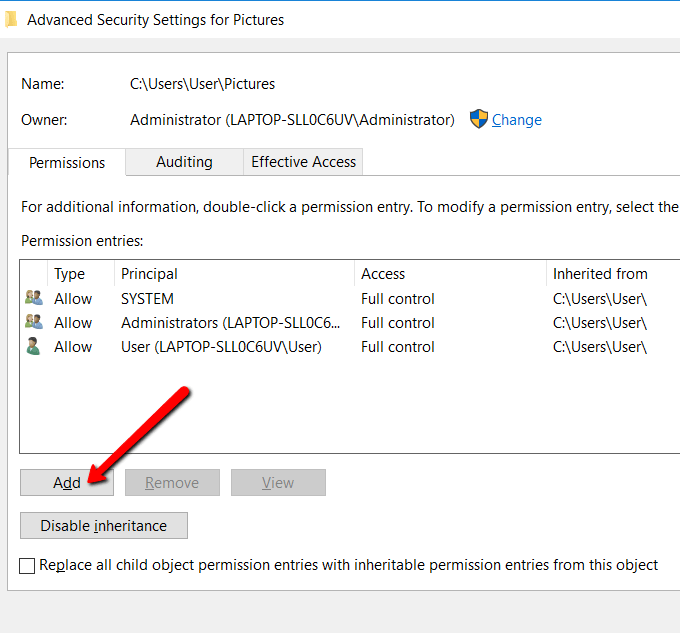
Once again, launch File Explorer and go to Properties. Go to the Security tab and open the Advanced button.
Under Permission entries, click Add.
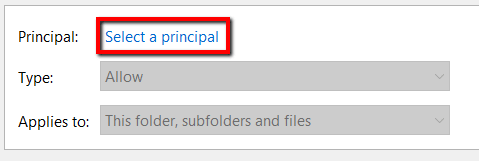
Here, click Select a principal.
Again, you will land on the Select User or Group window. There, open Advanced.
Load your user account using the Find Now button. Like in the previous process, doing this helps you find your user account.
Once you have eyes on your user account, select it and hit OK.
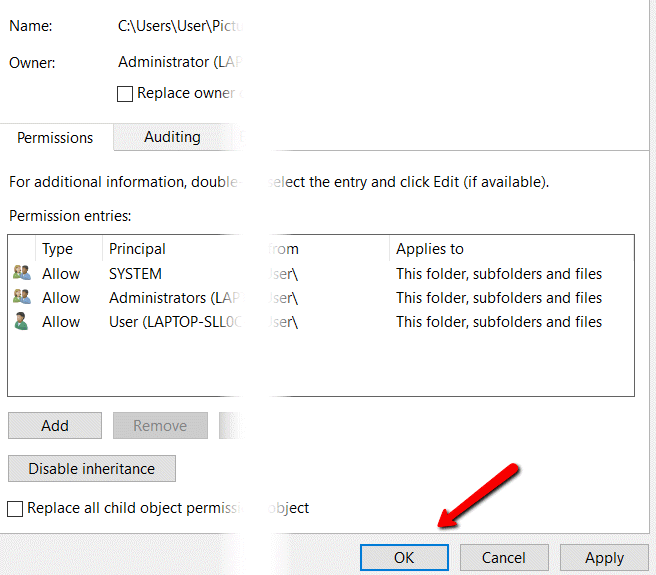
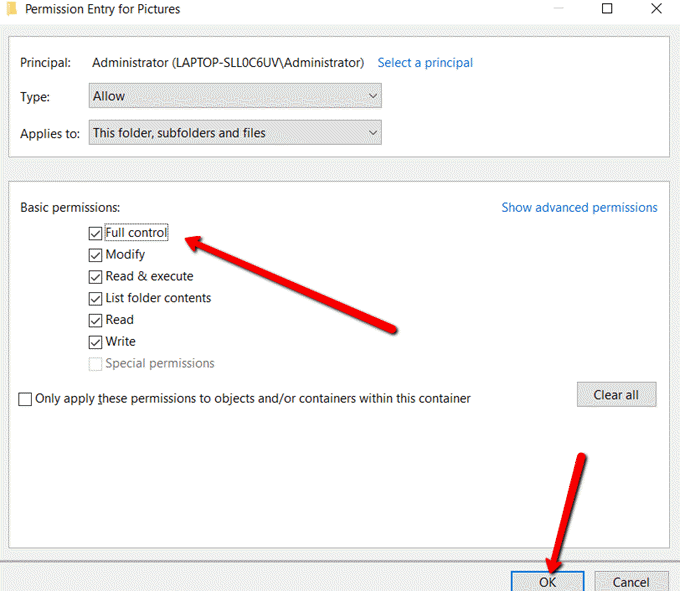
You will get to familiar windows. Just click OK until you land on a window named Permission Entry (for file or folder).
Under Basic permissions, make sure to tick the box that lets you get Full control and hit OK.
Select Apply to let the changes take effect.
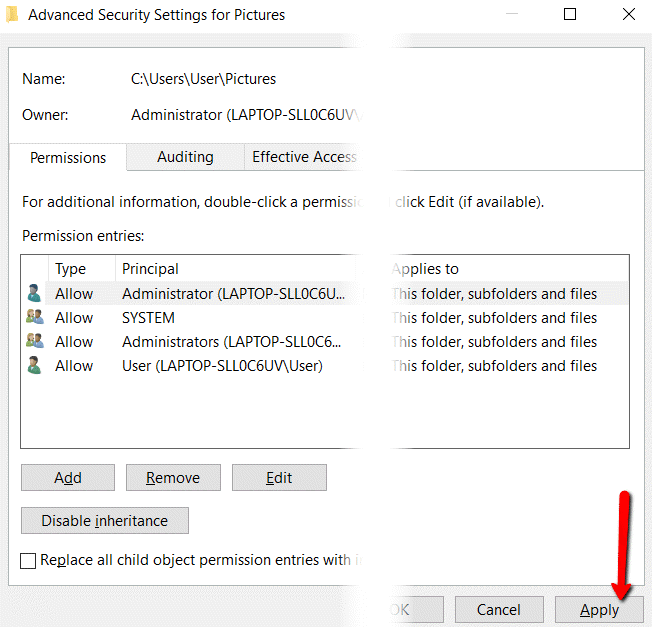
Then, choose OK to close the window.
Christopher Jan Benitez is a freelance writer for hire who provides actionable and useful web content to small businesses and startups. In his spare time, he religiously watches professional wrestling and finds solace in listening to ’80s speed metal. Read Christopher’s Full Bio
Change Ownership of a File or Folder Using Takeown Command-Line Tool
Every file or folder in an NTFS volume has an owner. Certain system files are owned by TrustedInstaller, some by SYSTEM account, and others by the “Administrators” group. If a user creates a file or folder, that user is usually the owner of the file or folder. The owner is the one who can assign permissions (Allow or Deny) to other users for that object.
If a user is not the owner of a file or folder or has no permissions to access the file, he gets the “access is denied” error when accessing the object. If that user is an administrator, he can take ownership of the object using the file or folder’s Properties – Security tab. Then he can assign himself the required permissions.
This post tells you how to take ownership of a file or folder, and assign required permissions for it using the command-line instead of GUI.
Contents
Additional Info
Windows includes a command-line tool named Takeown.exe, which can be used from an admin Command Prompt to quickly change the ownership of a file or folder. Here is how to take ownership of a file or folder and then assign permissions for an account using the command-line.
Taking ownership of a file
Open an elevated Command Prompt window. Use the following syntax to take ownership of a file:
Replace with the actual file name with the full path.
The currently logged on user is now the owner of the file.
To set Administrators group the owner of the file, use the /A switch in addition:
- /A Gives ownership to the Administrators group instead of the current user. If /A is not specified, file ownership will be given to the currently logged-on user. This parameter is not case-sensitive.
If the operation was successful, you should see the following message:
“SUCCESS: The file (or folder): “filename” now owned by user “Computer Name\User name”.”
SUCCESS: The file (or folder): “filename” now owned by the administrators group.
Assign File Permissions
Then to grant Administrators Full Control permissions for the file, use ICACLS. Here is the syntax:
Example 2: To assign Full Control permissions for the currently logged on user, use this command:
%username% represents the account name of the currently logged-on user. ICacls accepts this variable directly.
Example 3: To assign Full Control permissions for the user named John , use this command:
Taking ownership of a folder
Use the following syntax:
(or)
- /a Gives ownership to the Administrators group instead of the current user. If /a is not specified, ownership will be given to the currently logged-on user. This parameter is not case-sensitive.
You’ll see the following output:
SUCCESS: The file (or folder): “folder_name” now owned by by user “computername\username”
SUCCESS: The file (or folder): “folder_name” now owned by the administrators group.
Change ownership recursively:
To change the ownership of a folder, its subfolders, and files in each subfolder, use this syntax:
The currently logged on user is now the owner of the folder.
To set Administrators group the owner of the folder, its subfolders, and files recursively, use the /A switch in addition:
- /R Recurse: instructs the tool to operate on files in the specified directory and all subdirectories.
- /D prompt Default answer used when the current user does not have the “list folder” permission on a directory. This occurs while operating recursively (/R) on sub-directories. Valid values “Y” to take ownership or “N” to skip.
Assign Folder Permissions
Then to assign the Administrators group Full Control Permissions for the folder, use this syntax:
The /T parameter is added so that the operation is carried out through all the sub-directories and files within that folder.
Command-line help:
To know the complete usage information for Takeown.exe and ICacls.exe, run these commands from a Command Prompt window.
Easier Methods for Taking Ownership
Command Script
To further simplify the process of taking ownership, Tim Sneath of Microsoft provides a .CMD file (Windows Command Script) which takes ownership and assigns Full Control Permissions to Administrators for the directory. For more information, read Tim’s post, titled Secret #11: Deleting the Undeletable.
Add the “Take Ownership” command to the right-click menu
This again uses the special runas verb in Windows Vista and higher, which I’ve covered earlier (REF RunAs).
Download takeown_context.reg and save to Desktop. Right-click on the file and choose Merge. Click Yes when asked for confirmation. This adds an extended command named Take Ownership in the context menu for files and directories. To access the command, you need to press and hold the SHIFT key and then right-click on a file or folder.
Additional Information
The above section covers most of the stuff you need. Read below if you need more tips on this topic.
icacls.exe also can change ownership of a file or folder!
Takeown.exe and Icacls.exe are the two built-in console tools in Windows, that lets you change file or folder ownership and assign access control permissions, respectively. Takeown.exe sets the currently logged-in user account as the owner of an object (file or folder).
However, with Takeown.exe, you can’t make another account as the owner of an object.
Did you know that the icacls.exe tool can also be used to change ownership?
To change the ownership to a third-party account (i.e., the account that’s not currently logged in) or group, you may use icacls.exe with the /setowner command-line argument, instead of takeown.exe.
Change ownership of a file or folder using icacls.exe
We saw how to change the ownership using icacls.exe in the last part of the article Take Ownership of a File or Folder Using Command-Line in Windows. Here are some more examples:
The following is the command-line syntax to change the ownership of a file or folder using icacls.exe:
Examples: Set #1: Change ownership of a single file or folder
If the operation was successful, you’ll see the following message:
Example #2: Change ownership for a folder (subfolder, and files) recursively
To change the ownership of a folder, its subfolders, and all the files in all subfolders recursively, use the /T switch (traverse) in addition:
- /T indicates that this operation is performed on all matching files/directories below the directories specified in the name.
The above command sets TrustedInstaller as the owner of the folder, its subfolders, and all the files in all the subfolders.
Revert the Ownership back to TrustedInstaller
Sometimes, to fix an issue, you may need to alter a data file such as XML or a registry key owned by TrustedInstaller. For that, you first need to take ownership of the file, folder, or registry key.
After modifying the files or settings, you need to revert the ownership back to TrustedInstaller, if TrustedInstaller was the previous or original owner. To set the ownership back to TrustedInstaller, use these steps:
The Windows Modules Installer service or TrustedInstaller enables the installation, modification, and removal of Windows updates and optional components. By default, TrustedInstaller is also the owner of many critical registry keys and system files.
- Right-click on a file or registry key, and click Permissions.
- Click Advanced to open the Advanced Security Settings dialog.
- Near “Owner:”, click Change.
- In the Select User or Group dialog, type “ NT SERVICE\TrustedInstaller ” and press ENTER.
- Click Apply, OK.
This changes the object’s ownership (file, folder, or registry key) to TrustedInstaller or Windows Modules Installer.
Using icacls.exe command to set TrustedInstaller as the owner of a file
From an admin Command Prompt window, use the following command-line syntax:
TrustedInstaller now owns the file WindowsStore.admx.
icacls /setowner access denied?
Sometimes, the icacls.exe /setowner command-line can encounter the following error:
This can happen when it encounters an NTFS hard link. The error usually pops up when you attempt to change ownership of protected files in the Windows directory — e.g., C:\Windows\Notepad.exe . A hard link is the file system representation of a file by which more than one path references a single file in the same volume.
For example, the Notepad.exe files have two hard-linked files, which you can see using the following command:
You can see that Notepad.exe is hard-linked to the following files:
The icacls.exe /setowner command encounters the ACCESS_DENIED error when processing these hard links.
Note that the icacls.exe documentation says, “This option does not force a change of ownership; use the takeown.exe utility for that purpose.”
If you encounter “Access is Denied” errors when setting ownership using Icacls, you may have to rely on Takeown.exe, SubInACL, or the third-party SetACL.exe (see next paragraph) command-line utility.
Using SetACL.exe to take ownership and assign permissions
SetACL.exe is a 3rd party command-line tool (from HelgeKlein.com) which we’ve covered before.
SetACL: Command-line arguments
Before proceeding, let’s see the command-line syntax for changing file/registry ownership and permissions using SetACL.
- -on : Specify the path to the object SetACL should operate on (e.g., file, registry key, network share, service, or printer).
- -ot : Specify the object type. To change ownership or permissions for a file or folder, use the object type file . For registry keys, use the object type reg
- -actn : Specify the action as to what should SetACL do against the object specified. For taking ownership, set the action as setowner . To change permissions, set the action as ace .
- -ownr : Specify Name or SID of a trustee (a user or group) in this format — e.g., «n:Administrators»
(See SetACL documentation for the full list of objects, types, and supported actions.)
To change ownership and grant full control permission, here are some examples:
Examples: Change ownership of a single file or folder:
Examples: Change ownership recursively:
Option 1: To set ownership of a folder and its subfolders (not for files) recursively, use one of these examples:
- -rec – recursion is enabled.
- cont – Recurse, and process directories only.
Option 2: To set ownership of files in a folder and its subfolders (not folders) recursively, use one of these examples:
- -rec – recursion is enabled.
- obj – Recurse, and process files only.
Option 3: To set ownership of a folder, its subfolders, and the files recursively, use one of these examples:
- -rec – recursion is enabled.
- cont_obj – Recurse, and process directories and files.
Examples: Assign the required permissions for a file or folder:
Once you have the ownership, you can assign the required permissions for an object. Here are some examples:
To assign the permissions for a single file or folder, use one of these examples:
Examples: Assign the required permissions recursively:
Option 1: For a folder and subfolders (not files) recursively, use one of these examples:
- -rec – recursion is enabled.
- cont – Recurse, and process directories only.
Option 2: For files in a folder and subfolders (not folders) recursively, use one of these examples:
- -rec – recursion is enabled.
- obj – Recurse, and process files only.
Option 3: For a folder, its subfolders, and the files recursively, use one of these examples:
- -rec – recursion is enabled.
- cont_obj – Recurse, and process directories and files.


