- Как посмотреть и скопировать путь к папке или файлу на Mac
- Быстрое копирование пути в Терминал
- Просмотр и копирование пути через меню Finder
- Пункт «Место» в свойствах папки
- Включение показа пути к папке в заголовке Finder
- Видео инструкция
- How to Find the Path of a File on Mac OS X
- 1. Copy File Path from Mac Context Menu
- 2. Find File Paths via Get Info Option
- 3. Copy File Path via Go to Folder
- 4. Find the Path of a File in Mac Terminal
- 5. Create ‘Copy Path’ Service in Automator
- Question: Q: entering a file path into Finder or elsewhere?
- Helpful answers
Как посмотреть и скопировать путь к папке или файлу на Mac
 Если вы недавно начали работать с Mac OS и столкнулись с задачей, где требуется скопировать путь к файлу или папке из Finder и вставить его где-то ещё, то порядок действий может быть неочевидным. Тем не менее, сделать это очень просто.
В этой инструкции подробно о 4-х способах просмотреть или же скопировать полный путь к нужной папке или файлу на Mac.
Быстрое копирование пути в Терминал
Если ваша цель — вставить путь к файлу или папке в Терминал Mac OS для выполнения какой-либо команды, то самый простой способ сделать это состоит из следующего одного шага:
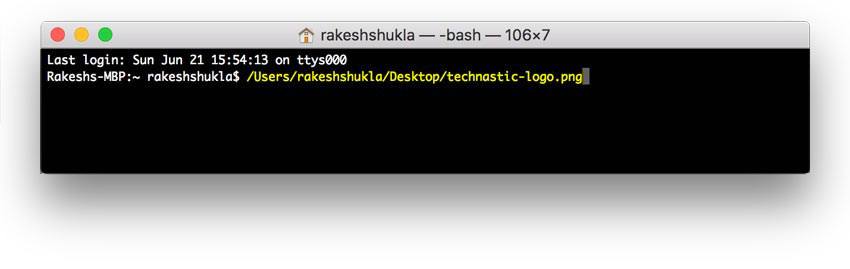
Перетащите файл или папку на окно терминала в нужное место и отпустите: путь к ней будет вставлен автоматически.

По факту путь не будет скопирован в буфер обмена, а просто добавится к команде в Терминале. Но, с учетом того, что очень часто требуется именно это, способ может быть очень удобным.
Просмотр и копирование пути через меню Finder
Следующий метод — использование пункт меню «Вид» в приложении Finder:
- Находясь в нужной папке откройте меню «Вид».
- Нажмите по пункту «Показать строку пути».
- Внизу окна Finder будет отображен путь к текущей папке, при нажатии «правым» кликом на любую папку в пути, вы увидите пункт «Скопировать путь до» с указанием папки — нажмите по этому пункту и путь к папке будет скопирован в буфер обмена.


После этого скопированный путь можно вставить в любом приложении. Недостаток способа: нельзя копировать пути к файлам.
Пункт «Место» в свойствах папки
Если нажать правой кнопкой мыши или двойным нажатием по тачпаду по файлу или папке в Mac OS, а затем открыть пункт контекстного меню «Свойства», в списке свойств вы увидите пункт «Место», где можно посмотреть полный путь к папке, где находится выбранный элемент.

При нажатии по этому пункту правой кнопкой мыши, его можно скопировать. Но, как и в предыдущем способе, копируется только путь к папке, не к файлу.
Включение показа пути к папке в заголовке Finder
В Finder для Mac существует скрытый параметр, позволяющий включить показ пути к текущей папке прямо в заголовке окна. Копирование оттуда недоступно, но функция может быть удобной. Для того, чтобы включить функцию, в терминале введите команду:
Результат вы можете видеть на следующем изображении:

Если в дальнейшем вы захотите вернуть прежний вид Finder, используйте ту же команду, но замените слово true на false.
Видео инструкция
А вдруг и это будет интересно:
25.05.2021 в 09:38
спасибо, а то я всегда с этим мучаюсь (приходится попеременно работать на Windows и Mac)
25.05.2021 в 15:30
Добрый день, Дмитрий. И спасибо за такие всегда полные и полезные статьи. У меня вопрос, и я вынужден задать его здесь, поскольку не вижу где бы я мог сделать это еще, и я понимаю что вы конечно удалите этот мой текст отсюда поскольку он никакого отношения к данной статье не имеет — это нормально.
Вопрос: подскажите пожалуйста, какими способами можно перенести аудио файлы ( в моем случае просто музыку) с компьютера на смартфон ( в моем случае на Huawei P30 PRO)? До сих пор я справлялся без проблем с помощью Send Anywhere, однако как бы быстра она не была это все равно берет время, особенно если счет идет на десятки гигабайт. Думается, с помощью кабеля по USB дело должно было бы пойти быстрее, но я запутался там с какими-то дебаггинами, девелоперскими опциями и прочим узкоспециальным окружением, мне показалось проще спросить, тем более что, я уверен, с этой проблемой сталкиваются многие люди.
Если будет время, конечно.
Спасибо,
Юрий.
26.05.2021 в 19:21
Здравствуйте.
Обычно никакую отладку и не нужно включать: просто подключили кабелем, на телефоне разрешили доступ к файлам (в области уведомлений обычно) и копируем как по тому же принципу, что и на флешку.
27.05.2021 в 14:28
Если бы! Простите за назойливостть, Дмитрий, но — а как сделать, чтобы компьютер развидел этот мой телефон? Кабелем он подключен, доступ к файлам ему дан (это предложение появляется на несколько секунд сразу после подключения кабеля), но ни в File Explorer ни в Device Manager все равно ничего нового не появляется и никакого телефона не видно. Покопал в интернетах, везде говорится всё именно то же что и вы, но нигде нет как увидеть телефон. Ну, или я слишком туп с возрастом стал.
Конечно, если только у вас есть время.
Спасибо,
Юрий.
29.05.2021 в 10:44
Здравствуйте.
А существует ли возможность этот же телефон проверить на другом компьютере, к которому он раньше не подключался? Если да, то: а там то же самое поведение наблюдается?
Источник
How to Find the Path of a File on Mac OS X
File path is the address or location of a file or folder in a computer’s file system. If you are a Mac user, you may need the full path of a file or folder at times. While it’s easy to find the path of a file in the Mac terminal using drag and drop, there are some more ways to copy the path of a file or folder on Mac OS X Mountain Lion and macOS Catalina and Mojave. You can paste the file path on Mac using Command +V.
I already wrote a detailed tutorial describing 7 ways to find the path of a file and folder on Windows 10. Below, I’ll be describing 5 ways to find a file path on Mac. The copied full path of a file will look as shown below:
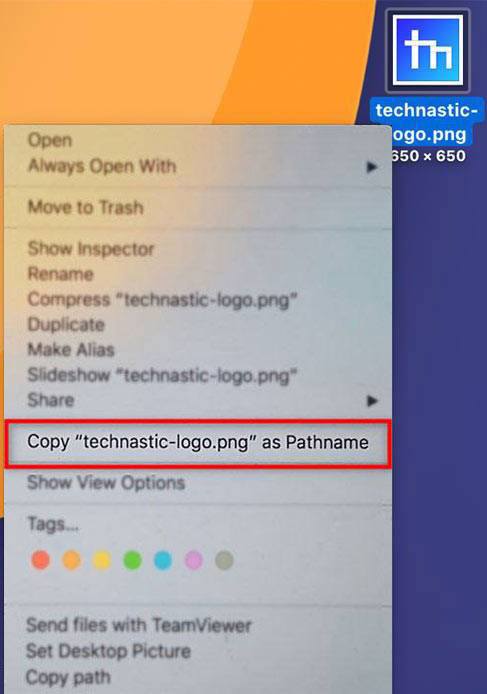
1. Copy File Path from Mac Context Menu
This is probably the easiest way to copy the path of a file or folder on macOS and is very similar to Shift + Right-click keyboard shortcut on Windows. The Copy path option is hidden by default
- Select a file or folder and perform a right-click.
- When the context menu pops up, press and hold the Option key on the keyboard.
- Copy “file-name” as Pathname option will appear in the context menu. Just click it to copy the full file path to the clipboard.
2. Find File Paths via Get Info Option
Just like the Properties option on Windows, macOS has an option called Get info in the context menu. Using this option, you can see all information related to any file on your Macintosh computer such as file name, file type, file size, location, and so on.
- Right-click on a file or folder and click the Get info option in the context menu.
- The infobox will pop-up.
- Check the Where label and you will find the path of the file as shown below. You can highlight the path of the file and copy it.
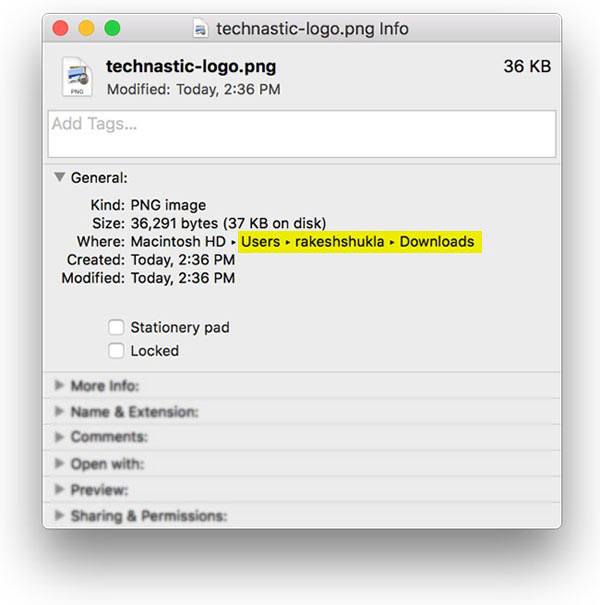
Use this method only if you just want to know the location of a file or folder. You can copy the path of the file but can’t use it in the Terminal or a file upload dialog box.
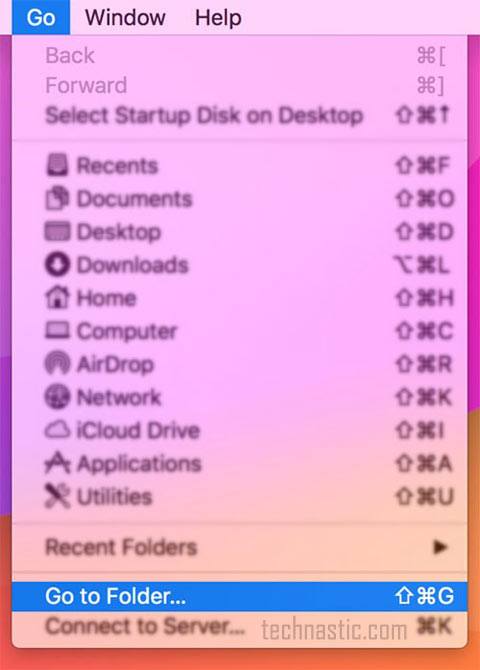
3. Copy File Path via Go to Folder
There is yet another easy way using which you can find and copy the file path on your Mac.
- While in Finder, click on the Go option on the taskbar of your Mac.
- Select Go to Folder option.
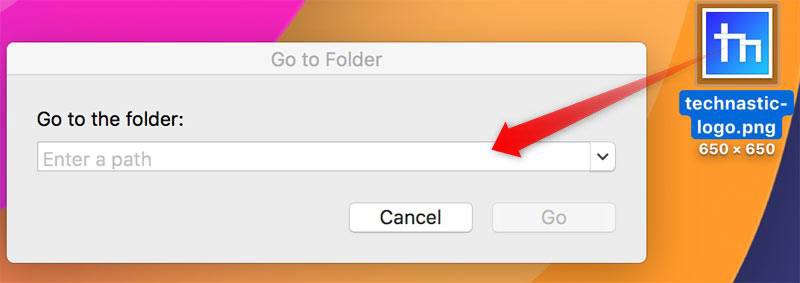
- You’ll see a new pop-up window named Go to Folder.
- Now, you need to drag the file or folder you want to copy the full path of and drag it into the input field that says Enter a path.
- You should now see the full file path in the Go to Folder dialog box.
- Just press Command + C to copy the path of the file to the clipboard. You can now paste the full path of the file anywhere you want.


4. Find the Path of a File in Mac Terminal
Mac Terminal is generally used to execute commands but you can also use to find the path of a file on macOS. Follow these steps to find a file path using the Terminal app on Mac. This method is useful especially if you need to type the full path of a file in a command line.
- Navigate to Finder > Go > Utilities. Utilities» width=»800″ height=»586″ data-lazy-srcset=»https://technastic.com/wp-content/uploads/2020/02/go-utilities-macos.jpg 800w, https://technastic.com/wp-content/uploads/2020/02/go-utilities-macos-300×220.jpg 300w, https://technastic.com/wp-content/uploads/2020/02/go-utilities-macos-768×563.jpg 768w» data-lazy-sizes=»(max-width: 800px) 100vw, 800px» data-lazy-src=»https://technastic.com/wp-content/uploads/2020/02/go-utilities-macos.jpg»>
- Launch the Terminal app.
- Now, drag the file or folder you want the find the path of and drop it in the Terminal window.
- It’ll instantly show you the full path of the file. If the file is located on the desktop, it will show the desktop path. Similarly, if the file is in the Downloads folder, it will show the download folder path in the Terminal.
- Just highlight the file path and copy it to the clipboard. The path of the file is ready to be pasted wherever you want.
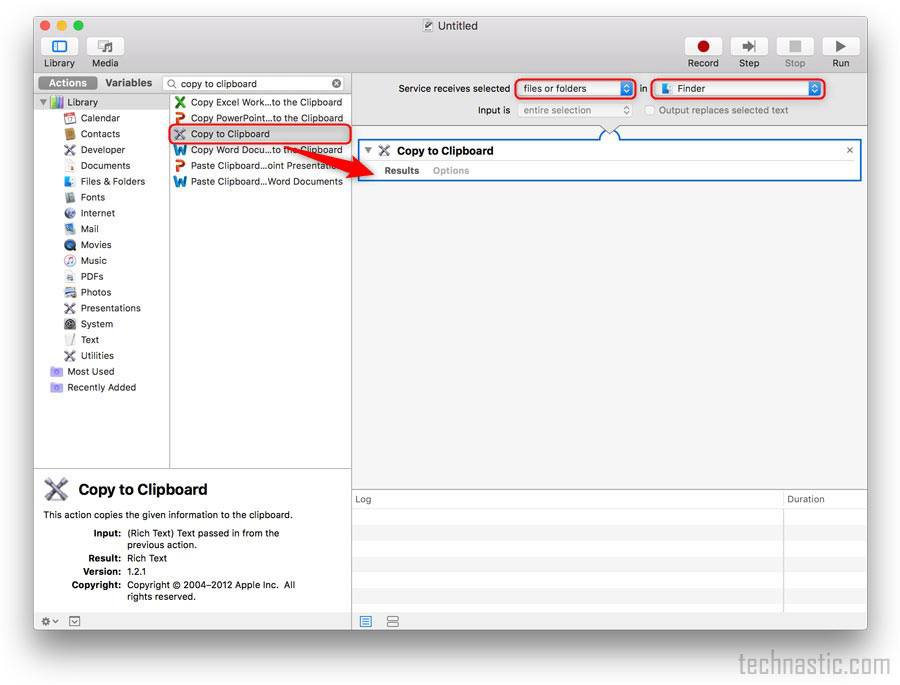
5. Create ‘Copy Path’ Service in Automator
This method requires a little effort on your part because you need to create an Automator service using Copy to clipboard feature on macOS. Once you have created the service, you’ll have a Copy path option in the context menu for all files and folders. As this option will be permanently available in Mac’s context menu, it’ll really prove very handy if you need to copy the file path on your Mac frequently.
The trick described below might sound a bit geeky to you but believe me you can create the Copy path service easily using my detailed steps.
- Launch the Automator app on your Mac. If you don’t know where to find it, try one of the methods described below and double-click the app icon to launch it.
- Click on the File tab in the Finder screen and type “Automator” in the search bar.
- Click on Go > Utilities and search for Automator.
- Launch Finder and look for Automator under Applications.
- On the next screen, select Service and click on Choose to create a new service.
- In the search input box, type “Copy to Clipboard”.
- Drag Copy to Clipboard into that into the right pane of the window.
- Now, configure the 2 options under Service receives selected as files or folders and Finder as shown below.
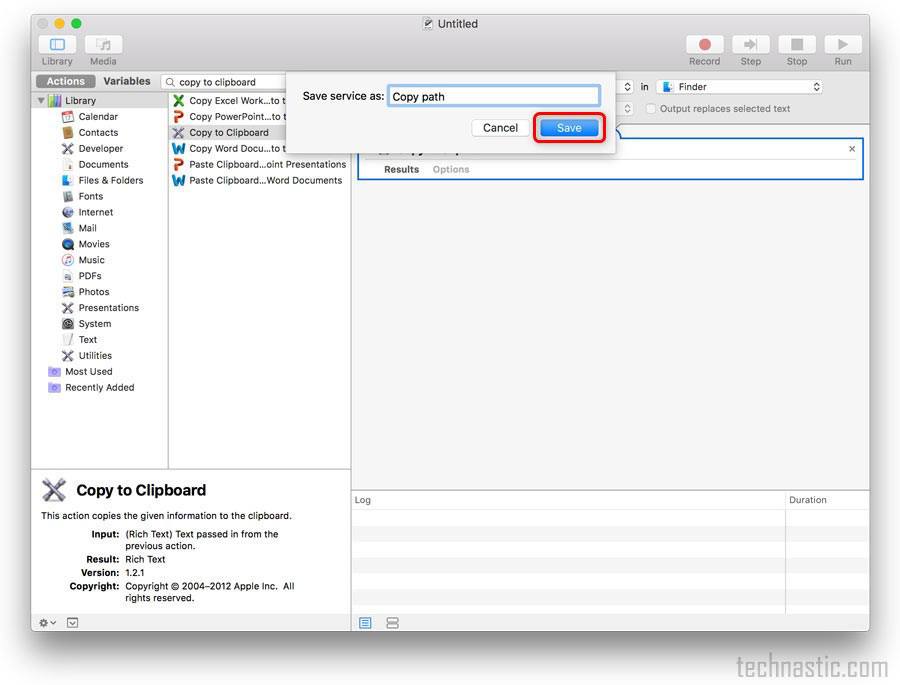
- Finally, click on File > Save and save your newly created service as “Copy path” or “Copy path to clipboard“.


Now select any file or folder in Finder and perform a right-click. You’ll see a new item called Copy path in the context menu. Clicking this option will copy the full path of a file to the clipboard.

If you use any of the methods listed above, you won’t need to type the desktop path or the download folder path of a file manually. In place using the Terminal app to find the path of a file, it’s better to create the Copy path service so that the option is always available in the context menu itself.
Источник
Question: Q: entering a file path into Finder or elsewhere?
can anyone help me if there are one or more ways to find a path like this in finder or other software? i have recently realized that i don’t know how to take a file path such as this and then get my mac to show me where this is without «manually» finding it myself. also, i would love any other info on this type of topic or closely related topics if there are any that a new user should be aware of.
/Users/mini_me/Library/Application Support/Postbox/Profiles/jaw8jgkk.default/Mail/Local Folders
Posted on Apr 28, 2012 5:35 PM
You can type Command + Shift + g while in any Finder window or select «Go to Folder…» from the «Go» menu & type in or paste in a filepath. Press the «Go» button & you are there.
Posted on Apr 28, 2012 6:57 PM
Helpful answers
CMD+Shift+g means to hold down the command & shift keys & then tap the «g» key. This shortcut is built into the Finder; you don’t need to add it.
You can see this indicated in Finder’s «Go» menu: next to «Go to Folder…» you will see «⇧⌘G» to help you remember this keyboard shortcut.
The hollow up arrow is the system wide menu symbol for the shift key. You will also sometimes see the ⌥ symbol (for the option key) & the ^ symbol (for the control key) in menus. They are all modifiers keys that you hold down while typing other keys to modify their behavior.
Apr 29, 2012 3:10 PM
There’s more to the conversation
Loading page content
Page content loaded
You can type Command + Shift + g while in any Finder window or select «Go to Folder…» from the «Go» menu & type in or paste in a filepath. Press the «Go» button & you are there.
Apr 28, 2012 6:57 PM
Apr 28, 2012 7:25 PM
Can I please ask you where i find this CMD+Shift+g in the MacOS? I mean, presumably I can customize this if I want and I am not finding it in the preferences under Keyboard Shortcuts.
Apr 29, 2012 2:39 PM
CMD+Shift+g means to hold down the command & shift keys & then tap the «g» key. This shortcut is built into the Finder; you don’t need to add it.
You can see this indicated in Finder’s «Go» menu: next to «Go to Folder…» you will see «⇧⌘G» to help you remember this keyboard shortcut.
The hollow up arrow is the system wide menu symbol for the shift key. You will also sometimes see the ⌥ symbol (for the option key) & the ^ symbol (for the control key) in menus. They are all modifiers keys that you hold down while typing other keys to modify their behavior.
Apr 29, 2012 3:10 PM
thank you very much.
i am new to the OS and trying to get caught up on a couple of things.
so this is a «hard-coded keyboard shortcut» that is basically embedded into the OS and I cannot change it and the ones that I can change are located in the Preferences Keyboard Command section is that right?
i mean, the ones I can change i can see in the Preferences and the ones that I cannot change and they are listed here is that correct?
Apr 29, 2012 3:17 PM
That particular keyboard shortcut is coded into the Finder, which is an application even though we don’t usually think of it that way. In other apps, it might do something else, or nothing at all. For instance, in Safari, «⇧⌘G» is the shortcut for finding the previous instance in a search (it’s on the «Find» menu item of the «Edit» menu).
You are right about the Keyboard Shortcuts section of the Keyboard system preference. Note that you can also create shortcuts as well as change ones that appear there, & they can be either «global,» applying to all apps or specific to a selected app. However, the shortcuts you create will not override ones coded into an app.
If you click the purple question mark icon in the preference, the help topic that appears will give you a little more info about this.
Источник


