- Ошибка «Permission denied» в Linux
- Изменение прав в терминале
- Изменение прав в файловом менеджере
- В заключение
- File permission error in linux
- How to resolve the «Permission Denied» error in Linux
- Linux File Permission Tutorial: How to Check and Change Permissions
- How to View Check Permissions in Linux
- Check Permissions using GUI
- Check Permissions in Command-Line with Ls Command
- Using Chmod Command to Change File Permissions
- Define File Permission with Symbolic Mode
- Define File Permission in Octal/Numeric Mode
- Changing User File and Group Ownership
Ошибка «Permission denied» в Linux
Все операционные системы семейства Linux имеют четко разграниченные права доступа. В своей домашней директории пользователь может делать все, что ему угодно, до тех пор, пока укладывается в отведенные рамки. Попытка выйти за них приводит к появлению ошибки «Permission Denied».
Изменение прав в терминале
Рассмотрим вариант, в котором необходимо прочесть текстовый документ, созданный другим пользователем. Файлы TXT в Linux можно просматривать непосредственно в терминале с помощью команды «cat».
- Заходим в каталог с интересующим нас документом. Набираем команду «cat filename», подставляя вместо «filename» имя нужного файла. На скриншоте показана ошибка «Permission Denied», выглядящая в русской локализации как «Отказано в доступе».

Получаем ошибку «Permission Denied» при попытке просмотреть содержимое файла
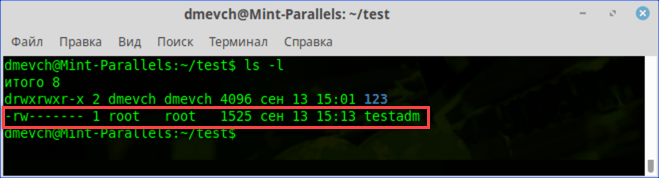
Проверяем права доступа к документу используя команду «ls -l»
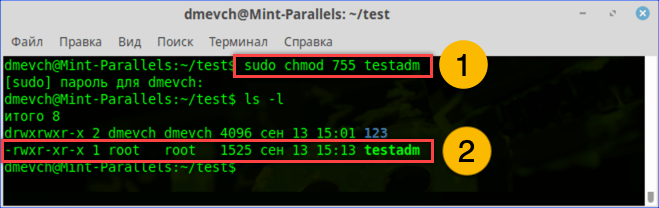
Используем команду «chmod» и административные права для получения доступа
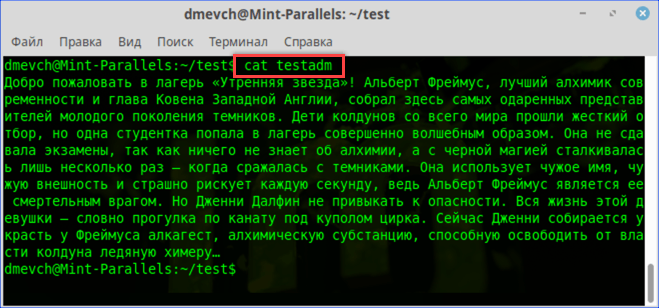
Просматриваем содержимое текстового документа командой «cat»
Изменение прав в файловом менеджере
Разберемся, как выполнить рассмотренную выше операцию в графическом интерфейсе, используя файловый менеджер из дистрибутива.
- Как видно на скриншоте, значок файла изначально имеет дополнительные символы, указывающие на то, что доступ у нему ограничен. При попытке посмотреть содержимое получаем графический вариант ошибки «Permission Denied».
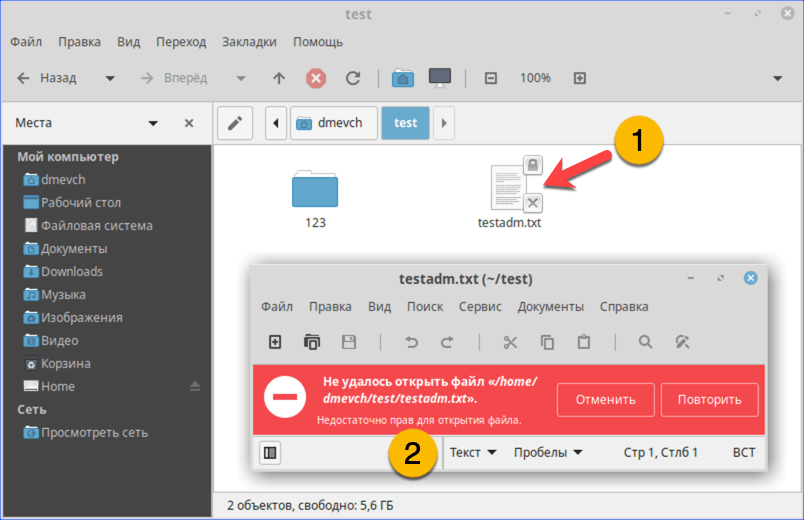
При попытке открыть текстовый документ получаем ошибку «Permission Denied»
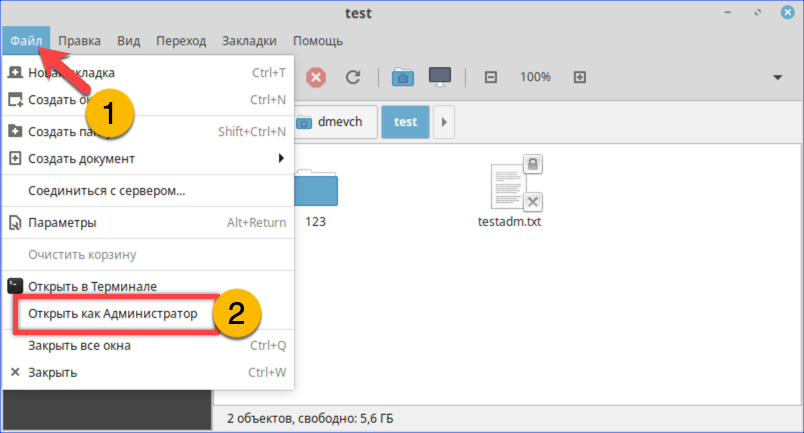
Открываем меню «Файл» и перезапускаем файловый менеджер от имени root
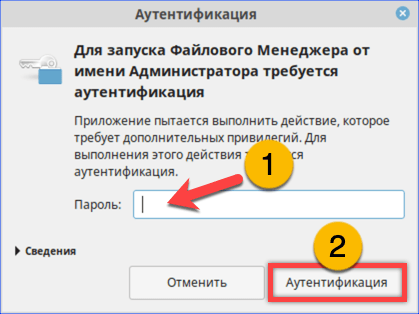
Набираем пароль root в окне аутентификации
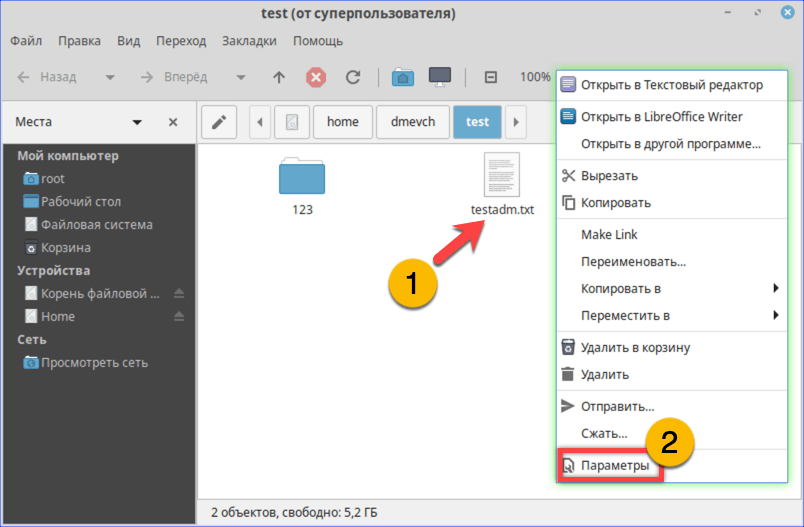
Открываем параметры файла с помощью контекстного меню
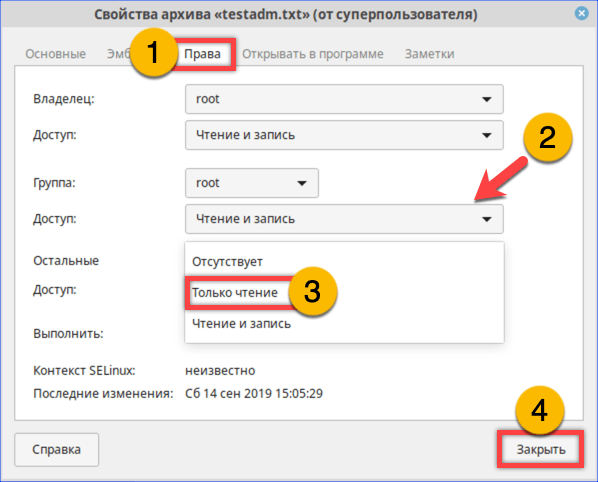
На вкладке «Права» разрешаем доступ для группы root и остальных пользователей
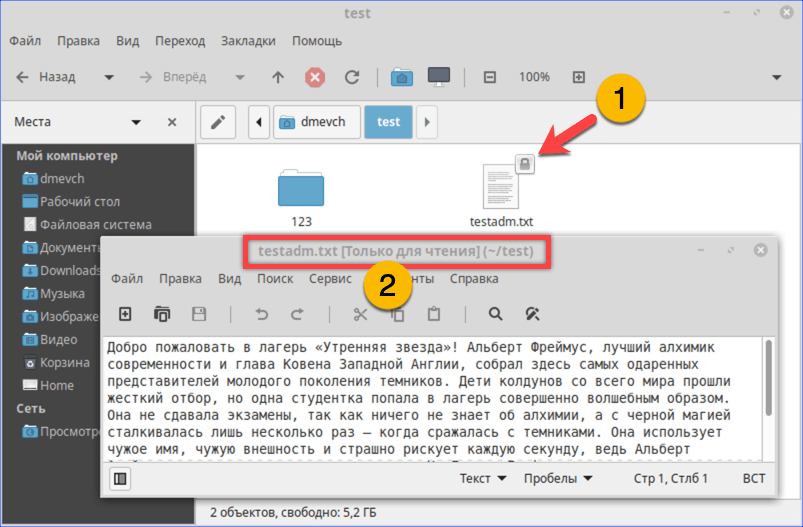
Открываем ранее недоступный файл в режиме чтения и изучаем содержимое
В заключение
Как видим, избавиться от ошибки Permission Denied достаточно просто. Решив изменить правда доступа к системным файлам, лишний раз убедитесь, что полностью уверены в своих действиях и понимаете последствия вносимых изменений.
Источник
File permission error in linux
When I tried to upgrade from 5.6.0.2 to the 5.6.1.2, I got a page full of errors when I hit download.
They were from file.php basically saying «failed to open stream: Permission denied» and pointed to line 71 from file.php. Real obvious, right?
When you see ‘permisson denied’ or ‘not allowed to access’, think file ownership (especially if you just installed/moved something).
More recently, a user who FTP-copied C5 to his server got the following error message:
«The script whose uid is 586 is not allowed to access /var/www/tmp owned by uid 505.»
In Linux (or Unix), applications can only use the files that belong to them.
Remember that Concrete5 runs on Apache web server, and the user Apache runs on is called ‘Daemon’, typically.
Often when files are copied onto a server, the file transfer program might be running as root, your user id, (or the user Bitnami if you are using their stack).
In my case the owner of the /updates folder was bitnami while the Apache web service runs as user DAEMON. That won’t work. Apache cannot write to files belonging to another user, unless it’s running as root. (normally services should not run as root, but I digress)
So in my case at the Linux command prompt I navigated to the htdocs folder and, whilst logged in as root typed the following:
chown daemon updates
This changes the ownership of the /updates folder to the user that the Apache web service is using when it runs. Now that Apache owns the updates folder, it can write files to it.
In my case, once ownership was changed, I went back to the dashboard and the download button worked without error. Up came the screen reminding me to first backup my database (done that, thanks) and a button press later brought me up to 5.6.1.2
This same ownership change may be possible through the graphical file manager of cPanel for those not comfortable with command-line Linux, or through Linux using a graphical file manager (but must have root authority via sudo/gksudo or running file manager as root).
If you remotely connect to your server via SSH, consider instead using a graphical SSH client such as WinSCP. Linux workstations can access remote SSH servers and interact via whatever file manager you use (pretty sure OS-X works same way). In either case, if you have to fiddle around with files on your server, it’s much easier not to use the command prompt.
Depending on how the server was setup, the permissons may be different, so proceed with caution, and please look at what they were before you change them. If you start changing permissions incorrectly, things will break and it may create security vulnerabilities (e.g. don’t allow user root to own all files on server).
Tips for those new to Linux/Unix:
1) How to translate user number to user name: If it gives a cryptic ‘user id’ number, you need to view your /etc/passwd file to translate that.
type: cat /etc/passwd
2) View owner of folders/files:
ls -l from the path above the folder
ls -l -d if you are in the folder.
On my home test server, I have the bitnami stack, and therefore everything is owned by the user ‘bitnami’.
Thus if I go into my /scripts directory and type
drwxrwxr-x 2 bitnami bitnami 4096 Nov 15 03:28
In this example bitnami is the group and owner for that folder (typically group and owner are the same).
Permissions are your friends, they keep the bad guys out. However when they break things they would appear to be the bad guy themselves.
Источник
How to resolve the «Permission Denied» error in Linux

While using Linux, you may encounter the error, “permission denied”. This error occurs when the user does not have the privileges to make edits to a file. Root has access to all files and folders and can make any edits. Other users, however, may not be allowed to make such edits.
Remember that only root or users with Sudo privileges can change permissions for files and folders.
The permissions can be changed using the chmod keyword. The syntax for the command is:
chmod flags permissions filename
- flags are the additional options users can set.
- permissions define if the user can read, write, or execute the file. They can be represented using symbolic or octal numbers.
- filename is the name of the file whose permissions are changed.
Here is an example where users can read, write, and execute a file; whereas, group and others can only read it.
Here, each letter has a meaning:
r gives read permissions
w gives write permissions
x gives execute permissions
The same command can be run using octal notation:
Here, each digit represents the sum of the permissions allowed:
4 gives read permissions
2 gives write permissions
1 gives execute permissions
0 gives no permissions
The sum of these permissions is used to represent each type of author.
Источник
Linux File Permission Tutorial: How to Check and Change Permissions
Home » SysAdmin » Linux File Permission Tutorial: How to Check and Change Permissions
Linux, like other Unix-like operating systems, allows multiple users to work on the same server simultaneously without disrupting each other.
Individuals sharing access to files pose a risk exposing classified information or even data loss if other users access their files or directories. To address this, Unix added the file permission feature to specify how much power each user has over a given file or directory.
In this tutorial, you will learn how to view and change file permissions in Linux.

How to View Check Permissions in Linux
To start with file permissions, you have to find the current Linux permission settings. There are two options to choose from, depending on your personal preference: checking through the graphical interface or using the command.
Check Permissions using GUI
Finding the file (directory) permission via the graphical user interface is simple.
1. Locate the file you want to examine, right-click on the icon, and select Properties.
2. This opens a new window initially showing Basic information about the file.
Navigate to the second tab in the window, labeled Permissions.

3. There, you’ll see that the permission for each file differs according to three categories:
- Owner (the user who created the file/directory)
- Group (to which the owner belongs to)
- Others (all other users)
For each file, the owner can grant or restrict access to users according to the categories they fall in.
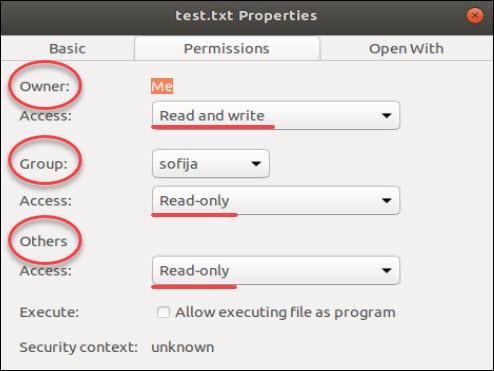
In our example, the owner of the file test.txt has access to “Read and write”, while other members of its group, as well as all other users, have “Read-only” access. Therefore, they can only open the file, but cannot make any modifications.
To alter the file configuration, the user can open the drop-down menu for each category and select the desired permission.
Additionally, you can make the file executable, allowing it to run as a program, by checking the Execute box.
Check Permissions in Command-Line with Ls Command
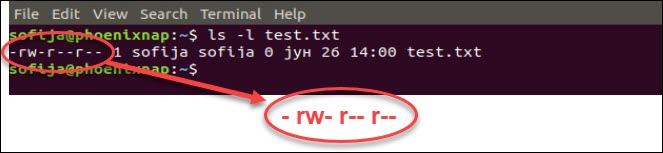
If you prefer using the command line, you can easily find a file’s permission settings with the ls command, used to list information about files/directories. You can also add the –l option to the command to see the information in the long list format.
To check the permission configuration of a file, use the command:
For instance, the command for the previously mentioned file would be:

As seen in the image above, the output provides the following information:
- file permission
- the owner (creator) of the file
- the group to which that owner belongs to
- the date of creation.
It shows the permission settings, grouped in a string of characters (-, r, w, x) classified into four sections:
- File type. There are three possibilities for the type. It can either be a regular file (–), a directory (d) or a link (i).
- File permission of the user (owner)
- File permission of the owner’s group
- File permission of other users
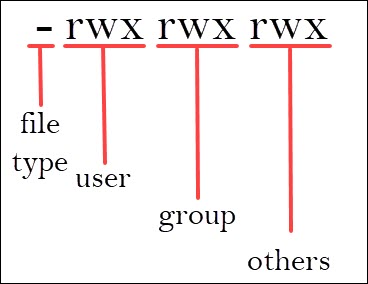
The characters r, w, and x stand for read, write, and execute.
The categories can have all three privileges, just specific ones, or none at all (represented by –, for denied).
Users that have reading permission can see the content of a file (or files in a directory). However, they cannot modify it (nor add/remove files in a directory). On the other hand, those who have writing privileges can edit (add and remove) files. Finally, being able to execute means the user can run the file. This option is mainly used for running scripts.
In the previous example, the output showed that test.txt is a regular file with read and write permission assigned to the owner, but gives read-only access to the group and others.
Using Chmod Command to Change File Permissions
As all Linux users, you will at some point need to modify the permission settings of a file/directory. The command that executes such tasks is the chmod command.
The basic syntax is:
There are two ways to define permission:
- using symbols (alphanumerical characters)
- using the octal notation method
Define File Permission with Symbolic Mode
To specify permission settings using alphanumerical characters, you’ll need to define accessibility for the user/owner (u), group (g), and others (o).
Type the initial letter for each class, followed by the equal sign (=) and the first letter of the read (r), write (w) and/or execute (x) privileges.
To set a file, so it is public for reading, writing, and executing, the command is:
To set permission as in the previously mentioned test.txt to be:
• read and write for the user
• read for the members of the group
• read for other users
Use the following command:
Note: There is no space between the categories; we only use commas to separate them.
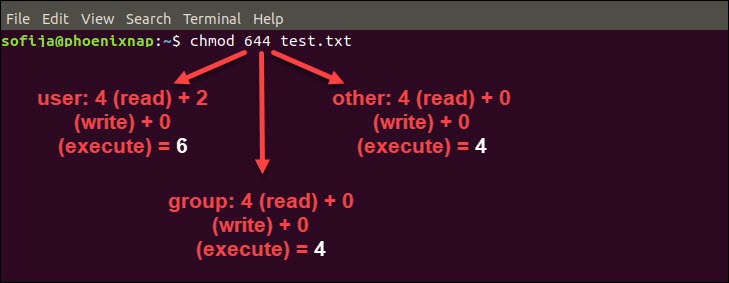
Another way to specify permission is by using the octal/numeric format. This option is faster, as it requires less typing, although it is not as straightforward as the previous method.
Instead of letters, the octal format represents privileges with numbers:
- r(ead) has the value of 4
- w(rite) has the value of 2
- (e)x(ecute) has the value of 1
- no permission has the value of 0
The privileges are summed up and depicted by one number. Therefore, the possibilities are:
- 7 – for read, write, and execute permission
- 6 – for read and write privileges
- 5 – for read and execute privileges
- 4 – for read privileges
As you have to define permission for each category (user, group, owner), the command will include three (3) numbers (each representing the summation of privileges).
For instance, let’s look at the test.txt file that we symbolically configured with the chmod u=rw,g=r,o=r test.txt command.
The same permission settings can be defined using the octal format with the command:
Define File Permission in Octal/Numeric Mode
Note: If you need a more in-depth guide on how to use Chmod In Linux to change file permissions recursively, read our Chmod Recursive guide.
Changing User File and Group Ownership
Aside from changing file permissions, you may come across a situation that requires changing the user file ownership or even group ownership.
Performing either of these tasks requires you first need to switch to superuser privileges. Use one of the options outlined in the previous passage.
To change the file ownership use the chown command:
Instead of [user_name] type in the name of the user who will be the new owner of the file.
To change the group ownership type in the following command:
Instead of [group_name] type in the name of the group that will be the new owner of the file.
Learning how to check and change permissions of Linux files and directories are basic commands all users should master. To change file’s group permissions, you might find helpful our article on how to use the chgrp command.
No matter whether you prefer using the GUI or command-line, this article should help you better understand how to use file permissions.
Источник


