- Configure File System Permissions for Database Engine Access
- To Grant File System Permission to the Per-service SID
- NFS Server and File Permissions
- Аннотация
- Дополнительные сведения
- Control Over Windows Server File and Folder Permissions to Shield Your Sensitive Data
- Knowing who has access to what by regularly reviewing Windows server file and folder permissions
- Staying abreast of NTFS file and folder permissions with insightful reports
- Watching out for group and user permissions with Netwrix Auditor
- NTFS Permissions Management Best Practices
- Configuring NTFS Permissions
- Configuring File Shares
- Top 5 NTFS Permissions Tools
- Exporting NTFS Permissions via Powershell
- What are NTFS Permissions
Configure File System Permissions for Database Engine Access
Applies to: SQL Server (all supported versions)
This topic describes how to grant the SQL Server Database Engine file system access to the location where database files are stored. The Database Engine service must have permission of the Windows file system to access the file folder where database files are stored. Permission to the default location is configured during setup. If you place your database files in a different location, you might need to follow these steps to grant the Database Engine the full control permission to that location.
Beginning with SQL Server 2012 (11.x) permissions are assigned to the per-service SID for each of its services. This system helps provide service isolation and defense in depth. The per-service SID is derived from the service name and is unique to each service. The topic Configure Windows Service Accounts and Permissions describes the per-service SID and provides the names in the section Windows Privileges and Rights. It is the per-service SID that must be assigned the access permission on the file location.
To Grant File System Permission to the Per-service SID
Using Windows Explorer, navigate to the file system location where the database files are stored. Right-click the file system folder, and then click Properties.
On the Security tab, click Edit, and then Add.
In the Select Users, Computer, Service Account, or Groups dialog box, click Locations, at the top of the location list, select your computer name, and then click OK.
In the Enter the object names to select box, type the name of the per-service SID name listed in the Books Online topic Configure Windows Service Accounts and Permissions. (For the Database Engine per service SID name, use NT SERVICE\MSSQLSERVER for a default instance, or NT SERVICE\MSSQL$InstanceName for a named instance.)
Click Check Names to validate the entry. (If the validation fails, it might advise you that the name was not found. When you click OK, a Multiple Names Found dialog box appears. Now select the per-service SID name, either MSSQLSERVER or NT SERVICE\MSSQL$InstanceName, and then click OK. Click OK again to return to the Permissions dialog box.)
In the Group or user names box, select the per-service SID name, and then in the Permissions for box, select the Allow check box for Full control.
Click Apply, and then click OK twice to exit.
NFS Server and File Permissions
В этой статье данная статья содержит некоторые сведения о NFS Server и разрешениях файлов.
Исходная версия продукта: Windows Server 2012 R2
Исходный номер КБ: 231964
Аннотация
В этой статье описывается настройка разрешений файлов для экспорта Windows NT файловой системы (NFS) для работы с рабочими станциями UNIX NFS.
Дополнительные сведения
Эти действия не нужно выполнять при использовании только анонимной проверки подлинности, хотя результаты могут дать вам представление о том, как разрешения файлов NTFS отражаются на UNIX рабочих станциях.
В следующих инструкциях предполагается, что Windows NT NFS на основе сервера настроен на использование значений по умолчанию для дополнительных параметров и разрешений безопасности.
На компьютере NFS Windows NT Microsoft server:
Всегда устанавливайте разрешения NTFS для экспорта (а также все папки и файлы под экспортом) на полный доступ для всех пользователей, группы администраторов и пользователя администратора.
Если папка экспорта пуста, создайте фиmmy-файл, который будет вызван в папке экспорта dummyfile NFS.
Если вы не используете сервер сетевой службы (NIS), скопируйте файлы Etc/Passwd и Etc/Group в двоичном режиме с соответствующего компьютера UNIX в папку Winnt\System32\drivers\etc.
Оставьте поля пароля пустыми. Рекомендуется, чтобы пользовательские интерфейсы и GID были уникальными в целом, а также именами пользователей и группами в целом. Например, не используйте 1001 для пользователя и группы и не используйте пользователя с колесико в дополнение к группе колес.
Сое всех пользователей и каждой группы с уникальными Windows NT и группой. Это можно сделать с помощью сервера для диспетчера пользователей NFS.
Сое UNIX корневого пользователя с Windows NT администратора группы и корнем группы или колесикой с группой Windows NT администраторов.
В клиенте UNIX NFS:
Войдите как корневой (только корневой может установить экспорт NFS). Смонтировать экспорт на рабочей станции UNIX, введя
где имя хоста компьютера на Windows NT, ntserver F/export/home/user является путем к экспорту и является локально доступной точкой mnt крепления.
Проверьте разрешения, введя:
Отображаются выходные данные, аналогичные следующему примеру:
Назначьте соответствующих владельцев файлам и папок, введя:
В некоторых UNIX операционных системах эта команда не принимает параметр группы. В таких ситуациях в дополнение к этой команде необходимо ввести chgrp -R group /mnt.
Назначьте соответствующие разрешения для файлов и папок, введя:
Проверьте новые разрешения, введя:
Отображаются выходные данные, аналогичные следующему примеру:
Если вы не можете изменить разрешения для файла или получили сообщения об ошибке «Доступ отказано», с помощью следующих действий:
- На компьютере Windows NT NFS на основе сервера назначьте полный доступ экспорту для всех пользователей, группы администраторов и пользователя администратора.
- В клиенте UNIX NFS скопируйте файл в другое имя (это необходимо сделать от имени пользователя, а не от имени корня). Удалите исходный файл в Windows NT и переименуйте его в исходное имя.
Некоторые Windows NT и группы не могут быть соенены с эквивалентными UNIX пользователями или группами. Они могут отображаться как nogroup4 или nogroup. К специальным группам, которые демонстрируют такое поведение, относятся:
- Все
- Сеть
- Интерактивны
- Системные
- Пользователи, прошедшие проверку
—>
Control Over Windows Server File and Folder Permissions to Shield Your Sensitive Data
Don’t wait for a data breach or a failed compliance audit to finally start paying proper attention to who has what Windows Server file permissions in your organization. To reduce the risk of breaches and diligently follow data privacy policies, you need to fine-tune your Windows server file and folder permissions, and then regularly manage them to maintain proper data access control. In particular, you need to identify users with permissions to files and folders that they don’t need, and keep an eye on all changes to access permissions and group membership.
Knowing who has access to what by regularly reviewing Windows server file and folder permissions
The actions that a user can perform across your NTFS are strictly limited by the Windows Server file and folder permissions granted to that user. The table below gives you an overview of the basic permissions that can be assigned to users in your network.
| Permission | Control for Folders | Control for Files |
|---|---|---|
| Read | View and list folder contents and subfolders | View or access the file’s contents |
| Write | Create files and subfolders | Write to a file |
| Read & Execute | View and list files and subfolders as well as execute files, inherited by files and folders | View and access the file’s contents as well as execute the file |
| Modify | Read and write files and subfolders; delete the folder | Read and write the file; delete the file |
| Full Control | Read, write, change and delete files and subfolders | Read, write, change and delete the file |
| Special permissions | A combination of special permissions that doesn’t match the basic ones, such as List Folder/read data + Delete | A combination of special permissions that doesn’t match the basic ones, such as List Folder/read data + Delete |
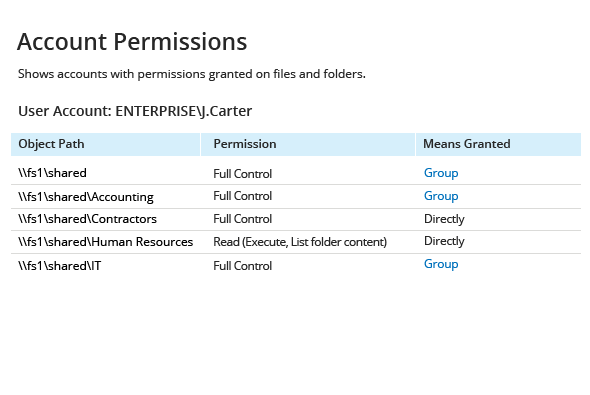
Staying abreast of NTFS file and folder permissions with insightful reports
To ensure that only eligible users have access to your sensitive data, you need to identify each user’s exact Windows Server file and folder permissions and determine whether their job descriptions or roles in the organization align with those permissions. Netwrix Auditor for Windows File Servers enables you to effectively protect your data and prove your compliance by delivering a full picture of your current effective permissions and enabling you to spot users with unnecessary access. Plus, the application helps you stay in charge of privilege escalation by delivering actionable reports about what permissions were altered, added or removed across your file systems, who made each change, and when and where it happened.
Watching out for group and user permissions with Netwrix Auditor
Tracking Windows Server user permissions to files and folders is the first step in mitigating the risk of privilege abuse and securing your critical assets. But you also need to know what’s going on with Active Directory group membership, critical Group Policy objects, and local users and groups, so you can make sure none of them are altered without your approval. That’s why Netwrix offers a broad spectrum of Netwrix Auditor applications. They complement Netwrix Auditor for Windows File Servers by providing you with insightful details into activity across your critical systems, including Microsoft Active Directory and Windows Server, so you can strengthen control over access to your highly sensitive information.
NTFS Permissions Management Best Practices
Configuring NTFS Permissions
- Create a file server permissions policy that clearly defines your permissions management process.
- Use Active Directory groups everywhere. Don’t assign NTFS permissions to individuals, even if you have to create hundreds of groups. It’s far easier to manage 200 groups than 2,000 one-off permissions.
- Configure NTFS permissions for the assets, assign roles to those permissions, and assign people to roles. For example, suppose you have a share named HR on fileserver1. Do the following:
- For this share, create the following domain local groups in your AD with the permissions shown:
- fileserver1_HR_read (Read-only)
- fileserver1_HR_modify (Read and Modify)
- fileserver1_HR_fullcontrol (Full Control)
- Use these groups to set NTFS permissions to the appropriate user rights.
- Create a global group in AD named HR for your HR people. Add this global group to the domain local group fileserver1_HR_read, and then add user accounts to the global group HR. What you have now done is tied an asset to a permission, and the permissions to a role. As you expand your network and add different assets and areas of access to the role, you’ll be able to easily see what assets a role can access.
People (user accounts) -> Role (AD global group) -> Permissions (AD domain local group) -> Asset (file or folder on a file server)
- Avoid giving users the Full Control permission. Full Control enables users to change NTFS permissions, which average users should not need to do. Modify rights should be all that’s necessary for most users.
- Assign the most restrictive permissions that still allow users to perform their jobs. For example, if users need only to read information in a folder and not to change, delete or create files, assign the Read permission only.
- Remove the Everyone permission from every resource except the global folder designated for file exchanges.
- Create a Global Deny group so that when employees leave the company, you can quickly remove all their file server access by making them members of that group.
- Avoid breaking permissions inheritance as much as possible. There will be a few folders where this may be necessary, but generally avoid it. If something would break inheritance, then it either needs to move up a level or you need to reassess who’s got what permissions on the parent folder. For example, if a you need to give someone Read/Write permissions for all of the \Finance folder but not \Finance\Budget, you’re gonna have a bad time later.
- Have users log on using domain user accounts rather than local accounts. This approach centralizes the administration of share permissions.
- All permissions changes should be audited as they occur, and the permissions hierarchy should be audited at least once a year.
Configuring File Shares
- Create a top-level folder that will serve as the root storage folder for all user-created data (for example, C:\Data). Create sub-folders in it to segregate and organize data according to job roles and security requirements.
- Ensure that only IT can create root-level folders. Don’t even let managers or executive create folders at the top 1 or 2 levels. If you don’t lock down the root-level hierarchy, your neat folder structure will quickly be destroyed. Departments can organize their folders how they want, but don’t allow junk folders.
- Organize your resources so that objects with the same security requirements are located in the same folder. For example, if users require the Read permission for several application folders, store those folders in the same parent folder. Then give Read permissions to the parent folder, rather than sharing each individual application folder separately.
- Make sure access-based enumeration is enabled. Access-based enumeration displays only the files and folders that a user has permissions to access. If a user does not have Read (or equivalent) permissions for a folder, Windows hides the folder from the user’s view.
- Set the Windows file share permissions pretty leniently — give Everyone, Authenticated Users or Domain Users the Full Control or Change permissions — and rely on NTFS for the real permissions management.
- Avoid having nested shares in your file structures because they can create conflicting behavior for the same network resources if it is accessed through different shares. This can be asking for trouble, especially when the share permissions are different. A nested share is a shared folder that resides in a separate shared folder. There are, of course, the default hidden shares (C$, D$, etc.), which make all shares nested beneath them, and they’re a default. However, if your users use two separate non-hidden shares that are nested, there can be conflicting share permissions.
- Know when to copy and when to move. Standard copy and move operations deliver default results that can maintain your configured NTFS permissions — or break them. Copy operations will create the permissions of the destination container, and move operations will maintain that of the parent container. To keep this straight, just remember CC/MM — Copies Create, Moves Maintain.
Top 5 NTFS Permissions Tools
- Effective Permissions Reporting Tool from Netwrix
- NTFS Permissions Reporterfrom Cjwdev
- Access Enum (Microsoft utility)
- Permissions Reporter from Key Metric Software
- Permissions Analyzer from SolarWinds
Exporting NTFS Permissions via Powershell
What are NTFS Permissions
NTFS (New Technology File System) is the standard file system for Windows NT and all later Windows operating systems. With NTFS, you use shared folders to provide network users with access to file resources and thereby manage permissions for drives and folders. NTFS permissions are available to all drives formatted with this file system. Each user can choose to share entire drives or individual folders with the network.
The main advantages of NTFS permissions are that they affect local users as well as network users and they are based on the permissions granted to each individual user at the Windows logon, regardless of where the user is connecting. Administrators can use the NTFS utility to control access to files and folders, containers and objects on the network as part of system security.


