- How to Get Octal File Permissions from Command Line in Mac OS
- How to Get Numerical chmod Permissions Values on the Mac
- Getting Octal File Permissions from Command Line in Linux
- Change File Permissions in Mac OS X
- How to Change File Permissions on Mac
- Permission Types & Explanations of Limitations
- How to Set File Permissions on a Mac
- File Permissions Crash Course
- How to Modify Permissions with the Info Window
- How to Modify Permissions with chmod
- Final Thoughts
- Related Articles
- Subscribe to our email newsletter
- Change permissions for files, folders or disks on Mac
- Assign permissions to users and groups
- Apply permissions to all items in a folder or a disk
- Change an item’s owner
- Add or remove a user or group in the Name column
How to Get Octal File Permissions from Command Line in Mac OS

Command line users are likely familiar with using chmod to set file permissions in numerical or octal format, for example running a command like ‘chmod 755 filename’, but have you ever wondered how you can get file permissions in octal format?
If you want to see or view the octal numerical value of permissions of any file or folder via the command line, you can turn to the stat command in Mac OS to do so.
We’re assuming you have a reasonable level of experience and comfort at the command line, if you don’t then this article likely isn’t relevant to you. Most Mac users will only ever view or change file permissions through the Mac Finder as described elsewhere (if even that), whereas this particular article is aimed at more advanced users.
How to Get Numerical chmod Permissions Values on the Mac
To get started, launch the Terminal app from /Applications/ on the Mac and use the following commands:
stat -f %A file.txt
For example, that command may output something like the following:
$ stat -f %A wget-1.18.tar.gz
644
Where, in this example, ‘644’ is the octal value of that files permissions.
Alternatively, you can use -f and %OLp (yes that’s an upper case ‘o’ and not a zero), the output will be the same assuming the file is too:
stat -f %OLp /Applications/System\ Preferences.app
Example output for that command may look like the following, showing the numerical octal value permissions for the target item:
$ stat -f «%OLp» ‘/Applications/System Preferences.app’
775
In this example, the “System Preferences” application has a octal permissions value of 775.
You should not need to use quotations, though if you need for some reason to escape a file name or path, or for scripting purposes, they’re easy to place like so:
stat -f «%OLp» ‘/Applications/System Preferences.app’
The -f flag is for format, you can read more about specific formatting options for the stat output from the manual page on stat with ‘man stat’.
In the latter command case, the “O” (upper case o) is specifically for achieving octal output.
Knowing the exact numerical permissions of a file or folder is wildly useful for so many reasons, and it can be helpful to know this if you’re adjusting the permissions of various items, or even if you’re moving files on the Mac and want to maintain the exact permissions and to verify it after the fact. There are countless other uses as well, particularly if you’re running a server of any sort from the Mac.
These commands should work the same for retrieving octal permissions in just about any version of macOS, MacOS, or Mac OS X, regardless of how the naming convention is capitalized. Notably however, is that the approach to getting octal permissions on the Mac is different from the rest of the Linux world, thus if you’re coming to the Mac from the Linux world you’ll need to adjust the stat command flags to accurately get the permissions in octal format, we’ll cover that quickly next.
Getting Octal File Permissions from Command Line in Linux
For the sake of being thorough, we’ll briefly discuss getting octal permissions values in the Linux world as well, where you can use the following to get the octal file permissions:
stat -c «%a %n» /Path/To/File
You can also more simply use the stat -c command:
stat -c %a /Path/To/File.txt
The numerical value output will be the same regardless, as long as the inputted target file is the same of course.
Again, these latter two approaches are linux specific, and you’ll need to use the methods outlined further above to get octal values of permissions of a file in Mac OS.
Do you know of any other methods or approaches to retrieving the numerical value of file permissions on a Mac? Share them in the comments below!
Источник
Change File Permissions in Mac OS X
You can instantly change file permissions in Mac OS X without getting your hands dirty in the command line by using the Finder instead. All you need to do is access the “Get Info” panel for the file, folder, or application in question. These instructions demonstrate locating the file permissions manager, and how to adjust privileges for items found in Mac OS.
It’s worth mentioning that you can also use this trick to quickly view current file and folder permissions and ownership details in the Mac OS X Finder. To view permissions, just use the Get Info panel as described below but don’t make any modifications. Mac OS X calls permissions “Privileges”, but they mean the same thing.
How to Change File Permissions on Mac
This is the most user friendly way to view or adjust file permissions in Mac OS X, it works with anything found in the Finder file system, be it a file, binary, application, or a folder. Here’s what you’ll want to do:
- Select the file or app in the Finder you want to edit permissions for
- Hit Command+i to “Get Info” about the selected file (or go to File > Get Info)
- At the bottom of the Get Info window, you’ll see “Sharing & Permissions”, select the arrow to drop down the options
- Adjust permissions* on a per user basis, the options being: read and write, read only, or no access
*Note that with certain files, apps, and folders, you may need to click on the little lock icon in the corner of the Get Info window, this will require a login to grant access from the administrator to be able to modify the permissions for the selected item.
When finished, just close out of the Get Info window. The changes to permissions happen immediately as you select items from the privilege option dropdown menus.
Permission Types & Explanations of Limitations
The permissions options are fairly self-descriptive in their naming, but here’s a quick overview in case you’re new to the concepts on a file level:
- Read & Write: The user can both read the file, and write to the file (make changes, modify the file, delete it, etc)
- Read Only: The user can only read the file, and is therefor unable to make changes to the file
- No Access: The user has no access to the file at all, meaning the user can not read the file or write to it
When you’re finished setting the desired permissions and privileges, close the Get Info window and the changes will take effect immediately.
Notice that you can’t make files executable through this the Get Info panels, you’ll still need to pull up the terminal for that.
One of our readers pointed out that you can use Get Info to adjust file permissions on remote files using the Mac OS X built-in FTP client, which is pretty convenient if you’re without a separate FTP app but you’re remotely needing to change privileges on something.
Generally speaking, if you’re not sure what to set, you shouldn’t mess around with file permissions since it can change the way a file or application responds to a given document. This is particularly true with system files and applications, as permissions can mean the difference between some apps working and some not. If you’re digging around because of frequent errors regarding access to files or ownership, try using the Recovery Mode method of repairing user permissions that works with Mac OS X 10.7, 10.8, 10.9, 10.10, macOS 10.12, 10.11, 10.13, etc, which can usually sort out those problems automatically without any manual modification of files.
You can also modify permissions from the command line using the ‘chmod’ command followed by flags or sequences and a file name, but that’s really a topic for another article.
Источник
How to Set File Permissions on a Mac
Your Mac uses permissions to restrict access to applications, files, and folders. Utilizing this security control can help protect your data from unauthorized access. Whether you use your Mac in public places or share it with other users, you may want to change the permissions on your documents to ensure the confidentiality and integrity of your data.
Of course, it can be difficult to strike a balance between convenience and security when using permissions. Users who are too restricted won’t be able to perform basic tasks. And if you give users too much power, you risk privilege escalation or worse. Use trial and error to find an adequate level of security that everyone can live with.
File Permissions Crash Course
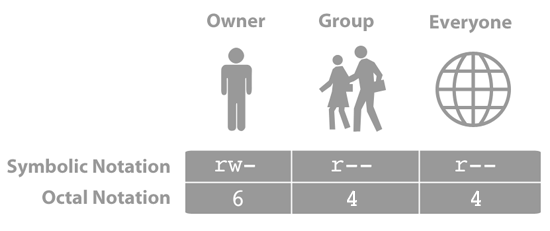
Every file and folder on your Mac has a configurable set of permissions. Permissions control three types of access: reading, writing, and executing. You can mix and match any of the types to grant seven levels of access, as illustrated below. Read, write, and execute permissions overlap to create seven octal permission notations.

You’ll learn how to modify permissions using the Info window in the next section. But to really leverage permissions, you need to learn the Unix-based symbolic and octal permission notations, which are hidden beneath the macOS graphical user interface. All of the available permissions are shown in the table below.
| Permissions | No permission | Execute | Write | Write and execute | Read | Read and execute | Read and write | Read, write and execute |
| Octal Notation | 0 | 1 | 2 | 3 | 4 | 5 | 6 | 7 |
| Symbolic notation | — | —x | -w- | -wx | r— | r-x | rw- | rwx |
The Terminal application allows you to use octal notation to set permissions for the owner, a group, and everyone else. For example, to create a “write only” drop box folder, you could set directory permissions to 622 to give the owner read and write permissions, and the group and everyone else write only permissions. The three groups of notations are shown below.
Your Mac automatically sets permissions to limit a user’s access to system files and other user directories. If that protection isn’t good enough, you can change permissions to prevent other users from doing stuff like editing your “Great American Novel,” reading private financial documents, or opening a specific application.
How to Modify Permissions with the Info Window
The Info window allows you to modify permissions for users, groups, and everyone else. It doesn’t provide the same level of granular control as the chmod command, which you’ll learn about in the next section, but it’s a good way to quickly limit access to a file or folder.
Here’s how to modify permissions with the Info window:
Click a file or folder to select it.
From the File menu, select Get Info. The window shown below appears.

Click the disclosure triangle next to Sharing & Permissions to display permissions for the selected file or folder.
Click the lock and authenticate with an administrator account.
Use the menus next to users and groups to change the permissions.
When you’re finished, close the Info window.
Changes are effective immediately.
How to Modify Permissions with chmod
For total control over permissions, you can use two Unix commands — ls and chmod — to display permissions and modify them. Assume you want to find a folder’s current permissions and then change them to 755. This would give you as the owner read, write and execute permissions, and everyone else read and execute permissions.
Here’s how to find a folder’s current permissions and change them:
Open the Terminal application.
Type ls –l , and then press Return. The symbolic permissions of the files and folders in your home directory are displayed, as shown below.
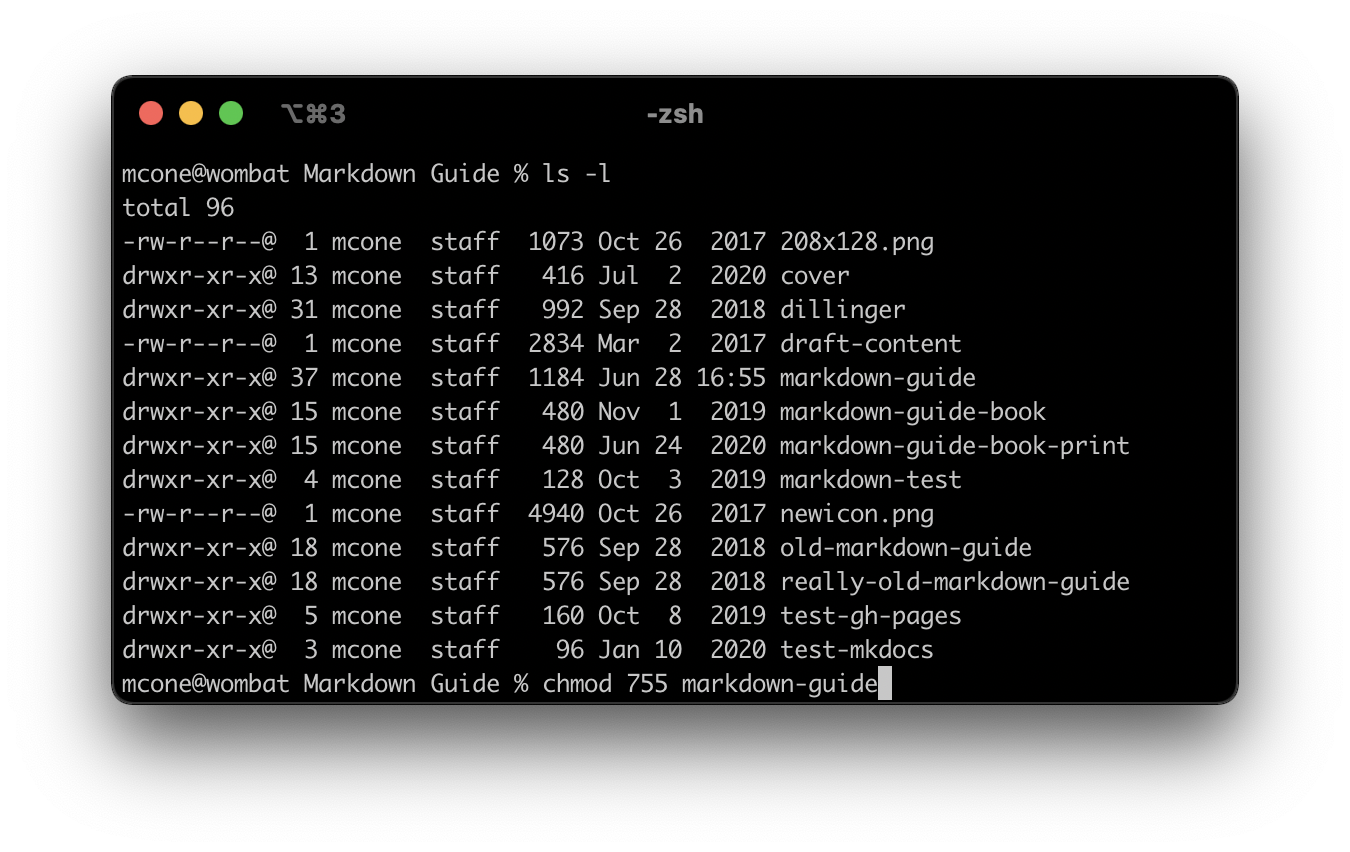
Type chmod 755 foldername , and then press Return. This changes the permissions of the folder to rwxr-xr-x.
When it comes to using the ls and chmod commands, practice makes perfect. Try modifying the permissions on a couple of sample files. If you need more help, use the man command to display the manual pages for these commands (e.g., man ls ).
Final Thoughts
Permissions as a security control are more effective in some environments than others. Schools and offices have a real need for permissions — there are lots of users, and the information stored on the computers can be valuable. In single-user households, where only one person uses a Mac, convenience might outweigh any perceived security threats. It’s all about finding the right balance for your environment.
Related Articles
Subscribe to our email newsletter
Sign up and get Macinstruct’s tutorials delivered to your inbox. No spam, promise!
Источник
Change permissions for files, folders or disks on Mac
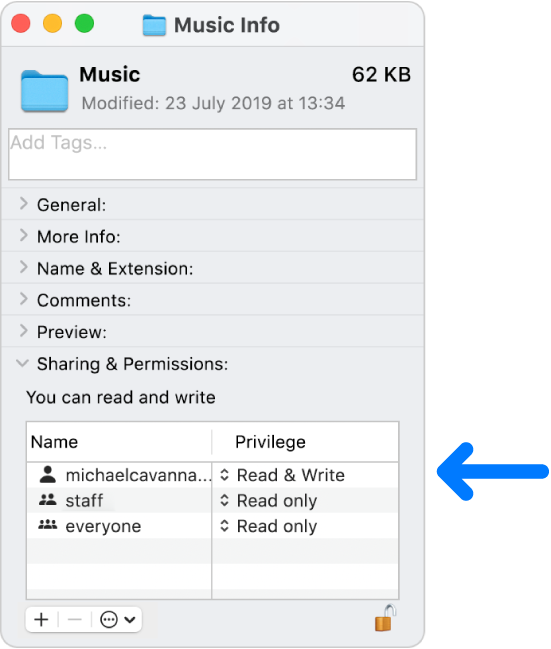
Permission settings determine who can view and alter files on the computer. You change permission settings at the bottom of the Info window for a file, folder or disk in the Finder. For example, you can change permission settings for a folder so that other users who log in to your Mac, or connect to it for file sharing, can view but not change files in a folder.
Assign permissions to users and groups
On your Mac, select a disk, folder or file, then choose File > Get Info.
If the information in Sharing & Permissions isn’t visible, click the arrow  .
.
If the lock at the bottom right is locked  , click it to unlock the Get Info options, then enter an administrator name and password.
Click a user or group in the Name column, then choose a privilege setting from the pop-up menu.
Read & Write: Allows a user to open the item and change it.
Read only: Allows a user to open the item but not change its contents.
Write only (Drop Box): Makes a folder into a drop box. Users can copy items to the drop box, but can’t open it. Only the owner of the drop box can open it.
No Access: Blocks all access to the item.
You can undo any changes to privilege settings for a user or group in the Sharing & Permissions section since opening the Info window. Before closing the Info window, click the Action pop-up menu  , then choose “Revert changes”.
Apply permissions to all items in a folder or a disk
On your Mac, select a folder or disk, then choose File > Get Info.
If the lock at the bottom right is locked , click it to unlock the Get Info options, then enter an administrator name and password.
Click the Action pop-up menu , then choose “Apply to enclosed items”.
Change an item’s owner
On your Mac, select the item, then choose File > Get Info.
If the lock at the bottom right is locked , click it to unlock the Get Info options, then enter an administrator name and password.
If the new owner’s name isn’t listed in the Name column in the Sharing & Permissions section, click the Add button  to add the new owner.
Select the new owner in the Name column, click the Action pop-up menu , then choose “Make __ the owner”.
You can undo any changes to an item’s owner in the Sharing & Permissions section since opening the Info window. Before closing the Info window, click the Action pop-up menu , then choose “Revert changes”.
Add or remove a user or group in the Name column
On your Mac, select an item, then choose File > Get Info.
If the lock at the bottom right is locked , click it to unlock the Get Info options, then enter an administrator name and password.
In the Sharing & Permissions section, do any of the following:
Add a user or group: Click the Add button below the list, select a user or group, then click Select.
Remove a user or group: Select the user or group, then click the Remove button  below the list.
You can undo adding or removing a user or group in the Sharing & Permissions section since opening the Info window. Before closing the Info window, click the Action pop-up menu , then choose “Revert changes”.
Источник


