- Free up storage space on your Mac
- Find out how much storage is available on your Mac
- Manage storage on your Mac
- Store in iCloud
- Optimize Storage
- Empty Trash Automatically
- Reduce Clutter
- Where to find the settings for each feature
- Other ways that macOS helps automatically save space
- How to free up storage space manually
- Change the Screen Shot Save File Location in Mac OS X
- How to Change Where Screen Shots Save on Mac
- Changing Back to the Default Screen Shot File Save Location in Mac OS X
- Using the Mac’s Auto-Save and Versions Feature
- Revert to any previously saved version of a document
- Auto-Save
- Versions
- How to Use Auto-Save and Versions
- Which Auto-Save and Versions Options Are Available?
- Unlock
- Duplicate
- Revert To
- Browse All Versions
Free up storage space on your Mac
Save space by storing your content in iCloud or using built-in tools to find and remove large or unneeded files.
The Optimized Storage features of your Mac help you save storage space by storing your content in iCloud and making it available on demand:
- When storage space is needed, files, photos, movies, email attachments, and other files that you seldom use are stored in iCloud automatically.
- Each file stays right where you last saved it, and downloads when you open it.
- Files that you’ve used recently remain on your Mac, along with optimized versions of your photos.
If you haven’t yet upgraded to macOS Sierra or later, learn about other ways to free up storage space.
Find out how much storage is available on your Mac
Choose Apple menu > About This Mac, then click Storage. Each segment of the bar is an estimate of the storage space used by a category of files. Move your pointer over each segment for more detail.
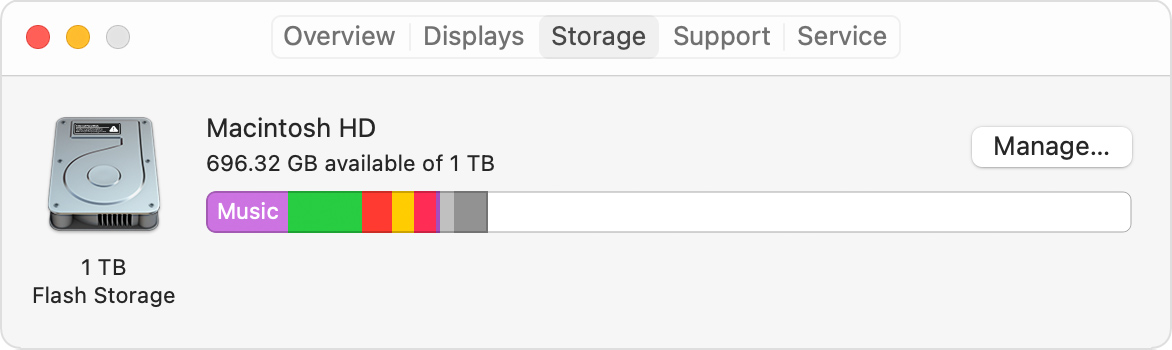
Click the Manage button to open the Storage Management window, pictured below.
Manage storage on your Mac
The Storage Management window offers recommendations for optimizing your storage. If some recommendations are already turned on, you will see fewer recommendations.
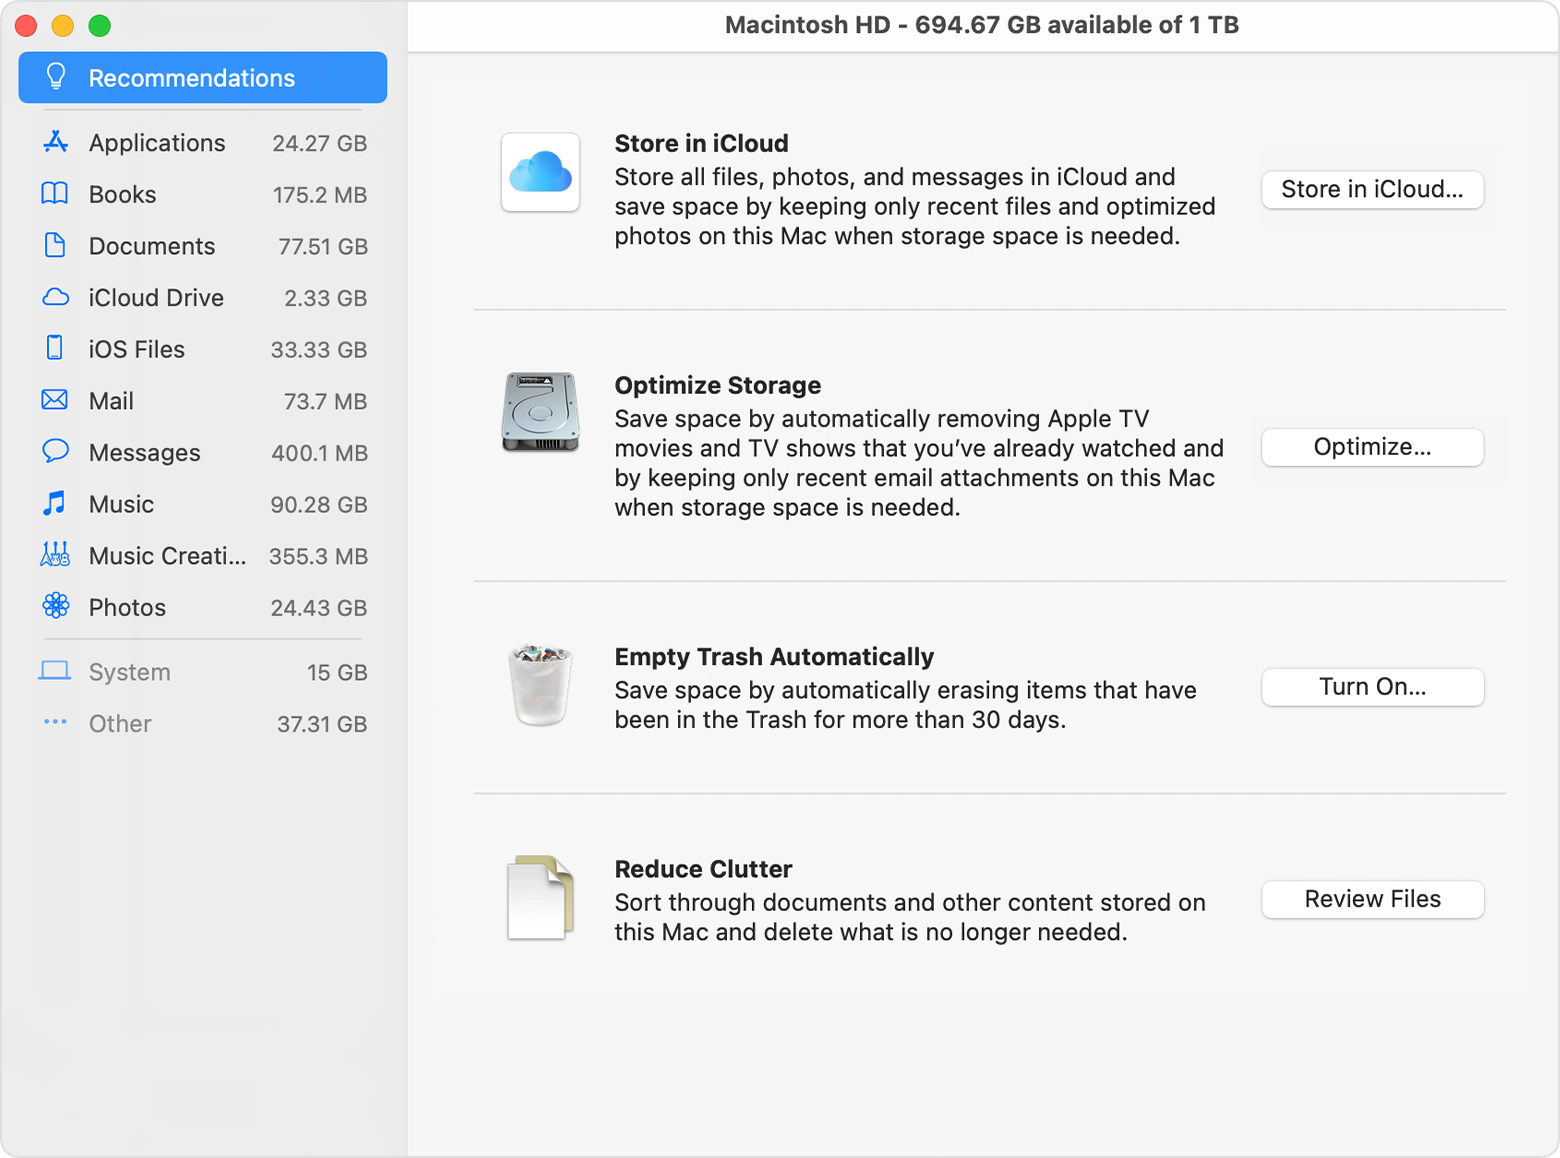
Store in iCloud
Click the Store in iCloud button, then choose from these options:
- Desktop and Documents. Store all files from these two locations in iCloud Drive. When storage space is needed, only the files you recently opened are kept on your Mac, so that you can easily work offline. Files stored only in iCloud show a download icon , which you can double-click to download the original file. Learn more about this feature.
- Photos. Store all original, full-resolution photos and videos in iCloud Photos. When storage space is needed, only space-saving (optimized) versions of photos are kept on your Mac. To download the original photo or video, just open it.
- Messages. Store all messages and attachments in iCloud. When storage space is needed, only the messages and attachments you recently opened are kept on your Mac. Learn more about Messages in iCloud.
Storing files in iCloud uses the storage space in your iCloud storage plan. If you reach or exceed your iCloud storage limit, you can either buy more iCloud storage or make more iCloud storage available. iCloud storage starts at 50GB for $0.99 (USD) a month, and you can purchase additional storage directly from your Apple device. Learn more about prices in your region.
Optimize Storage
Click the Optimize button to save space by automatically removing watched movies and TV shows. When storage space is needed, movies or TV shows that you purchased from Apple and already watched are removed from your Mac. Click the download icon next to a movie or TV show to download it again.
Your Mac will also save space by keeping only recent email attachments on this Mac when storage space is needed. You can manually download any attachments at any time by opening the email or attachment, or saving the attachment to your Mac.
Optimizing storage for movies, TV shows, and email attachments doesn’t require iCloud storage space.
Empty Trash Automatically
Empty Trash Automatically permanently deletes files that have been in the Trash for more than 30 days.
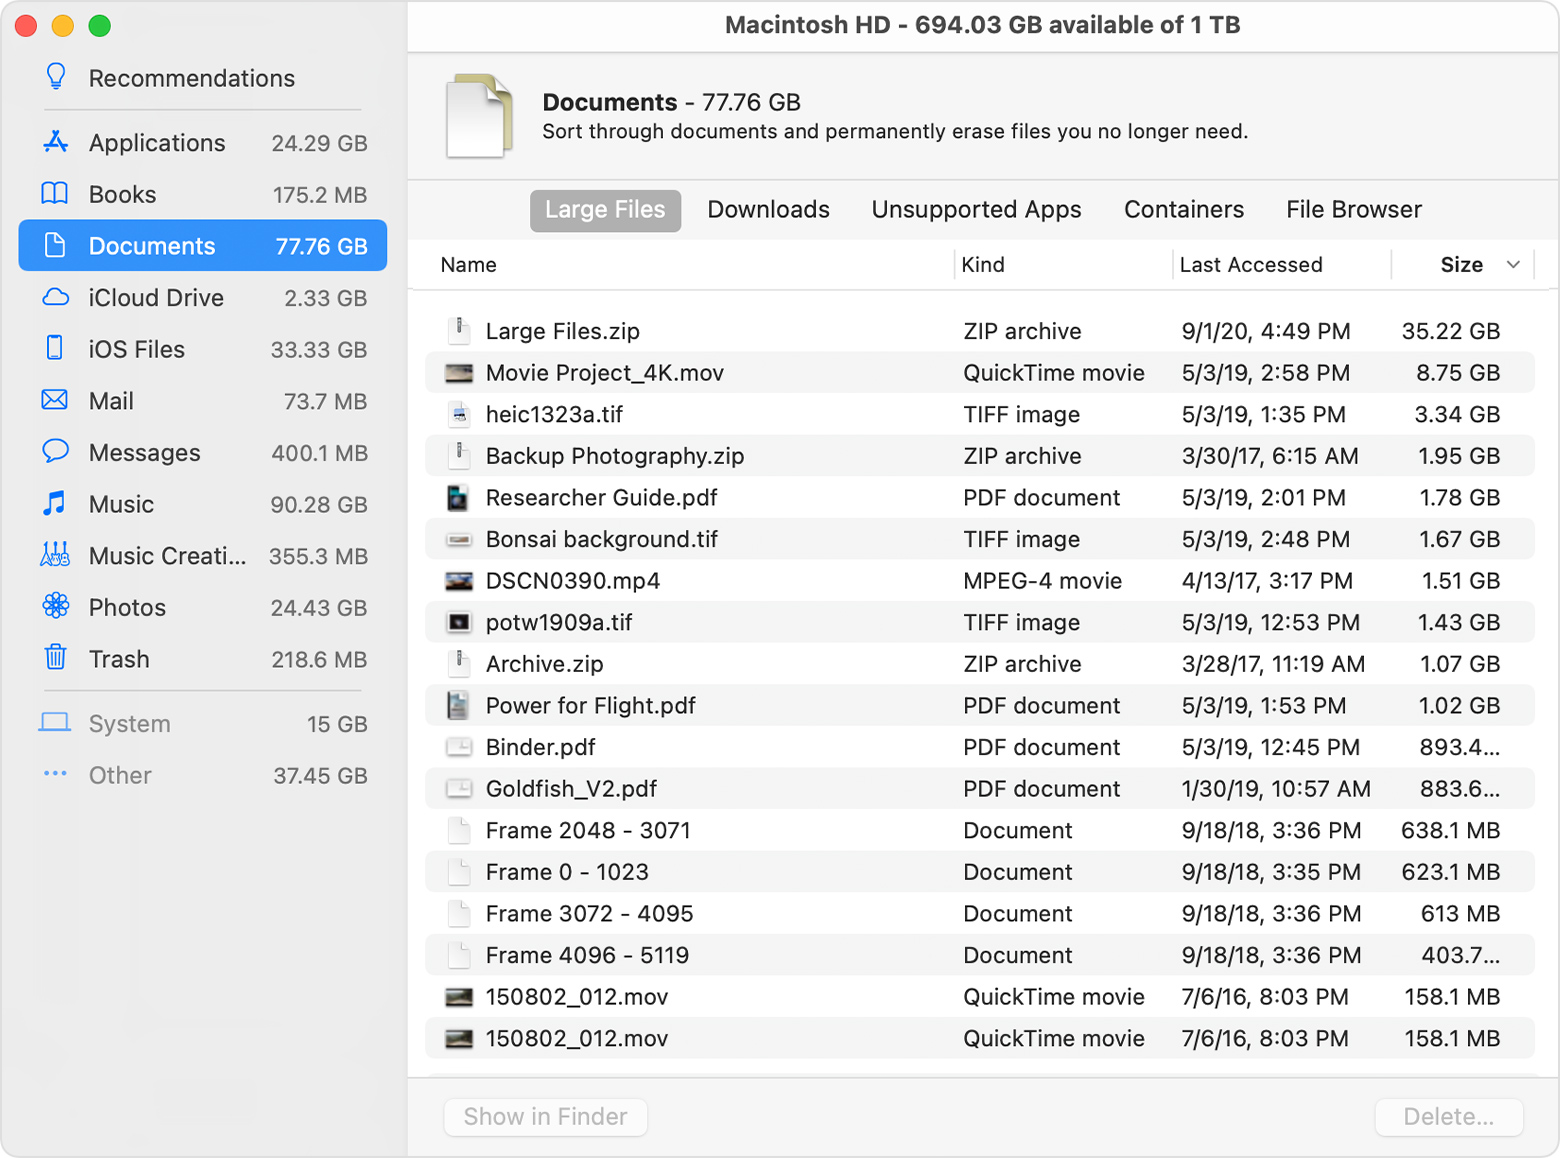
Reduce Clutter
Reduce Clutter helps you identify large files and files you might no longer need. Click the Review Files button, then choose any of the file categories in the sidebar, such as Applications, Documents, Music Creation, or Trash.
You can delete the files in some categories directly from this window. Other categories show the total storage space used by the files in each app. You can then open the app and decide whether to delete files from within it.
Where to find the settings for each feature
The button for each recommendation in the Storage Management window affects one or more settings in other apps. You can also control those settings directly within each app.
- If you’re using macOS Catalina or later, choose Apple menu > System Preferences, click Apple ID, then select iCloud in the sidebar: Store in iCloud turns on the Optimize Mac Storage setting on the right. To turn off iCloud Drive entirely, deselect iCloud Drive.
- If you’re using macOS Mojave or earlier, choose Apple menu > System Preferences, click iCloud, then click Options next to iCloud Drive. Store in iCloud turns on the Desktop & Documents Folders and Optimize Mac Storage settings.
- In Photos, choose Photos > Preferences, then click iCloud. Store in iCloud selects iCloud Photos and Optimize Mac Storage.
- In Messages, choose Messages > Preferences, then click iMessage. Store in iCloud selects Enable Messages in iCloud.
- If you’re using macOS Catalina or later, open the Apple TV app, choose TV > Preferences from the menu bar, then click Files. Optimize Storage selects “Automatically delete watched movies and TV shows.”
- In you’re using macOS Mojave or earlier, open iTunes, choose iTunes > Preferences from the menu bar, then click Advanced. Optimize Storage selects “Automatically delete watched movies and TV shows.”
- In Mail, choose Mail > Preferences from the menu bar, then click Accounts. In the Account Information section on the right, Optimize Storage sets the Download Attachments menu to either Recent or None.
Empty Trash Automatically: From the Finder, choose Finder > Preferences, then click Advanced. Empty Trash Automatically selects “Remove items from the Trash after 30 days.”
Other ways that macOS helps automatically save space
With macOS Sierra or later, your Mac automatically takes these additional steps to save storage space:
- Detects duplicate downloads in Safari, keeping only the most recent version of the download
- Reminds you to delete used app installers
- Removes old fonts, languages, and dictionaries that aren’t being used
- Clears caches, logs, and other unnecessary data when storage space is needed
How to free up storage space manually
Even without using the Optimized Storage features described in this article, you can take other steps to make more storage space available:
- Music, movies, and other media can use a lot of storage space. Learn how to delete music, movies, and TV shows from your device.
- Delete other files that you no longer need by moving them to the Trash, then emptying the Trash. The Downloads folder is good place to look for files that you might no longer need.
- Move files to an external storage device.
- Compress files.
- Delete unneeded email: In the Mail app, choose Mailbox > Erase Junk Mail. If you no longer need the email in your Trash mailbox, choose Mailbox > Erase Deleted Items.
Источник
Change the Screen Shot Save File Location in Mac OS X

By default, anytime you take a screen capture in Mac OS X, the resulting screenshot file will save to the current users desktop. This makes retrieval very easy and is very appropriate for the average Mac user, but for those who take a lot of screen shots in OS X, they may find their desktop to be cluttered with the screenshot files rather quickly.
An excellent solution is to adjust the default location of where Mac OS X saves captured screen shot files to another location in the file system when Command + Shift + 3 is pressed, this walkthrough will show you how to do that with a defaults command.
How to Change Where Screen Shots Save on Mac
You will need to use the command line to change the save location of screen shots in Mac OS X. Thus, the first thing you’ll need to do is launch the Terminal app from /Applications/Utilities/ to get a prompt.
The general syntax for changing screenshot file location is as follows, note it must be entered on a single line and with a proper path set for the new screencapture save location to take effect:
defaults write com.apple.screencapture location /path/;killall SystemUIServer
Change the ‘/path/’ sequence to where you want the screen shot files to save to. For example, if I want to have the screenshots appear in the user (
) Pictures folder, I would use:
defaults write com.apple.screencapture location
Hit the return key to set
/Pictures as the location. You’ll need to follow it up with a SystemUIServer relaunch too:
Here is what this defaults sequence may look like as entered into the Terminals command line prompt:
(tilde) is a shortcut to the current user home directory. A full path can be used as well, as we’ll discuss in a moment.
If you want to make a unique folder within the
/Pictures/ directory to save your screen shots too, you can do that from the Finder as usual, or from the command line with the following command to create a directory named “Screenshots”:
Now to set that new directory as the default saved location for captured screen images use the following syntax:
defaults write com.apple.screencapture location
For the changes to take effect without rebooting, kill SystemUIServer process to relaunch it and set the location:
That’s it, hit “Command+Shift+3” to take a screen shot and watch as the file is no longer saved to the user Desktop, but to the newly defined screen shot location.
This means the next time you take a screenshot (or as Windows converts like to say, Print Screen on a Mac), the screenshot file will appear at the location you specified.
Note that some users in the comments have experienced syntax issues when typing the tilde (
) as a shortcut for the Home folder, that shouldn’t be an issue if used properly, but nonetheless you can get around that by implying a full path to the home directory as follows:
defaults write com.apple.screencapture location /Users/USERNAME/Pictures/
Where “USERNAME” is the precise shortname of the users home directory, followed by the desired path to set as the save location for future screen captures. Again, one must killall SystemUIServer or log out and back in again for the change to take effect.
Changing Back to the Default Screen Shot File Save Location in Mac OS X
If you decide having screencaptures automatically saved to another location on the Mac is no longer what you’d like to do, you can always change the saved screenshot location back to the OS X default setting simply by specifying the desktop again in the aforementioned defaults command sequence. The default save location would thus be the following:
defaults write com.apple.screencapture location
Again, you’d need to kill SystemUIServer for changes to take effect.
You can again verify the change has been set back to the default by hitting Command+Shift+3 to capture the screen as a file in OS X, and look on the active user accounts desktop to find the screen shot file.
For many users, maintaining the Desktop as the default location of the screen shot files to generate is perfectly fine, this trick is really intended for individuals who use Command+Shift+3 for screen captures often and find the desktop file generation to be a distraction or otherwise difficult to manage. Users may also find useful to change the file name of generated screen shots as well as the image file type that is used, both of which can be widely customized to accommodate preferences.
This command works in all versions of Mac OS X.
Источник
Using the Mac’s Auto-Save and Versions Feature
Revert to any previously saved version of a document
When they launched, Auto-Save and Versions fundamentally changed how you work with documents on a Mac. In most cases, they free you from having to manually save as you work. They also let you return to or compare previous versions of the item you’re working on.
Unfortunately, Apple didn’t provide much information on how to use these new features; you may not even have noticed them. Here’s how to use both Auto-Save and Versions to manage your documents and improve workflow.
Instructions in this article apply to devices running Mac OS X Lion (10.7) and later.
:max_bytes(150000):strip_icc()/GettyImages-518832211-cf60ff1942694733840aa6fc72417572.jpg)
Auto-Save
Auto-Save monitors you as you work on a document. When you pause, it saves the document. If you work continuously, Auto-Save will perform a save every 5 minutes. The auto-saving means that you won’t lose more than 5 minutes of work should something unexpected happen, such as a power outage or a cat taking a shortcut across your keyboard.
Auto-Save doesn’t create a new document each time it performs a save. If it did, you might eventually run out of drive space. Instead, it only notes the changes you make between saves.
The Auto-Save service appears in any document-based app that saves files to the Mac. Although any app can take advantage of the service, Apple doesn’t require developers to include it. Some major productivity apps, such as Microsoft Office, don’t use Auto-Save; they use their own file management routines instead.
Versions
The Versions feature works alongside Auto-Save to provide a way to access and compare previous versions of a document you’re working on. In the past, you had to use the Save As command to save a document with a different file name, such as Monthly Report 1, Monthly Report 2, etc. Doing so allowed you to make changes to a document without worrying about losing the original. Versions does something similar automatically: It lets you access and compare any version of a document you’ve created.
Versions creates a new version of a document every time you open it, every hour that you’re working on it, and whenever you use a Save, Save Version, Duplicate, Lock, or Save As command. Auto-Save doesn’t create new versions; it adds to the current version. You can’t use Versions to see how the document looked 5 minutes ago unless you had performed one of the trigger events listed above.
How to Use Auto-Save and Versions
Auto-Save and Versions are on by default. You can’t deactivate them, but you do have control over how they work in individual documents.
Apple made some slight changes in how you access Versions information. In OS X Lion and Mountain Lion, you use an app’s window title, also known as the proxy icon. Next to the document name is a small chevron that reveals a menu containing the Versions options for the selected document. In OS X Mavericks and later, Apple moved most of the Versions menu items to the app’s File menu while leaving the Auto-Save Lock function within the document window’s title.
Launch TextEdit, located at /Applications.
:max_bytes(150000):strip_icc()/001-using-the-macs-auto-save-and-versions-feature-9e4dd9419dd9453986a4f2702b443caa.jpg)
When TextEdit opens, select New Document to open a blank file.
In older versions of macOS, select New under the File menu or press Command+N on your keyboard.
:max_bytes(150000):strip_icc()/002-using-the-macs-auto-save-and-versions-feature-28f86502399e40f5be5fc55ff6034818.jpg)
Type a line or two of text in the document, and then select File>Save.
:max_bytes(150000):strip_icc()/003-using-the-macs-auto-save-and-versions-feature-ba8bfec6778b4558abc0b559abfb5877.jpg)
Enter a name for the file, and click Save.
:max_bytes(150000):strip_icc()/004-using-the-macs-auto-save-and-versions-feature-d5d916790ac2469a8d16d33214063112.jpg)
The document window now shows the name of the document in the window title.
:max_bytes(150000):strip_icc()/005-using-the-macs-auto-save-and-versions-feature-28ed873bf35a45c1bfcc50dda69cb964.jpg)
Let the mouse pointer hover over the document’s name in the window title. A small chevron will appear, indicating that the title is actually a drop-down menu.
:max_bytes(150000):strip_icc()/006-using-the-macs-auto-save-and-versions-feature-5315297a58904612baba06a9b029f202.jpg)
Click the document title to see the available menu items. In OS X Mavericks and later, you’ll just see the Locked option, but earlier versions will have more choices.
:max_bytes(150000):strip_icc()/007-using-the-macs-auto-save-and-versions-feature-8925f5b7de324c4889b18176902aaaa5.jpg)
Which Auto-Save and Versions Options Are Available?
In older versions of Mac OS X, you’ll find all of these options under the title menu in a document. In Mavericks (10.9) and later, you’ll find most of them under the File menu. Regardless of where you find them, they all do the same things.
Clicking the Lock item will lock the document, preventing any changes from occurring. You can’t modify or save a locked document without first unlocking it. Locking a document not only prevents inadvertent changes, but also lets you use the document as a template, or as a starting point for a new document.
Unlock
This option only appears in the menu when a document has been locked. Click the Unlock menu item to remove the lock and allow full editing. In later versions of OS X and macOS, the Locked option appears as a checkbox under the document title menu. Uncheck the box to unlock the document.
:max_bytes(150000):strip_icc()/008-using-the-macs-auto-save-and-versions-feature-96d06fa32dc4436487258eb1fcc1a780.jpg)
Duplicate
Clicking the Duplicate menu item creates a copy of the document and places it next to the original. Creating a duplicate allows you to use the original document as a template or a jumping-off point to create a whole new version. If the original document was locked, the duplicate is unlocked, ready for you to make changes. Any changes that you make to the duplicate won’t affect the original. The duplicate is a new document, with its own save history and versions.
Revert To
How you revert to an earlier version of a document depends on which version of the OS you’re using.
- Revert to Last Saved is the version for Mac OS X Lion and Mountain Lion. If this option is available, it will include the time and date the last version was saved. Selecting this option will save your document’s current state and then restore the last saved version.
- Revert to appears under the app’s File menu in Mac OS X Mavericks and later. It allows you to access previous versions of the current document.
Browse All Versions
When you select this menu item, the display changes to show you a Time Machine-like view of all of the versions of the document. The current version appears on the left; all other versions are on the right. Select a version to compare it to the current document. The time and date of each version appears in the timeline slider on the right, and just below the frontmost document. Clicking Done will return you to the current document; clicking Restore will take you back to the selected version.
:max_bytes(150000):strip_icc()/009-using-the-macs-auto-save-and-versions-feature-d243cb8bca5847a68c08934575076ca6.jpg)
When using the Browse All Versions option, you can copy an element from any of the versions using the standard copy command. Click and drag to select the desired text, then right-click and select Copy from the pop-up menu. When you return to the standard editing window, you can paste the contents into the target location.
By using the Auto-Save and Versions features, you can work with documents without worrying about accidentally changing a document, forgetting to save it, or experiencing a power outage.
Источник


