- How to Show Hidden Files in Windows 10
- Option 1 – From File Explorer
- Option 2 – From Control Panel
- Option 3 – Via Registry
- You Might Also Like
- Reader Interactions
- Comments
- Did this help? Let us know! Cancel reply
- Primary Sidebar
- Recent Posts
- Who’s Behind Technipages?
- Files hidden from windows api
- How to show hidden files in Windows 7
- Users who read this also read:
- How can I make a file hidden on Windows?
- 3 Answers 3
- Not the answer you’re looking for? Browse other questions tagged python windows python-3.x or ask your own question.
- Linked
- Related
- Hot Network Questions
- Subscribe to RSS
- FileSystem API&File API: разбираемся и используем
- В качестве введения
- Обращаемся к файловой системе
- Работа с файлам
- Работа с директориями
- Копируем, переименовываем и перемещаем
How to Show Hidden Files in Windows 10
By Mitch Bartlett 10 Comments
By default, Microsoft Windows 10 hides certain files from view when you explore them on your hard drive. This protects important files from being deleted so that the system isn’t damaged. If you’re the geeky type, you’ll want to be able to view all files all the time. Follow these steps to show hidden files.
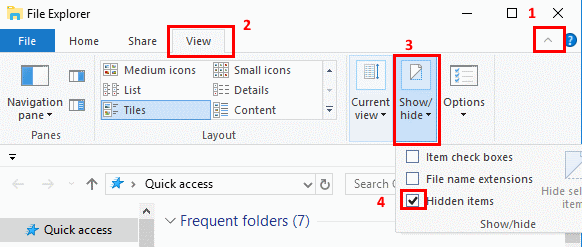
Option 1 – From File Explorer
- Select the “Start” button, then choose “File Explorer“.

- Make sure the menu bar is expanded. You can toggle the menu bar by selecting the ^ at the upper right portion of the window.
- Select the “View” tab.
- Check the “Hidden items” check box to view hidden items.
- If you need more file viewing options, select “Options” > “View“.

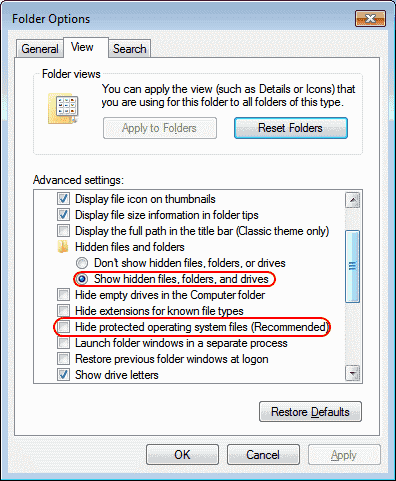
Option 2 – From Control Panel
- Right-click the “Start” button, then select “Control Panel“.
- Go to “Appearance and Personalization“, then select “File Explorer Options“.
- Click the “View” tab.
- Scroll down a bit and change the “Hidden files and folders” setting to “Show hidden files, folders, and drives“. Optionally, you may wish to uncheck the “Hide protected operating system files” box as well.
Option 3 – Via Registry
- Hold the Windows Key and press “R” to bring up the Run dialog box.
- Type “regedit“, then press “Enter“.
- Navigate to the following location:
- HKEY_CURRENT_USER
- Software
- Microsoft
- Windows
- CurrentVersion
- Explorer
- Advanced
- Set the value for “Hidden” to “1” to show hidden files, folders, and drives. Set the value to “2” to not show hidden files, folders, and drives.
- Set the value for “ShowSuperHidden” to “1” to show protected operating system files. Set the value to “2” to not show protected operating system files.
You Might Also Like
Filed Under: Windows Tagged With: Windows 10
Reader Interactions
Comments
Kartik singh says
I have nokia lumia 520.
I want to convert it into android.I want to know that after installing the android. Will my sim card work and data connection.
Jan de Vos says
I have reinstalled the USB driver successfully. Though, Samsung dex did not recognize my device.
Neha Singh says
This one worked. Thanks for the guidance. It really helped me alot.
Ok, I just checked this out… here’s an example where the attrib method (below) will show files when the author’s method will not. To illustrate, configure Explorer to show all files as outlined in this article. Then,
1) Open a 2nd Windows Explore and navigate to C:\Users\\AppData\Roaming\Microsoft\Windows\Recent Items
2) Shift select and delete these files (or move them to a temp location; I think advanced “Disk Cleanup” tool will delete as well).
Also, note that all the advanced “show file” setting made earlier are still intact.
Next open a command prompt in the …\Recent Items folder. To do this:
1) Open a 3rd explorer window and navigate *in the left panel* to C:\Users\\AppData\Roaming\Microsoft\Windows
2) With your mouse over the “Windows” folder *still in the left panel*, hold down Left-Shift + Right Mouse Click to get the advanced context menu, click on “Open command window here”
3) In the …\Roaming\Microsoft\Windows> command prompt, key in: “cd recent”
4) Key in …\recent\> attrib *.*
You should see a bunch of files not shown in explorer.
Charles Davis says
The current version of Win 10 looks and works differently, so this just confused me.
I don`t have CurrentVersion in Windows from HKEY_CURRENT_USER, please help me!
No. Unable to change entry. Received notice “Cannot edit Hidden. Error writing the value’s new contents”.
This saved me so much time! Thank you!
This saved me so much time! Thank you!
Did this help? Let us know! Cancel reply
This site uses Akismet to reduce spam. Learn how your comment data is processed.
Primary Sidebar
Recent Posts
Who’s Behind Technipages?
 My name is Mitch Bartlett. I’ve been working in technology for over 20 years in a wide range of tech jobs from Tech Support to Software Testing. I started this site as a technical guide for myself and it has grown into what I hope is a useful reference for all.
Follow me on Twitter, or visit my personal blog.
Files hidden from windows api
- Home
- Tutorials & Tech Support Guides
- Windows 7 Tutorials
- How to show hidden files in Windows 7
How to show hidden files in Windows 7
Lawrence Abrams
- February 1, 2009
- Read 3,680,305 times
Windows 7 hides certain files so that they are not able to be seen when you exploring the files on your computer. The files it hides are typically Windows 7 System files that if tampered with could cause problems with the proper operation of the computer. It is possible, though, for a user or piece of software to set make a file hidden by enabling the hidden attribute in a particular file or folder’s properties. Due to this it can be beneficial at times to be able to see any hidden files that may be on your computer. This tutorial will explain how to show all hidden files in Windows 7.
To enable the viewing of hidden and protected system files in Windows 7 please follow these steps:
- Close all programs so that you are at your desktop.
- Click on the Start button. This is the small round button ( ) in the lower left corner of your screen that has a Windows flag on it.
- Click on the Control Panel menu option.
- When the control panel opens you will see a screen similar to Figure 1 below.
Now click on the Show hidden files and folders option as shown by the red arrow in Figure 2 above.
Once this is done, your Folder Options screen should look similar to the following image.
Figure 3. Folder Options screen
You will now be at your desktop and Windows 7 will be configured to show all hidden files.
If you have any questions about this tutorial please feel free to post them in our Windows 7 forums.
Users who read this also read:
How to see hidden files in Windows
By default Windows hides certain files from being seen with Windows Explorer or My Computer. This is done to protect these files, which are usually system files, from accidentally being modified or deleted by the user. Unfortunately viruses, spyware, and hijackers often hide there files in this way making it hard to find them and then delete them.
How to remove a Trojan, Virus, Worm, or other Malware
If you use a computer, read the newspaper, or watch the news, you will know about computer viruses or other malware. These are those malicious programs that once they infect your machine will start causing havoc on your computer. What many people do not know is that there are many different types of infections that are categorized in the general category of Malware.
How to see hidden files in Windows 8
Windows 8 hides certain files so that you are not able to view them while exploring the files and folders on your computer. Windows has two types of files that Windows will classify as hidden and hide from the user. The first type are actually hidden files, which are ones that are given the +H attribute or specified as Hidden in a file or folder’s properties. The second type of file are System .

How to create a new user account in Windows 7 and Windows Vista
Windows 7 allows you to have multiple users sharing the same computer under their own individual accounts. This allows each individual user to have their own location on the computer where they can store their personal documents, pictures, videos, saved games, and other personal data. This also allows the owner of the computer to assign certain accounts the ability to perform administrative tasks .

How to start Windows in Safe Mode
Windows Safe Mode is a way of booting up your Windows operating system in order to run administrative and diagnostic tasks on your installation. When you boot into Safe Mode the operating system only loads the bare minimum of software that is required for the operating system to work. This mode of operating is designed to let you troubleshoot and run diagnostics on your computer. Windows Safe Mode .
How can I make a file hidden on Windows?
On windows you can right-click a file, click on properties and select hidden. How can I do this to a file in python?


3 Answers 3
If you don’t want/don’t have access to win32 modules you can still call attrib :
If this is for Windows only:

this is the easy way
hide file ‘+h’
show file ‘-h’
myFile.txt can be the full path to your file
Not the answer you’re looking for? Browse other questions tagged python windows python-3.x or ask your own question.
Linked
Related
Hot Network Questions
Subscribe to RSS
To subscribe to this RSS feed, copy and paste this URL into your RSS reader.
site design / logo © 2021 Stack Exchange Inc; user contributions licensed under cc by-sa. rev 2021.4.16.39093
By clicking “Accept all cookies”, you agree Stack Exchange can store cookies on your device and disclose information in accordance with our Cookie Policy.
FileSystem API&File API: разбираемся и используем
В качестве введения
С помощью FileSystem API и File API веб приложение может создавать, читать, просматривать и записывать файлы находящиеся в области пользовательской «песочницы».
Описание API разбито на следующие секции:
- Чтение и управление файлами: File/Blob, FileList, FileReader
- Создание и запись: BlobBuilder, FileWriter
- Работа с директориями и права доступа: DirectoryReader, FileEntry/DirectoryEntry, LocalFileSystem
Пара слов об объектах, с которыми предстоит работать:
- File — собственно файл; позволяет получить такую доступную только для чтения информацию, как имя, размер, mimetype и прочее.
- FileList — «массив» объектов File.
- Blob — сущность, позволяющая разбирать файл по байтам.
Поддержка браузерами и ограничение на хранение
На момент написания статьи только Google Chrome 9+ имеет рабочую реализацию FileSystem API. И на данный момент пока нет никаких диалоговых окон для управления файлами и квотами на хранилище, поэтому нужно будет использовать флаг —unlimited-quota-for-files (в случае разработки приложений для Chrome Web Store будет достаточно манифеста с разрешением unlimitedStorage). Но все меняется и пользователи в скором времени получат возможность для управления правами по работе с файлами, которые будут требоваться приложению.
Вам может потребоваться использование флага —allow-file-access-from-files , если вы дебажите приложение с использованием file://. Если этот флаг не использовать, то будут выброшены исключения типа SECURITY_ERR или QUOTA_EXCEEDED_ERR.
Обращаемся к файловой системе
Проверим поддержку браузером нужных нам функций
Веб приложение может обратиться к файловой системе (естественно в ограниченной «песочнице») вызвав следующий метод window.requestFileSystem():
Правила хранения, доступные значения window.TEMPORARY и window.PERSISTENT. данные, хранящиеся с использованием ключа TEMPORARY могут быть удаление по усмотрению браузером (например, если не хватает места). Если же выставлен ключPERSISTENT, то данные могут быть очищены только после действий пользователя или приложения.
Размер (в байтах) хранилища, которое потребуется приложению.
Callback-функция, выполняемая в случае успешного обращения к файловой системе. Ее аргументом является объект типа FileSystem.
Необязательная callback-функция для обработки ошибок. Так же вызывается, когда возникают ошибки обращения к файловой системе. Параметром является объект типа FileError.
Если вы вызываете метод requestFileSystem() в рамках вашего приложения в первый раз, то в этот момент и будет создано хранилище. Очень важно помнить, что данное хранилище является закрытым и другое приложение не будет иметь к нему доступа. Это так же значит, что приложение не может менять прочие файлы и папки, расположенные на жестком диске.
Спецификация по FileSystem так же описывает API для синхронной работы, а именно интерфейс LocalFileSystemSync, который предполагается использовать совместно Web Workers. Но в этой статье данное API не будет рассмотрено.
Возвращаясь к методу requestFileSystem() стоит описать возможные варианты возникающих ошибок:
Описанный пример очень прост, но по сути является заготовкой для дальнейшей работы с возникающими ошибками.
Работа с файлам
Для работы с файлам предусмотрен интерфейс FileEntry. Он обладает рядом методов и свойств, которые мы привыкли ассоциировать с обычными файлами. Приведем их ниже:
Разберем на примерах азы работы с FileEntry.
Создание файла
Получить или создать файл можно с помощью метода getFile() у интерфейса DirectoryEntry. После обращения к хранилищу, callback возвращает нам объект FileSystem, содержащий в себе DirectoryEntry (fs.root), ссылающийся на корневую папку хранилища.
Следующий код создаст пустой файл «log.txt»:
Итак, после обращения к файловому хранилищу, у нас в руках оказывается FileSystem. Внутри сallback-функции мы можем обратится к методу fs.root.getFile(), передав имя файла, который требуется создать. Можно передать как относительный, так и абсолютный путь — главное чтобы он был верным. Например, ошибочным будет создание файла, если его родительская папка не существует. Вторым аргументом метода getFile() является объект, описывающий параметры объекта, которые будут к нему применены, если он еще не создан. Более подробно можно прочитать в документации.
Чтение файла по имени
. Если файл не существует, то будет выброшена ошибка.
FileReader помимо прочего предоставляет следующие методы для чтения:
- FileReader.readAsBinaryString(Blob|File) — результат будет содержать байтовую строку.
- FileReader.readAsText(Blob|File, opt_encoding) — результат будет содержать текстовую строку. Кодировка по умолчанию — ‘UTF-8’, менять можно с помощью задания опционального параметра
- FileReader.readAsDataURL(Blob|File) — на выходе имеем data URL.
- FileReader.readAsArrayBuffer(Blob|File) — получаем данные в виде ArrayBuffer.
В следующем примере мы зачитаем изображение и выведем его thumbnail:
Иногда нам может потребоваться не весь файл, а лишь его часть, для этого удобно использовать File.slice(start_byte,length).
Выглядит это так:
В следующем примере мы сможем прочитать либо нужные на байты, либо весь файл целиком. Особое внимание обратите на onloadend и evt.target.readyState, которые в данном случае будут заменять нам событие onload. (О событиях чуть ниже).
Теперь о событиях. FileReader предоставляет нам следующие типы событий:
- onloadstart
- onprogress
- onload,
- onabort
- onerror
- onloadend
Их можно использовать, когда нужно отобразить процесс загрузки файла. Например так:
Запись в файл
С помощью следующего кода мы создадим файл «log.txt» (если он не существует) и запишем в него ‘Ipsum Lorem’.
Как видно, мы обращаемся к методу createWriter() для получения объекта. Кроме этого, мы обрабатываем события окончания записи в файл и возможного создания ошибки.
Дописываем данные в файл
Следующий код допишет ‘Hello World’ в конец файла. Если файла нет, то выброситься ошибка.
Создание копий выбранных файлов
Следующий код позволяет пользователю выбирать несколько файлов, используя и создает копии этих файлов.
Для упрощения выбора файлов можно использовать HTML5 Drag and Drop.
Удаление файлов
Следующий код удалит ‘log.txt’.
Работа с директориями
Работа с директориями осуществляется за счет использования DirectoryEntry, который обладает большинством свойств FileEntry ( они оба наследуют интерфейс Entry). Перечислим ниже свойства и методы DirectoryEntry.
Создание директорий
Для создания и обращения к директориям используется getDirectory() интерфейса DirectoryEntry. Можно передавать как имя, так и путь до директории.
Создадим в корне директорию «MyPictures»:
Поддиректории
Создание поддиректорий по сути то же самое, что и создание директорий, однако надо помнить, что если родительская директория не существует, то будет выброшена ошибка. Следующий код показывает, как можно обойти это ограничение:
Теперь у нас создана директория «music/genres/jazz» и мы можем обращаться к любому ее уровню и создавать в них новые файлы. Например:
Разбираем содержимое директории
Чтобы узнать, что содержится в директории нужно создать DirectoryReader и вызвать его метод readEntries(), но при этом нет гарантии, что вернется все содержимое выбранной директории (. ). Это значит, что надо обращаться к методу DirectoryReader.readEntries(), пока результат не станет пустым. Пример:
Удаляем директорию
Для удаления следует вызвать метод DirectoryEntry.remove(). Важно знать, что если попытаться удалить не пустую директорию, то будет выброшена ошибка.
Удалим пустую директорию «jazz» из «/music/genres/»:
Рекурсивно удаляем директории
Если у вас есть не пустая директория и вы все же хотите ее удалить, то вам поможет метод removeRecursively(), который удалить и директорию и все ее содержимое.
Произведем эту операцию с директорией «music»:
Копируем, переименовываем и перемещаем
FileEntry и DirectoryEntry полностью идентичны в этом аспекте.
Копируем
И FileEntry и DirectoryEntry имеют метод copyTo() для копирования. В случае директорий, метод рекурсивно создаст и все содержимое.
Скопируем «me.png» из одной директории в другую:
Перемещение или переименование
У FileEntry и DirectoryEntry есть метод moveTo(), позволяющие перемещать и переименовывать файлы и директории. Первым аргументом является родительская папка, вторым (опциональным) параметром является новое имя.
Переименуем «me.png» в «you.png»:
Переместим «me.png» из корневой директории в «newfolder».
Use Cases
HTML5 предлагает несколько вариантов локального хранения данных, но FileSystem отличается тем, что позволяет удовлетворить те потребности, которые не удовлетворяют базы данных. В основном, это нужды приложение, которые хранят большой объем бинарных данных и/или предоставляет доступ к файлам приложениям вне браузера.
Приведем список возможных применений:
- Uploader файлов
- Игры и приложение, работающие с медиа файлами
- Аудио/фото редактор, с оффлайновым режимом работы
- Оффлановый видео проигрыватель
- Оффлайновый почтовый клиент


