Using pandas to fill gaps only, and not NaNs on the ends
I have some housing price data that spans about 8 months, and tracks the price as houses come onto the market up until they are sold. There are a couple gaps in the data in the middle that I’d like to fill in, but I’d like to leave the NaNs on the end of each untouched.
To use a simple example, let’s say we have house1 that comes on the market for 200000 on ‘Day 4’, and sells for 190000 on ‘Day 9’. And we have house2 that stays at 180000 for Days 1 — 12 and doesn’t sell in that time window. But, something went wrong on days 6 and 7 and I lost the data:
Now imagine instead of regular arrays these were columns in Pandas Dataframes indexed by date.
The trouble is, the function I would normally use to fill the gaps here would be DataFrame.fillna() using either the backfill or ffill methods. If I use ffill, house1 returns this:
Which fills the gap, but also incorrectly fills the data past the day of sale. If I use backfill instead, I get this:
Again, it fills the gap, but this time it also fills the front end of the data. If I use ‘limit=2’ with ffill, then what I get is:
Once again, it fills the gap, but then it also begins to fill the data beyond the end of where the ‘real’ data ends.
My solution so far was to write the following function:
It simply skips all the NaNs in front, fills in the gaps (defined by groups of NaNs between real values), and doesn’t fill in NaNs on the end.
Is there a cleaner way to do this, or a built-in pandas function I’m unaware of?
Fill gaps in windows
Well, i’d like to announce the first release of a reaper extension I developed to fill automatically the gaps after processes like drum editing. It was developed for my own needs but would to share it with the other reaper users. It’s idea is based on another similar extension by Adam Wathan (thanks Adam!) but offers more features like better transient detection & group handling.
To quickly install & execute it on Windows platforms:
— install activepython 3.1.3.5 from http://downloads.activestate.com/Act. eases/3.1.3.5/
— download extension from http://code.google.com/p/auto-fill-gaps/ —> Downloads
— extract zip file & copy the four .py files into reaper’s ‘Scripts’ directory
— launch reaper, open actions window, add as custom actions the three auto_fill_*.py files
— select some media items with gaps between them & run the ‘auto_fill_gaps_defaults’ action
— the gaps should be properly filled, listen to the result
If you have some time, read through the README.txt for detailed instructions and run ‘auto_fill_gaps’ action modifying the settings as you wish.
Below I’m pasting the whole README.txt with all the instructions on how to use it.
Feel free to contact me or reply in this post for questions, problems, whatever.
This is ‘Auto-fill gaps’, a REAPER extension to fill gaps between media
items automatically. It is a Python script and can be executed from
REAPER as a custom action. THE SOFTWARE IS PROVIDED «AS IS», WITHOUT
WARRANTY OF ANY KIND; for more details see ‘LICENSE.txt’.
The ‘Auto-fill gaps’ was developed by George Giaslas. Feel free to
contact me at: ggiaslas at gmail dot com. If you find it useful, a donation
through Paypal to the aforementioned e-mail is always appreciated.
What it does at a glance: This script can be used to automatically fill
the gaps between media items after processes like drums editing. It’s
based on a similar extension (AutoPocket by Adam Wathan), but with
better transient handling and group processing. It was initially
developed to cover my own needs for drums editing and wanted to share it
with other REAPER users, so feel free to use it.
The process for each gap to be filled is the following:
1) the gap is optionally shifted to the left so if the split point falls
on a middle of a transient, the whole transient is recovered.
2) then, the gap is optionally shifted to the right just before the next
transient. if you’re lazy like me and don’t chop up the waveforms exactly
before the transients, this can be used to put the gap where it should be,
thus allowing less stretching afterwards.
3) next, the last transient is optionally detected in the items to be stretched,
and a split is performed after the transient, so only the rest of the item is
stretched, thus leaving the transient intact.
4) finally, the gap is now filled by stretching the media item and applying
crossfades taking into account maximum gap & minimum rate limits. if any of
these two limits is reached, the remaining gap will be filled by extending
the right-hand item to the left.
The above procedure can take into account optionally item grouping, i.e.
all items in a group will be handled the same way (same gap shifting,
same stretch factor). This is especially useful in transient handling
where the last transient is looked up in the whole group (and this was
something missing from the original AutoPocket extention). So if there’s
a kick followed by a snare in a group of media items that has a gap
afterwards, and both group & transient handling are enabled, the items
will be splitted after the snare, so leaving both kick & snare intact,
and the rest of the items will only be stretched.
Another feature of this script is that the split point after a transient
is not fixed. You can specify a min & max transient length and the item
is splitted at a point where the stretch rate does not reach the limit
specified, while trying to keep as much as possible from the transient
based on the min/max limits.
Also, you can specify which of the tracks may contain transients. So if
you’re doing a full drums editing with kick, snare, toms, over & room
mics you can specify only kick, snare & tom tracks to detect for
transients.
Finally, the script places markers on positions that: — max gap/min rate
limit was reached so there might be a possible artifact — a transient
was stretched so it may sound strange — there is a group mismatch (i.e.
group of items with unequal start/length) so the gap is not filled at
all
Installation instructions:
1) Install Python: If working on Windows, install ActivePython community edition
v3.1.3.5 from http://downloads.activestate.com/Act. eases/3.1.3.5/
Older Python versions v2.x are not recognized by REAPER, later versions v3.2.x
are not compatible with REAPER, so you’re left with this option only. If
working on OS X usually Python is already installed and recognized by REAPER.
2) Copy the four .py files into the REAPER’s ‘Scripts’ directory. On Windows XP & earlier it is
something like: C:\Documents and Settings\ \Application Data\REAPER\Scripts,
on Windows 7 it is something like: C:\Users\ \AppData\Roaming\REAPER\Scripts ,
while on OS X it is something like: /Users/ /Library/Application Support/REAPER/Scripts.
If ‘Scripts’ directory does not exist create it yourself before copying the files.
3) Launch REAPER and show action list window (quick shortcut: ‘?’). The ReaScript ‘New/Load’
button should be enabled if Python is properly installed. Press it and select
‘auto_fill_gaps.py’ file, optionally assign a shortcut to it. Do the same for
‘auto_fill_gaps_quick.py’ & ‘auto_fill_gaps_defaults.py’ files. Now you have two three
custom actions installed and ready to be used.
Usage instructions:
Execute the ‘auto-fill gaps’ action. Two dialogs will pop-up in order to fill-in the
parameters required as described below:
— itemsToProcess: ‘1’ to process only the selected media items, ‘2’ to process the media
items in all tracks inside the time selection, ‘3’ to process all media items in the project
— shiftLeftGapMsec: if greater than zero, the gap will first be shifted to the left by
the specified amount of time in msec. this is useful in cases where the split points fall
on the middle of a transient, so shifting the gap slightly to the left the whole transient
is recovered.
— gapFillCrossfadeMsec: crossfade length when filling gaps
— crossfadeType: crossfade type when filling gaps. 0->equal gain, 1->equal power,
2->reverse equal power, 3->steep curve, 4->reverse steep curve, 5->s-curve
— maxGapMsec: maximum amount of gap in msec that is allowed to be filled by stretching
— minRate: minimum rate that is allowed for stretching
— takeCareOfTransients: set to ‘1’ or ‘true’ to try to enable transient handling, trying
to leave transients intact and stretch the rest of the items only
— transientLengthMinMsec: minimum length of a transient
— transientLengthMaxMsec: maximum length of a transient
— transientSplitCrossfadeMsec: crossfade length when splitting after transients
— shiftRightGapToTransient: set to ‘1’ or ‘true’ to try to shift right the gap just before
the next transient. useful if you were not chopping the items just before the transients
— maxGapToTransientLengthMsec: the gap will be shifted to the right only if the next
transient is no more than this amount of time in msec
— gapToTransientPadMsec: safety padding when shifting right the gap. it positions the gap
the specified time in msec before the transient, because REAPER does not always detects
the transients at their start point
— groupHandling: set to ‘1’ or ‘true’ to handle items as groups
— tracksContainingTransients: track numbers separated by ‘|’ that will be used for
transient detection. if you leave it empty it defaults to all tracks in the items to
be processed
If you want to execute the script quickly using the last settings without
poping-up the parameter dialogs, then run the ‘auto_fill_gaps_quick’
action. If you find the above settings too complex then execute the script
with the default settings by selecting the media items to process &
running the ‘auto_fill_gaps_defaults’ action.
Also, keep in mind it takes a lot of time to execute (i’ll work on
optimizing it a later phase) and possibly REAPER will terminate it with
a ‘possible infinite loop’ error. In the latter case try to select a
smaller region and execute it again. It has been tested only on REAPER
v4.10 running on Windows.
So, that was a quick introduction on the script. Feel free to use it on
your projects and send me any feedback whether you you find it useful or
rather messes up your project. And a donation through Paypal to
ggiaslas at gmail dot com is always appreciated 🙂
Fill Gaps
Available with Production Mapping license.
Summary
Many types of polygon features should have coincident boundaries with other features. Coincident boundaries may be important for features within a single polygon feature class, such as parcels, or between features in different feature classes, such as lakes and surrounding vegetation. A gap between the features exists when there is space between the boundaries of two or more features.
Illustration
Usage
Caution:
This tool modifies the input data. See Tools that do not create output datasets for more information and strategies to avoid undesired data changes.
If this tool is run in an edit session in ArcMap , you can stop the edit session without saving changes to restore features that have been modified.
The order of the entries in the Input Polygon Features list is important when the Fill Options parameter is set to FILL_BY_ORDER . For instance, if vegetation is first in the list, and lakes are the second input polygons when FILL_BY_ORDER is selected, the vegetation features will always be adjusted to fill the gap. If the order is reversed and lakes appear first in the list, the lake features will always be adjusted to fill the gap.
When multiple compare feature layers are provided and the Fill Options parameter is set to FILL_BY_LENGTH , the area of the gap is added to the feature class that shares the longest boundary with the gap. For instance, if the gap shares a longer boundary with feature layer A and a shorter boundary with feature layer B, the area of the gap will be added to the feature in feature class A.
This tool requires one or more input feature classes. If only one input feature class is specified, the tool will look for gaps between individual features in that feature class. When multiple feature classes are specified, the tool will look for gaps between all features in all the input feature classes. The tool will find gaps between two features in the same feature class as well as gaps between features in the different feature classes.
When looking for gaps between multiple feature classes, add all of the feature classes as input polygons. For example, if there should be no gaps between features in the lakes, grass, and forest feature classes, add them all in the Input Polygon Features parameter. If you just add lakes and forests, the tool may identify a gap between lakes and forests and fill the gap. However, the area that was identified as a gap may have had a grass feature which will result in the modified feature overlapping the grass. To prevent possible overlaps, add all feature classes into the Input Polygon Features parameter.
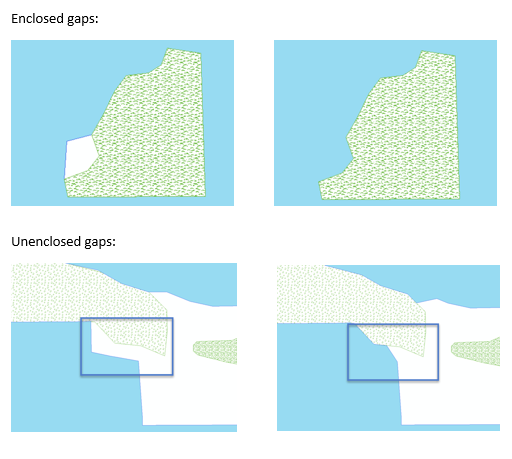
Unenclosed gaps exist when two polygon boundaries are within a specified distance to each other. The two polygon features do not have to touch each other at any point.
When the Fill Unenclosed Gaps option is checked, the unenclosed gaps will be filled first. After unenclosed gaps are filled, then enclosed gaps will be filled.
Enclosed gaps exist when there are gaps between two polygon boundaries.
This tool does not fill self-gaps. If a feature is a multipart feature or a feature with holes, the tool will not fill the holes or gaps between the parts.
Syntax
| Parameter | Explanation | Data Type |
| String | ||
| Boolean | ||
| Linear Unit |
Code sample
FillGaps example 1 (stand-alone script)
The following stand-alone sample script demonstrates how to use FillGaps for enclosed features.
FillGaps example 2 (stand-alone script)
The following stand-alone sample script demonstrates how to use FillGaps for unenclosed features.


