- 4 Ways To Find Large Files In Windows 10
- Find Large Files In Windows 10 Using File Explorer
- Search For Large Files In Windows 10 With Command Prompt
- Use Largest Files Finder To Find Large Files On Windows 10
- Find Largest Files On Windows 10 With TreeSize Free
- Copy only changed files (new & modified) in Windows 10
- Replies (9)
4 Ways To Find Large Files In Windows 10
Free up space quickly by deleting them
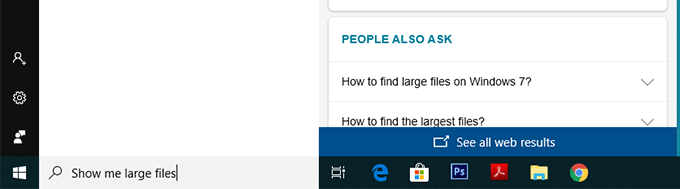
If you quickly want to free-up memory space on your Windows machine, the best way to do that is to find large files on your Windows 10 PC and get rid of them if they’re no longer useful. The question though is how do you go about searching for large files on your computer?
Windows provides you with multiple ways to find all the large files that are stored in your drives. Either you can use the built-in tools on your machine to look for these files or you can grab a third-party app that will do the task for you. Either way, you’ll find the files that occupy a significant portion of your memory space.

Once such files are found, it’s then up to you what you want to do with them. If deleting them permanently isn’t something you’d like to do straightaway, you can move them over to a cloud storage or to an external hard drive.
Also, be sure to check out our YouTube video from our sister site Online Tech Tips where we go through some of the options mentioned below in this article.
Find Large Files In Windows 10 Using File Explorer
File Explorer comes with a lot of hidden features to let you organize, sort, and find files on your computer. One of its abilities is to help you find files that are of specific size on your computer. Using this feature, you can locate those memory-hogging files and get them removed from your PC.
Before you do that, though, you’ll need to first enable the hidden files option. This is to ensure that Explorer looks for large hidden files as well in addition to searching for the normal files.
However, be cautious while dealing with the hidden files. Most of the time, these are system and app related files which, if you delete, will cause your apps to malfunction and even lead your entire system to crash. Before you delete anything, just make sure you know what it is and you’ll be fine.
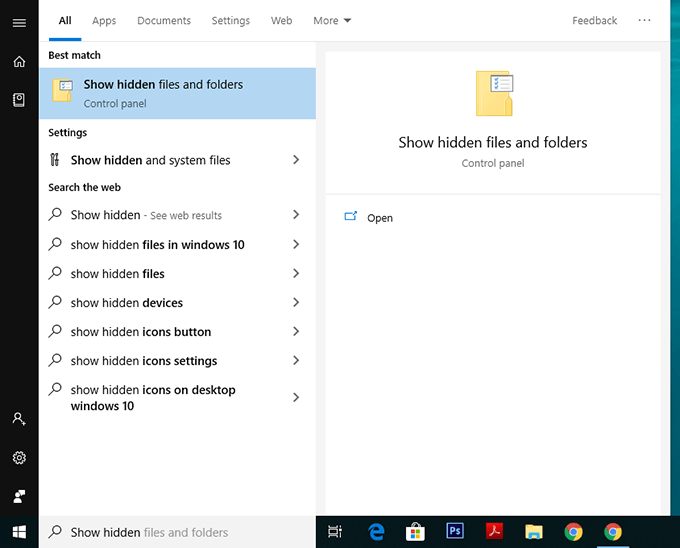
Open the Start Menu and search for Show hidden and click on Show hidden files and folders.
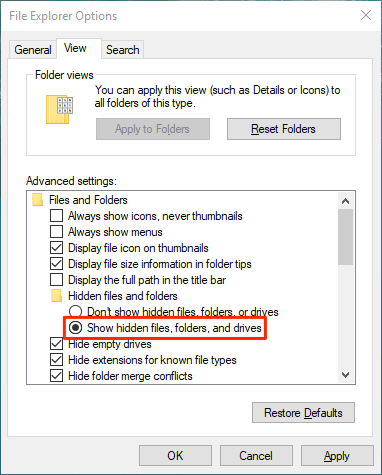
When the dialog box opens, click on the View tab at the top. You’ll see various File Explorer options that you can modify.
Find the option that says Show hidden files, folders, and drives and put a checkmark in it. Then click on the OK button to save your changes.
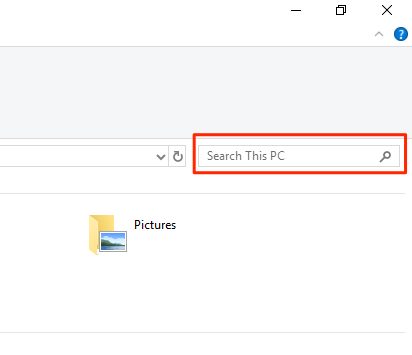
Double-click on This PC on your desktop to launch File Explorer. When the utility launches, click on the search box given at the top-right corner.
A new menu item will be added to the top of your screen. Click on the newly added item that says Search to view further options.
Select the Size option and then select an appropriate option from the list. It’ll let you find large files available on your PC.
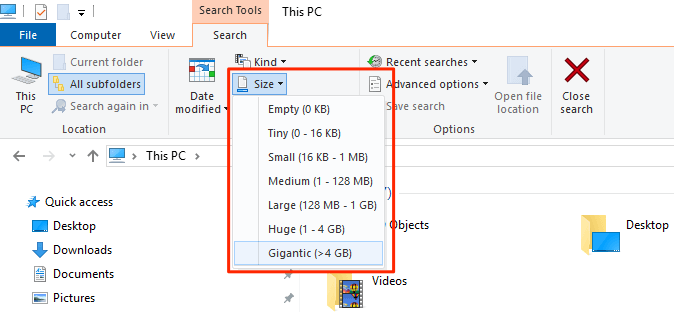
If what you consider as a large file isn’t available in the default menu, type in size:>1GB (replace 1GB with your size) in the search box and hit Enter. It’ll only look for the files that are larger than your specified size.

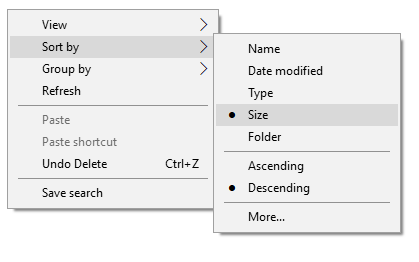
When the search results appear, right-click anywhere blank and select Sort by followed by Size and Descending. This’ll ensure the largest file is shown at the top of the results.
Search For Large Files In Windows 10 With Command Prompt
If you’re more of a geeky person, you can use the Command Prompt utility to retrieve a list of all the files larger than a specified size value. The files list can be exported to a text file for you to then actually find those files on your machine.
Press Windows + R, type in cmd, and hit Enter to launch the utility.
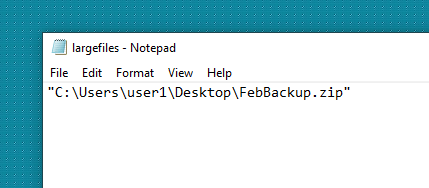
When it launches, type in the following command and hit Enter. It’ll find all the files that are larger than 1GB in size. You can modify the value in the command so it finds files that you think are large.
forfiles /S /M * /C “cmd /c if @fsize GEQ 1073741824 echo @path > largefiles.txt

Open the newly created largefiles.txt file and it’ll have a list of all the large files sitting on your computer.
Use Largest Files Finder To Find Large Files On Windows 10
File Explorer and Command Prompt aren’t the only tools to find large files on your Windows 10 computer. There are a few third-party apps as well that can help you find such files.
Largest Files Finder is one of those apps that helps you find the top 100 largest files on your computer. It claims to be only taking a minute to scan drives sized upto 200GB. Also, it doesn’t require any installation and works straight out of the box.
- Download and launch the app on your computer.
- Soon as it launches, it automatically starts searching for large files on your computer. When it’s done, you can review the results for yourself.
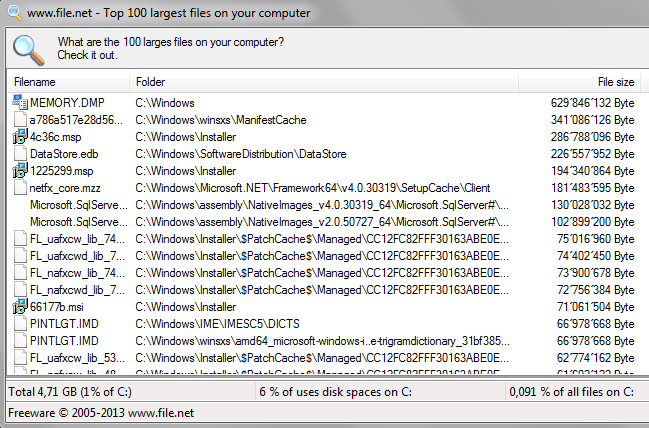
If you want to delete any files from the search results, you can do so with ease from within the app. Simply right-click on any of the files and select Delete.
Find Largest Files On Windows 10 With TreeSize Free
TreeSize Free has been around for quite a long time and it helps you find space hogging files on your Windows computers. It requires a small installation but then it works like a charm.
- Download, install, and launch the app on your computer. Make sure to run it with admin rights so it can search the folders that it can’t otherwise.
- You’ll see a tree of your folders along with the space they occupy on your screen. You can double-click on any folder to view its subfolders and their sizes.
You can then sort the directories by the Size column so that the largest files are always shown at the top.
It has a few customizable options as well should you want to use them. Feel free to play around with any options you think will make it easier to find large files on your computer.
Mahesh has been obsessed with technology since he got his first gadget a decade or so ago. Over the last few years, he’s written a number of tech articles on various online publications including but not limited to MakeTechEasier and Android AppStorm. Read Mahesh’s Full Bio
Copy only changed files (new & modified) in Windows 10
How to Copy Only New Files and Changed Files to my backup USB to do a backup.
—- You could do this on Old DOS and Window before they fixed it in Windows 10 —
Her is the Situation:/Problem
I drag a bunch of folders to the destination (my (USB backup drive) and copying begins
Then I get a window that says destination has files with the same name and asks if :
1. I want to replace the files
2. Skip these files
3 let me decide what to do with each individual file
copy «»»»changed»»»» files only — Remember that?
Window 10, in it’s wisdom, no longer seems to have this option — even though the files still have dates and sizes.
I used to be able to say copy ( or move) changed files only. bing, bang, bata boom and it’s done.
Because of this I Must either:
1 not save the updated files- even though they have been updated based on the new file date
2 replace all of the files which is waste of time and resources (there are 3307 files that I copy)
or decide on each file what I want to do on 3307 files also a major waste of my time. That would take me days.
On previous Windows and DOS you could copy changed files only.
——Where is that option in windows 10 operating system? ———
I can buy a simply program like copywiz to do that for $29 dollars or use the dos Xcopy at the command prompt but really? This is the best the new wonderful window 10 can do? Search hardly works and now the Copy command is pathetic too?
Does anyone have any idea what to do besides DOS or paid copy programs?
Also, how much longer will windows 7 be supported by Microsoft.
I ask because MS support is so willing to help that their people say go back to 7. I assume they have no interest in fixing this well know issue. That was a good program and I am considering going back. until windows 10 beta testing is done using all of us as guinea pigs.
Replies (9)
Select Let me decide for each file and then in the File Conflict dialog choose the option to Skip N files with the same date and size:
82 people found this reply helpful
Was this reply helpful?
Sorry this didn’t help.
Great! Thanks for your feedback.
How satisfied are you with this reply?
Thanks for your feedback, it helps us improve the site.
How satisfied are you with this reply?
Thanks for your feedback.
Thank you for this response. It’s an interesting workaround and I will naturally take it under consideration even though it’s a workaround that doesn’t exactly fit my needs as a user and all of my circumstances.
I know we can’t have everything of course and if Microsoft wants to eliminate this method of copying, that has worked well all this time, they can do so. However, what I am still looking for is an answer to this question —
How to make windows 10 work like older versions of windows and even as old as DOS 3 plus. by copying only changed files rather then wasting either my time making individual choices on 3000 plus files or wasting my resources copying all of the 3000 plus files. if having to use yet another work around to do what is so simple to in other older versions of window.s. I can use the proper DOS Xcopy commands at the command promt of course, but this is supposed to be the newest and the best so why would I use DOS to get the job done or have to use a workaround?
I only drive my 1929 ford for show not because I expect it to go 120 MPH in 5 seconds flat.
I wold like the system to copy only changed files as an option when I copy or move a file to another drive or to my backup USB drive
Do you by chance know how to make «that» work?
10 people found this reply helpful
Was this reply helpful?
Sorry this didn’t help.
Great! Thanks for your feedback.
How satisfied are you with this reply?
Thanks for your feedback, it helps us improve the site.
How satisfied are you with this reply?
Thanks for your feedback.
Hi RoberttWin and thank you for your quick response to this.
Unfortunately, this does no solve the problem because my version of window 10 appear to be different from yours.
Select Let me decide for each file and then in the File Conflict dialog choose the option to Skip N files with the same date and size:
Let me decide I don’t get that option: Hers is what I show.
Notice that my choice is to skip 0 files with same date and size out of ( in this case) 720 files although it shows 720 files with the same date and size.
I don’t know why that is. Do you know how to make it read the correct number?
Also this give me a choice of which to keep if I copy the files.
Is it not true that If I am making a —COPY — elsewhere that I want to keep the original files? If however I din’t want the originals to stay in place that I would —MOVE — the files. Have he definitions of these words changed or is Microsoft now using offshore programmers who don’t really understand the US language that well.
I want to keep both with the — Same — Name. If I want to copy why would they even ask?
If I had the skip option on my windows 10 version your solution might work though — unless it renames the files which I don’t want.
Thanks — I hopefully await your reply
5 people found this reply helpful
Was this reply helpful?
Sorry this didn’t help.
Great! Thanks for your feedback.
How satisfied are you with this reply?
Thanks for your feedback, it helps us improve the site.
How satisfied are you with this reply?
Thanks for your feedback.
Well I found other posts which I missed before. Here seems to be the problem as of Aug 31 2015 but not the answer.
No it doesn’t work according to MS — and it has not been fixed in over one year. see below.
Windows 10 — Copy and paste functionality in file explorer
Each day, I copy a number of files from my office computer to my home computer as a back up. As I update these files in my office computer, I copy and replace the older versions on my computer at home.
When I did copy and replace in Windows 7, for each file name that was already existing in my home computer, Windows 7 would give me a message for copy and replace giving the date of file modified and label it as Newer. For all «newer» files, I would them accept the copy and replace function.
I found this functionality in Windows 7 extremely useful since it would protect me from accidental replacement of a newer version with an older version. Just by checking the «Newer» word in the prompt, I would click yes.
This functionality is missing in Windows 10. It only provides an option where I have to manually compare and determine the newer version, and I find this loss of functionality very irritating (it was so much easier when Windows 7 did the compare and labelled newer files). I can’t understand why Microsoft removed this functionality.
I called Microsoft support but the only solution they gave me is to go back to Windows 7 (a suggestion that I found to be extreme).
Am I the only one missing this functionality? Is there a work-around for this?
Any help or advice would be greatly appreciated as I am missing this functionality — I use it everyday.
Is there any hope that Microsoft will add this functionality to Windows 10 in the future?
Thank you very much.
11 people found this reply helpful
Was this reply helpful?
Sorry this didn’t help.
Great! Thanks for your feedback.
How satisfied are you with this reply?
Thanks for your feedback, it helps us improve the site.
How satisfied are you with this reply?
Thanks for your feedback.
Notice that my choice is to skip 0 files with same date and size out of ( in this case) 720 files although it shows 720 files with the same date and size.
1. I see 760 conflicting files. Where are you getting the 720 number from?
2. You’re wrong, the two sets of files don’t have the same date and size. The files in K: are all newer than those in F:, as shown clearly by the fact that their dates are in bold text. So even if the sizes match (since neither size text is in bold), the dates don’t and so the files are not necessarily the same.
Is it not true that If I am making a —COPY — elsewhere that I want to keep the original files? If however I din’t want the originals to stay in place that I would —MOVE — the files.
Who says the files in the original location i.e. F: won’t be kept? The dialog is clearly asking whether in the target folder i.e. K:, you want to keep copies of the original set of files from F:, or you want to retain the new files already in K:.
Have he definitions of these words changed or is Microsoft now using offshore programmers who don’t really understand the US language that well.
No offence, but just because you didn’t understand the dialog doesn’t mean others don’t. I’ve been around the world enough to have met lots of foreigners who could speak English better and write both English and code better than their counterparts here. Personally, when I’m faced with genuine OS issues I couldn’t care less about the background of the developers. They’re MS employees, that’s all I know, and so I want them to fix their damn mistakes wherever they are, be it America, China, Russia or Addis Ababa.
I want to keep both with the — Same — Name.
You can’t keep both sets of files with the same name in the same folder. This has never been possible. All you can decide to do with the dialog above is, as I’ve already said, choose to keep the newer files in K: or overwrite them with the older ones from F: (or keep both versions in K: with the ones from F: being automatically renamed). The original files in F: will of course be left untouched since you’re copying and not moving, exactly as you want.
If I want to copy why would they even ask?
They’re asking because the file names are conflicting. Couldn’t be simpler. Now you decide which version of the files you want ending up in K:.
With a multi-file copy/move Win10 doesn’t prompt you for each file whether it is newer or older than the one with the same name in the target folder. Instead it shows you a dialog where it highlights which file in each pair is newer, and which file in each pair is bigger. If you select both of a pair then it will rename the file being copied so both versions can co-exist in the target folder.
Now is the current implementation perfect? Of course not. For example see the following case:
As you can see the Source versions of Files 1 & 3 are newer, but the Target versions of Files 2 & 4 are newer. Now what if one wants to end up with only the newer files in the Target folder (i.e. copy Files 1 & 3 from Source but leave Files 2 & 4 untouched in the Target)? Currently there’s only a Select All checkbox for each column, so one would have to manually select Files 1 & 3 from the first column and Files 2 & 4 from the second. This is obviously impossible when one has hundreds of files in each column to select.
Instead if they had options like i) Select only the newer files, ii) Select only the older files, iii) Select only the smaller files and iv) Select only the bigger files, then IMO the dialog would be far more useful.
Edit: Here are the XP and Win7 file conflict dialogs:
Where’s the «copy «»»»changed»»»» files only» option you were talking about?


