- Fix disappearing files and folders in Windows 10 and bring them all back
- How to find missing files and folders On Windows 10 PC or laptop?
- Solution 1 – Check the Users folder
- Solution 2 – Show hidden files and folders
- Solution 3 – Switch to your old user account
- Solution 4 – Backup your data before making changes
- Solution 5 – Search different hard drive partitions for your files
- Solution 6 – Turn off Fast Startup
- Solution 7 – Change Indexing options
- Solution 8 – Set the folder temporarily to hidden and read-only
- Solution 9 – Check the AppDataTemp folder
- Solution 10 – Check your hard drive
- How to Search for Files and Folders in Windows 10
- Search for a File, folder or Application in Windows 10 using Cortana:
- 4 Ways To Find Large Files In Windows 10
- Find Large Files In Windows 10 Using File Explorer
- Search For Large Files In Windows 10 With Command Prompt
- Use Largest Files Finder To Find Large Files On Windows 10
- Find Largest Files On Windows 10 With TreeSize Free
Fix disappearing files and folders in Windows 10 and bring them all back

- Find files on your PC, laptop and other devices
- Locate themin multiple places: local, network or cloud storage
- Get back pretty much everything you lost at a snap
find all the files,
even in cloud and network
Windows 10 issues aren’t common, but some issues are rather unusual. According to users, files and folders are disappearing on Windows 10.
This can be a big problem and interfere with your work, therefore it’s crucial to fix this problem.
- Files disappeared from Desktop Windows 10 – If you can’t see the icons on your Desktop, you’ve probably just hidden them accidentally. This can be solved with a few clicks.
- Folder disappeared Windows 7 – The same thing applies to Windows 7.
- User folder missing Windows 10 – If you cannot find the user folder in My Documents, just follow the solutions below.
- Folder disappeared from Desktop Windows 8 – Once again, the drill is identical in Windows 8.
- Files missing after Windows 10 update – If your files are missing after installing a certain update, the best solution would be to uninstall the troublesome update.
How to find missing files and folders On Windows 10 PC or laptop?
Table of contents:
Solution 1 – Check the Users folder
a. Search for missing files and folders manually
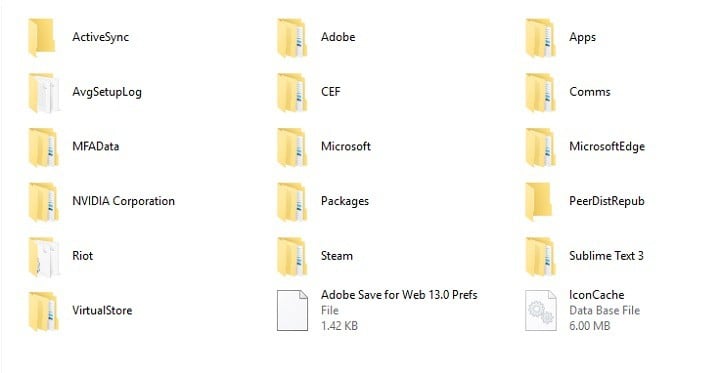
After Windows 10 upgrade, certain files might be missing from your computer, however, in most cases they are just moved to a different folder. Users report that most of their missing files and folders can be found at This PC > Local Disk (C) > Users > User Name > Documents or This PC > Local Disk (C) > Users > Public.
b. Use a dedicated file finder
In case the missing files and folders are not located in the path mentioned above, you will have a hard time while searching them.
In this case, we recommend you to use a file-finder software which will run multiple searches on all active storage elements of your system. We strongly recommend you Copernic Desktop search.
This tool will search not only all components of your system, but also your mails, USBs and external HDDs.
Solution 2 – Show hidden files and folders
If your files and folders disappeared, maybe you should check for hidden files and folders.
Sometimes, files and folders might appear missing, but they are actually hidden. To show hidden files and folders, do the following:
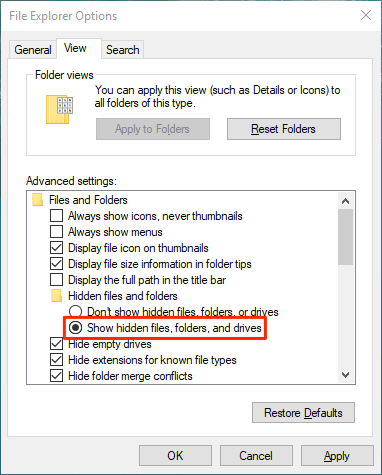
- Press Windows Key + S and type File Explorer. Choose File Explorer Options from the list.

- When File Explorer Options window opens, go to View tab. Locate Hidden files and folders option and select Show hidden files, folders, and drives.
- Click Apply and OK to save changes.


After you’ve changed this option, try searching for the missing files and folders on your computer. In most cases, the files should be in the same folder where you left them.
Solution 3 – Switch to your old user account
In some cases, files and folders might disappear when you upgrade to Windows 10 and that’s because Windows 10 creates a new account for you by default.
Your old account is still present, but it’s not set as the default account, so you have to switch to it. To do that, follow these steps:
- Click the Start Button and click your username at the top.
- You should see another account available on the list. Click it in order to switch to it.
- After you switch to it, all your files and folders should be available to you.
Solution 4 – Backup your data before making changes
In case you haven’t yet upgraded to Windows 10 or done some important changes to your system, we strongly recommend you to make a backup copy of your system.
For that, you will have to use a backup software that will make a copy of your files and store it in a safe place at your choice: USB or external HDD.
If you already did it and encountered this issue, we strongly recommend you Paragon Backup&Recovery 16.
This is a leader on the backup and recovery software market with a lot of simple but powerful features in order to protect and recover your data while making changes to your PC.
It has a user-friendly interface and can be used whithout any issues. It stores quickly (15 GB in about 5 minutes) but you will need an external storage device in order to backup a huge amount of data.
Solution 5 – Search different hard drive partitions for your files
After you upgrade to Windows 10, your hard drive letters might get changed for some reason. For example, if you used to store files on your C drive, they might be moved to D:UsersYour_username folder on any other hard drive partition.
In order to locate your missing files and folder, make sure to check all hard drive partitions thoroughly.
Solution 6 – Turn off Fast Startup
Users reported that Fast Startup can sometimes be responsible for disappearing files and folders on Windows 10. In order to fix this issue, some users suggest disabling Fast Startup by following these steps:
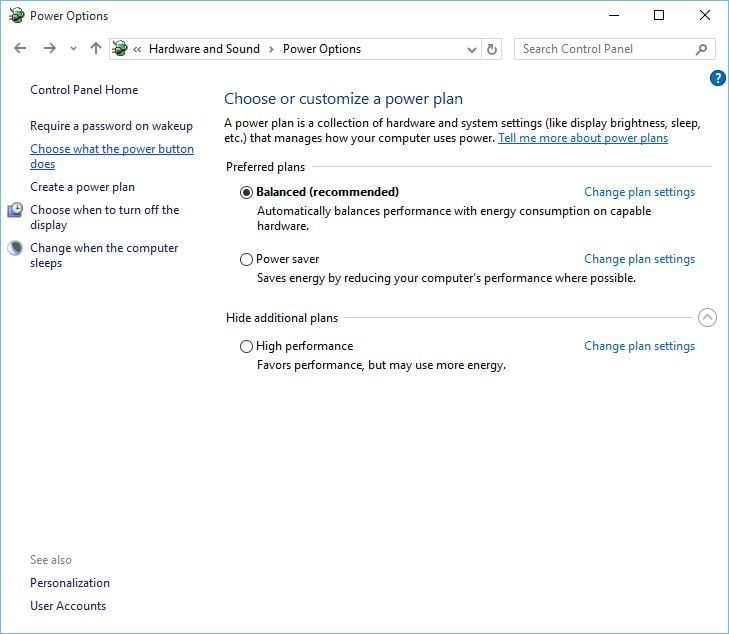
- Press Windows Key + S and type Power Options. Select Power Options from the list of results.
- Click on Choose what the power button does.
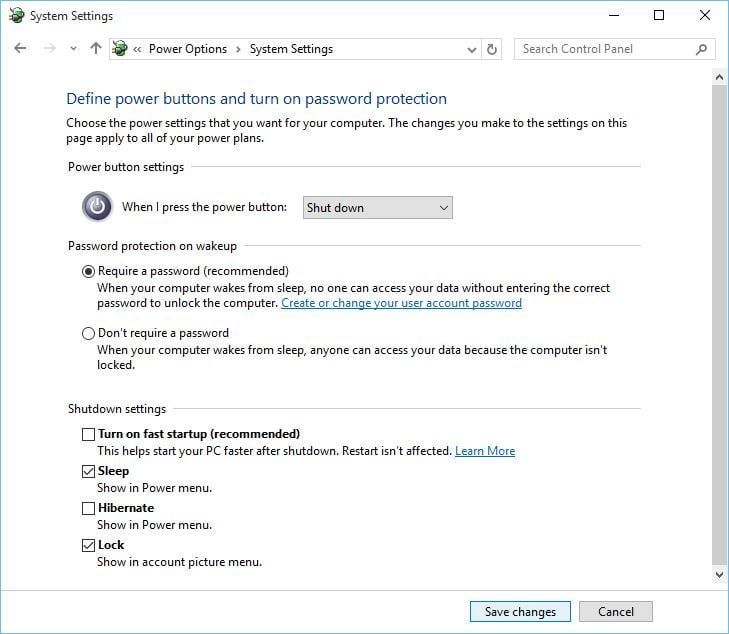
- Click Change settings that are currently unavailable and scroll down to Shutdown settings.
- Uncheck Turn on fast startup (recommended) and click Save changes.


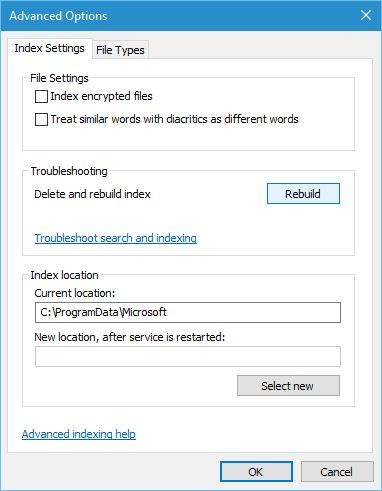
Solution 7 – Change Indexing options
If random files and folders are disappearing on Windows 10, you might want to change Indexing Options. To do that, follow these steps:
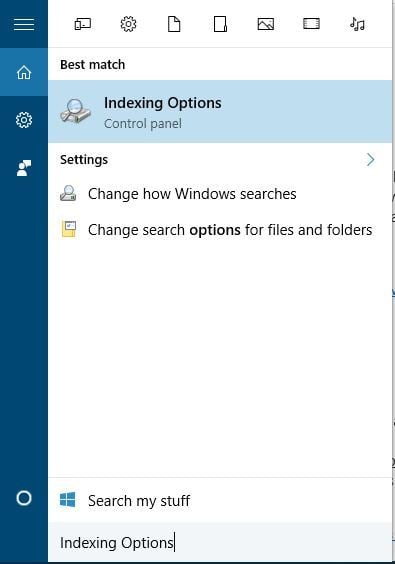
- Press Windows Key + S and type Indexing Options. Select Indexing Options from the list of results.
- When Indexing Options window opens, click on Advanced.
- Go to Index Settings tab, and in Troubleshooting section click the Rebuild button.

Solution 8 – Set the folder temporarily to hidden and read-only
When files and folders disappear from a certain folder, sometimes setting that folder to hidden and read-only can fix the issue.
Before you set your folder to hidden, you need to make sure you can view hidden files and folders. In order to see hidden files and folders, check Solution 2 for detailed instructions.
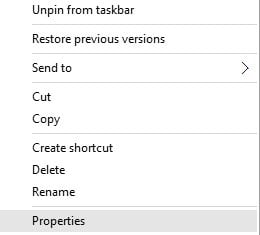
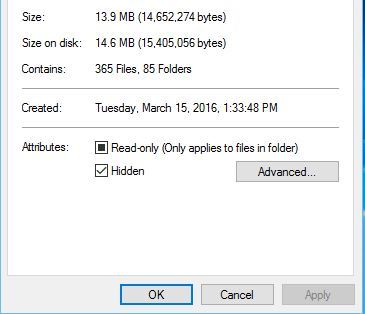
To set a specific folder to hidden and read-only, do the following:
- Find the folder with missing files and right click it. Choose Properties from the menu.
- In General tab go to Attributes section and check Read-only and Hidden.
- Click Apply and OK.
- Right click the same folder again, and uncheck Read-only and Hidden options.
- Click Apply and OK to save changes.
- Enter the folder and the missing files should appear.
Solution 9 – Check the AppDataTemp folder
Sometimes, files that disappear might get moved to AppDataTemp folder. In order to recover the missing files and folders, go to the C:UsersAppDataLocalTemp folder.
Users reported that missing files were located in jbtempx-7895.ixx folder, but they will probably be located in a different folder on your computer, so you might have to do some manual searching.
We have to mention that you’ll have to reveal hidden files and folders in order to access AppData folder. For detailed instructions check Solution 2.
Solution 10 – Check your hard drive
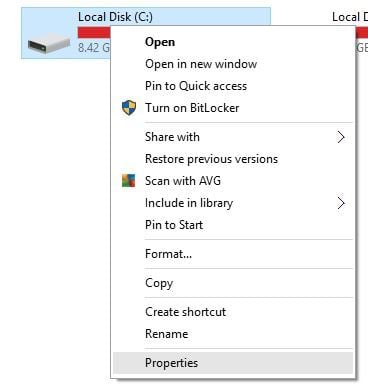
In some cases, files and folders can disappear if the drive index gets corrupted. In order to fix this, it’s advised that you check your hard drive. To do that, follow these steps:
- Open This PC and locate your hard drive. Right click it and choose Properties.
- Go to Tools tab and click Check Now button. Your hard drive will be scanned for errors. After the scan is completed, hidden files and folders should be restored.

Disappearing files and folders can cause a lot of problems, and if you have experienced similar issues, feel free to try some of our solutions.
RELATED STORIES YOU NEED TO CHECK OUT:
How to Search for Files and Folders in Windows 10
It always comes handy to just type in the name or a keyword of the file / folder you’re looking for into the search bar, and it immediately populates the results matching your search query which is when you make a click to get to the file, this was the case in Windows 8 and prior versions. Now let’s talk about 10, many users new to Windows 10 are a bit confused with Cortana and the search features because it is different, the layout has changed and better designed not just for search, but entirely to ease usability and comes packed with many features. This has all been done, keeping in view that more and more devices, computers, tablets and phones are shifting towards touch screen layouts. Some users may not find it easy; and i’d not push them to learn it because Windows 7/8 will still continue for a couple of years and they can stick to it before adapting to this change. A bit off topic, let’s come back to Windows 10 search, once you get to know it in and out of it, it’ll be extremely helpful and you’ll start liking it.
Although, conventional methods of searching for a file or folder is still possible but, Cortana is so powerful that you won’t need to look back to the older ones. Cortana doesn’t just provide the search results from the hard drive instead; it can search over the internet for the relative search terms and provide the best results possible. Also another prominent and probably, the most powerful feature of Cortana, is its natural language recognition support along with the ability to listen to the users’ vocal search queries.

Search for a File, folder or Application in Windows 10 using Cortana:
Searching for files, folder and applications using Cortana is quite easy. You can follow along this guide for further information.
To search for a file inside Windows 10, you can use the neat search utility i.e. Cortana. It indexes that file and provides the relevant results. To search for a specific file, click on the Cortana search area at the bottom left of your Windows. Type the file name inside the search field or you can use voice command by clicking the tiny mic icon on the right. In this case, I will be searching for a folder “juan” resided on my hard drive.
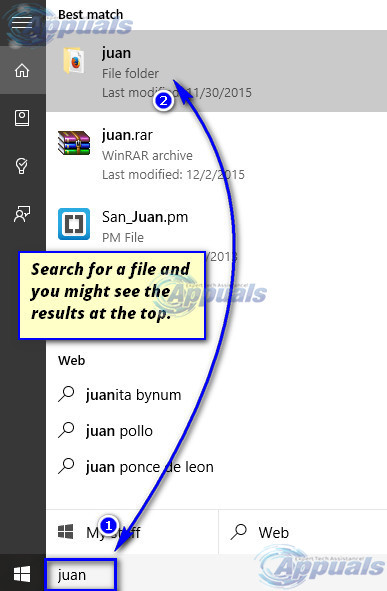
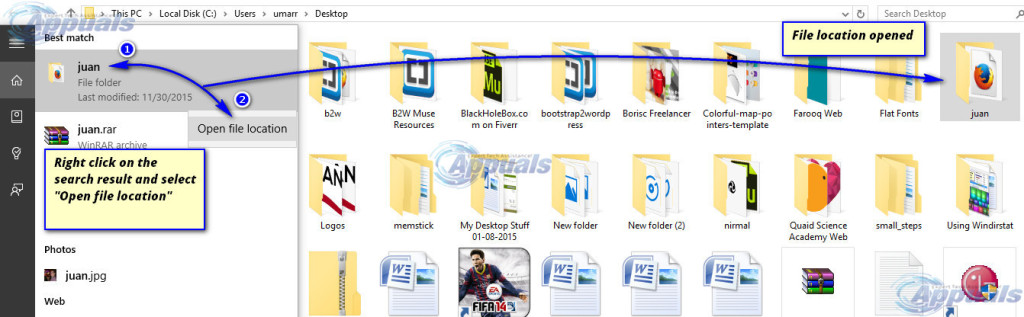
After you got your desired result, you can open the file or folder right away. If you want to find the location of that file, you can definitely do that by right-clicking on the file or folder and select Open file location.
If you can’t find a file or folder inside the search results using Cortana, you can click on My Stuff to get more filters for search results. In my case, I can’t find a folder called “Shows”. So, I will click on My Stuff to open the advance menu.

Inside the advance search menu, you can use the filters to modify your search. When you scroll down, you will find the exact search match as I got in my case.
4 Ways To Find Large Files In Windows 10
Free up space quickly by deleting them
If you quickly want to free-up memory space on your Windows machine, the best way to do that is to find large files on your Windows 10 PC and get rid of them if they’re no longer useful. The question though is how do you go about searching for large files on your computer?
Windows provides you with multiple ways to find all the large files that are stored in your drives. Either you can use the built-in tools on your machine to look for these files or you can grab a third-party app that will do the task for you. Either way, you’ll find the files that occupy a significant portion of your memory space.

Once such files are found, it’s then up to you what you want to do with them. If deleting them permanently isn’t something you’d like to do straightaway, you can move them over to a cloud storage or to an external hard drive.
Also, be sure to check out our YouTube video from our sister site Online Tech Tips where we go through some of the options mentioned below in this article.
Find Large Files In Windows 10 Using File Explorer
File Explorer comes with a lot of hidden features to let you organize, sort, and find files on your computer. One of its abilities is to help you find files that are of specific size on your computer. Using this feature, you can locate those memory-hogging files and get them removed from your PC.
Before you do that, though, you’ll need to first enable the hidden files option. This is to ensure that Explorer looks for large hidden files as well in addition to searching for the normal files.
However, be cautious while dealing with the hidden files. Most of the time, these are system and app related files which, if you delete, will cause your apps to malfunction and even lead your entire system to crash. Before you delete anything, just make sure you know what it is and you’ll be fine.
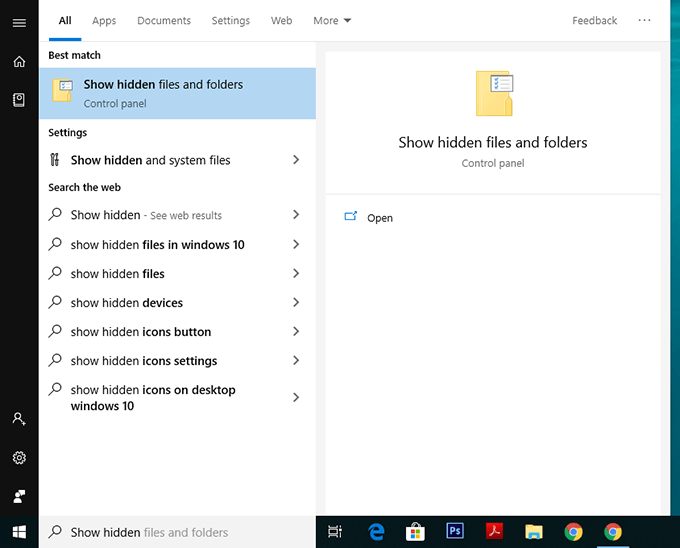
Open the Start Menu and search for Show hidden and click on Show hidden files and folders.
When the dialog box opens, click on the View tab at the top. You’ll see various File Explorer options that you can modify.
Find the option that says Show hidden files, folders, and drives and put a checkmark in it. Then click on the OK button to save your changes.
Double-click on This PC on your desktop to launch File Explorer. When the utility launches, click on the search box given at the top-right corner.
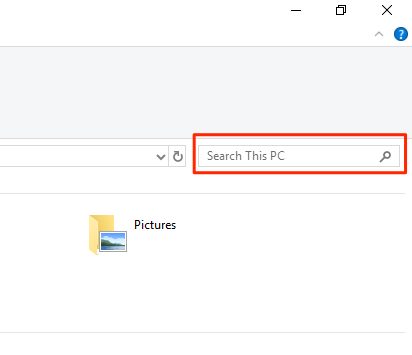
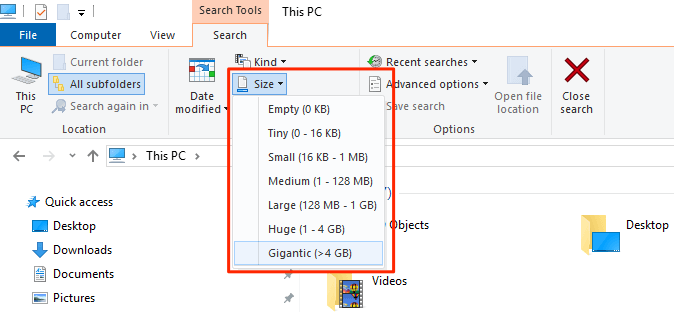
A new menu item will be added to the top of your screen. Click on the newly added item that says Search to view further options.
Select the Size option and then select an appropriate option from the list. It’ll let you find large files available on your PC.
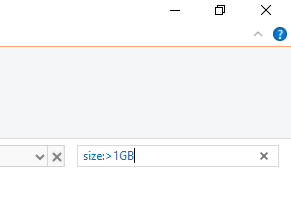
If what you consider as a large file isn’t available in the default menu, type in size:>1GB (replace 1GB with your size) in the search box and hit Enter. It’ll only look for the files that are larger than your specified size.
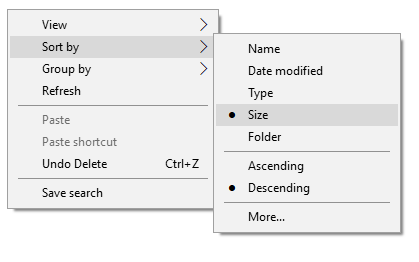
When the search results appear, right-click anywhere blank and select Sort by followed by Size and Descending. This’ll ensure the largest file is shown at the top of the results.
Search For Large Files In Windows 10 With Command Prompt
If you’re more of a geeky person, you can use the Command Prompt utility to retrieve a list of all the files larger than a specified size value. The files list can be exported to a text file for you to then actually find those files on your machine.
Press Windows + R, type in cmd, and hit Enter to launch the utility.
When it launches, type in the following command and hit Enter. It’ll find all the files that are larger than 1GB in size. You can modify the value in the command so it finds files that you think are large.
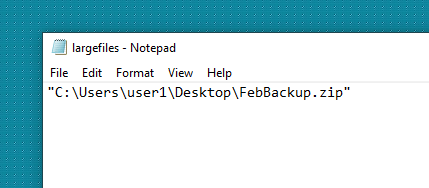
forfiles /S /M * /C “cmd /c if @fsize GEQ 1073741824 echo @path > largefiles.txt

Open the newly created largefiles.txt file and it’ll have a list of all the large files sitting on your computer.
Use Largest Files Finder To Find Large Files On Windows 10
File Explorer and Command Prompt aren’t the only tools to find large files on your Windows 10 computer. There are a few third-party apps as well that can help you find such files.
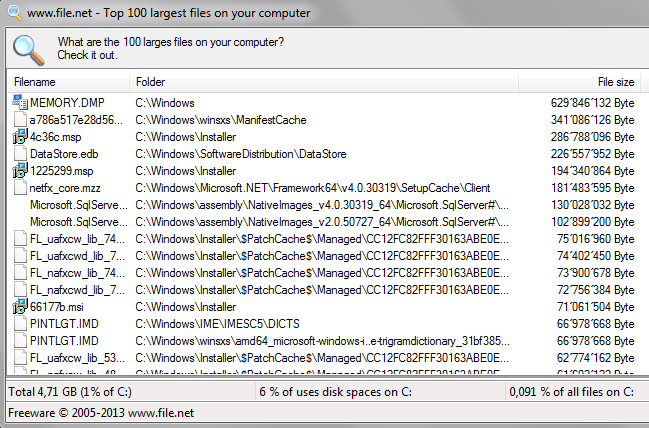
Largest Files Finder is one of those apps that helps you find the top 100 largest files on your computer. It claims to be only taking a minute to scan drives sized upto 200GB. Also, it doesn’t require any installation and works straight out of the box.
- Download and launch the app on your computer.
- Soon as it launches, it automatically starts searching for large files on your computer. When it’s done, you can review the results for yourself.
If you want to delete any files from the search results, you can do so with ease from within the app. Simply right-click on any of the files and select Delete.
Find Largest Files On Windows 10 With TreeSize Free
TreeSize Free has been around for quite a long time and it helps you find space hogging files on your Windows computers. It requires a small installation but then it works like a charm.
- Download, install, and launch the app on your computer. Make sure to run it with admin rights so it can search the folders that it can’t otherwise.
- You’ll see a tree of your folders along with the space they occupy on your screen. You can double-click on any folder to view its subfolders and their sizes.
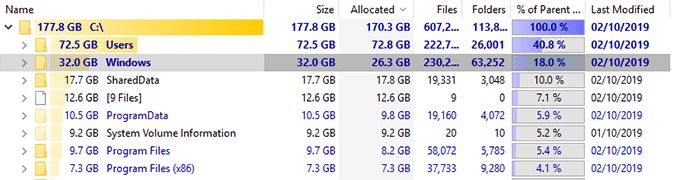
You can then sort the directories by the Size column so that the largest files are always shown at the top.
It has a few customizable options as well should you want to use them. Feel free to play around with any options you think will make it easier to find large files on your computer.
Mahesh has been obsessed with technology since he got his first gadget a decade or so ago. Over the last few years, he’s written a number of tech articles on various online publications including but not limited to MakeTechEasier and Android AppStorm. Read Mahesh’s Full Bio


