- Как грамотно установить VirtualBox Extension Pack?
- Как установить Oracle VM VirtualBox Extension Pack
- Установка Oracle VM VirtualBox Extension Pack
- Шаг 1. Версия VirtualBox
- Шаг 2. Загрузка Extension Pack
- Шаг 3. Установка Extension Pack
- Оцените статью:
- Об авторе
- 6 комментариев
- How To Find a File In Linux From the Command Line
- Locate Linux Files by Their Name or Extension
- Typical Linux Find Commands and Syntax
- Basic Examples
- Options and Optimization for Find Command for Linux
- Find Files by When They Were Modified
- Use Grep to Find Files Based on Content
- How to Locate and Process Files Using the Find Command in Linux
- How To Manage Files Using Plesk?
- How to Edit Files in File Manager
- How to Change Permissions with File Manager
- File Search in File Manager
Как грамотно установить VirtualBox Extension Pack?
Как установить VirtualBox Extension Pack в гостевую Linux-машину?
В прежние года это делалось запросто. Но с годами стало запутаннее и непонятнее, т.к Oracle перестала следить даже за документацией.
Например, что мы видим в документации на сегодняшний день?
1.5. Installing VirtualBox and extension packs
VirtualBox extension packages have a .vbox-extpack file name extension. To install an extension, simply double-click on the package file and a Network Operations Manager window will appear, guiding you through the required steps.
Двойной клик и вы в дамках? Ага, щаззз!
Это относится только в их сраной обожаемой винде.
В Линуксе же этот пак откроется просто как архив, где есть кое-что для Линукса —
— VBoxLinuxAddition.run
— autorun.sh
— runasroot.sh
ну и виндовые файлы, куда ж без них.
Кстати, в архиве есть Readme.txt, но опять-таки — только для винды!
Пробовал установить с помощью этих ‘sh’ — ничего хорошего не получилось, хотя в VirtualBox Manager появился плагин VirtualBox Extension Pack.
Но что толку — мне же нужно установить его в гостевую Linux-машине.
Есть еще, правда, п. «8.41. VBoxManage extpack», в котором якобы можно этот пак установить из консоли —
Extension package management.
Synopsis
VBoxManage extpack install [—replace]
VBoxManage extpack uninstall [—force]
VBoxManage extpack cleanup
VBoxManage extpack install [—replace]
— пробую этот вариант — а фигушки, приложения ‘VBoxManage’ нет и в помине!
Потому что оракловцы забили на Linux.
Короче, я в диком а..е — простейшая задача превратилась в неодолимую проблему.
И что особенно бесит — в гостевой виндовс-машине с установкой пака проблем нет никаких (Р-ррр. )
Источник
Как установить Oracle VM VirtualBox Extension Pack
Виртуальная машина VirtualBox распространяется с открытым исходным кодом. Однако у неё есть набор проприетарных модулей, которые добавляют дополнительные возможности. Например, поддержку USB 2.0, подключение к машине по VNC или RDP, а также возможность загрузки PXE в виртуальной машине. После установки этого плагина вы получаете возможность пробрасывать вашу мышь и клавиатуру прямо в виртуальную машину.
В этой небольшой статье мы рассмотрим как установить Oracle VM VirtualBox Extension Pack на примере операционной системы Ubuntu.
Установка Oracle VM VirtualBox Extension Pack
Шаг 1. Версия VirtualBox
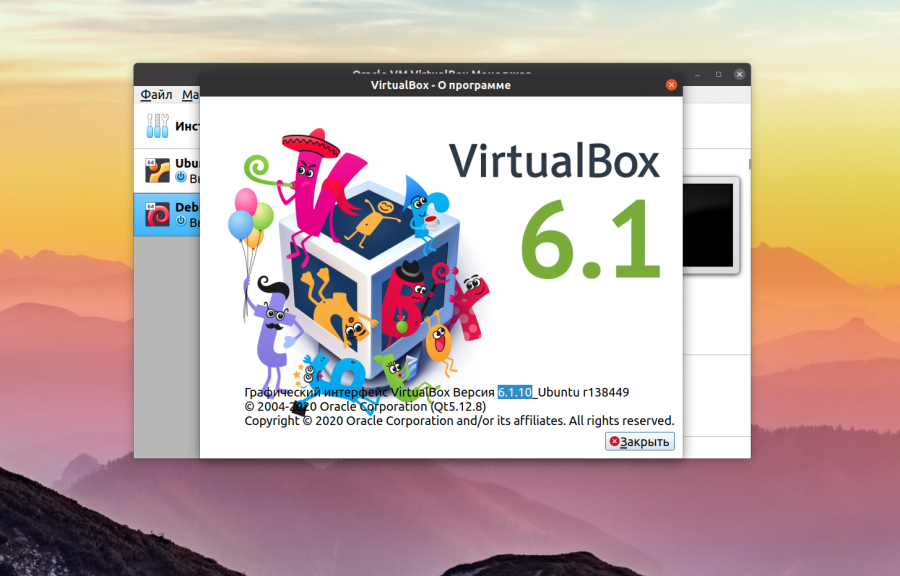
Плагин VirtualBox Exetension Pack выпускается для каждой версии VirtualBox, поэтому сначала надо узнать какая версия у вас установлена. Для этого запустите программу, кликните по меню Справка, а в нём выберите О программе:

В открывшемся окне вы можете видеть версию VirtualBox, в данном случае это 6.1:
Шаг 2. Загрузка Extension Pack
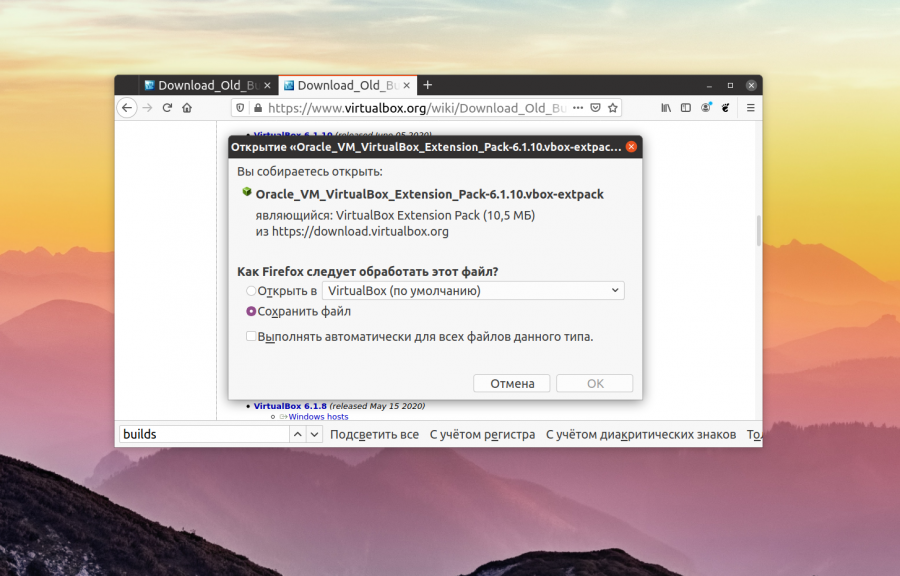
Скачать VirtualBox Extension Pack можно с официального сайта VirtualBox. Если у вас самая последняя версия VirtualBox, которая есть на этой странице, можно скачивать Extension Pack прямо отсюда. Но в данном случае, нам надо не 6.1.16, а 6.1.10. Поэтому надо найти ссылку на страницу Older builds:

Здесь вы берите нужную мажорную версию виртуальной машины, а уже на самой странице старых сборок VirtualBox найдите свою минорную версию:

Здесь есть ссылка на Extension Pack. Просто кликните по ней, затем выберите Сохранить файл в чтобы скачать плагин в папку Загрузки.
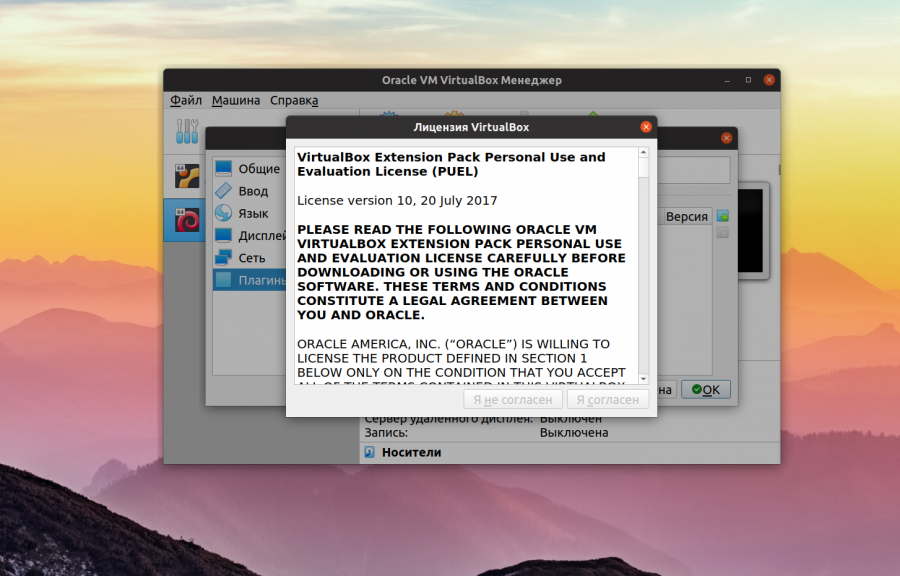
Шаг 3. Установка Extension Pack
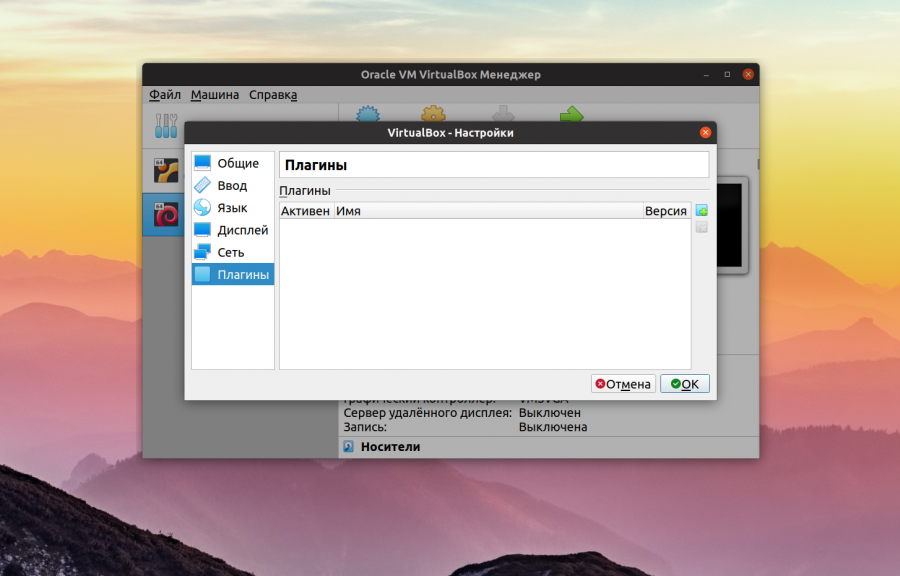
Теперь осталось только установить Extension Pack. Для этого в главном окне VirtualBox откройте меню Файл, а затем Настройки. В открывшемся окне выберите Плагины:
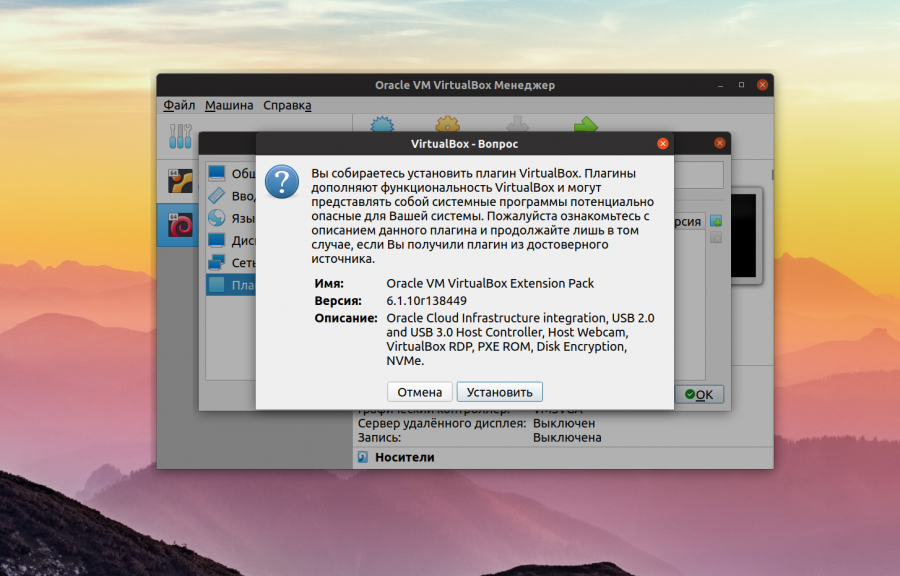
В этом окне кликните по кнопке с зелёным плюсом и выберите файл плагина. Затем подтвердите установку с помощью кнопки Установить:
Спустя несколько мгновений программа сообщит, что VirtualBox Extension Pack успешно установлен:

Теперь вы можете использовать USB 2.0, пробрасывать свою мышь или клавиатуру в виртуальную машину, а также подключаться к виртуальной машине по RDP.
Нет похожих записей
Оцените статью:
Об авторе
Основатель и администратор сайта losst.ru, увлекаюсь открытым программным обеспечением и операционной системой Linux. В качестве основной ОС сейчас использую Ubuntu. Кроме Linux, интересуюсь всем, что связано с информационными технологиями и современной наукой.
6 комментариев
Нет, я понимаю, что надо популизировать линукс , что статьи разные нужны и статьи разные важны . Но Losst , вы опускаетесь до уровня Ответы.Mail.ru . Вам нечем наполнить контент ? Сделайте опросник, тем накидают кучу. С уважением , старый ваш читатель.
Отлично! Теперь ждем новость, как то-же самое проделать на QEMU, общий буфер обмена, масштабирование, открытие виртуальной машины в полный экран, подключение локальных дисков, папок, подключение съемных носителей, usb, и. т. д .
Всё хорошо, но никак не могу создать общую папку. Приходится чесать правой рукой левое ухо: передавать данные из системы в виртуальную машину с помощью флешки (((
samba тебе в помощь. Расшарь папку и лазь по сетке
Лет пять назад написал себе скрип:
VBOX_VER=`VBoxManage —version|awk -Fr ‘
EXTPACK_FILENAME=Oracle_VM_VirtualBox_Extension_Pack-$VBOX_VER.vbox-extpack
gfile=http://download.virtualbox.org/virtualbox/$VBOX_VER/$EXTPACK_FILENAME
al=—accept-license=33d7284dc4a0ece381196fda3cfe2ed0e1e8e7ed7f27b9a9ebc4ee22e24bd23c
echo $EXTPACK_FILENAME
if [ -e $EXTPACK_FILENAME ]; then
echo «Файл $EXTPACK_FILENAME обнаружен.»
echo «Устанавливаем файл $EXTPACK_FILENAME. »
VBoxManage extpack install —replace $EXTPACK_FILENAME $al
exit 0
else
echo «Файл $EXTPACK_FILENAME не обнаружен.»
echo «Загружаем файл $EXTPACK_FILENAME. »
wget $gfile
echo «Устанавливаем файл $EXTPACK_FILENAME. »
VBoxManage extpack install —replace $EXTPACK_FILENAME $al
fi
#========================================================
Источник
How To Find a File In Linux From the Command Line
Need to know how to find a file in Linux? Well, surprise, surprise, you’re going to need the find command in Linux to scour your directory or file system. The Linux find command can filter objects recursively using a simple conditional mechanism, and if you use the -exec flag, you’ll also be able to find a file in Linux straightaway and process it without needing to use another command.
Locate Linux Files by Their Name or Extension
Typical Linux Find Commands and Syntax
find command expressions look like this:
find command options starting/path expression
The options attribute controls the behavior and optimization method of the find process. The starting/path attribute defines the top-level directory where the find command in Linux begins the filtering process. The expression attribute controls the assessments that scour the directory tree to create output.
Let’s break down a Linux find command where we don’t just want Linux find file by name:
find -O3 -L /var/www/ -name «*.html»
It enables the top-level optimization (-O3) and permits find to follow symbolic links (-L). The find command in Linux searches through the whole directory hierarchy under /var/www/ for files that have .html on the end.
Basic Examples
1. find . -name thisfile.txt
If you need to know how to find a file in Linux called thisfile.txt, it will look for it in current and sub-directories.
2. find /home -name *.jpg
Look for all .jpg files in the /home and directories below it.
3. find . -type f -empty
Look for an empty file inside the current directory.
4. find /home -user randomperson-mtime 6 -iname «.db»
Look for all .db files (ignoring text case) that have been changed in the preceding 6 days by a user called randomperson.
Options and Optimization for Find Command for Linux
find is configured to ignore symbolic links (shortcut files) by default. If you’d like the find command to follow and show symbolic links, just add the -L option to the command, as we did in this example.
find can help Linux find file by name. The Linux find command enhances its approach to filtering so that performance is optimised. The user can find a file in Linux by selecting three stages of optimisation-O1, -O2, and -O3. -O1 is the standard setting and it causes find to filter according to filename before it runs any other tests.
-O2 filters by name and type of file before carrying on with more demanding filters to find a file in Linux. Level -O3 reorders all tests according to their relative expense and how likely they are to succeed.
- -O1 – (Default) filter based on file name first
- -O2 – File name first, then file-type
- -O3 – Allow find to automatically re-order the search based on efficient use of resources and likelihood of success
- -maxdepth X – Search this directory along with all sub-directories to a level of X
- -iname – Search while ignoring text case.
- -not – Only produce results that don’t match the test case
- -type f – Look for files
- -type d – Look for directories
Find Files by When They Were Modified
The Linux find command contains the ability to filter a directory hierarchy based on when the file was last modified:
find / -name «*jpg» -mtime 5
find /home/randomuser/ -name «*jpg» -mtime 4
The initial Linux find command pulls up a list of files in the whole system that end with the characters jpg and have been modified in the preceding 5 days. The next one filters randomuser’s home directory for files with names that end with the characters “conf” and have been modified in the preceding 4 days.
Use Grep to Find Files Based on Content
The find command in Linux is great but it can only filter the directory tree according to filename and meta data. To search files based on what they contain you’ll need a tool like grep. Take a look:
find . -type f -exec grep «forinstance» ‘<>‘ \; -print
This goes through every object in the current directory tree (.) that’s a file (-type f) and then runs grep ” forinstance ” for every file that matches, then prints them on the screen (-print). The curly braces (<>) are a placeholder for those results matched by the Linux find command. The <> go inside single quotes (‘) so that grep isn’t given a misshapen file name. The -exec command is ended with a semicolon (;), which also needs an escape (\;) so that it doesn’t end up being interpreted by the shell.
Before -exec was implemented, xargs would have been used to create the same kind of output:
find . -type f -print | xargs grep «forinstance»
How to Locate and Process Files Using the Find Command in Linux
The -exec option runs commands against every object that matches the find expression. Let’s see how that looks:
This filters all objects in the current directory tree (.) for files named rc.conf and runs the chmod o+r command to alter file permissions of the results that find returns.
The root directory of the Linux is where the commands that -exec runs are executed. Use -execdir to execute the command you want in the directory where the match is sitting, because this might be more secure and improve performance under certain circumstances.
The -exec or -execdir options will continue to run on their own, but if you’d like to see prompts before they do anything, swap out -exec -ok or -execdir for -okdir.
How To Manage Files Using Plesk?
Let’s say you have a website that’s all ready to go on your laptop/desktop and you’d like to use File Manager to upload it to the Plesk on Linux server:
- On your machine, you’ll need to take the folder with all of your website’s files on it and add it to a compressed archive in one of the usual formats (ZIP, RAR, TAR, TGZ, or TAR.GZ).
- In Plesk, go to Files, click the httpdocs folder to open it, click Upload, choose the archive file, and then click Open.
- As soon as you’ve uploaded it, click in the checkbox you see alongside and then on Extract Files.
How to Edit Files in File Manager
File Manager lets you edit your website pages by default. To do this you can use:
- An HTML editor or a “what-you-see-is-what-you-get” style of editor, which is a nice option because it adds the HTML tags for you. If you aren’t all that confident with HTML then this can be a helpful option.
- Code editor. When you open HTML files with this one you’ll be presented with text where the HTML syntax is highlighted. If you’re comfortable with adding HTML tags yourself then code editor is for you.
- Text editor. HTML files are opened as ordinary text with this one.
Your Plesk administrator may have already et up the Rich Editor extension, in which case you can use it for HTML file editing. Rich Editor works in a what-you-see-is-what-you-get fashion, just like Code Editor, although it’s better specced with features like a spellchecker for instance.
Here’s how to use File Manager to edit a file:
- Put the cursor over the file and the line that corresponds with it will show a highlight.
- Open the context menu for the file by clicking on it.
- Click Edit in … Editor (this will vary depending on your chosen editor).
How to Change Permissions with File Manager
There are some web pages and files that you don’t necessarily want to share with the world, and that’s where altering their permissions settings can come in handy.
To achieve this, find the item you want to restrict Internet access for like this:
- Place your cursor over it and wait for the highlight to appear as in the previous example.
- Click on the file to open its context menu and do the same again on Change Permissions.
- Make your change and then hit OK. If you’d like to find out more about how to look at and alter permissions in Setting File and Directory Access Permissions.
File Manager’s default approach is to change permissions in a non-recursive manner, so consequently, sub-files and directories don’t aren’t affected by the changed permissions of the higher-level directories they belong to. With Plesk for Linux, you can make File Manager modify permissions in a recursive manner, assuming that your Plesk administrator set up the Permissions Recursive extension and that you understand the octal notation of file permissions.
To enable recursive editing of access permissions:
- Place the cursor over the directory and wait for the highlight.
- Click to open its context menu and then again on Set Permissions Recursive.
- Now you can edit them. “Folder Permissions” is talking about the higher-level directory and any of its associated sub-directories. “File Permissions” applies to sub-files in this instance.
- When you’ve completed your permission amendments, click OK.
File Search in File Manager
You’ve got a little bit of latitude with file searches. You can have File Manager hunt for a specific bit of text either in the file name, in the content, or in both. You can choose how you want it to search for files by clicking on the icon that appears adjacent to your chosen search field, and then clicking on whichever type you prefer.
Источник


