- Free up storage space on your Mac
- Find out how much storage is available on your Mac
- Manage storage on your Mac
- Store in iCloud
- Optimize Storage
- Empty Trash Automatically
- Reduce Clutter
- Where to find the settings for each feature
- Other ways that macOS helps automatically save space
- How to free up storage space manually
- 3 of the Best Disk Space Analyzers for Mac OS X
- DaisyDisk
- OmniDiskSweeper
- Disk Inventory X
- Bonus: The Finder!
- Work in multiple spaces on Mac
- Create a space
- Move between spaces
- Move an app window from one space to another
- Assign apps to spaces
- Delete a space
Free up storage space on your Mac
Save space by storing your content in iCloud or using built-in tools to find and remove large or unneeded files.
The Optimized Storage features of your Mac help you save storage space by storing your content in iCloud and making it available on demand:
- When storage space is needed, files, photos, movies, email attachments, and other files that you seldom use are stored in iCloud automatically.
- Each file stays right where you last saved it, and downloads when you open it.
- Files that you’ve used recently remain on your Mac, along with optimized versions of your photos.
If you haven’t yet upgraded to macOS Sierra or later, learn about other ways to free up storage space.
Find out how much storage is available on your Mac
Choose Apple menu > About This Mac, then click Storage. Each segment of the bar is an estimate of the storage space used by a category of files. Move your pointer over each segment for more detail.
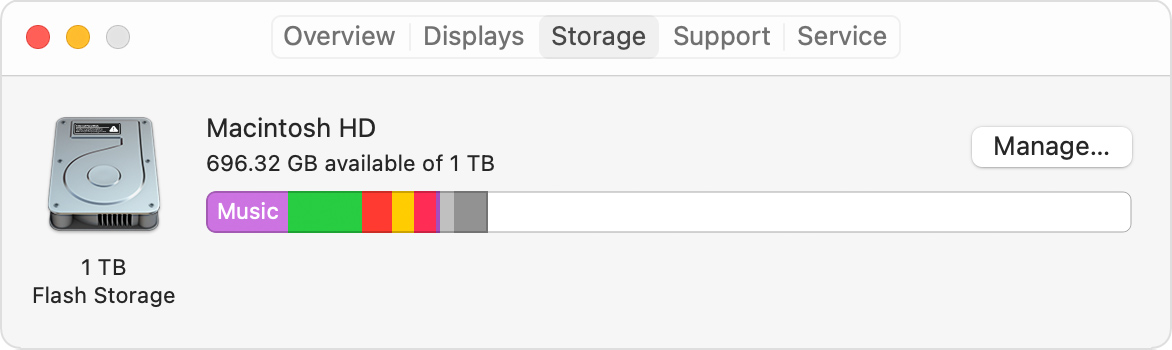
Click the Manage button to open the Storage Management window, pictured below.
Manage storage on your Mac
The Storage Management window offers recommendations for optimizing your storage. If some recommendations are already turned on, you will see fewer recommendations.
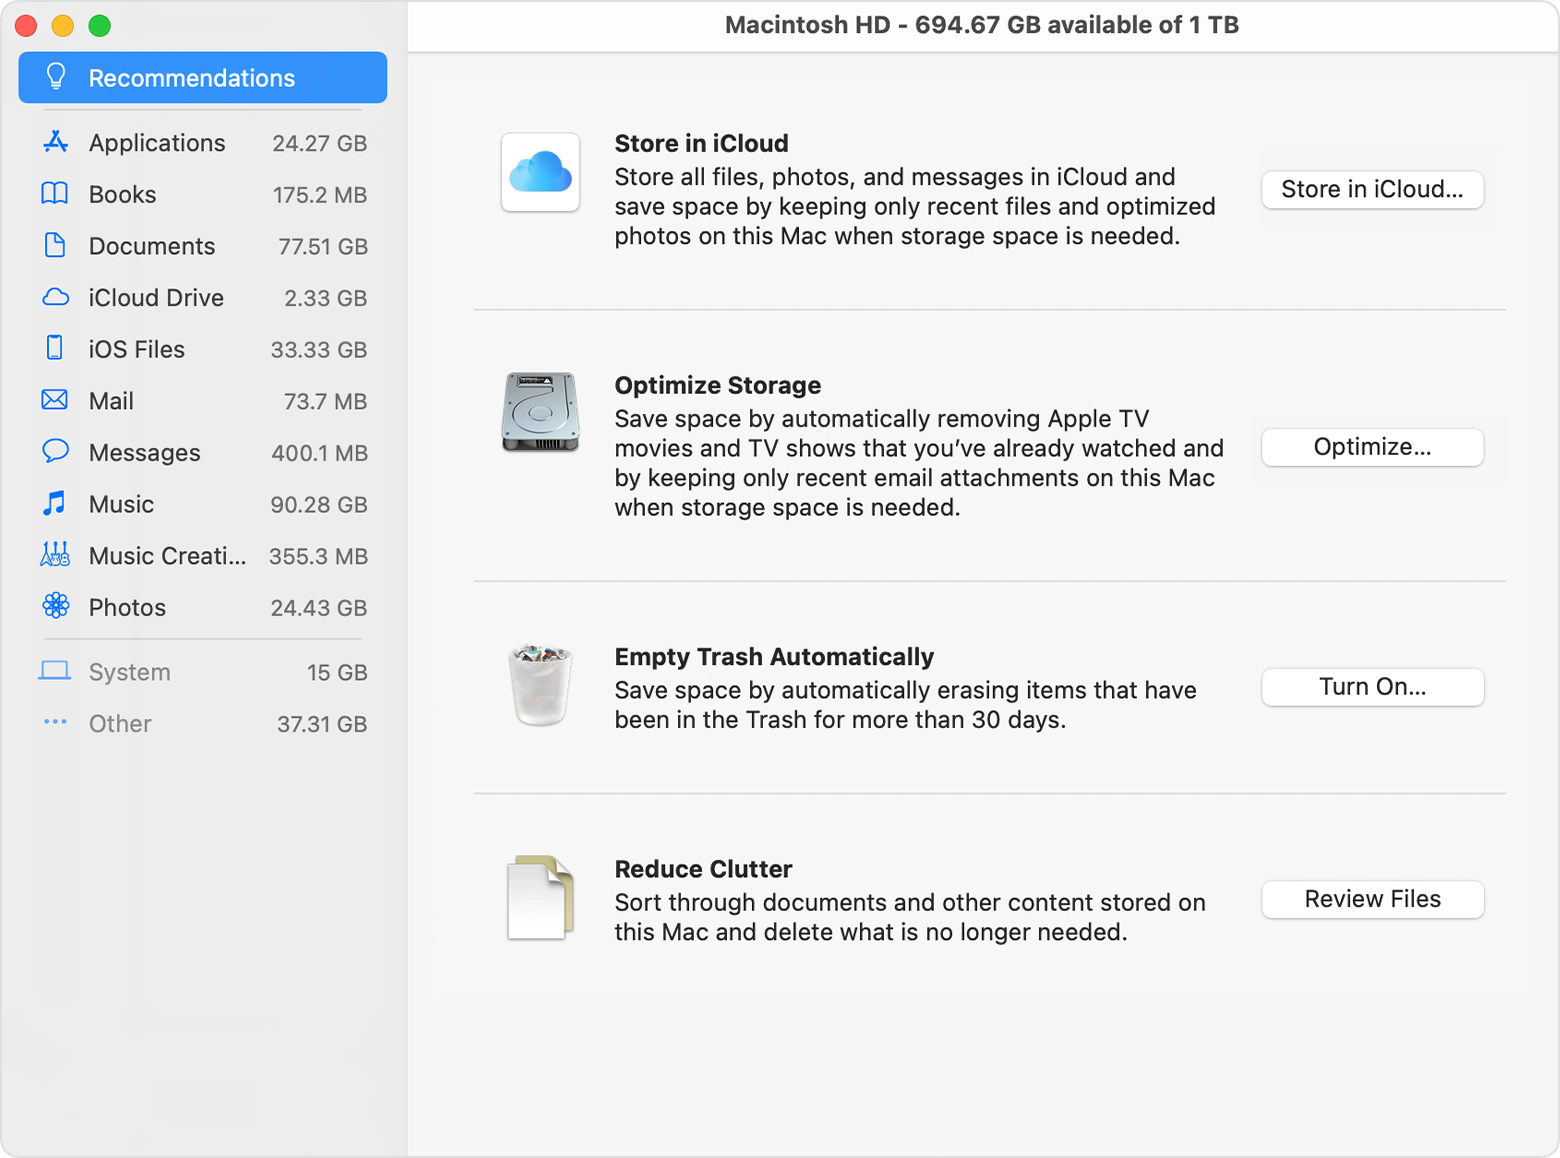
Store in iCloud
Click the Store in iCloud button, then choose from these options:
- Desktop and Documents. Store all files from these two locations in iCloud Drive. When storage space is needed, only the files you recently opened are kept on your Mac, so that you can easily work offline. Files stored only in iCloud show a download icon , which you can double-click to download the original file. Learn more about this feature.
- Photos. Store all original, full-resolution photos and videos in iCloud Photos. When storage space is needed, only space-saving (optimized) versions of photos are kept on your Mac. To download the original photo or video, just open it.
- Messages. Store all messages and attachments in iCloud. When storage space is needed, only the messages and attachments you recently opened are kept on your Mac. Learn more about Messages in iCloud.
Storing files in iCloud uses the storage space in your iCloud storage plan. If you reach or exceed your iCloud storage limit, you can either buy more iCloud storage or make more iCloud storage available. iCloud storage starts at 50GB for $0.99 (USD) a month, and you can purchase additional storage directly from your Apple device. Learn more about prices in your region.
Optimize Storage
Click the Optimize button to save space by automatically removing watched movies and TV shows. When storage space is needed, movies or TV shows that you purchased from Apple and already watched are removed from your Mac. Click the download icon next to a movie or TV show to download it again.
Your Mac will also save space by keeping only recent email attachments on this Mac when storage space is needed. You can manually download any attachments at any time by opening the email or attachment, or saving the attachment to your Mac.
Optimizing storage for movies, TV shows, and email attachments doesn’t require iCloud storage space.
Empty Trash Automatically
Empty Trash Automatically permanently deletes files that have been in the Trash for more than 30 days.
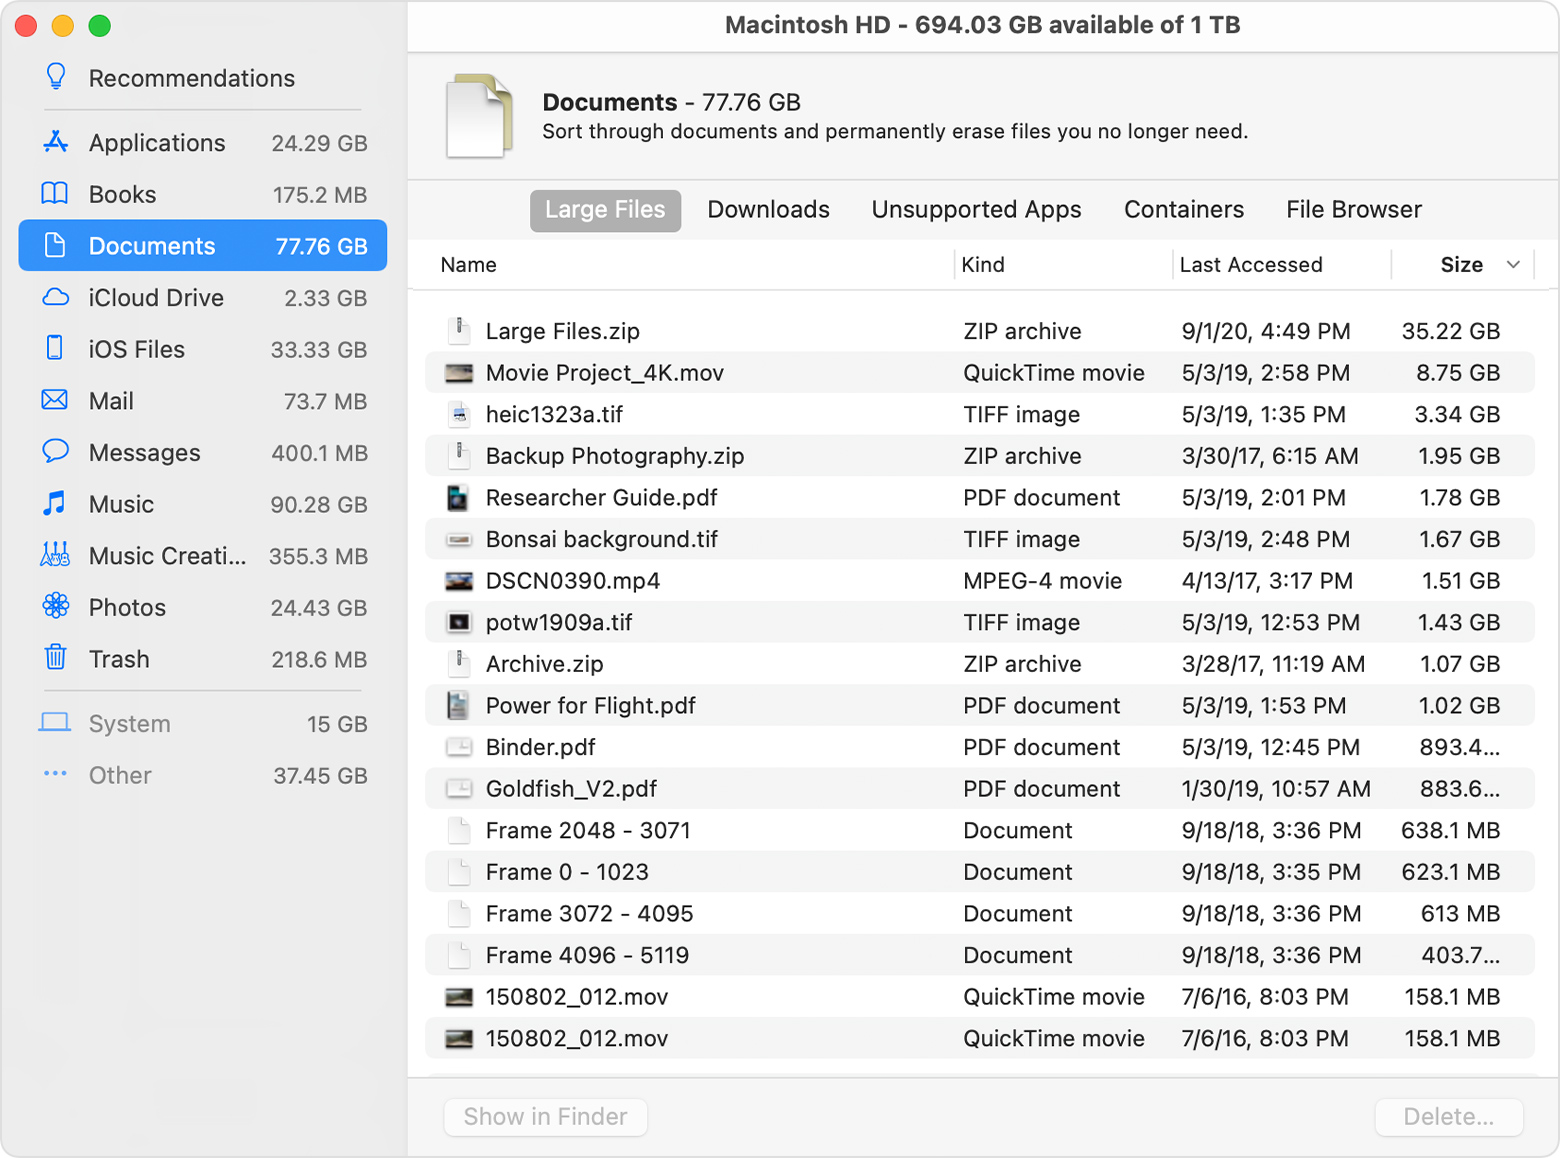
Reduce Clutter
Reduce Clutter helps you identify large files and files you might no longer need. Click the Review Files button, then choose any of the file categories in the sidebar, such as Applications, Documents, Music Creation, or Trash.
You can delete the files in some categories directly from this window. Other categories show the total storage space used by the files in each app. You can then open the app and decide whether to delete files from within it.
Where to find the settings for each feature
The button for each recommendation in the Storage Management window affects one or more settings in other apps. You can also control those settings directly within each app.
- If you’re using macOS Catalina or later, choose Apple menu > System Preferences, click Apple ID, then select iCloud in the sidebar: Store in iCloud turns on the Optimize Mac Storage setting on the right. To turn off iCloud Drive entirely, deselect iCloud Drive.
- If you’re using macOS Mojave or earlier, choose Apple menu > System Preferences, click iCloud, then click Options next to iCloud Drive. Store in iCloud turns on the Desktop & Documents Folders and Optimize Mac Storage settings.
- In Photos, choose Photos > Preferences, then click iCloud. Store in iCloud selects iCloud Photos and Optimize Mac Storage.
- In Messages, choose Messages > Preferences, then click iMessage. Store in iCloud selects Enable Messages in iCloud.
- If you’re using macOS Catalina or later, open the Apple TV app, choose TV > Preferences from the menu bar, then click Files. Optimize Storage selects “Automatically delete watched movies and TV shows.”
- In you’re using macOS Mojave or earlier, open iTunes, choose iTunes > Preferences from the menu bar, then click Advanced. Optimize Storage selects “Automatically delete watched movies and TV shows.”
- In Mail, choose Mail > Preferences from the menu bar, then click Accounts. In the Account Information section on the right, Optimize Storage sets the Download Attachments menu to either Recent or None.
Empty Trash Automatically: From the Finder, choose Finder > Preferences, then click Advanced. Empty Trash Automatically selects “Remove items from the Trash after 30 days.”
Other ways that macOS helps automatically save space
With macOS Sierra or later, your Mac automatically takes these additional steps to save storage space:
- Detects duplicate downloads in Safari, keeping only the most recent version of the download
- Reminds you to delete used app installers
- Removes old fonts, languages, and dictionaries that aren’t being used
- Clears caches, logs, and other unnecessary data when storage space is needed
How to free up storage space manually
Even without using the Optimized Storage features described in this article, you can take other steps to make more storage space available:
- Music, movies, and other media can use a lot of storage space. Learn how to delete music, movies, and TV shows from your device.
- Delete other files that you no longer need by moving them to the Trash, then emptying the Trash. The Downloads folder is good place to look for files that you might no longer need.
- Move files to an external storage device.
- Compress files.
- Delete unneeded email: In the Mail app, choose Mailbox > Erase Junk Mail. If you no longer need the email in your Trash mailbox, choose Mailbox > Erase Deleted Items.
Источник
3 of the Best Disk Space Analyzers for Mac OS X

It’s often only a matter of time before Mac users wind up seeing the dreaded “startup disk almost full” warning message in Mac OS X, which often leads to a frantic dash around the Downloads folder as users trash unnecessary files to attempt to free up disk space. While there’s nothing wrong with going on a manual mission of tracking down where your disk storage vanished to, there are an entire category of disk space analyzer apps available which make the job easier, offering a visual experience that is quickly scannable and actionable.
We’ll cover three of the best and most popular disk space analysis tools available for the Mac, each of which is either free or offers a free trial version to give a good test run with.
A big thing to remember with using these disk analyzer apps is that if you shouldn’t delete anything without discretion, as they sweep the entire drive and inevitably display system files, system folders, and other necessary components of Mac OS X and apps, along with personal documents and accumulated cruft. It’s a good idea to back up the Mac with Time Machine before using these apps if you’re planning on performing some mass file removal, it’s always better to be safe than sorry and lose files or have to reinstall Mac OS X if you deleted critical system files willy-nilly.
DaisyDisk
DaisyDisk is by far the most attractive storage analysis utility, with a beautiful and intuitive interface that makes finding disk clutter a matter of navigating an interactive colorful wheel. In terms of visualization of your file data, DaisyDisk is superior to anything else available, and it’s also very fast.
The free version of DaisyDisk is highly functional and will sweep your drive and allow simple quick access to any files or folders found (right-click on anything and choose ‘Show in Finder’), and you could get away with just using the free version if you wanted to, but if you enjoy DaisyDisk enough and find it to be a helpful companion to your Mac experience, the full version is money well spent.
OmniDiskSweeper
OmniDiskSweeper is great and the interface is quite similar to using the Finder in Column view, making it very easy to navigate to large files and folders throughout the file system hierarchy. The files are shown in descending order by size, so it’s very easy to figure out what’s eating up storage space.
OmniDiskSweeper has long been one of my favorite free utilities available for the Mac, and I use it often for my own computer and when trying to figure out what’s eating the disk space of other Macs I may encounter. We have discussed using OmniDiskSweeper before here on multiple occasions, it’s a great tool.
Disk Inventory X
Disk Inventory X has been around on the Mac for quite some time, it is an oldie but goodie. Though the interface could use some updating, the functionality remains high and the app works great for discovering large blocks of data (for example, a gazillion photos or zip archives). Perhaps the only issue is that in modern versions of Mac OS X, files can be assigned to the app they open with rather than their file type, which may lead to some confusion. Nonetheless, Disk Inventory X is free too, so if you decide it’s not your cup of tea you’re out nothing but a few mb of bandwidth.
A significant perk of DiskInventoryX having been around for ages is that it’s widely supported on much earlier versions of Mac OS X, so if you’re working on an older Mac with earlier system software, this may be the solution you’re looking for.
Bonus: The Finder!
If you don’t want to download any third party utilities, or perhaps you can’t for whatever reason, the Mac search function within the Finder is able to find large files in Mac OS X too. You’ll just need to set a minimum file size to look for, and away it goes.
The Finder search function works reasonably well for this purpose, but for many Mac users they will find one of the above third party utilities to be easier to quickly scan for large groups of files on a drive with.
Know of any other great utilities to analyze disk storage space and files on a Mac? Let us know in the comments!
Источник
Work in multiple spaces on Mac
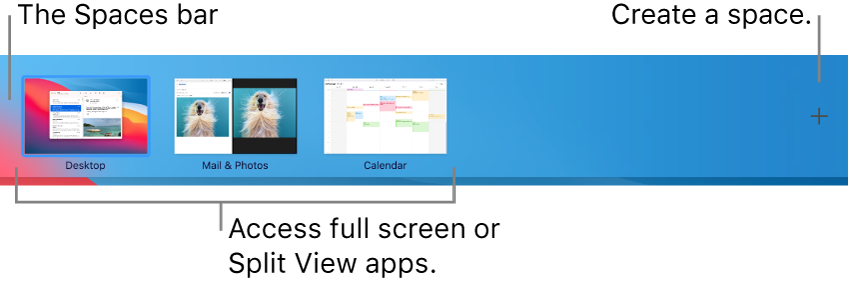
If the desktop on your Mac gets cluttered with open app windows, you can use Mission Control to create additional desktops, called spaces, to organise the windows. When you work in a space, you see only the windows that are in that space.
Create a space
If you’re working with apps in full screen or Split View, their thumbnails are shown in the Spaces bar.
In the Spaces bar, click the Add button  .
.
You can create up to 16 spaces.
When you’ve finished, click the thumbnail for a space to open it.
Tip: Make your spaces unique by assigning a different desktop picture to each one. Just assign System Preferences to all desktops (see the information about assigning apps below), then change the desktop picture in each space.
Move between spaces
On your Mac, do any of the following:
On a trackpad, swipe left or right with three or four fingers. On a Magic Mouse, swipe with two fingers.
Press the Control key and the Right or Left arrow key.
Enter Mission Control, move the pointer to the top edge of the screen, then click a space in the Spaces bar.
If your Mac has a Touch Bar, you can set an option in Keyboard preferences to show spaces in the Touch Bar. Then just tap a space in the Touch Bar to open the space.
Move an app window from one space to another
On your Mac, do any of the following:
Drag the app window you want to move to the edge of the screen. After a moment, the window moves to the next space.
Go to the space that has the window you want to move, enter Mission Control, then drag the window up to the space you want to use.
If you drag the window onto a full screen app in the Spaces bar, you can use the apps in Split View.
Assign apps to spaces
If you use two or more spaces, you can assign an app (or System Preferences) to a specific space so it always opens in that space.
On your Mac, Control-click an app’s icon in the Dock.
You may need to first open the app to see its icon in the Dock.
From the shortcut menu that appears, choose Options, then choose one of the following:
All Desktops: The app opens in every space.
This Desktop: The app opens only in the current space. If you use the app full screen, it appears in its own space.
Desktop on Display [number]: The app opens in the current space on a specific display (if more than one display is available).
None: The app opens in whichever space you’re using at the time.
By default, when switching to an app, the desktop automatically switches to a space that has open windows for the app. For example, if you create a new TextEdit document in Desktop 3, but TextEdit windows are already open in Desktop 2, your new document opens in Desktop 2. To change this setting, choose Apple menu

> System Preferences, click Mission Control, then deselect the tickbox for switching.
Delete a space
On your Mac, enter Mission Control, then move the pointer to the top edge of the screen.
In the Spaces bar, move the pointer over the space you want to delete, then click the Delete button  that appears.
If the space contains open windows, they are moved to another space.
You can quickly stop using an app in full screen or Split View by moving the pointer over the thumbnail in the Space bar, then clicking the Exit button  that appears.
Источник


