- Find text in a document
- поиск find
- Синтаксис Syntax
- Параметры Parameters
- Комментарии Remarks
- Примеры Examples
- Recover a lost, unsaved, or corrupted Word document
- Quick resolution
- Additional resources
- Detailed view of the options
- Option 1: Search for the original document
- Option 2: Search for Word Backup files
- Option 3: Check the Recycle Bin
- Option 4: Search for AutoRecover unsaved or corrupted files
- Option 5: Search for temporary files
- Option 6: Search for «
- Option 7: How to troubleshoot damaged documents
- More information
Find text in a document
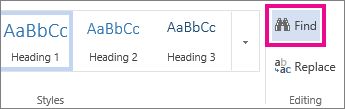
Looking for text in your document? The Find pane helps you find characters, words, and phrases. If you want, you can also replace it with different text.
If you’re in Reading View, switch to Editing View by clicking Edit Document > Edit in Word Web App.

To open the Find pane from the Edit View, press Ctrl+F, or click Home > Find.
Find text by typing it in the Search the document for… box. Word Web App starts searching as soon as you start typing. To further narrow the search results, click the magnifying glass and select one or both of the search options.
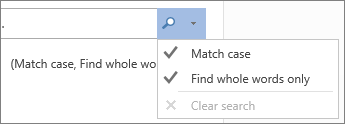
Tip: If you don’t see the magnifying glass, click the X at the end of the Search the document for… box. The magnifying glass reappears.
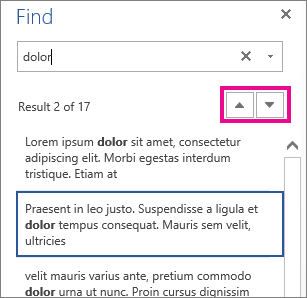
When you type in your document or make a change, Word Web App pauses the search and clears the Find pane. To see the results again, click the Next Search Result or Previous Search Result arrow.
When you’re done searching, click the X at the end of the Search the document for… box.
поиск find
Выполняет поиск строки текста в файле или файлах и отображает строки текста, содержащие указанную строку. Searches for a string of text in a file or files, and displays lines of text that contain the specified string.
Синтаксис Syntax
Параметры Parameters
| Параметр Parameter | Описание Description |
|---|---|
| /v /v | Отображает все строки, не содержащие указанный объект . Displays all lines that don’t contain the specified . |
| /C /c | Подсчитывает количество строк, содержащих указанный объект , и отображает итоговое значение. Counts the lines that contain the specified and displays the total. |
| /n /n | Предшествует каждой строке с номером строки файла. Precedes each line with the file’s line number. |
| /i /i | Указывает, что при поиске регистр не учитывается. Specifies that the search is not case-sensitive. |
| [«/OFF» [строка]] [/off[line]] | Не пропускает файлы с установленным атрибутом «вне сети». Doesn’t skip files that have the offline attribute set. |
| Обязательный элемент. Required. Задает группу символов (заключенных в кавычки), которые требуется найти. Specifies the group of characters (enclosed in quotation marks) that you want to search for. | |
| [ :][ |
]
Комментарии Remarks
Если вы не используете /i, эта команда ищет именно то, что указано для String. If you don’t use /i, this command searches for exactly what you specify for string. Например, эта команда обрабатывает символы и по a — A разному. For example, this command treats the characters a and A differently. Однако при использовании параметра /i Поиск выполняется без учета регистра, а в a A качестве того же символа обрабатывается и. If you use /i, however, the search becomes non-case-sensitive, and it treats a and A as the same character.
Если строка, которую нужно найти, содержит кавычки, необходимо использовать двойные кавычки для каждой кавычки, содержащейся в строке (например, «» Эта строка содержит кавычки «»). If the string you want to search for contains quotation marks, you must use double quotation marks for each quotation mark contained within the string (for example, «»This string contains quotation marks»»).
Если опустить имя файла, эта команда выступает в качестве фильтра, принимая входные данные из стандартного источника входных данных (обычно это клавиатура, канал (|) или перенаправленный файл), а затем отображает все строки, содержащие строку. If you omit a file name, this command acts as a filter, taking input from the standard input source (usually the keyboard, a pipe (|), or a redirected file) and then displays any lines that contain string.
Параметры и параметры командной строки для команды Find можно вводить в любом порядке. You can type parameters and command-line options for the find command in any order.
Нельзя использовать подстановочные знаки (* и ?) в именах файлов или расширениях, указанных при использовании этой команды. You can’t use wildcards (* and ?) in file names or extensions that you specify while using this command. Для поиска строки в наборе файлов, указанных с помощью подстановочных знаков, эту команду можно использовать в команде for . To search for a string in a set of files that you specify with wildcards, you can use this command within a for command.
При использовании /c и /v в одной командной строке эта команда отображает количество строк, которые не содержат указанную строку. If you use /c and /v in the same command line, this command displays a count of the lines that don’t contain the specified string. При указании параметра /c и /n в той же командной строке команда Find игнорирует параметр /n. If you specify /c and /n in the same command line, find ignores /n.
Эта команда не распознает возвраты каретки. This command doesn’t recognize carriage returns. При использовании этой команды для поиска текста в файле, который содержит символы возврата каретки, необходимо ограничить строку поиска текстом, который может быть найден между возвратами каретки (то есть строкой, которая не может быть прервана символом возврата каретки). When you use this command to search for text in a file that includes carriage returns, you must limit the search string to text that can be found between carriage returns (that is, a string that is not likely to be interrupted by a carriage return). Например, эта команда не сообщает о совпадении для строкового налогового файла, если между словами налога и файла происходит возврат каретки. For example, this command doesn’t report a match for the string tax file if a carriage return occurs between the words tax and file.
Примеры Examples
Чтобы отобразить все строки из Pencil.AD , которые содержат строку резкость карандаша, введите: To display all lines from pencil.ad that contain the string pencil sharpener, type:
Чтобы найти текст, «специалисты, обозначенные в документе только для обсуждения. To find the text, «The scientists labeled their paper for discussion only. Это не окончательный отчет «. It is not a final report.» в файле report.doc введите: in the report.doc file, type:
Для поиска набора файлов можно использовать команду Find в команде for . To search for a set of files, you can use the find command within the for command. Чтобы найти в текущем каталоге файлы с расширением bat, которые содержат строку строки, введите следующую команду: To search the current directory for files that have the extension .bat and that contain the string PROMPT, type:
Чтобы найти и отобразить имена файлов на диске C, которые содержат строковый ЦП, выполните поиск на жестком диске с помощью вертикальной черты (|), чтобы направить выходные данные команды dir в команду Find следующим образом: To search your hard disk to find and display the file names on drive C that contain the string CPU, use the pipe (|) to direct the output of the dir command to the find command as follows:
Так как поиск при поиске выполняется с учетом регистра, а dir создает прописные буквы, необходимо либо ввести строковый процессор в верхнем регистре, либо использовать параметр командной строки /i с командой Find. Because find searches are case-sensitive and dir produces uppercase output, you must either type the string CPU in uppercase letters or use the /i command-line option with find.
Recover a lost, unsaved, or corrupted Word document
Office 365 ProPlus is being renamed to Microsoft 365 Apps for enterprise. For more information about this change, read this blog post.
This article describes how you can recover a lost, unsaved, or corrupted Microsoft Word document.
If you’re looking for information about how to recover recent Office documents, see the following articles:
For more information about earlier versions of Word, see the following Knowledge Base article:
Quick resolution
Try the following options to help recover your lost, unsaved, or corrupted Word document. Select the image at the left or the option heading to see more detailed instructions about that option.

Search for the original document
Windows 10 and Windows 7
- Select Start, enter the document name in Windows 10 or enter the document name in the Search box in earlier versions of Windows, and then press Enter.
- Take the following action, as appropriate:
- If the File list contains the document, double-click the document to open it in Word.
- If the File list doesn’t contain the file, go to Option 2.

Search for Word backup files
- Locate the folder in which you last saved the missing file.
- Search for files that have the .wbk file name extension.

Check the Recycle Bin
Check the Windows Recycle Bin on the desktop to see whether it contains your document. If you save documents on OneDrive, also check the OneDrive recycle bin.
- Commercial customers: Check the SharePoint recycle bin. For more information, see Restore items in the recycle bin that were deleted from SharePoint or Teams.

Search for AutoRecover files
Right-click the taskbar, and select Task Manager.
On the Processes tab, select any instance of Winword.exe or Microsoft Word, and then select End Task or End Process. Repeat this step until you exit all instances of Winword.exe and Microsoft Word.
Close the Windows Task Manager dialog box, and then start Word.
Double-click the file in the Document Recovery pane, select Save As on the File menu, and then save the document as a .docx file. To manually change the extension to .docx, right-click the file, and select Rename.

Search for temporary files
- Select Start, enter .tmp in Windows 10 or enter .tmp in the Search box in earlier versions of Windows, and then press Enter.
- In the search results, select Documents.
- Scroll through the files, and search for files that match the last few dates and times that you edited the document.

Search for «
Windows 10 and Windows 7
Select Start, enter the tilde character (
) in the Search box in earlier versions of Windows, and then press Enter.
In the search results, select Documents.
Scroll through the files, and look for any files that match the last few dates and times that you edited the document.

How to troubleshoot damaged documents
For information about how to troubleshoot damaged Word documents, see How to troubleshoot damaged documents in Word.
Additional resources
If you experience specific issues when you use Word, go to the following website to search for more information about your program version:
Detailed view of the options
The following section provides more detailed descriptions of these options.
Option 1: Search for the original document
- Select Start, enter the document name in Windows 10 or enter the document name in the Search box in earlier versions of Windows, and then press Enter.
- Take the following action, as appropriate:
- If the File list contains the document, double-click the document to open it in Word.
- If the File list doesn’t contain the file, go to Option 2.
Option 2: Search for Word Backup files
Word backup file names have a «.wbk» extension. If you have the «backup copy» option selected in Word, there might be a backup copy of the file.
To locate this option:
- Word for Office 365, Word 2019, Word 2016, and Word 2013: Select File >Options >Advanced, scroll down to the Save section, and then select Always create backup copy.
- Word 2010: Select File >Options, open the Save tab, and then select Always create backup copy.
To find the backup copy of the file, follow these steps:
- Locate the folder in which you last saved the missing file.
- Search for files that have the .wbk file name extension.
- If you find the backup file, right-click the file name, and then select Open.
If there are no .wbk files in the original folder, search the computer for any .wbk files. To do this, follow these steps.
- Select Start, enter .wbk in Windows 10 or enter .wbk in the Search box in earlier versions of Windows. Then, press Enter.
- Take the following action, as appropriate:
- If the File list contains the backup file, repeat the steps in Option 2 to open the file.
- If the File list does not contain the backup file, go to Option 4.
If you find any files that have the name «Backup of» followed by the name of the missing file, use one of the following methods, as appropriate for the version of Word that you’re running.
Word for Office 365, Word 2019, Word 2016, and Word 2013
- File >Open >Browse. (In some versions of Word, select Computer >Browse.)
- In the «files of type» list to the right of File name, select All Files.
- Right-click the backup file that you found, and then select Open.
Word 2010
- On the File menu, select Open.
- In the «files of type» list to the right of File name, select All Files.
- Right-click the backup file that you found, and then select Open.
Option 3: Check the Recycle Bin
Recovering deleted Word documents from the Recycle Bin
If you deleted a Word document without emptying the Recycle Bin, you might be able to restore the document.
Double-click the Recycle Bin on the Desktop.
Search through the list of documents to see whether the deleted word file is still there. If you don’t know the name, look for file types such as .doc, .docx, and .dot.
If you find the desired Word file, right-click the file name, and then select Restore to recover the file.

If you saved files to a SharePoint site, see the Restore a SharePoint item from the Microsoft 365 site collection Recycle Bin section.
If you saved files to OneDrive, check the OneDrive recycle bin. For more information, see Restore deleted files or folders in OneDrive.
If you emptied the Windows Recycle Bin after you deleted files, the deleted Word file might have been permanently removed. If you are running Windows 10, version 2004 or later, you can try the Windows File Recovery tool, available from the Microsoft Store. For more information about the tool, see Recover lost files on Windows 10.
If you canot find the file by using any of these methods, go to Option 4.
Restore a SharePoint item from the Microsoft 365 site collection Recycle Bin
Open the Recycle Bin, and take one of the following actions, depending on the type of site that you are using:
Modern Team and Classic sites (or subsites): In the left pane, select Recycle Bin.

Modern Communication sites: Select Site contents, and then select Recycle Bin in the top navigation bar.
If you don’t see the Recycle Bin, follow these steps:
- Select Settings >Site settings. (If you don’t see Site settings, select Site information >View all site settings. Some pages might require you to select Site contents >Site settings.)
- On Site settings, under Site Collection Administration, select Recycle bin.

At the bottom of the Recycle Bin page, select Second-stage recycle bin.

You must have administrator or owner permissions to use the site collection Recycle Bin. If you don’t see the Recycle Bin, then either you don’t have permission to access it or it may have been disabled.
Select the check icon to the right of each document that you want to recover, and then select Restore.

If you restore an item that was originally located in a deleted folder, the folder is re-created in its original location, and the item is restored to that folder.
Option 4: Search for AutoRecover unsaved or corrupted files
AutoRecover file names have the .asd extension. By default, Word searches for AutoRecover files every time that it starts, and then it displays any files that are found in the Document Recovery task pane.
Use Word to automatically find the AutoRecover files. To do this, follow these steps:
Right-click the taskbar, and select Task Manager.

On the Processes tab, select any instance of Winword.exe or Microsoft Word, and then select End Task or End Process. Repeat this step until you have exited all instances of Winword.exe and Word.

Close the Windows Task Manager dialog box, and then start Word.

If Word finds any automatically recovered file, the Document Recovery task pane opens on the left side of the screen, and the missing document is listed as «document name [Original]» or as «document name [Recovered].» If this occurs, double-click the file in the Document Recovery pane, select File > Save As, and then save the document as a .docx file. To manually change the extension to .docx, right-click the file, and select Rename.
Manually search for AutoRecover files
If the Document Recovery pane does not open, manually search for automatically recovered files. To do this, use one of the following procedures, as appropriate for the version of Word that you’re using.
Word for Office 365, Word 2019, Word 2016, and Word 2013
- On the File menu, select Open >Browse. (In Word 2013, select File >Open >Computer >Browse.)
- Browse to the folder where you last saved your document, and look for files that end in .asd.
- If you don’t see your document listed, select File >Info >Manage Documents (or Manage Versions) >Recover Unsaved Documents.
Word 2010
- On the File menu, select Recent.
- If you don’t see your document listed, select Recover Unsaved Documents.
Search for .asd files
If you don’t find an AutoRecover file in the location that is identified in the Folder name list, search your whole drive for any .asd files. To do this, follow these steps:
Enter .asd in Windows 10 or enter .asd in the Start Search box in earlier versions of Windows, and then press Enter.
If the File list does not contain AutoRecover files, go to Option 5.
If you find any files that have the .asd extension, use one of the following procedures, as appropriate for the version of Word that you’re using:
Word 2019, Word 2016, and Word 2013
- Select File >Open >Browse. (In some versions, you may have to select Computer and then Browse.)
- In the «files of type» list to the right of File name, select All Files.
- Select the .asd file that you found, and then select Open.
Word 2010
- On the File menu, select Open.
- In the «files of type» list to the right of File name, select All Files.
- Select the .asd file that you found, and then select Open.
In the Recovery pane, if you find an automatically recovered file that does not open correctly, go to Option 6 for more information about how to open damaged files.
Option 5: Search for temporary files
Temporary file names have a .tmp extension. To find these files, follow these steps:
- Select Start, enter .tmp in Windows 10 or enter .tmp in the Start Search box in earlier versions of Windows, and then press Enter.
- On the Show only toolbar, select Other.
- Scroll through the files, and search for file names that match the last few dates and times that you edited the document. If you find the document that you’re looking for, go to Option 7 to find out how to recover information from the file.
Option 6: Search for «
Some temporary file names start in a tilde (
) character. To find these files, follow these steps:
Select Start, enter the tilde character (
) in the Start Search box in earlier versions of Windows), and then press Enter.
Select See more results.
Scroll through the files, and look for any that match the last few dates and times that you edited the document.
If you find the document that you’re looking for, go to Option 7 to find out how to recover information from the file.
For more information about how Word creates and uses temporary files, see Description of how Word creates temporary files.
Option 7: How to troubleshoot damaged documents
For information about how to troubleshoot damaged Word documents, see How to troubleshoot damaged documents in Word.
More information
In certain situations, it’s possible to completely lose a Word document. For example:
- An error occurs that forces Word to close.
- You experience a power interruption while editing.
- You close the document without saving your changes.
The whole document may be lost if you have not recently saved the document. If you have saved your document, you may lose only the changes that you made since the last save. Be aware that some lost documents may not be recoverable.
If a file that was saved to OneDrive becomes corrupted or isn’t found in the recycle bin, it is possible to roll back changes that were made to your OneDrive files. For more information, see Restore your OneDrive.
The AutoRecover feature in Word makes an emergency backup of open documents when an error occurs. Some errors can interfere with AutoRecover functionality. The AutoRecover feature is not a substitute for saving your files.
We do not provide any additional tools to recover deleted documents. However, some third-party utilities to recover deleted documents might be available from the internet.
For more information about AutoRecover, see the following articles:
Third-party information disclaimer
The third-party products that this article discusses are manufactured by companies that are independent of Microsoft. Microsoft makes no warranty, implied or otherwise, about the performance or reliability of these products.


