- Find your computer’s name and network address on Mac
- Find your computer’s name
- Find your computer’s local hostname
- Find your computer’s network address
- Find your computer’s name and network address on Mac
- Find your computer’s name
- Find your computer’s local hostname
- Find your computer’s network address
- Что это такое WindowServer и почему он потребляет много ресурсов ЦП и ОЗУ на macOS
- Что означает процесс WindowServer, и почему он расходует ресурсы на Mac?
- Почему WindowServer расходует столько ресурсов?
- Connect to a Windows computer from a Mac
- Connect to a Windows computer by browsing
- Connect to a Windows computer by entering its address
- Connect using an Ethernet cable
- Reconnect to recent computers or servers
Find your computer’s name and network address on Mac
If other people want to locate your Mac on the network, they need to know your computer’s name or network address. Your Mac has several identifiers that people may look for on the network: computer name, local hostname (or local network name) and network address.
Find your computer’s name
If you’re sharing your computer’s screen or files, other users on your network can find your Mac by looking for its computer name.
On your Mac, choose Apple menu

> System Preferences, then click Sharing.
The computer name for your Mac appears at the top of Sharing preferences.
Find your computer’s local hostname
Your computer’s local hostname, or local network name, is displayed on your local network so others on the network can connect to your Mac. It also identifies your Mac to Bonjour-compatible services.
On your Mac, choose Apple menu
> System Preferences, then click Sharing.
Your computer’s local hostname is displayed beneath the computer’s name at the top of Sharing preferences.
The local network name is your computer’s name with .local added, and any spaces are replaced with hyphens (-). For example, if your computer’s name is My Computer, your local network name is My-Computer.local. Local network names aren’t case sensitive, so my-computer.local is the same as My-Computer.local.
Find your computer’s network address
If you’re sharing your computer’s screen, allowing remote logins or management, or sharing files, other users may need to know your computer’s network address instead of its name to access these services.
On your Mac, choose Apple menu
> System Preferences, then click Sharing.
In the list on the left, select a service that is On.
The network address for the service is displayed on the right. For example:
If you select Screen Sharing, the network address looks similar to vnc://10.212.167.33 or vnc://name.example.com.
if you select File Sharing, the network address looks similar to smb://10.212.167.33 or smb://name.example.com.
If you select Remote Login, the network address looks similar to username@10.212.167.33 or username@name.example.com.
If you select Remote Management, the network address looks similar to 10.212.167.33 or name.example.com.
Your computer’s network address is provided by the Domain Name System (DNS) server your computer uses. If you don’t use a DNS service, the network address is derived from your computer name.
Find your computer’s name and network address on Mac
If other people want to locate your Mac on the network, they need to know your computer’s name or network address. Your Mac has several identifiers that people may look for on the network: computer name, local hostname (or local network name) and network address.
Find your computer’s name
If you’re sharing your computer’s screen or files, other users on your network can find your Mac by looking for its computer name.
On your Mac, choose Apple menu
> System Preferences, then click Sharing.
The computer name for your Mac appears at the top of Sharing preferences.
Find your computer’s local hostname
Your computer’s local hostname, or local network name, is displayed on your local network so others on the network can connect to your Mac. It also identifies your Mac to Bonjour-compatible services.
On your Mac, choose Apple menu
> System Preferences, then click Sharing.
Your computer’s local hostname is displayed beneath the computer’s name at the top of Sharing preferences.
The local network name is your computer’s name with .local added, and any spaces are replaced with hyphens (-). For example, if your computer’s name is My Computer, your local network name is My-Computer.local. Local network names aren’t case sensitive, so my-computer.local is the same as My-Computer.local.
Find your computer’s network address
If you’re sharing your computer’s screen, allowing remote logins or management, or sharing files, other users may need to know your computer’s network address instead of its name to access these services.
On your Mac, choose Apple menu
> System Preferences, then click Sharing.
In the list on the left, select a service that is On.
The network address for the service is displayed on the right. For example:
If you select Screen Sharing, the network address looks similar to vnc://10.212.167.33 or vnc://name.example.com.
if you select File Sharing, the network address looks similar to smb://10.212.167.33 or smb://name.example.com.
If you select Remote Login, the network address looks similar to username@10.212.167.33 or username@name.example.com.
If you select Remote Management, the network address looks similar to 10.212.167.33 or name.example.com.
Your computer’s network address is provided by the Domain Name System (DNS) server your computer uses. If you don’t use a DNS service, the network address is derived from your computer name.
Что это такое WindowServer и почему он потребляет много ресурсов ЦП и ОЗУ на macOS
Имя процесса «WindowServer«Заставит нас думать о»Windows сервер«Но он не имеет к этому никакого отношения Windows от Microsoft.
Что такое и что делает процесс WindowsСервер включен macОС (Монитор активности)
Многие жалуются на то, что суд WindowServer иногда потребляет много ресурсов процессора (CPU) и RAM, что автоматически приводит к трудность бега macOS pe Mac, тоMac или MacBook.
Коэффициент потребления технологических ресурсов WindowServer доступен в реальном времени любому пользователю при доступе Мониторинг системы.

По-видимому, процесс WindowServer он начинает потреблять иногда много ресурсов ОЗУ и ЦП, что автоматически приводит к снижение производительности системы, Приложения начинают заклинивать, окна поиска открываются жестко, заставка начинает подергиваться, а доступ к системным настройкам задерживается.
Процесс WindowServer принадлежит операционной системе macОС (системный процесс) и занимается всем визуальная сторона от рабочий стол, Док-бар si Строка меню, Этот процесс делает управление между визуальной стороной (что видит пользователь) и аппаратной частью. все папки si файлы которые находятся на рабочий стол, последствия прозрачности из Dock si Строка меню управляются WindowSэрвер.
Этот процесс запускается сразу после запуска операционной системы, и без него вы не сможете получить доступ ни к чему из Mac. Вот почему не рекомендуется отключать его из Activity Monitor, даже если вам это разрешено. Вы обнаружите, что как только процесс будет закрыт WindowSэй, вы перейдете прямо к «экрану входа в систему».
Как мы можем сделать это WindowServer, чтобы не потреблять много памяти и процессора
Процесс WindowServer обычно имеет короткие периоды времени, когда ему требуется большой объем ресурсов, после чего все возвращается в норму. Однако, если вы не хотите, чтобы эти периоды имели место, примите во внимание следующее:
1. Постарайтесь максимально сократить количество папок и файлов на рабочем столе.
Например, если у вас на рабочем столе 50 файлов и 5 папок, попробуйте собрать их все в одну папку. Таким образом, в процессе WindowServer передаст один визуальный элемент вместо 55.
2. Закройте окна Finder, которые вы не используете. или использовать одно открытое окно с несколькими вкладками.
3. Отключить эффекты прозрачности macOS.
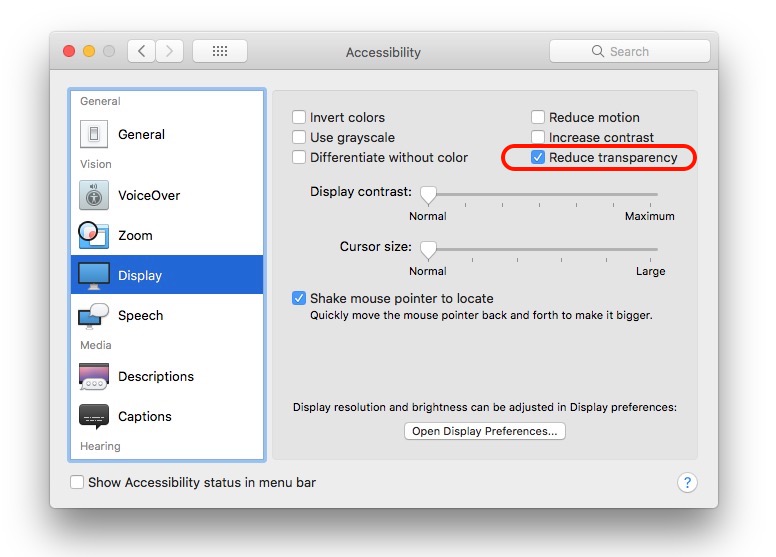
Отключение этих визуальных эффектов повысит производительность любого Mac. Сделайте это из: «Системные настройки»→«Доступность»→«Показать»→«Снижает прозрачность».
 Эффект прозрачности Dock, Строка меню, Finder si Launchpad.
4. Отключить автоматическую перестановку в Mission Control.
Идти к «Системные настройки«The»Mission Control«И снимите флажок»Автоматическое переупорядочение пространств на основе последнего использования».
5. Закрыть приложения, которые вы не используете.
Установлено, что объем потребления WindowSНа erver также влияют графические эффекты, присутствующие в приложениях.
После внесения всех этих изменений или их части перезапустите операционную систему.
Однозначно сервис WindowServer не будет потреблять столько оперативной памяти и процессора, как раньше.
Что означает процесс WindowServer, и почему он расходует ресурсы на Mac?
При проверке Мониторинга системы на Mac вы могли замечать процесс под названием «WindowServer», который сильно расходует ресурсы.

В этой статье мы объясним вам, что означает этот процесс, и для чего он вообще нужен. WindowServer – это неотъемлемая часть macOS, отвечающая за взаимодействие ваших программ и монитора. Если вы видите что-то на экране, это работа WindowServer. Каждое открытое окно, сайт и игра – это всё работа процесса WindowServer.
По сути процесс WindowServer используется для отображения содержимого на вашем экране. Он абсолютно безопасен.
Почему WindowServer расходует столько ресурсов?
Каждая программа использует процесс WindowServer для отображения содержимого на вашем экране. Если процесс расходует слишком много ресурсов, попробуйте закрыть свои программы, и вы заметите, что это изменится. Возможно, в сильном расходе ресурсов виновата даже какая-то конкретная программа. Постарайтесь её найти.
Иногда это нормальная ситуация: программы, которые постоянно меняют отображаемый контент, сильнее всего используют WindowServer, а значит и расходуют больше ресурсов. Чаще всего это игры, видеоредакторы и другие программы.
Иногда чрезмерный расход ресурсов может вызывать системный баг. Если вы считаете, что какая-то программа не должна расходовать настолько много ресурсов, попробуйте связаться с её разработчиком. Возможно, вы обнаружили какую-то проблему, которую он может исправить.
Если процесс WindowServer расходует много ресурсов, даже когда у вас не запущены программы, это уже другая проблема. Можете попробовать уменьшить прозрачность. Для этого зайдите в Системные настройки > Универсальный доступ > Монитор. После включения этой опции нагрузка на процессор должна уменьшиться. Особенно актуален этот способ для старых Mac.

Также попробуйте закрыть все ненужные окна, убрать лишних иконки с рабочего стола и избавиться от лишних рабочих столов в Mission Control. Если не поможет и это, можете сделать сброс NVRAM.
Стоит отметить ещё кое-что. Если у вас несколько мониторов, процесс WindowServer будет расходовать ещё больше ресурсов. Чем больше мониторов вы используете, тем больше будет нагрузка.
Connect to a Windows computer from a Mac
You can connect to Windows computers and servers on your network from your Mac.
For instructions on setting up the Windows computer, see Set up Windows to share files with Mac users.
Connect to a Windows computer by browsing
In the Finder  on your Mac, choose Go > Connect to Server, then click Browse.
Find the computer’s name in the Shared section of the Finder sidebar, then click it to connect. You may need to click All to see all the shared computers.
When you locate the shared computer or server, select it, then click Connect As.
In some cases you need the network area or workgroup for the shared computer. If you don’t have this information, contact the computer’s owner or your network administrator.
If necessary, enter your user name and password, then select volumes or shared folders on the server.
Passwords for Windows computers and servers are often 14 characters or fewer. Check with the owner or administrator to be sure.
To make it easier to connect to the computer in the future, select “Remember this password in my keychain” to add your user name and password for the computer to your keychain.
Connect to a Windows computer by entering its address
In the Finder on your Mac, choose Go > Connect to Server.
Type the network address for the computer in the Server Address field using one of these formats:
For information about the correct format for network addresses, see Network address formats for shared computers and servers.
Follow the onscreen instructions to type the workgroup name and a user name and password, then choose the shared folder you want to access.
If you don’t know the workgroup name and the network name (called the computer name) for the Windows computer, contact the person who owns the computer or your network administrator.
If necessary, enter your user name and password and select volumes or shared folders on the server.
Passwords for Windows computers and servers are often 14 characters or fewer. Check with the owner or administrator to be sure you have the correct password.
To make it easier to connect to the computer in the future, select “Remember this password in my keychain” to add your user name and password for the computer to your keychain.
Connect using an Ethernet cable
Connect your Mac to the Windows computer using a standard Ethernet cable. If your Mac doesn’t have an Ethernet port, try using a USB-to-Ethernet adapter.
Connecting the two computers creates a small local network that consists of just the two computers.
On the Windows computer, turn on file sharing. Refer to the instructions that came with the Windows computer if you’re not sure how to do this.
Make sure the Internet Connection Firewall is turned off on the Windows computer, or if it’s on, make sure TCP port 445 is open to allow sharing connections.
For more information, refer to the user manual and onscreen help for the Windows computer.
On the Mac, choose Go > Connect to Server, then click Browse, or type the network address for the computer in the Server Address field.
Reconnect to recent computers or servers
Here are some ways to make it easy to reconnect to shared computers and servers you frequently use:
On your Mac, choose Apple menu

> Recent Items, then choose from the list of recent servers.
In the Finder on your Mac, choose Go > Connect to Server, click the pop-up menu to the far right of the Server Address field, then choose a recent server.
Add shared computers, network areas, and workgroups to the Finder sidebar. Select the item, then choose File > Add To Sidebar or press Command-T.
Add a shared computer or server to your list of favorites. In the Finder on your Mac, choose Go > Connect to Server, enter the network address, then click the Add button  .
.
If you can’t locate a shared computer or server or connect to it, it may not be available, or you may not have permission to connect to it. Contact the person who owns the computer or the network administrator for help.


