- Where are fonts stored in Windows 10 and the font folder location?
- Example to find stored fonts in the Windows 10, please start the MS Explorer to install, or uninstall the Windows Fonts!
- 1.) . Find and open the Fonts Folder in Windows 10! 2.) . Copy a font eg install from another folder on Windows-10! 3.) . Create a Desktop Shortcut for Windows 10 font Folder! 4.) . Keyboard Shortcut for a fast access to Font Directory!
- 1.) Find and open the fonts Folder in Windows 10 !
- 2.) Copy a font eg install from another folder!
- 3.) Create a Shortcut for Windows font Folder!
- 4.) Keyboard Shortcut for a fast access to Font Directory!
- How to Install Fonts in Windows 7
- Add fun new fonts in a flash
- Safely Add Fonts to Windows
- Unzip the Font File
- How to Install Fonts on Windows 7 From the Font Folder
- How to Install Fonts from File
- Uninstall Fonts
- How to Manage Your Fonts in Windows 10
- View Installed Fonts
- Preview Fonts
- Preview Font Families
- Hiding Fonts
- Uninstall Fonts
- Back Up Fonts
- Reinstall Fonts
- Fonts Tool
- View Font Details
- Custom Preview
- Uninstall Font
- Add Fonts
- Find a New Font
- Get New Font
- Launch New Font
- View New Font
- Drag and Drop a Font
Where are fonts stored in Windows 10 and the font folder location?
Example to find stored fonts in the Windows 10, please start the MS Explorer to install, or uninstall the Windows Fonts!
1.) . Find and open the Fonts Folder in Windows 10!
2.) . Copy a font eg install from another folder on Windows-10!
3.) . Create a Desktop Shortcut for Windows 10 font Folder!
4.) . Keyboard Shortcut for a fast access to Font Directory!
1.) Find and open the fonts Folder in Windows 10 !
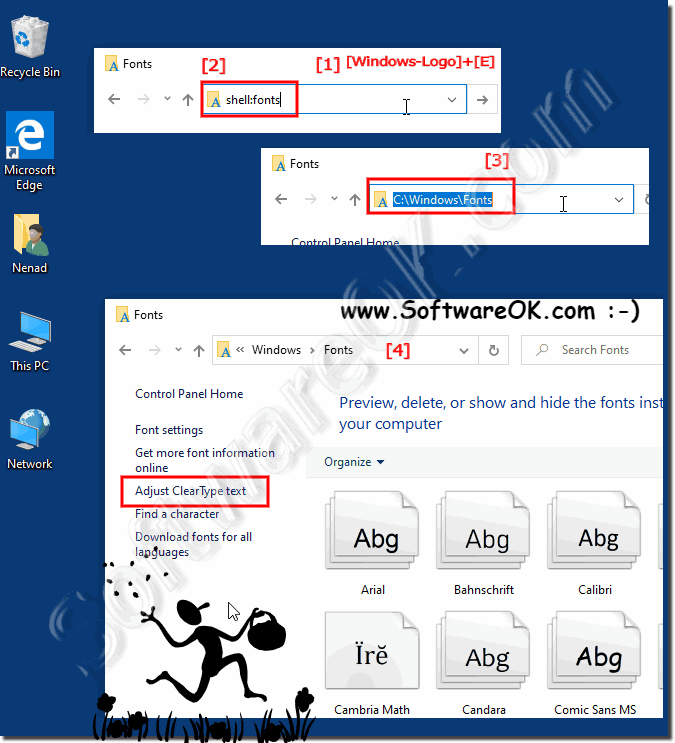
1. Please use the hot key [Windows + E]
2. and enter in the address bar Address: shell:fonts or %WINDIR%/Fonts
(. see Image-1 Point 1 to 3)
3. now you can see all installed fonts on the Windows 10
In Windows-10 Fonts Overview, you can also Adjust Clear Type text (. see Image-1 Point 5)
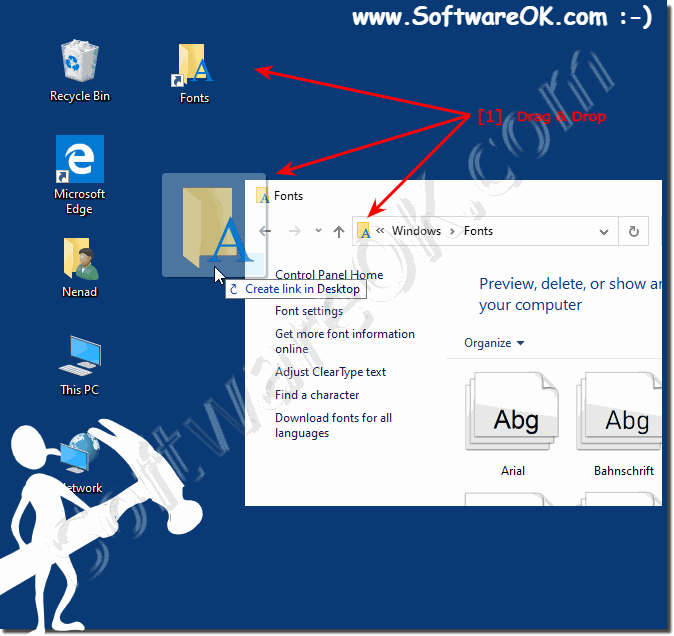
At this point, you can create a Desktop Shortcut for the System-Fonts-Folder on the Windows-10 Desktop, it is very easy, by using Drag & Drop! (. see Image-2 Arrow-1)
| (Image-1) Fonts folder in windows 10 (install, uninstall)! |
 |

Tip: To delete a font, open the Windows 10 fonts folder. Click the font you want to delete. To select more than one font at a time in Windows 10 explorer, press and hold down the Ctrl button while you click each font.
Tip: Right-click the font you want to install and click install. You can also install a font by dragging it into the Fonts Control Panel page in Windows 10 Explorer View. See also: Uninstall fonts from Windows-10 (remove, delete)?
| (Image-2) Desktop Shortcut for the System-Fonts on the Windows 10 Desktop! |
 |
Despite the abundance of preinstalled fonts in Windows 10, some Windows users, especially those involved in design, graphics, advertising, and printing, often require the installation of additional fonts, for example, imported from third-party applications or created for business purposes. What could be easier than installing fonts on Windows 10? But some users of Windows 10 even sometimes need help solving such a task, the information in this FAQ provides the solution to the font theme here!
There is also a problem with this font smoothing that should not be forgotten.
► How can I disable ClearType in Windows 8.1 or 10?
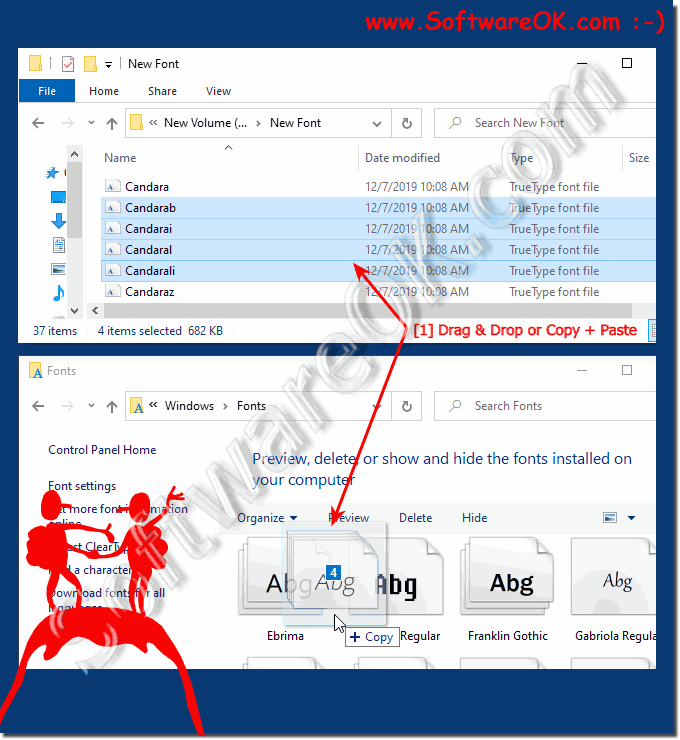
2.) Copy a font eg install from another folder!
Please open the Windows Fonts Folder and the source folder of new fonts and drag & drop or install it via copy & paste!
(. see Image-3)
| Copy install fonts on Windows 10! (Image-3) |
 |
Fonts are ordinary files with a specific extension. For fonts that support Windows 10, the .ttf extension is the TrueType font, and the .otf extension is OpenType. Sometimes a font can consist of several similar files that define the outline of the same font. Before you install a font on your system, you can see what the font looks like. After opening the file, just double-click on the file with the font to see what the font looks like and check if the font matches the font!
► Uninstall fonts from Windows-10 (remove, delete)!
3.) Create a Shortcut for Windows font Folder!
To see the Windows 10 desktop, press the key combination Windows logo key + D.
Click on an empty space on the Windows 10 desktop, right Mouse-Button. And select «New», «shortcut»
Now enter the full location path of the Font Directory: C:\Windows\Fonts (Optional: shell:fonts)
Click the Button «Next».
Please enter the name for the Desktop-Shortcut, you can use Fonts or enter Font Folder.
(. see Image-4 Point 1 to 4)
| (Image-4) Fonts Folder Shortcut for the Desktop! |
 |
Many users are wondering where the Windows fonts are, here are simple examples of how to find them and make them more accessible, these solutions are not just for 10, but are also an example of working on Microsoft Web Server 2019, 2016 or 2012 R2!
4.) Keyboard Shortcut for a fast access to Font Directory!
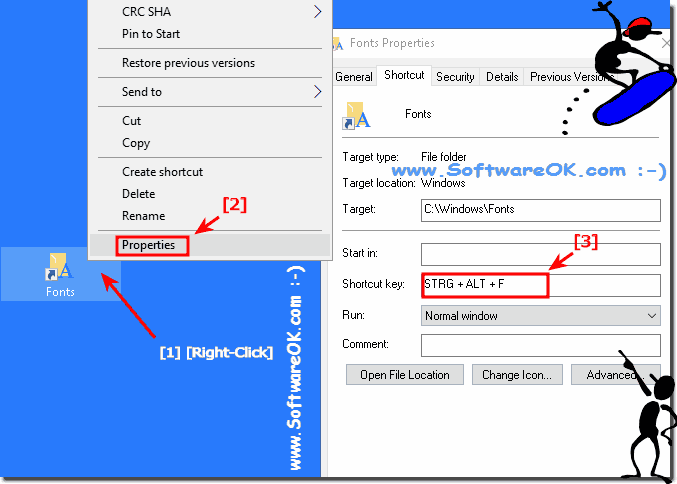
If you have created the desktop shortcut for the Font folder, do a Mouse Right Click and select «Properties»
And create / activate a windows Font Folder keyboard shortcut for you Windows!
| (Image-5) fonts folder keyboard shortcut ergo Hot-Key! |
 |
The solution is simple and is also suitable for Windows Server 2016 and Web Server 2012 R2 to find the font folder and install fonts! This is the Question of many Window User and hear is the answer for this very important Question, to find fonts on Microsoft’s best Windows operating system ever on your personal computer system and business PC!
The simple examples, how to find fonts folder and make the fonts much more accessible on Windows 10 and also for Microsoft Windows Server 2019, 2016, .
How to Install Fonts in Windows 7
Add fun new fonts in a flash
:max_bytes(150000):strip_icc()/TriciaGoss-c6bcd4d050f744c2b13efbf760819c9d.jpg)
Windows 7 comes loaded with dozens of attractive and professional-looking fonts. However, there are even more unique, eye-catching and fun fonts available for download all over the internet. If you are creating a custom document, publication or some other design with text, using a new font can make it extra special. Better yet, when you discover how easy it is to add fonts to Windows, you can install all sorts of them.
As of January 2020, Microsoft is no longer supporting Windows 7. We recommend upgrading to Windows 10 to continue receiving security updates and technical support.
:max_bytes(150000):strip_icc()/adult-blur-businessman-927022-4e5401dbd45d46379b29501730db376a.jpg)
Learn how to install fonts on Windows 7 using a couple of methods as well as how to uninstall them if you change your mind.
Safely Add Fonts to Windows
» data-caption=»» data-expand=»300″ data-tracking-container=»true»/>
As with any type of file or software you download onto your computer, you want to be sure that any fonts you install are safe.
- Look for fonts on reputable websites or as part of curated lists on a website you trust.
- In addition, make sure you select the correct download button. Ads containing misleading graphics that resemble download buttons can trick you into installing something potentially dangerous.
A good place to find fonts that you know are safe is the Microsoft Typography Page. You’ll also find lots of information there about current and developing Microsoft fonts.
Unzip the Font File
:max_bytes(150000):strip_icc()/001-how-to-install-fonts-in-windows-7-b2daa01c29944da0adf00deeb774a3ce.jpg)
In most cases, new fonts will download to your computer as ZIP files. Before you can add fonts to Windows, you must unzip or extract them.
- Navigate to the font file you downloaded, which is likely in your Downloads folder.
- Right-click the folder and select Extract All.
- Choose the location where you want to save the unzipped font files and select Extract.
How to Install Fonts on Windows 7 From the Font Folder
:max_bytes(150000):strip_icc()/Capture-0aee1fafd0d74a63b38e21e42f8a58ad.JPG)
Fonts are stored in the Windows 7 fonts folder. Once you have downloaded new fonts, you can install them directly from this folder, as well.
- To access the folder quickly, press Start and select Run or press Windows key+R. Type (or paste) %windir%\fonts into the Open box and select OK.
- Go to the File menu and choose Install New Font.
- Navigate to the location where you saved the extracted font.
- Select the file you want to install (if there are more than one files for the font, choose the .ttf, .otf, or .fon file). If you want to install several fonts, press and hold the Ctrl key while selecting the files.
- Select Copy Fonts To Fonts Folder and choose OK.
How to Install Fonts from File
:max_bytes(150000):strip_icc()/002-how-to-install-fonts-in-windows-7-63777545d0e04b21b77473825a65ac31.jpg)
You can also install fonts in Windows 7 directly from the downloaded font file after you have unzipped it.
- Navigate to the font file you downloaded and extracted.
- Double-click the font file (if there are multiple files in the font folder, choose the .ttf, .otf, or .fon file).
- Select Install at the top of the window and wait a moment while the font is installed onto your computer.
Uninstall Fonts
:max_bytes(150000):strip_icc()/004-how-to-install-fonts-in-windows-7-1bb422f1dc1b41c9bf5fcd2f6d6b0ca0.jpg)
If you decide you don’t like a font after all, you can remove it from your computer.
- Navigate to the Fonts folder.
- Select the font you want to remove and press Delete (or select Delete from the File menu).
- Select Yes if a prompt window appears asking if you want to delete the font(s).
How to Manage Your Fonts in Windows 10
Windows 10 updates offer new ways to manage the fonts loaded on your computer. You can now view, hide, and remove fonts, download new ones, and use drag and drop to add more.


You probably have an army of fonts on your Windows 10 PC that you can use to spice up your documents, presentations, and other files. But how do you know which fonts are available, how they’ll appear, and how to obtain new ones?
If you’re using Windows 10, Microsoft offers a couple of tools that can help. With the standard Fonts tool in Control Panel, you can see which fonts are installed and view and print a preview of each one.
With the Windows 10 April 2018 Update or higher, you can perform other tricks via the Fonts screen under Settings: see how each font looks without having to preview it; uninstall fonts you don’t need; and download more fonts from Microsoft. The Windows 10 May 2019 Update, meanwhile, adds the option to install a font by dragging and dropping it.
To check on this, go to Settings > System > About. Scroll down the About screen. If the Windows version says 1903, you have the May update. If not, go to the Update & security category in Settings. If your PC is ready and compatible, you’ll see an update called «Feature Update to Windows 10, version 1903,» which you can then install.
View Installed Fonts
Preview Fonts
Preview Font Families
If the font is a family (any font represented by multiple pages), double-clicking opens a page displaying each member of the family. You can then preview each individual font. If you select Preview for a font family, multiple viewers open to display the font with different attributes, such as bold, italic, and bold italic.
For font families that require more than a few viewer screens, Windows first asks if you want to open them all. You then have to close each individual preview window.
Hiding Fonts
You can hide a font you don’t wish to see or use when you work with certain programs and apps. However, this trick doesn’t work across the board. Hiding fonts through the Fonts screen renders them invisible for certain built-in apps such as WordPad and Notepad.
Applications such as Microsoft Office generate their own font menus, so hiding fonts through Control Panel has no effect on them. To hide a font, right-click on it and select Hide from the pop-up menu.
You can also automatically hide all fonts that aren’t designed for your language settings. To do this, click the link for Font settings on the left sidebar. In the Font settings window, check the box to Hide fonts based on language settings. Click OK.
Uninstall Fonts
Back Up Fonts
Reinstall Fonts
Fonts Tool
View Font Details
Custom Preview
Uninstall Font
Add Fonts
Find a New Font
Get New Font
Launch New Font
View New Font
Drag and Drop a Font
Finally, with the Windows 10 May 2019 Update, you can install a font by dragging and dropping it. This can come in handy if you’ve backed up and deleted an unprotected font and now wish to reinstall it. You can also use drag and drop to install a font you’ve downloaded from the web. Many sites offer fonts, both free and paid.
To install a font using drag and drop, open File Explorer and look for the TrueType (TTF) file. Drag the file onto the pane in the Font screen that reads Drag and drop to install. Release your hold on the font when you see the Copy icon, and it should be installed.


