- Using Linux Mint for the first time
- Linux Mint the first time
- The main components of the desktop
- System indicators
- Window and application icons on the panel
- Application launcher
- Lock, Logout and Quit
- Update Manager
- System Settings
- Appearance
- Preferences
- Hardware
- Administration
- Applications and Software Manager
- Final words
- Trying Linux for the First Time: A Beginner’s Guide
- Free JavaScript Book!
- Choose Your Flavor
- Difficult or Not?
- What Are the Benefits?
- Will Linux Be Compatible with My Hardware?
- How to Choose a Distro?
- How Do I Install It?
- What About Other Software?
- What About Updates?
- So What Are You Waiting For?
Using Linux Mint for the first time

Now that we in the previous course chapters have looked at what distributions are, how to choose the best Linux distribution and desktop environment for your needs, how to download Linux mint, how to create a Linux Mint Live USB stick in Windows or in macOS, how to use Linux Mint without installing on a PC or on a Mac and how to install Linux Mint on a PC or Mac, we finally reached the moment you were waiting for: we can have a first look at what Linux Mint is, how it looks, and what it can do. So let’s really open Linux Mint for the first time.
Linux Mint the first time
Now that based on the previous lessons Linux Mint has been booted into a live session, or you even installed it on your hard drive, the real fun can begin. If everything went well you will see a relatively empty desktop environment that probably looks something like the screenshot below.

Maybe the first thing you would think is that it looks a lot like the more classic design principles of Windows XP and Windows 7. And for beginning Linux users with a Windows background that is probably a good thing as it is recognizable and it makes you find the things you need quite easily. But as you already could read in an earlier tutorial on desktop environments there are lots of different desktop environments, so maybe your preference is not Cinnamon, but for example Pantheon, Budgie or KDE Plasma. When you prefer something different be free to try it out after ending this course, but for the rest of this course we use the Cinnamon desktop environment.
The main components of the desktop
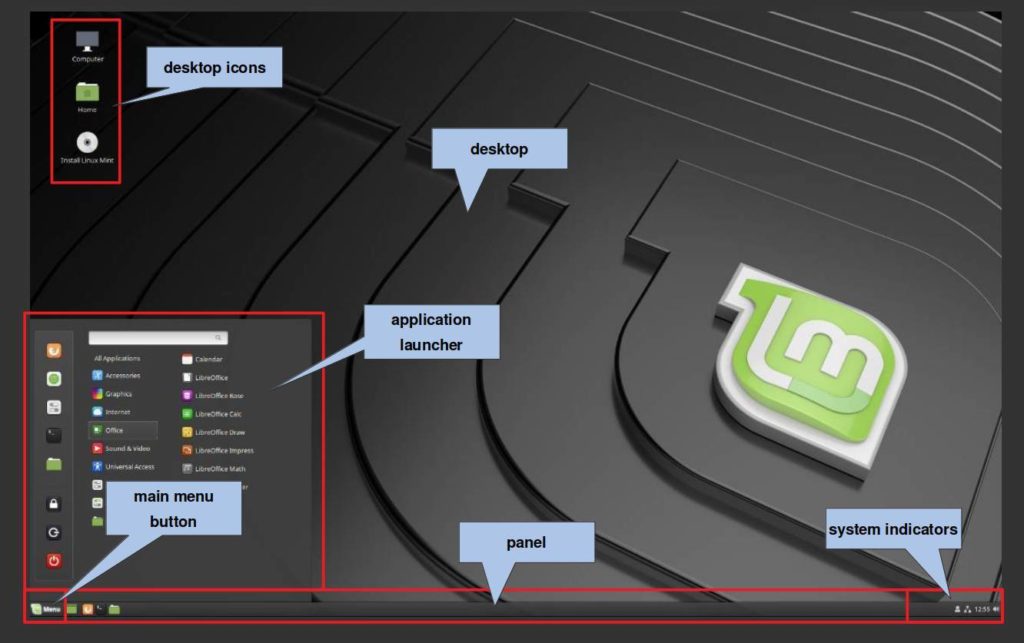
This desktop environment presents to you a couple of main components. Basically the desktop experience exist of a panel on the bottom of the screen that is housing a main application menu on the bottom left, system indicators on the bottom right, an application launcher if you activate the main menu button, some desktop icons and of course the desktop itself where you can add additional icons to your liking.
System indicators
At the right side of the panel we have the system indicator area. Standard it already has some indicators, but probably some new applications will add extra indicators as well. After a fresh installation of Linux Mint you see indicators for the Update manager, Removable drives, Network, Time and Calendar and Sound.
Window and application icons on the panel
From Linux Mint 19.1 you can choose between a traditional and a more modern desktop layout. In the traditional layout you will get a relatively smaller panel and a traditional open window list. When you select the modern desktop layout you get a larger panel and a grouped open windows presentation.

When you have open windows you see one or more previews of these open windows when you hover over the panel icons, which is very convenient if you have for example multiple open browser sessions or multiple open spreadsheets.
Further you can add application icons to the panel to have the most important of most used applications in a convenient and visible place. You can add
If you search for an application via the application menu and you right click on the application name a small menu will be opened. From this menu you can select the option to add the application to the panel (see the part about the Application Launcher for further information).
Application launcher
When we focus on the main menu being the application launcher we see five main areas: application categories, applications, search bar, favorites and lock / logout and quit.

To start with the left hand side we see a vertical area with on the top part space for some favorite applications. You can add your own applications here as you want. In the lower part of that same area you will find icons to lock, logout or quit your system.
At the top you find a search bar. Here you can type the name of an application or just the first characters of a name to find one or more installed applications that fits your search criteria.
In the middle part you find different application categories. These categories contains one or more applications. The name of a category can be changed, categories can be removed or new categories can be added. The great thing in the Cinnamon desktop is that you don’t need to click on the categories to see the containing applications. Just hover over the categories and you directly see on the right hand side the installed applications within a specific category.
The right part shows you all the applications in a specific application category, or all the applications available on your machine if you hover over the All Applications category. If you left click on an application name this specific application will start. If you right click on the application name a small menu will be opened. From this menu you can select the options Add to panel, Add to desktop, Add to favorites and Uninstall.
Lock, Logout and Quit
As already mentioned before on the left hand side of the application menu we see a vertical area where you will find icons to lock, logout or quit your system. The lock icon can be used to … well … lock your system. So if you need to go to the toilet, need to do some shopping or do something else and you don’t want to completely shut down your system, you can safely lock it via this option and log in again when you are back.
The logout button gives you three additional options: Switch User, Cancel and Log Out. When you have more than one user set up on your system via Switch User you can login as another user without closing down the current active user. With Cancel you can close this pop up. With Log Out you can actually log out of your session and login as another user if applicable.
The Quit option gives you a pop up with four additional options: Suspend, restart, Cancel and Shut Down. Suspend brings the operating system and the hardware in a sleeping state. Restart ends your session and reboots the complete system. With Cancel you can close this pop up. And Shut Down ends your session and stops powering your PC.
Update Manager
As already explained at the right side of the panel we have the system indicator area. There you will find among others the Update Manager icon, which looks a bit like a shield. This shield can have different looks, like having a blue circle with an “i” to indicate that there are updates available. When there are updates available you click on the blue shield to open the Update Manager.

In the example you see that there are 4 updates available. They are already pre selected so the only thing you need to do is to click on Install Updates. The system will ask you first to authenticate by providing your password.

Now the updates will be installed while you just continue the work you were doing. Updates in Linux Mint will be very fast, so it may be a bit of a surprise after coming from the Windows platform. After the update is finished you can close the update manager. Now you will see that the shield looks different, having a green “ok” marking.
System Settings
Linux Mint Cinnamon is a very flexible and customizable system. There are a lot of options and functionalities that can be changed and maintained. When you open the Application Menu you see the System Settings icon in the right top part of the menu. If it is not there then you can search for System Settings in the search bar in the same screen.

Click on the System Settings to open the settings screen.

In this screen you can find four main sections: Appearance, Preferences, Hardware and Administration.
Appearance
Under Appearance you can change your background, change windows effects, menu effects, fade effects, animations, fonts and themes for the complete look and feel of the desktop environment.

Preferences
Under Preferences you have a lot of options that can be changed. Think about accessibility options for impaired users, settings applets and desklets, desktop icons, extensions, corner functionality, languages, notification settings, online accounts like Google, Microsoft and Facebook, privacy settings, startup applications and window behavior.

Hardware
In the hardware section you can change settings with respect to Bluetooth, color, your display(s), input devices, network, printers and sound. Here you also can show your system info.

Administration
In the administration section you can change drivers for your hardware, change the firewall settings, add users or change their options and rights and change settings with respect to software sources, like official repositories, PPAs (Personal Package Archives) and additional repos.

Applications and Software Manager
If you open the Application Menu and click on the category All Applications you see that there are already a lot of applications pre installed, like all the LibreOffice components, Firefox browser, Thunderbird mail and the Gimp photo editing software. But there are far more fantastic applications available in the Linux Mint repository but also via Flatpack, Snap and PPAs, which will be discussed in a separate section of this course. The most convenient way to search for additional applications is via the Software Manager, which can be compared to the Google Play store. Here you can search for applications, see their descriptions and ratings and when you see something interesting, just click on install and a couple of seconds later you can find the application via your Application Menu.

Final words
For now you have probably enough information to be able to have some first looks at this Linux Mint distribution. Just browse around and try things out. In the next tutorials I will go much more deeper in specific functionalities of this operating system. But for now, have fun cruising around.
Источник
Trying Linux for the First Time: A Beginner’s Guide
Free JavaScript Book!
Write powerful, clean and maintainable JavaScript.
You’re probably familiar with Windows and/or Mac OS. But they aren’t the only operating systems available. A popular alternative is Linux. In this article, Lesley Lutomski introduces Linux and what you need to know to give it a try.
I’m constantly surprised by people who tell me they’d like to try Linux, but think it’s “too hard”.
There seems to be a common misapprehension that Linux is “for geeks”. Certainly, this was once the case: dedicated users compiled their own kernels, and it wasn’t for the faint-hearted.
But Linux has come a long way since those days. So, if you’ve never tried it, or tried it many years ago and gave up, I’d encourage you to think again.
Choose Your Flavor
Linux comes in many “flavors”, or “distributions”—normally referred to as distros. Some of these are aimed firmly at a mainstream audience, and I’d suggest using one of these to get your feet wet. The best known of these is possibly Ubuntu, which is the one I use and the one I’ll concentrate on here. Linux Mint is also popular, but there are many more.
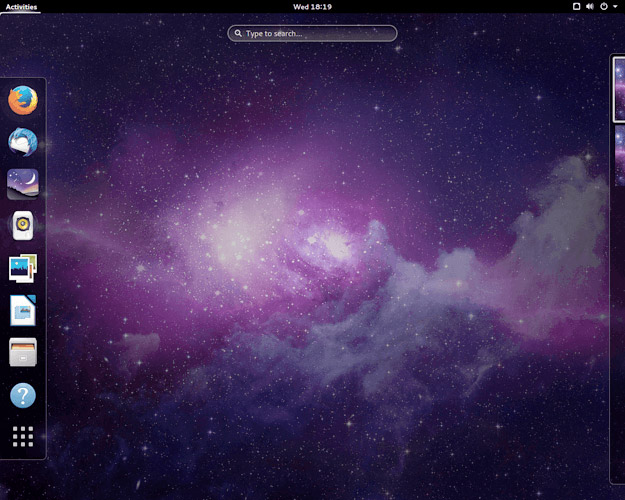 Ubuntu Gnome desktop
Difficult or Not?
So is it difficult to use? Not in my experience. The first thing I noticed when we switched to Ubuntu was the sudden reduction in the number of distress calls I received from my husband. He seemed to experience fewer problems using the system than he had on Windows XP, and also seemed to feel more confident about trying things for himself, rather than panicking that he might “break something”.
I also set up a Xubuntu system for an elderly friend who had never used a computer of any kind, and she rapidly got to grips with it.
What Are the Benefits?
For many people, cost will be a consideration. Most popular Linux distros—and their associated software—are free to download and use. For others, the open-source nature of the OS appeals.
Linux is also far less susceptible to viruses than Windows. The main reason for this is simply that most viruses are designed to target Windows machines and will have no effect on a Linux system. It’s not true that Linux systems are immune to viruses, but they are very rare. A humorous explanation can be found here.
This added security is one reason we chose it for our elderly friend. Although Linux viruses are rare, ClamAV is free and helps ensure you don’t inadvertently download and pass on viruses to friends with Windows.
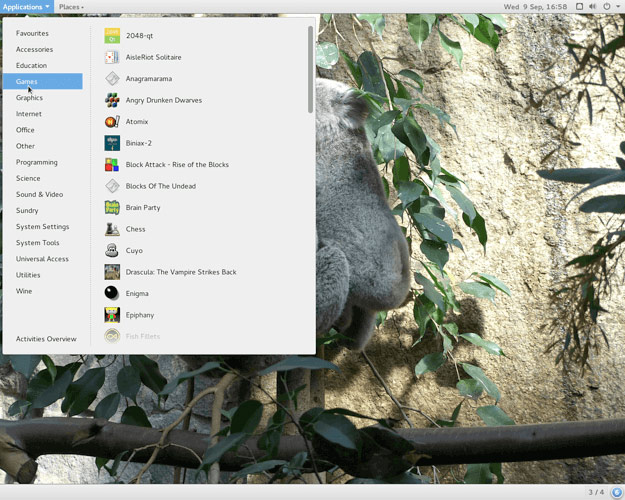 Ubuntu Gnome desktop – traditional version
Will Linux Be Compatible with My Hardware?
Linux will run well on most PCs, although if you have the very latest cutting-edge technology, you may find it’s not immediately supported.
On the other hand, installing Linux can be a great way to breathe new life into old hardware. Some distros are designed to be lightweight—such as the Ubuntu variant Xubuntu—and will perform well on systems with limited resources.
It’s also possible to run Linux on a Mac, although I have no experience of this. The Ubuntu Forums—a great source of help and support—have a dedicated section for Apple hardware users.
How to Choose a Distro?
The easiest way is simply to try one and see if you like it. This isn’t nearly as radical as it sounds.
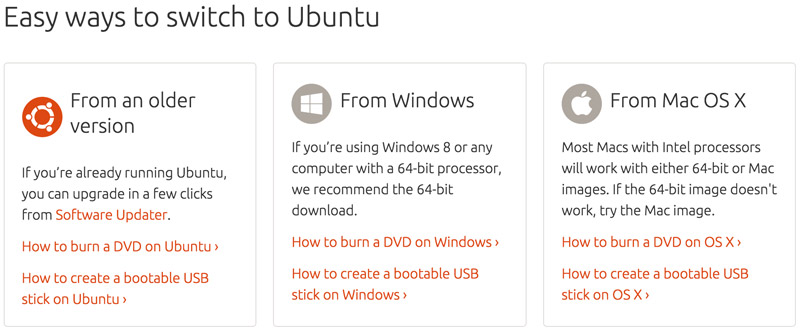
Many distros are free to download, after which you can burn them to DVD. They can then be run as a “live” CD/DVD. In other words, you boot your system from the DVD—or a USB drive—and run the OS from there. It doesn’t have to be installed, and nothing is written to your hard drive—although you should be able to access files on your hard drive while in Linux.
This is a great way to get a feel for the distro at no risk, and it also lets you check there are no problems with your hardware. The Ubuntu site provides very clear tutorials for getting all this done.
A word of caution, though; running from a live DVD is noticeably slower than running from a hard drive, so you should make allowances for this. Also, should you decide to stick with Linux, you may find extra proprietary drivers to improve the performance of graphics and other hardware.
How Do I Install It?
Again, this is a simple process. The “live” CD/DVD includes options to install the system, should you choose to do so, and will walk you through the process.
You can choose to install alongside another OS—either on the same drive or a separate drive—and run a dual-boot system. This allows you to use either system. You can also run it in a VM .
If you decide to install Ubuntu or its variants, either as a dual-boot or standalone system, the process is as simple as answering a few questions and then sitting back while the system does the work. If you’re installing alongside an existing OS on the same drive, Ubuntu will take care of partitioning it. If you have a broadband connection, you can choose to download and install updates as part of the process.
Be warned that Linux uses a different file system to Windows. While Linux will be able to read and write to a Windows partition, Windows won’t read the Linux partition. If you’re dual-booting and need to access files from both systems, ensure you save them to a partition formatted as FAT or NTFS.
My own experience of this as a first-time Linux user was not quite straightforward. I added a second hard drive for Ubuntu and the installation went smoothly. Afterwards, I booted into Ubuntu and everything was great—until I tried to boot WinXP and found I couldn’t.
After a brief panic, I headed off to the Ubuntu Forums, where somebody patiently walked me through a couple of possible solutions until we found one which worked for my system. That was seven years ago, and the only time I had an issue like that.
What About Other Software?
This is probably the ultimate determinant of whether or not Linux is for you. On the one hand, you have access to a great deal of free, easy-to-install software; on the other, many popular commercial applications are not available for Linux.
You can, of course, run a VM, or an alternative is to use Wine, which is a kind of translation layer for Windows software. The Wine website maintains an Application Database that gives guidance on how well each application runs under Wine. Often this can vary greatly, depending on the version of the software, as in these results for Photoshop:
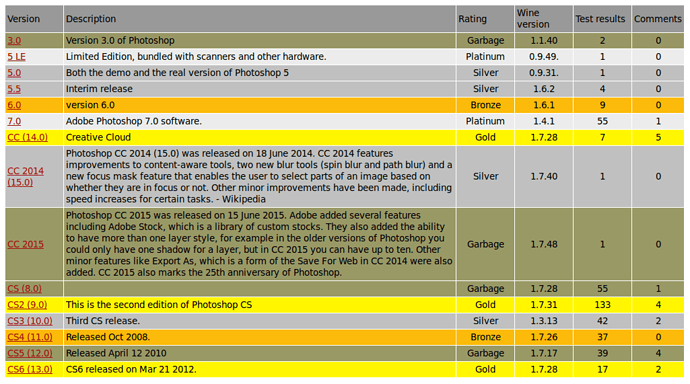
I’ve had good success with old games and smaller apps, but generally speaking, I use native Linux alternatives.
LibreOffice (a fork of OpenOffice) comes installed as standard, as does Firefox. Chromium is the native Linux version of the Chrome browser and supports many of the same extensions. GIMP is a near replacement for Photoshop, although opinions vary on how well it compares. In addition to the bundled applications, other software is easy to install from the repositories.
Ubuntu now comes with the Ubuntu Software Centre, which is a graphical interface that lets you find software by category and see ratings:

I tend to prefer the older Synaptic Package Manager. You can search for an application by name or keyword, and look through suggested results:

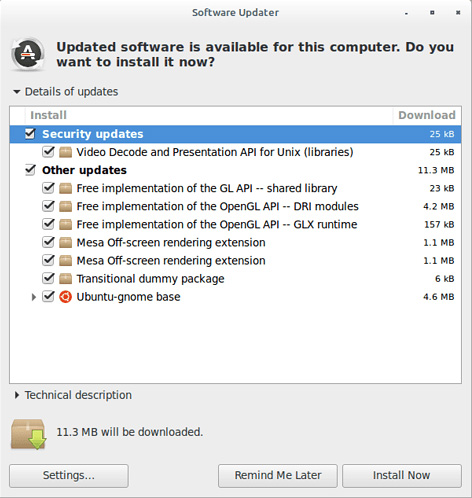
What About Updates?
Updates are notified automatically and installed with a single click. It’s rare to have to restart the system, except for updates to the kernel itself:
New releases of Ubuntu are made every six months, but you can opt to use a “Long Term Support” (LTS) version. These are released every two years. Installed applications will receive updates, but will generally not upgrade to a newer version until the next Ubuntu release. So if you like to run the latest version of things, the LTS version won’t be for you.
So What Are You Waiting For?
This was never intended as a “how to” guide, but just as an overview to whet your appetite and encourage you to try Linux for yourself. Hopefully I’ve succeeded, and you’re now off to download your very first distro!
If you’d rather dip your toe in an even gentler way, without even burning and booting from a DVD, the Ubuntu site offers a virtual tour of the operating system that you might enjoy. It gives you a taste of the look and feel of Ubuntu, including a glimpse of the main apps that come with it.
Lastly, if you’ve already taken the plunge and installed Linux, and you’re a web developer, here’s some advice on setting up a development environment in Linux.
If you have any questions or experiences to share, please do so in the comments.
Источник


