- Dual-boot Repair Windows 10 (8.1/8/7/Vista/XP)
- Main features of the tool
- Installation
- Prerequisites
- License
- Download link
- Windows 10 Ubuntu dual boot not working [QUICK SOLUTIONS]
- What can I do if there is no GRUB on Windows 10 Ubuntu dual boot:
- Solution 1: Repair from Windows – Command Prompt
- Solution 2: Disable Fast Boot
- Solution 3: Use the Boot Repair Tool
- Solution 4: Windows and Ubuntu are installed in different modes
- Dual boot Windows 10 and Linux issues: Here’s a quick fix
- How can I fix Windows 10 and Linux dual boot problems?
- Run bcdedit command in PowerShell
- Follow these steps if you can’t boot into Windows 10
- Dual Boot Repair Tool: Repair Boot Configuration Data for Windows 10
- Repair Boot Configuration Data or BCD
Dual-boot Repair Windows 10 (8.1/8/7/Vista/XP)
You have installed multiple Windows versions on your PC ?
You have problems booting one of the Windows operating systems ?
Dual-boot Repair utility for Windows 10 can fix the booting of any current dual or multi boot Windows system from an easy to use graphical user interface (GUI).
What’s new — «Fix Windows XP/2003 boot» option allows fixing of Windows booting even in a dual boot scenario of two or more Windows NT5 systems (XP / Windows Server 2003).
Important (but ignored by users):
The tool runs on any Windows OS from XP to Windows 10, so of all installed Windows versions there must be at least one Windows OS which can boot and run.
To fix booting if none of installed Windows versions can boot and run you should use your Windows installation or recovery media and run start-up(automatic) repair or use manual repair operations.
See these links and instructions how to repair Windows booting even if you don’t have installation/recovery DVD/USB.
Main features of the tool
1. Automatic one click boot repair — installs proper boot files and fixes booting of latest Windows NT 6 version (Vista to Windows 10) on BIOS or UEFI firmware (fixes also NT5 boot files if necessary).
2. Fix of MBR and partition boot records for Windows NT5 systems (XP, Windows Server 2003) and for Windows NT6 systems (Vista, Windows 7, Windows 8.x, Windows 10 and Server 2008/2012/2016).
3. Fix Windows Vista to Windows 10 BCD (Boot Configuration Data), also backup and restore of BCD (applies also to Server 2008/2012/2016). Using «Repair BCD» option you can create a boot loader(boot menu entry) for Vista, Windows 7/8/10 and Server 2008/2012.
4. Fix Windows XP / Windows Server 2003 boot.
5. Shortcut to Disk Management (create/shrink/extend/delete partitions and set active flag — important for booting on BIOS firmware and MBR style disks) and shortcut to administrator console and bcdedit.
6. Boot Sector Viewer for examining and saving of MBR and partition boot records.

The tool can be used by novice users (green colored buttons) and by more advanced users using all options.
Clicking on «Automatic Repair» displays a list of all installed Windows versions.
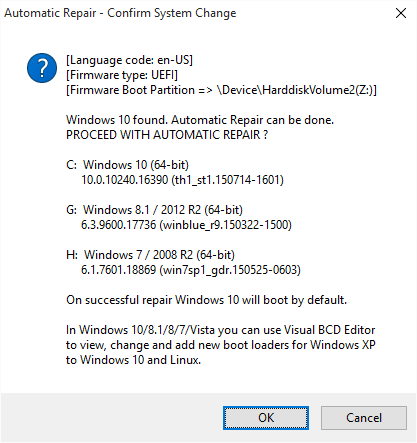
Please read carefully the displayed text before confirming the repair operation.
As already said «Automatic Repair» fixes the booting to latest Windows OS (Windows Vista to Windows 10) on your computer.
If you have only Windows XP / Server 2003 installed you can fix booting to either system using «Fix XP/2003 boot» option.
In the current implementation the «Automatic Repair» option does not fix the booting of all installed Windows systems — it fixes the booting only of the latest Windows OS installed on your computer. For fine tuning Windows boot and eventually fixing the booting of other installed Windows systems (Windows XP to Windows 10) you should use Visual BCD Editor (Visual BCD Editor runs on Windows Vista and later).
Visual BCD Editor allows to easily delete problematic boot loaders and to create a boot loader for any Windows XP to Windows 10.
I could drop support for Windows XP and use only one tool for repairing Windows booting — Visual BCD Editor — but I think that Windows XP is a good system and despite not anymore supported by Microsoft it is still used by many people.
Installation
==>> Extract zip file to an empty directory (application is portable) and create a shortcut icon for the tool on Desktop.
==>> Overwrite existing files in Visual BCD installation directory.
On English Windows versions Visual BCD is installed to folder «Program Files» (on 32-bit OS) or to «Program Files (x86)» (on 64-bit OS).
Prerequisites
The tool needs .NET 2 or .NET 4 and can run on Windows XP to Windows 10.
License
Dual-boot Repair tool is for private, non-profit use!
If you want to use the tool in a production/for profit environment you have to obtain a written permission from author — contact email boyans dot gm at gmail dot com.
THE TOOL CANNOT BE HOSTED ON OTHER SITES FOR DOWNLOAD.
Download link
Even small donations appreciated for site maintenance and further development. Thank you.
Copyright © 2012-2017 Bo Yans
Windows 10 Ubuntu dual boot not working [QUICK SOLUTIONS]


Many people use a dual boot setup on their PCs depending on their requirements and need. Some use both Ubuntu and Windows 10 because both have their pros and cons.
Ubuntu, like many other non-Windows operating systems, does support dual booting. Windows 10, on the other hand, usually ships with settings that are not optimal for dual boot setups.
GRUB (the acronym for GRand Unified Bootloader) is the bootloader which is used by Ubuntu to manage the operating systems installed on your computer.
Basically, it is the software that looks at the operating systems installed on your PC and allows you to choose which one to start after switching on the machine.
Most of the problems are related to GRUB, so if you are unable to boot into Grub and the system boots directly to Windows repeatedly, you are going to find below some solutions to this problem.
You can use this guide to fix the following Windows 10-Ubuntu issues:
- Dual boot option not showing in Windows 10
- GRUB menu not showing in Ubuntu
- Ubuntu won’t dual boot with Windows 10
What can I do if there is no GRUB on Windows 10 Ubuntu dual boot:
Solution 1: Repair from Windows – Command Prompt
The simplest way to try to solve this issue is by using the Command Prompt from Windows. In order to do this, please use the steps described below:
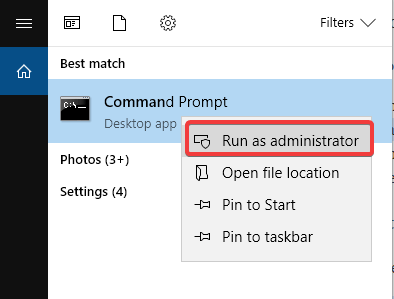
- In Windows go to menu and search for Command prompt
- Right click on Command Prompt and choose the option Run as administrator

- Copy and paste the command bcdedit /set
path EFIubuntugrubx64.efi - Restart your computer

Solution 2: Disable Fast Boot
You can also try to deactivate fast boot function of Windows 10 to access the GRUB menu. To do so, please follow the steps below:
- Access Control Panel
- Search for the term power in the search bar at the top right
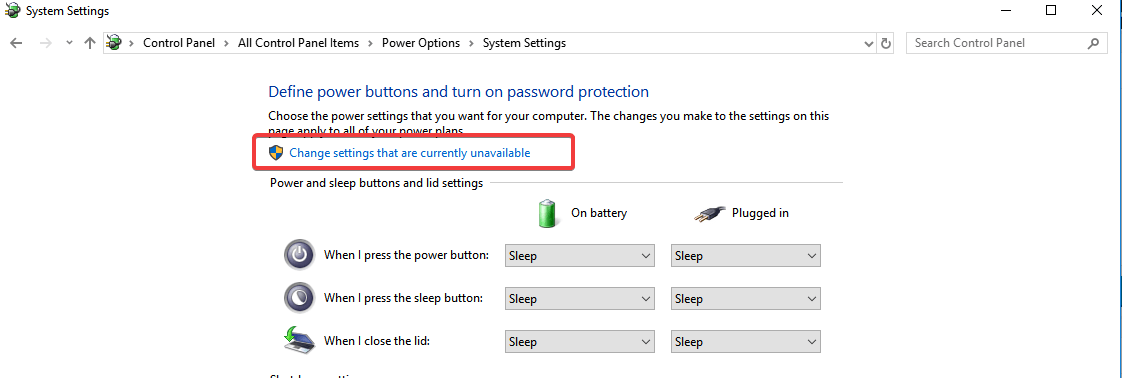
- Click on Change what the power buttons do
- Click on the Change settings currently unavailable
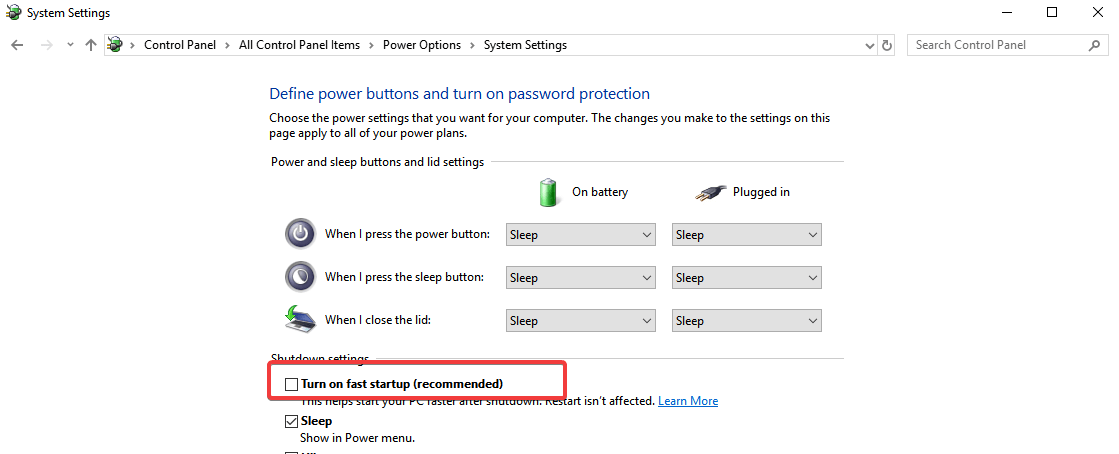
- Uncheck the item Turn on fast start up (recommended)
- Press Save Changes to save the settings
You can’t open Control Panel? Take a look at this step-by-step guide to find a solution.
Solution 3: Use the Boot Repair Tool
The Boot Repair Tool is a small software that can solve most of the boot related problems. In order to install it and use it:
- Boot into your operating system
- Enter the following commands:
sudo add-apt-repository -y ppa:yannubuntu/boot-repair
sudo apt-get update
sudo apt-get install -y boot-repair && boot-repair - After the installation is complete, you can launch Boot Repair tool from the apps menu
- It will do some scanning so let it finish its job
- Then a screen will appear which will be saying recommended repair based on the scan
- After choosing recommended updates, it will start the repair
- Open the terminal and copy and paste the highlighted command in terminal one by one.
- Select yes by using arrow keys or tab buttons and hit enter to select
- in Boot Repair Tool screen hit forward
- Copy the command mentioned there and paste it into terminal and hit enter and let it do the job
- If prompted some options to configure where to install GRUB Choose yes and then hit enter
- Use spacebar to select an option and TAB to navigate through options
- After you finish installing GRUB, you can close Terminal
- select the forward option in Boot Repair Tool screen
- Select Yes for every option regarding confirmation
- a successful confirmation message will appear on the screen
- restart your computer
Solution 4: Windows and Ubuntu are installed in different modes
It is not possible to dual boot two operating systems if they are installed in different modes – one in UEFI mode and the other one in BIOS Legacy mode.
Therefore, to solve the problem and restore the dual boot you have to convert the installation of Ubuntu to the same mode in which Windows is installed.
In order to solve this, you can use the Boot Repair Utility and you will need a live bootable DVD of your installed operating system. Afterwards, you can follow one of the steps below, depending on your situation.
- To convert Ubuntu to UEFI mode you need to start Boot Repair and activate the panel with the Advanced options, then select the GRUB Position tab, put the check on separate Partition/boot/efi and click Apply.
- To convert Ubuntu to BIOS Legacy mode, start Boot Repair and activate the panel with Advanced Options, then select the GRUB Position tab, uncheck the separate Partition/boot/efi item and click Apply.
Afterwards, enter into the UEFI firmware configuration panel and choose whether to start the computer in UEFI or Legacy mode.
Most users don’t know how to enable Legacy Boot on Windows. Check out this guide and be a step ahead. If you’re having UEFI boot problems on Windows, this guide should help you solve them in no time.
We hope that one of the solutions described above helped you solve the dual booting problems and now you are welcomed by the familiar Grub screen.
If you have any more questions, feel free to post them in the comments section below.
Dual boot Windows 10 and Linux issues: Here’s a quick fix


A large number of users that use Linux and Windows 10 in a dual-boot mode have reported that for some reason, they don’t see the menu to choose which OS should the PC boot into. They report that the computer automatically boots to Windows.
This issue can be extremely frustrating considering that the main reason for people installing a dual-boot system is to be able to quickly and effortlessly change their OS.
This issue can have even more of an impact if you set up your dual-boot session in order to run OS-specific apps inside Linux.
For these reasons, in today’s article, we will explore the best way to solve this issue once and for all. Please follow the steps presented here in the order that they were written to avoid any unnecessary complications.
Note: In order to fix this issue, we will have to dive into the boot settings of your PC. To avoid any additional ‘road-blocks’, it is recommended that you create a restore point
How can I fix Windows 10 and Linux dual boot problems?
Run bcdedit command in PowerShell

- Press Win+X keys on your keyboard -> select PowerShell (Admin).
- Copy-paste the following command: bcdedit /set
path EFI ubuntugrubx64.efi . - Wait for the process to complete, and then restart your computer. This method should have solved your problem.
If the method above didn’t help you solve your issue, you can simply reverse it by following step 1 mentioned above, and running the command: bcdedit /deletevalue
Follow these steps if you can’t boot into Windows 10

In the case that you can’t boot into Windows 10 after the restart process, follow these steps:
- Insert a Windows installation disk to your PC to get access to the Command Prompt window.
- Inside the Command Prompt window -> type in the following command: bcdedit /set
path EFIMicrosoftBootbootmgfw.efi -> press Enter to run it.
In today’s article, we explored the best way to fix the dual boot Windows 10 and Linux issues causing your PC to boot by default in Windows.
We hope this guide helped you solve your boot issue. Please feel free to let us know if it did by using the comment section found below.
Dual Boot Repair Tool: Repair Boot Configuration Data for Windows 10
The source of most of the unbootable situations on Windows 10/8/7 is caused by a misconfiguration or even corrupted Boot Configuration Data files, otherwise known as BCD. BCD contains boot configuration parameters on how to start your Windows operating system.
In earlier versions of Windows, it was stored in the Boot. ini file. On EFI-based operating system, you’ll find the entry in the EFI firmware boot manager, which is located at \EFI\Microsoft\Boot\Bootmgfw.efi.
One of the main reasons Microsoft upgraded from Boot.ini to BCD was to improve the working and introduce new features like Startup Repair Tool, Multi-User Install shortcuts, etc.
Most of the System Administrators use the command line utility called BCDEdit.exe, which helps the user to modify, create, edit delete entries from Boot Configuration Data. Some of the operations we can perform using BCDEdit.exe are:
- Add entries to an existing BCD
- Delete entries from a BCD
- Display all the active settings
- Change the default time-out value
There are a lot more you can do with BCDEdit.exe. But the problem with this command is that it’s not very user-friendly for an average user who is trying to fix something. A small mistake can make your operational system un-bootable. So if you want to repair your BCD, there are a lot of applications that help you make this process easier. For example, most of the Disk Management software will have some command build into it – like MBR repair, etc.
Repair Boot Configuration Data or BCD
Today, I’ll discuss a portable utility called Dual Boot Repair Tool. There are some really useful commands in this tool that will help you fix and repair MBR, PBR, BCD, and the disk structure. I’ll go over the options to explain what it does.
Repair BCD: It does exactly as the name suggests. The utility will check the BCD for incorrect parameters or any sort of error, and it will correct it. Before you proceed, you need to select the drive you have the BCD, the path of your Windows folder, language, and firmware (BIOS-MBR or EFI firmware). Remember, always select the installed OS that is updated. For example, if you have Windows 7 and Windows 10, you need to choose Windows 10.
Backup / Export BCD : This option will help you back up your BCD, it’s best that you back up your BCD before making any minor changes
Restore / Import BCD : If something goes wrong you can use this option to restore your BCD if you have done a backup before
Repair MBR & Boot Records: Just like the name suggests, it can repair your Master Boot Record. Use this option, when you need to resolve MBR corruption issues, or when you have to remove non-standard code from the MBR. Also, I believe, it writes a new boot sector to the system partition mostly, if the boot sector was replaced with a non-standard boot sector or if it was damaged some time. It also fixed those old NDLTR missing issues, as well.
The rest of the options are pretty much self-explanatory. Remember, if you are unsure about any of these options, please use the Automatic Repair option, which is much safer compared to the other commands.


