- Windows 10 deleted GRUB [FIXED BY EXPERTS]
- How do I recover GRUB after installing Windows?
- 1. Run Boot Repair
- Want to learn how to dual boot Windows 10? You won’t believe how easy it is!
- 2. Reinstall GRUB
- Fix Grub Not Showing For Windows 10 Linux Dual Boot
- Fix Dual Boot system booting straight to Windows
- Step 1
- Step 2
- Step 3
- Step 4
- No success?
- Восстановление GRUB после установки Windows или «как не стоит делать»
- Here’s how to fix Windows 10 Grub Rescue in 6 quick steps
- Table of contents
- How do I fix Windows 10 Grub Rescue errors?
- 1. Clean Install Windows 10
- Tenorshare Windows Boot Genius
- 2. Set the correct partition
- AOMEI Partition Assistant Professional
- 3. Reset BIOS Settings
- 4. Use Windows 10 Automatic Repair to restore the Boot Sector Code
- 5. Rebuild BCD using Windows 10 Automatic Repair
- 6. Clean Install Windows 10
- 7. Replace Hard Drive
Windows 10 deleted GRUB [FIXED BY EXPERTS]


GRUB is a multiboot loader and an essential part of the Linux operating system, but some users on the Microsoft community and Linux forums have reported that Windows 10 has deleted their grub, thus leaving their Linux distribution unable to boot. If you are also troubled this issue, here are a couple of solutions that can help you resolve this problem.
How do I recover GRUB after installing Windows?
1. Run Boot Repair
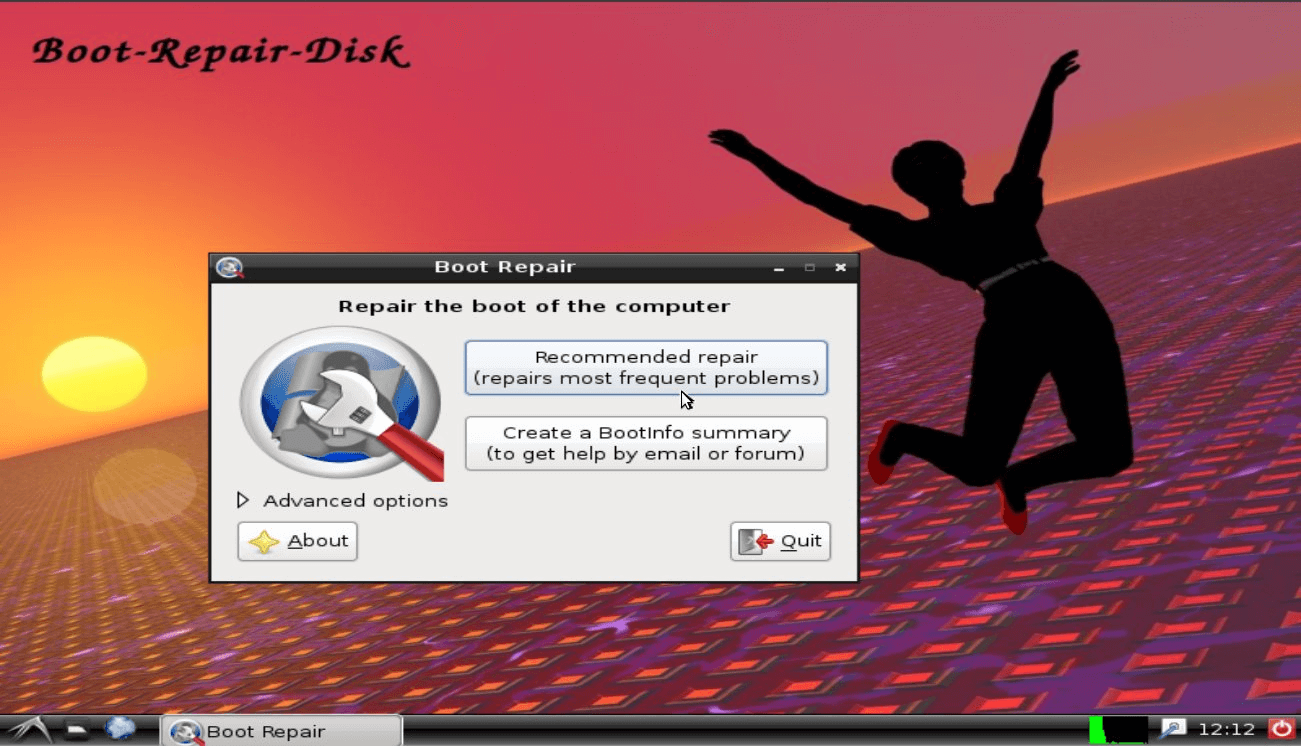
- There are two ways to get boot-repair. First is to create a disk containing the tool like Boot-Repair-Disk. This will help you to create a disk starting Boot-Repair automatically and boot on it.
- The second option is to Install Boot-Repair in Ubuntu. To do this, create Ubuntu Live-session on your USB and then choose “Try Ubuntu“.
- Connect to the Internet.
- Open a new terminal, and type the following command. Press enter after running each command.
sudo add-apt-repository ppa:yannubuntu/boot-repair
sudo apt-get update
sudo apt-get install -y boot-repair && boot-repair - Now you need to launch Boot-Repair by typing boot-repair in a terminal. You can also launch it from the Dash (Ubuntu logo at the top).
- Next, click the “Recommended Repair” button.
- Wait for the repair to finish. Note the URL that appeared on the screen.
- Now reboot the system and check if you can access the OS and GRUB is reinstalled.
Want to learn how to dual boot Windows 10? You won’t believe how easy it is!
2. Reinstall GRUB
- First, boot into your system using any Live Linux Distribution.
- Open Gnome Disks or GParted, the partition editor.
- Now find the partition where your Linux system is on. The Linux system is usually in /dev/sdax path (here X means number).
- Now close the Disk partition tool that is running (Gnome Disks or GParted).
- Open a terminal and run the following command and press Enter to execute it.
sudo mount /dev/sdaX /mnt && sudo mount –bind /dev /mnt/dev && sudo mount –bind /dev/pts /mnt/dev/pts && sudo mount –bind /proc /mnt/proc && sudo mount –bind /sys /mnt/sys && sudo chroot /mnt - In the above command replace X with the disk number that you discovered in the step 3.
- Next, enter the following command and hit enter as well.
grub-install /dev/sda && update-grub && exit
udo umount /mnt/sys && sudo umount /mnt/proc && sudo umount /mnt/dev/pts && sudo umount /mnt/dev && sudo umount /mnt && reboot - If everything goes right, this should reinstall GRUB. Reboot the computer and check if GRUB is re-installed successfully
By following any one of the methods above you should be able to fix the deleted GRUB issue. One thing to keep in mind is that if you want to dual boot on your system with Linux and Windows 10, always install Windows 10 first and then install Linux. This way Windows 10 won’t delete the GRUB by mistaking the EFI partition for its own.
RELATES STORIES YOU MAY LIKE:
Fix Grub Not Showing For Windows 10 Linux Dual Boot
Brief: Can’t access Linux in dual boot because your system boots straight to Windows without showing the Grub menu? Here’s a possible fix for you.
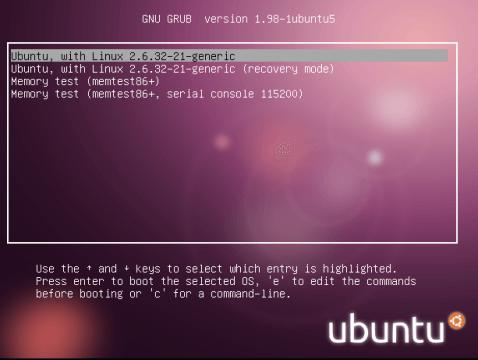
So, finally, I upgraded Windows 8.1 to Windows 10 last night. Since I dual boot Windows 8.1 with Ubuntu, I was expecting to see the Grub menu at boot so that I could choose the operating system I wanted to use. But the upgrade to Windows 10 from Windows 8.1 messed up the settings and it never showed the grub menu. It just kept booting into Windows 10 at each startup.
Frustrating, isn’t it? It seemed like there was no way to access Ubuntu at all. No – the Ubuntu install on the other partition was fine. It was just the UEFI settings that were different in the boot manager. I verified everything by accessing the UEFI firmware settings in Windows 10.
If you too are unable to boot into Grub and you’re just rebooting Windows 10 repeatedly, here’s the simple solution that worked for me.
Warning!
Playing with your boot settings can leave your system messed up. I advise having a recovery disk or Windows installation disk with you to reverse boot settings. Keeping the Linux live USB can also help in many situations.
Fix Dual Boot system booting straight to Windows
Though I’m referring to Windows 10, the steps are equally valid for Windows 8 and 8.1. Similarly, I’m using Ubuntu in dual boot here, but the trick applies to all other Linux distributions such as Linux Mint, etc.
Step 1
In Windows, go to the menu.

Step 2
Search for Command Prompt, right click on it to run it as administrator.

Step 3
This is strictly for Ubuntu. Other distributions might have some other folder name.
In here, copy and paste the command below:
You don’t need to enter a password or anything like that. The command should run just fine given that your account has admin rights.
Step 4
Restart and you’ll be welcomed by the familiar Grub screen. I hope this quick tutorial helped you fix the Grub issue.
No success?
If the above method didn’t change anything, you can reverse it using the command below:
Even if the above command didn’t work, try the one below to set the boot back to Windows.
If you’re not able to boot into the Windows installation, insert the Windows installation disk and there you’ll have access to the command prompt.
You can try some suggestions mentioned here to stop dual boot from booting straight into Windows.
If you see a “no boot found” error, you can try this or this solution.
Like what you read? Please share it with others.
Восстановление GRUB после установки Windows или «как не стоит делать»

Часа в 2 ночи мне написала подруга с просьбой одолжить ей нетбук на пару дней. Я, конечно, согласился, после чего она попросила меня поставить на него Windows с определенным софтом. Недолго думая, я накатил винду, совершенно забыв, что на нетбуке стояла Ubuntu 13.04. И все бы ничего, да вдруг вспомнил, что забыл на разделе убунты пару нужных мне файлов. Тут все и началось.
Предыстория
Ни для кого не секрет, что Windows при установке ставит свой загрузчик, не видя рядом стоящих систем. Когда я об этом вспомнил, на меня уже смотрел чистый рабочий стол Windows. Здесь был логичный выход из положения-скачать образ любого Linux-дистрибутива и запустить его в liveUSB, после чего обновить GRUB, но мне было слишком лень качать образ и записывать его на флешку. Поэтому я пошел более трудным путем. При установке Ubuntu диск был абсолютно чистым. Предвидя, что Windows рано или поздно вернется на нетбук я оставил часть диска неразмеченной. Обычно, я всегда создавал один раздел для » / » (hd0,0 в будущем) и swap (hd0,2), но в этот раз я решил поэкспериментировать и создал еще один раздел для » /home » (hd0,1).Спустя некоторое время была установлена Windows (hd0,3)
Запуск ядра
и как по волшебству ядро запустилось. Но и тут не все так просто.
Initramfs
mkdir /mnt
busybox mount /dev/sda1 /mnt
busybox mount /dev/sda2 /mnt/home
chroot /mnt
mkdir /mnt/dev
mount —bind /dev /mnt/dev
chroot /mnt
# update-grub
# exit
reboot
и получил возможность загружаться в Windows.
P.S. Предположу, что местные обитатели смогут и сами выкрутиться из подобной ситуации, поэтому статья ориентирована на тех, кто не особо дружит с Linux, но хочет подружиться, либо на тех, у кого нет второй машины или свободных флешек под рукой.
Данная статья не подлежит комментированию, поскольку её автор ещё не является полноправным участником сообщества. Вы сможете связаться с автором только после того, как он получит приглашение от кого-либо из участников сообщества. До этого момента его username будет скрыт псевдонимом.
Here’s how to fix Windows 10 Grub Rescue in 6 quick steps

- Managing your partitions can be helpful, but if they lead to boot errors, that can be upsetting.
- That would be the case with the Grub Rescue error that we will be covering below.
- If you have need of more helpful articles, our Windows 10 Errors Hub is full of them.
- If that doesn’t cut it, then maybe our much larger Troubleshooting section can help.

Many PC users partition their hard disk for one reason or the other. For instance, PC user may want to dual boot two operating systems on one PC.
However, the aftermath of the partition sometime results in PC errors e.g. GRUB rescue error problem. This occurs when Windows PC users intend to boot their computer get stuck at the boot screen with the following error messages:
- Example 1:
- error: no such partition.
- grub rescue>
- Example 2:
- error: no such partition.
- Entering rescue mode…
- grub rescue>
However, this error emanates for corrupt boot directory as well as the recent partition. Therefore, you can try out any of the enlisted solutions we have listed below to solve this problem.
Table of contents
- Clean Install Windows 10
- Set the correct partition
- Reset BIOS Settings
- Use Windows 10 Automatic Repair to restore the Boot Sector Code
- Rebuild BCD using Windows 10 Automatic Repair
- Replace Hard Drive
How do I fix Windows 10 Grub Rescue errors?
1. Clean Install Windows 10
This method installs Windows 10 OS afresh on your PC thereby wiping off previous system installations.
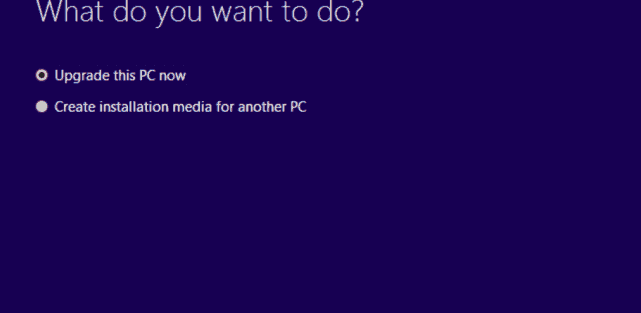
Before you proceed, download Windows 10 ISO file with the ‘media creation tool’ on another PC, and then create a bootable USB drive with it or burn it on a DVD.
Follow these steps to clean install Windows 10:
- Download the Media Creation Tool from the official download website.
- Plug in the USB flash drive with at least 4 GB.
- Run Media Creation Tool and accept the License Terms.
- Select the “Create installation media (USB flash drive, DVD, or ISO file) for another PC” option.

- Pick the preferred language, architecture, and edition and click ‘Next’.
- Choose the USB flash drive and then click ‘Next’.
- Wait for Media Creation Tool to download the setup and copy the installation files onto the USB flash drive.
- Finally, restart the affected PC.
- Plug in USB and start the Setup on your PC.
- Follow the prompts to set up new Windows.
Alternatively, creating a bootable media and fixing any boot-related errors can also be fixed using third-party utilities like Tenorshare Windows Boot Genius.
Not only doe sit greatly speed up the process of creating bootable drives like CDs, DVDs, and flash drives, but it can also help you boot your PC from various scenarios, such as black and blue screens, loading circles, and more so that you can get straight to troubleshooting them.
Tenorshare Windows Boot Genius
2. Set the correct partition
Sometimes, Windows users may deactivate the correct partition thereby resulting in the Windows 10 Grub Rescue problem. This is because the BIOS initiate the boot loader from the active partition.
Therefore, you need to check for the active partition and if it’s incorrect, you can activate the right partition. This should fix the Windows 10 Grub Rescue error display problem instantly.
Here’s how to do that:
- Connect the Windows 10 bootable media to your computer (DVD or USB flash drive)
- Restart your computer to enter into ‘Automatic Repair’ mode.
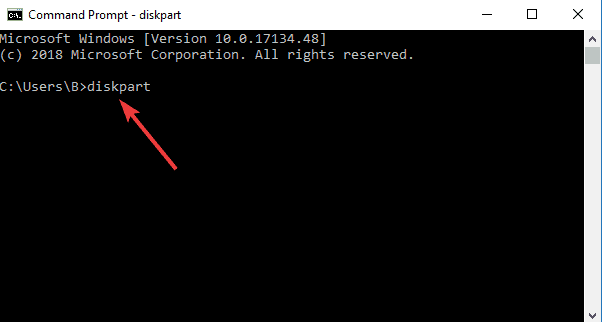
- Go to Troubleshoot > Advanced Options > Command Prompt to launch the CMD.
- Now, Type ‘diskpart’ without quotes and hit the ‘Enter’ key.
- Type the following commands one after the other:
- Then type the following commands one by one:
- list disk: ( this list all hard drives in your computer)
- select disk n: (n means the disk where the OS is installed. Here you can select disk 0 or any other disk where Windows 10 is installed.)
- list volume: (this list all volumes on disk 0 is listed.)
- select volume n: (the n implies the number of system partition.)
- active: (this indicates the active system partition.)
- From the list of the displayed system partition, determine the right partition which should be active.
- Type the following command and hit ‘Enter’ after each command:
- select partition d
- active
- quit
- Restart your PC afterwards.
This should resolve the Windows 10 grub rescue error startup problem.

As with the first solution, you can also consider using a third-party tool to help you with partition management as well, a tool like AOMEI Partition Assistant Professional.
Using the tool is far easier than the generic steps mentioned above since all you need to do is launch the program, select the partition, and then choose precisely what you want to do with it.
Once you’ve confirmed your choice, it’s only a matter of giving it time to apply the changes, and then performing a restart.

AOMEI Partition Assistant Professional
3. Reset BIOS Settings
To reset BIOS settings, do the following:
- Shut down your PC and then start it up.
- Hit the “F2” key repetitively until the system screen window come into view.(Note: BIOS function key may vary depending on your system. Check for the BIOS Function key when you switch on your PC).
- Use the “Right Arrow” on your keyboard to navigate to the “Exit” menu tab.
- Now, hit on the “Down Arrow” and navigate to the “Load Optimized Defaults” option.
- Select the “Load Optimized Defaults” option, and then hit the “Enter” button.
Meanwhile, you can also flash your PC’s BIOS as an alternative to fix Windows 10 grub rescue problem. If you intend to flash your PC’s BIOS, check out our prepared walkthrough guide for this purpose.
4. Use Windows 10 Automatic Repair to restore the Boot Sector Code
- Restart your PC few times during the boot sequence.
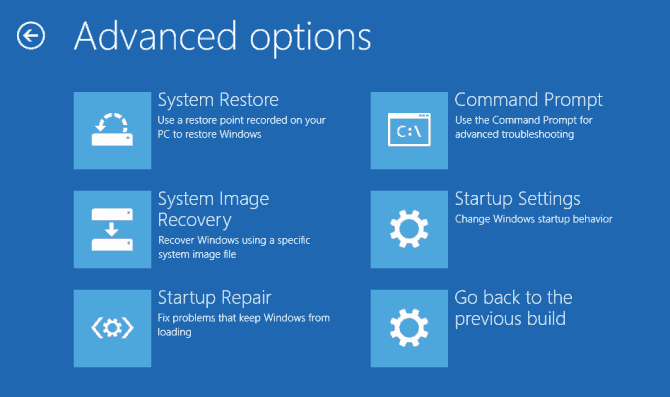
- From the list of options, Select Troubleshoot > Advanced options > Startup Repair.
- The repair process will now start.
- After the repair process is complete, check if the problem is resolved.
Damaged boot sector code may cause the Windows 10 grub rescue error prompt. Therefore, restoring the boot sector code works could potentially fix the grub rescue issue.
In addition, you can also use bootable Windows 10 DVD or USB flash drive to restore boot sector code.
- Connect the Windows 10 bootable media to your computer (DVD or USB flash drive)
- Restart your computer to enter into ‘Automatic Repair’ mode.
- Go to Troubleshoot > Advanced Options > Command Prompt to launch the CMD.
- In the CMD window, type the following command and hit “Enter” afterwards:
- diskpart
- select disk 0
- list volume
- All volumes will be displayed. In “Type” column, you will find “DVD-ROM” value. (ensure you remember the drive letter of the Windows 10 bootable media you plugged to your PC). For instance letter E.
- Now, type the following command and hit Enter afterwards:
- Exit
- E:
- cd boot
- Dir
- Check to see if you have bootsect.exe files in the list. If yes, enter the following command keys and hit ‘Enter’ afterwards:
- bootsect /nt60 SYS /mbr
- Exit
- Restart your PC and check to see if the problem is resolved.
Note: In case you do not see the bootsect.exe file from the steps above, you may proceed to the next step in order to rebuild BCD.
5. Rebuild BCD using Windows 10 Automatic Repair
Follow these steps to rebuild BCD:
- Connect the Windows 10 bootable media to your computer (DVD or USB flash drive)
- Restart your computer to enter into ‘Automatic Repair’ mode.
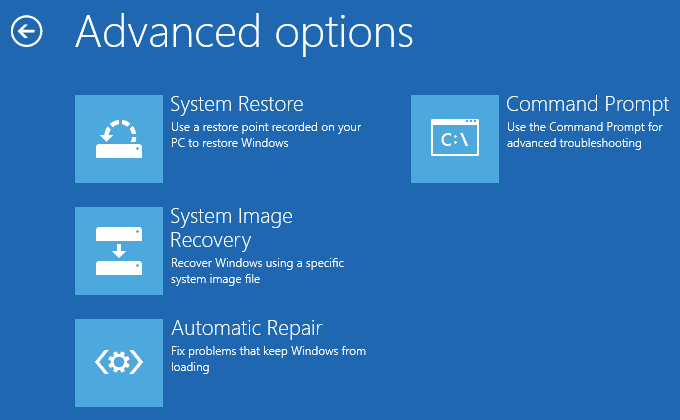
- In the Advanced options window, select “Command Prompt” to initiate the BCD files.
- In the CMD window, type the following commands in turn, and then hit the ‘Enter’ key afterwards:
- bootrec /fixmbr
- bootrec /fixboot
- bootrec /rebuildbcd
- After the process is complete, close Command Prompt, and then restart your PC.
Rebuild BCD is another applicable method in fixing Windows 10 grub rescue problem.
This should probably resolve the Windows 10 grub rescue issue. However, if you are still experiencing the issue, you may proceed to the next solution.
6. Clean Install Windows 10
- Download the Media Creation Tool from the official download website.
- Plug in the USB flash drive with at least 4 GB.
- Run Media Creation Tool and accept the License Terms.
- Select the “Create installation media (USB flash drive, DVD, or ISO file) for another PC” option.
- Pick the preferred language, architecture, and edition and click ‘Next’.
- Choose USB flash drive and then click ‘Next’.
- Wait for Media Creation Tool to download the setup and copy the installation files onto the USB flash drive.
- Finally, restart the affected PC.
- Plug in USB and start the Setup on your PC.
- Follow the prompts to setup new Windows.
This method installs Windows 10 OS afresh on your PC thereby wiping off previous system installations.
Before you proceed, download Windows 10 ISO file with the ‘media creation tool’ on another PC, and then create a bootable USB drive with it or burn it on a DVD.
Note: Ensure that the USB drive for the Windows 10 installation is 2.0 version instead of 3.0 or 3.1 and it’s at least 4GB.
7. Replace Hard Drive
Another alternative for fixing Windows 10 Grub Rescue issue is by replacing the hard drive. This is because the hard drive may be damaged hence resulting in the grub rescue startup problem.
Therefore, we recommend that you get another hard drive from your PC’s manufacturer websites, or mainstream retail sites such as Amazon or Aliexpress, and then replace it by yourself if you have the tech knowledge.
However, if you are unable to carry out the replace yourself, you can request the service of a computer engineer to replace the hard drive and clean install Windows 10 as well on your PC with the new hard drive.
In conclusion, we do hope that you were able to fix Windows 10 grub rescue problem by using any of the highlighted solutions we mentioned above. However, if you have any question regarding any of the solutions, feel free to drop us a comment below.
Are you experiencing any technical issue with your Windows PC? Drop us a message at the contact form located here for assistance.


