- Windows 10 Search Is Broken and Shows Blank Results, How to Fix
- How to fix blank results showing in Windows 10 search
- Method 1: Use premade Registry file to disable Bing search
- Method 2: Use the Registry Editor to disable Bing integration
- Enable Bing integration again
- Fixing broken shortcuts in Windows with the Broken Shortcuts Corrector
- Fix broken shortcuts
- April 2021 Update:
- Windows 10 Is Broken and How to Fix it
- Method 1. Run Windows Search Troubleshooter
- Method 2. Repair Corrupt or Missing System Files
- Method 3. Update Device Drivers
- 1. Identify Your Driver Issues
- 2. Download and Update Hardware Drivers
- 3. Restart Your Computer
- [Solved] How to Fix Broken Registry Items on Windows 10
- Method 1: Run Automatic Repair/Startup Repair via Settings
- Method 2: Use System Restore to Back to a Restore Point
- Method 3: Run System Files Checker in Command Prompt
- Method 4: Run the DISM Command in Command Prompt
- Method 5: Reset Windows System to Fix Broken Registry Items
- Recommendation: Clean Invalid Registries with System Genius
Windows 10 Search Is Broken and Shows Blank Results, How to Fix
Lawrence Abrams

Update #1: Microsoft has stated that they have pushed out a fix and that it should be resolved for «most’ users. If you already implemented the fix below, you can enable Bing search again (instructions below) and see if the issue is resolved for you. If it is not, you will need to use the fix again and wait for Microsoft to resolve the issue.
Update #2: Microsoft has stated that the issue should be resolved and that users need to restart their computers for the fix to work. More info below:
«This issue was resolved at 12:00 PM PST. If you are still experiencing issues, please restart your device. In rare cases, you may need to manually end the SearchUI.exe or SearchApp.exe process via Task Manager. (To locate these processes, select CTRL + Shift + Esc then select the Details tab.)»
A bug in the Windows 10 Search is causing blank results to be shown in both the Start Menu and in File Explorer. This is making it impossible to search for and launch an application from the Start Menu.
Starting today, Windows 10 users all over the world have discovered that when they attempt to use Windows Search from the Start Menu to search for a file or application, the results just come up blank.
This same behavior occurs when users try to perform a search within File Explorer as it too utilizes the Windows Search feature.
This issue is being caused by the integration of Bing search into Windows Search and the only way to fix it at this time is to disable this functionality.
If you do not utilize search often or do not find this bug to be a problem, it is suggested that you wait for Microsoft to push out a fix rather disabling Bing integration.
Update 2/5/20: Microsoft has stated that they are aware of the issue and have issued a fix and that it should be resolved for most users.
«We are aware of a temporary server-side issue causing Windows search to show a blank box. This issue has been resolved for most users and in some cases, you might need to restart your device. We are working diligently to fully resolve the issue and will provide an update once resolved. «
How to fix blank results showing in Windows 10 search
To disable Bing search in Windows Search we need to configure the following Registry values.
[HKEY_CURRENT_USER\Software\Microsoft\Windows\CurrentVersion\Search]
«CortanaConsent»=dword:00000000
«BingSearchEnabled»=dword:00000000
Below we have provided a simple method that you can use to quickly add these values to the Registry so that you can get Windows Search working again.
Method 1: Use premade Registry file to disable Bing search
BleepingComputer has created a Registry file that you can use to import the required changes into your Registry.
To use this Registry file to disable Bing search, please follow these steps:
- Download disable-bing-search.reg to your computer. Once downloaded, double-click on the file.
- When you double-click on the file, Windows 10 will display a UAC prompt asking if you would like to allow Registry Editor to make changes to your system. Click on the Yes button to continue.
- You will now be shown a prompt from Registry Editor asking if you wish to continue. Please click on the Yes button to configure the required Registry values.
Method 2: Use the Registry Editor to disable Bing integration
If you do not wish to use the premade Registry file, you can disable Bing’s integration with Windows Search via the Registry Editor.
- As you cannot launch programs via Windows Search, we need to launch the Registry Editor via the Run: dialog. To do that, press the Windows key + the R key at the same time to open the Run: dialog and then type Regedit and press the OK button.
- Windows will display a UAC prompt asking if you wish to allow the Registry Editor to make changes to the system. Press the Yes button to continue.
- Navigate to the HKEY_CURRENT_USER\Software\Microsoft\Windows\CurrentVersion\Search key.
- Right-click on Search and select New and then DWORD (32-bit) Value as shown below.
Regardless of the method used, once restarted, the Start Menu and File Explorer search results will no longer be blank.
Enable Bing integration again
Once Microsoft releases a fix, you can enable Bing integration with Windows Search by downloading the enable-bing-search.reg registry file.
This Registry file will delete the BingSearchEnabled value and set the CortanaConsent value to 1 under the HKEY_CURRENT_USER\Software\Microsoft\Windows\CurrentVersion\Search Registry key.
Once downloaded, you can double-click on the file to import the changes and restart Windows to enable Bing again.
While I strongly suggest that you use the premade Registry file for ease of use and to avoid mistakes, you can also make these changes via the Registry Editor.
Fixing broken shortcuts in Windows with the Broken Shortcuts Corrector
Broken Shortcut Fixer looks for broken shortcuts on your Windows computer and automatically fixes any shortcuts it can find using the Windows link resolution method.
Fix broken shortcuts
April 2021 Update:
We now recommend using this tool for your error. Additionally, this tool fixes common computer errors, protects you against file loss, malware, hardware failures and optimizes your PC for maximum performance. You can fix your PC problems quickly and prevent others from happening with this software:
- Step 1 : Download PC Repair & Optimizer Tool (Windows 10, 8, 7, XP, Vista – Microsoft Gold Certified).
- Step 2 : Click “Start Scan” to find Windows registry issues that could be causing PC problems.
- Step 3 : Click “Repair All” to fix all issues.

Select the drive to scan and click Scan Shortcuts. All shortcuts that cannot be repaired appear as defective. These broken shortcuts can be deleted or you can examine them individually by clicking Show shortcut.
Characteristics :
- Click Scan Shortcuts to repair and find broken shortcuts.
- Double-click broken shortcuts to display them in Windows.
- Move the mouse pointer over a broken shortcut to see the broken path.
- Delete broken shortcuts sends the selected shortcuts to the Recycle Bin.
Broken Shortcut Fixer is a portable freeware that also works under Windows 7 and can be downloaded from the softpedia.
Start Menu Cleaner might also interest you !
Windows 10 Is Broken and How to Fix it
Sep. 13, 2018 / Updated by Bessie Shaw to Windows 10
Quite a few Windows 10 users have encountered Cortana not working, Start menu not working, etc. If you are also experiencing this kind of issues, it means your Windows 10 is broken and here are 3 ways to fix the broken Windows 10 glitch.
Method 1. Run Windows Search Troubleshooter
You could utilize the built-in Windows 10 Search troubleshooter to diagnose Cortana and Start menu problems. Follow these steps:
Step 1. Open Control Panel
Step 2. Select All Control Panel Items
Step 3. Click on Find and fix problems with Windows Search to open the Windows Search Troubleshooter
Step 4. Run Windows Search Troubleshooter and follow the wizard
Step 5. Restart your computer once it is completed
Method 2. Repair Corrupt or Missing System Files
Your Windows 10 is broken that may be caused by corrupt or missing system files. You could run the System File Checker utility to repair the corrupted or missing system files. Follow the tutorial below to start the Command Prompt.
Step 1. Click Start, and type Command Prompt in the search box, then right-click Command Prompt (Run as administrator)
Step 2. At the command prompt, enter the following command and hit Enter
sfc/Scannow
Note: There’s a space between «sfc» and «/».
Step 3. The System File Checker utility will scan all protected system files and detect the corrupt or missing files and then repair or restore them.
Method 3. Update Device Drivers
If driver issues exist on your computer, your Windows 10 could be broken. You need to repair your problematic drivers and update the outdated drivers. The easiest and fastest way to download and update drivers is using an automatic driver download and update utility tool, such as Driver Talent, all your outdated, corrupt, damaged or missing drivers will be scanned out in seconds and then automatically download and install the most updated version within a few minutes.
Click the button below to grab Driver Talent directly.
Follow the 3 easy steps below to download and install the correct hardware drivers with Driver Talent to fix the broken Windows 10 problem.
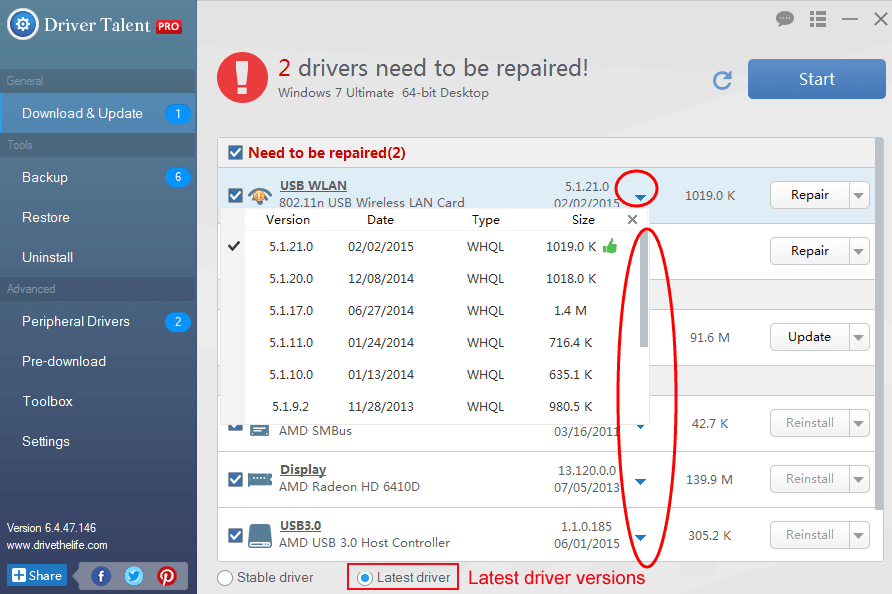
1. Identify Your Driver Issues
Start Driver Talent. All your outdated, corrupt, broken or missing device drivers could be identified in seconds by one-clicking the “Start” button.

2. Download and Update Hardware Drivers
You could fix all the detected erroneous drivers by one-clicking “Repair”. Driver Talent will automatically download and install the best-matched hardware drivers for Windows 10. You are also able to click “Update” to update your drivers to the newest version. It is recommended not to update what ain’t unless they are broken or you want particular functionality.
3. Restart Your Computer
Restart your computer in order to fully apply the hardware driver updates.
Note: Be sure to use Driver Talent to back up you drivers prior to any hardware driver update in case of driver crashes or other unexpected computer issues.
Apart from driver download and update, Drive Talent is bundled with far more premium features, such as drivers restore, drivers uninstall, system restore, drivers pre-download for another PC, PC Repair, hardware detection, VR support check and PC speed up, etc.
You may also like to check out:
If you discover any other troubleshooting methods to fix the broken Windows 10 issue, please write them down in the comments section below. Thanks a lot. Any other Windows 10-related computer issues, such as black screen, no WiFi available, stuck in a reboot loop and more, you can check for solutions in the Windows 10 Issues and Fix section.
[Solved] How to Fix Broken Registry Items on Windows 10
Windows registry is a massive database in your computer which contains settings, information, options and other values for programs and hardwares that are installed in the Windows operating system. The registry has two basic elements: keys and values. The operating system will refer the registry to get the relevant keys and values related to certain programs and applications. In general circumstances, the registry work fine. However, messing with registry keys can cause them to become corrupted or damaged. Malware and viruses, registry fragments and system shutdown errors are main causes to broken registry items. Here you’ll learn How to Fix Broken Registry Items on Windows 10.
Overview:

Method 1: Run Automatic Repair/Startup Repair via Settings
Using Automatic Repair is a useful way to fix broken registry items and corrupt or invalid registry keys on Windows 10. This feature is available in the newer versions of Windows. Now follow the below steps to learn how to fix broken registry items by using Automatic Repair/Startup Repair.
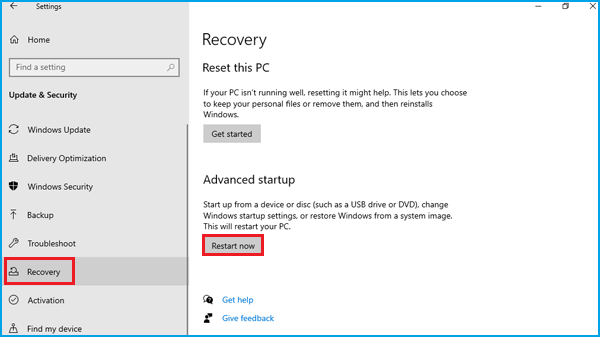
Step 1. Go to Settings > Update & Security, select Recovery on the left sidebar, and then click the Restart now button under the section of Advanced Startup.
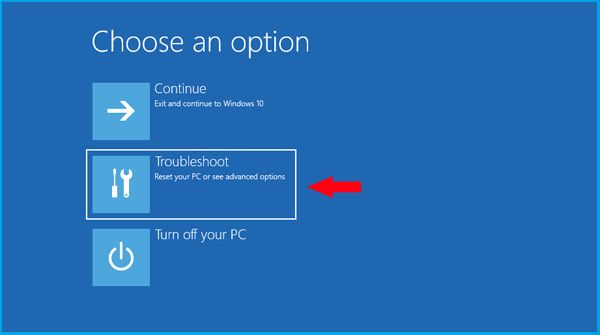
Step 2. Wait for a while and then you will see a few options on the interface. Choose Troubleshoot from the options to go on.
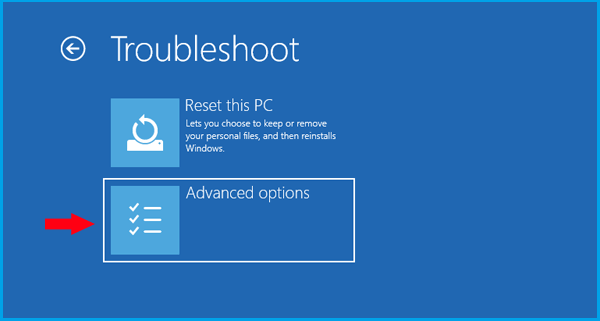
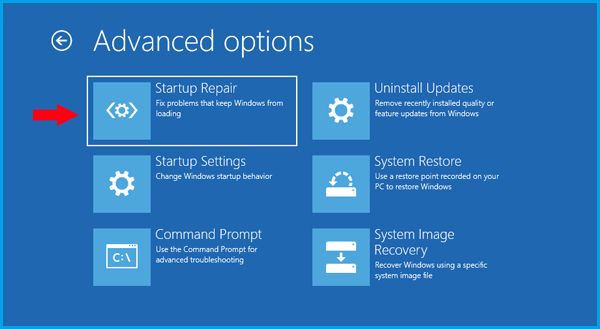
Step 3. Click Advanced options to proceed.
Step 4. Select Automatic Repair/Startup Repair.
Step 5. Choose an account to continue, enter the password for this account and then click Continue to go on.

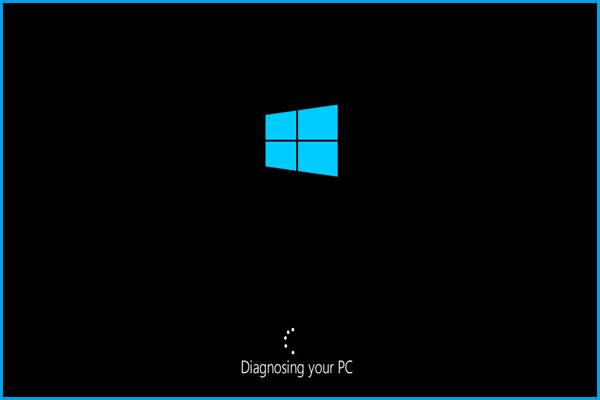
Step 6. Then the Automatic Repair/Startup Repair will start diagnosing your PC and it may restart in this process. In this way, your broken registry items can be fixed.
If this method doesn’t work for you, move on to the following methods.
Method 2: Use System Restore to Back to a Restore Point
If you have already enabled System Restore on Windows 10, Windows 10 will automatically create a restore point when a new update, a significant change or a major modification happens. You can also choose to create a System Restore Point manually. You can perform system restore to revert the registry back to a restore point where the registries were not broken. Below is the step-by-step guidance.
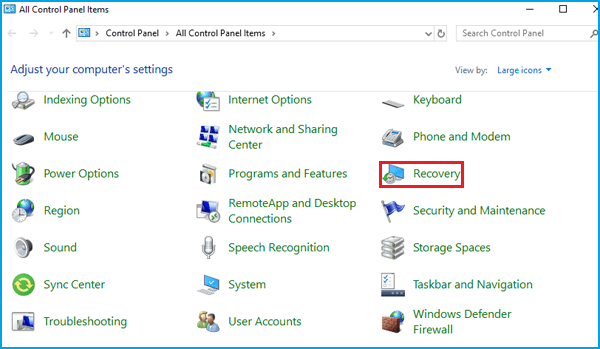
Step 1. Open Control Panel, view by large or small icons, and then select Recovery.
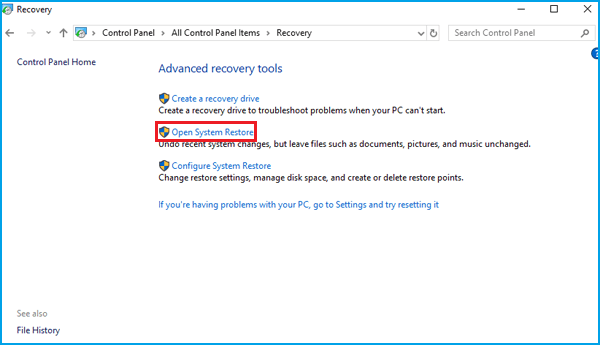
Step 2. Click Open System Restore to continue.
Step 3. In the Restore system files and settings window, click Next to go on.
Step 4. Select a restore point, click Scan for affected programs to check programs and drivers that will be deleted and might be restored. Then close it and click Next.
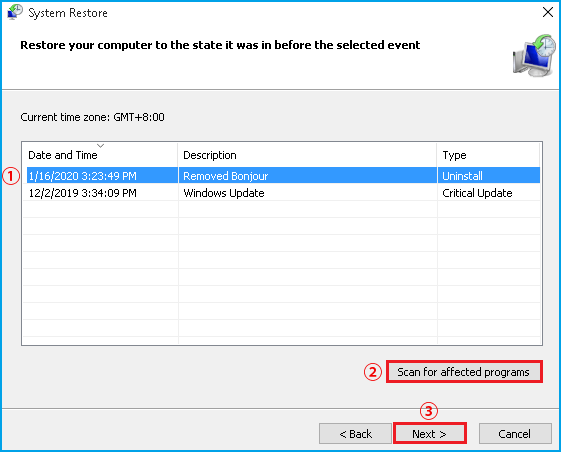
Step 5. Confirm your restore point carefully and click Finish to start the System Restore process and wait for the process to complete patiently. Then your system will be back to a restore point where the registries were not broken.
Method 3: Run System Files Checker in Command Prompt
Another way for you to fix broken registry items on Windows 10 is to run System File Checker in Command Prompt. System File Checker can help you search for missing or corrupted files and try to repair these files. Now learn how to fix broken registry items on Windows 10 as per the following instructions.
Step 1. Run Command Prompt as administrator, type the command of «sfc /scannow» without the quotes and press Enter to run it. Please be patient while it is scanning and wait for the process to complete.
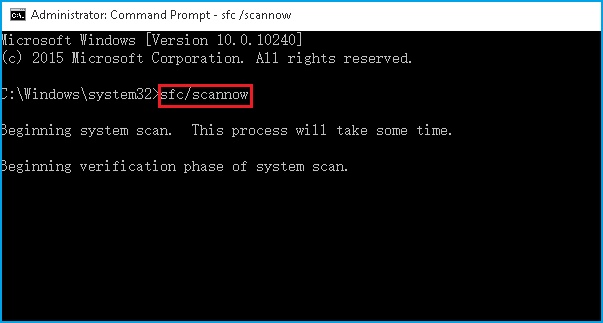
Step 2. Restart your computer to check if the broken registry items error has been repaired. If not, move to the next method.
Method 4: Run the DISM Command in Command Prompt
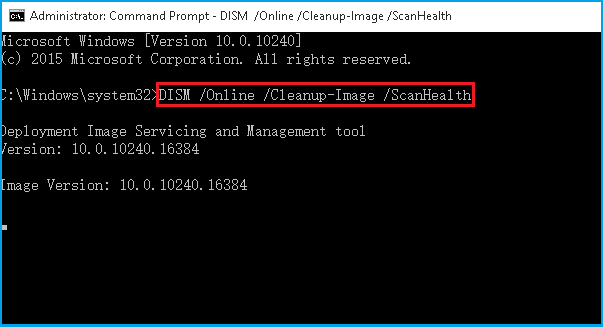
If the SFC command doesn’t work, you can try to fix broken registry items by using DISM Command. The steps are the same. You need: run Command Prompt as administrator, type «DISM /Online /Cleanup-Image /ScanHealth» command without the quotes and then press Enter to continue. Wait the process to finish and then check the results.
Method 5: Reset Windows System to Fix Broken Registry Items
The last method for you is to reset Windows system. You can adopt this method if all the above are useless to you. Here is how to fix broken registry items in Windows 10 by resetting Windows system.
Step 1. Go to Settings, select Update & Security and then choose Recovery.
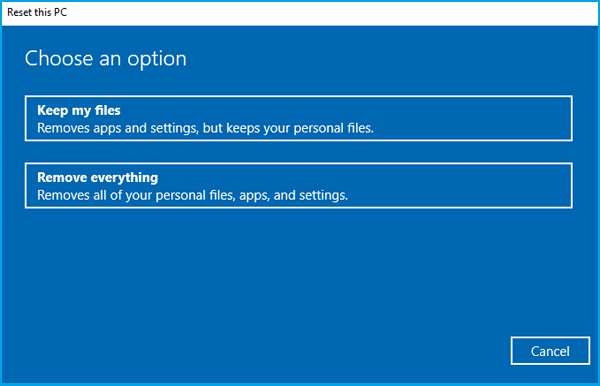
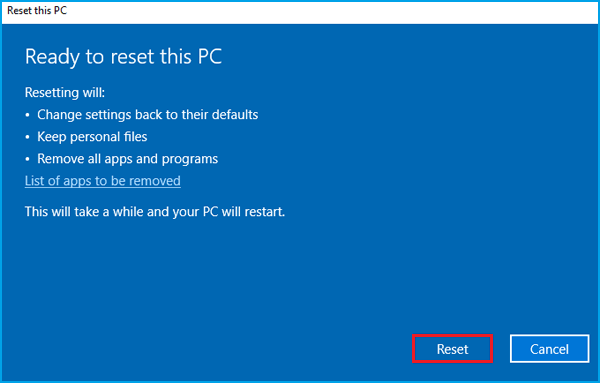
Step 2. Click the Get started button under Reset this PC section.
Step 3. Choose an option as per your preference. There are two options for you: Keep my files and Remove everything. If you want to keep your personal files, choose Keep my files.
Step 4. Confirm the resetting information carefully and then click the Reset button to start the process. This will take a while and your PC will restart.
After the resetting process is completed, you can check whether the broken registry items error is fixed.
Recommendation: Clean Invalid Registries with System Genius
Invalid registry entries will slow down the PC performance. Well, how to clean these invalid registry files in your computer? You can use a professional registry cleaner to help you. iSunshare System Genius is a reliable registry cleaner which can be used to clean invalid registry files as well as junk files quickly and safely. Steps to clean invalid registry files are introduced as below.

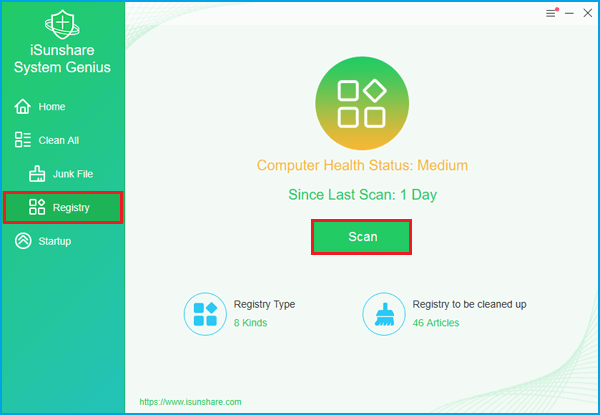
Step 1. Download iSunshare System Genius and install it on your computer properly. Launch the software, select the function of Registry on the left sidebar, and then click the Scan button to search for the invalid registry files.
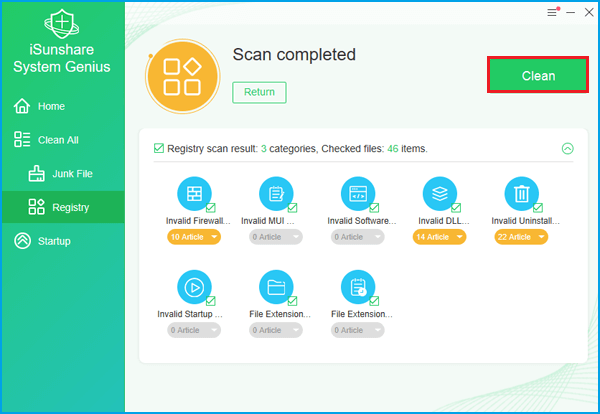
Step 2. It won’t take long to complete the scanning process. After the scanning finishes, you will get the registry scan result. To delete all the invalid registry files, click the Clean button to go on.
Step 3. After the registry files are removed successfully, tap OK to make sure the result. Then you can close the software. It is a good idea to regularly use it to clean invalid registry files for your computer. Thus your computer can keep clean and stable.


