- Fix: UEFI Firmware Settings Missing in Windows 10
- What is UEFI?
- What is causing UEFI Setting to disappear from Windows 10?
- Method 1: Verifying if the computer is equipped with UEFI
- Method 2: Bypassing the Fast Startup function
- Method 3: Disabling Fast Startup
- Method 4: Clearing the CMOS (if applicable)
- Method 5: Creating a Boot to UEFI Firmware Shortcut
- Method 6: Reinstalling Windows 10 with UEFI enabled
- FixWin for Windows 10 [2020] Download Latest Version
- What is FixWin10 App
- FixWin 10 Features
- Download FixWin for Windows 10
- How To Use Fix Win 10
- Conclusions
Fix: UEFI Firmware Settings Missing in Windows 10
Several Windows 10 users are reporting that they are unable to access the UEFI settings on their Windows 10 computer. In most cases, users have tried accessing the UEFI menu from the initial starting screen or via the Advanced options menu, but they weren’t able to get there. Most affected users report that the UEFI menu was accessible before.
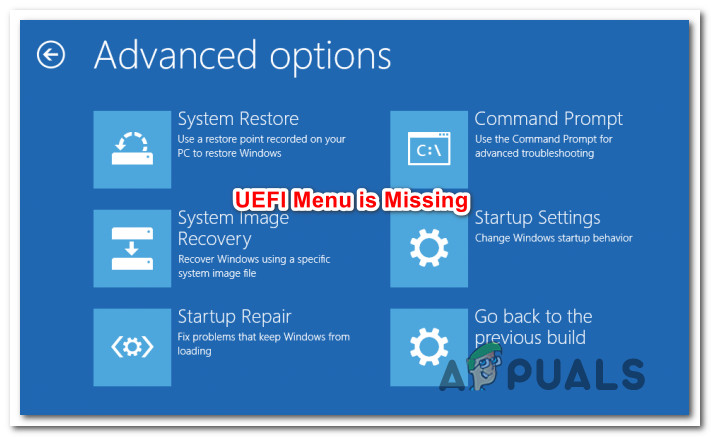 UEFI Menu is missing from Windows 10
What is UEFI?
Both BIOS (Basic Input/Output System) and UEFI (Unified Extensible Firmware Interface) are low-level software menus that will start when you boot your PC (before the sequence of booting your Operating System).
But the difference between the two is, UEFI is a more modern solution – it supports graphics, mouse cursors, more security feature, faster boot times, larger hard drives and the list can go on.
There’s no way to switch to a UEFI firmware if your computer only supports BIOS. However, most new computers will include UEFI. And even more, most UEFI implementations will support backward BIOS emulation (if you’re more familiar with the old menu).
What is causing UEFI Setting to disappear from Windows 10?
We investigated this particular issue by looking at various user reports and the repair strategies that affected users have deployed in order to resolve the issue and get the UEFI Setting back. Based on what we gathered from our investigations, the are several common scenarios that will trigger this particular problem:
- Computer’s motherboard doesn’t support UEFI – Before using any of the other potential fixes, it’s important to ensure that your motherboard is equipped to support UEFI. Older computers only know how to boot into BIOS (Legacy Mode). To make sure that your computer supports UEFI, you can use the MSINFO utility.
- Fast startup function is disabling access to the UEFI menu – Fast Startup has the potential of preventing the end user from accessing the UEFI menu for the sake of shaving off an extra few seconds off the booting up time. If this scenario is applicable, you can get around this issue by either bypassing the fast startup function or by disabling it altogether.
- Extra Fast Startup is enabled – An even more aggressive function that will restrict access to the UEFI menu is the Extra Fast Startup sequence. This setting is only available with a limited number of UEFI-based motherboards, but keeping this option enabled will disable keystrokes during the boot sequence, which makes it way harder to access the UEFI firmware settings. In this case, you can reset the setting by clearing the CMOS battery.
- Windows 10 Was installed in Legacy Mode – Even if your motherboard is equipped with UEFI capabilities, your OS won’t use it if your drive is formatted with MBR instead of GPT. If this scenario is applicable, you can either use a MBR to GPT converter or install your OS again with UEFI enabled.
If you’re currently struggling to resolve this particular issue on Windows 10, this article will provide you with several troubleshooting steps. Down below, you’ll find a collection of methods that other users in a similar situation have used to resolve the problem.
For the best results, we advise you to follow the methods below in the order that they are presented in since they are ordered by efficiency and severity. As long as UEFI is supported on your system, one of the methods below is bound to resolve the issue regardless of the scenario you’re in.
Method 1: Verifying if the computer is equipped with UEFI
Before you follow other repair strategies, it’s important to be 100% sure that your computer has the necessary UEFI firmware to open the settings menu. If you’re dealing with an older computer (with an older motherboard), chances are UEFI firmware is unavailable and the only supported BIOS Mode is Legacy.
To determine if this is true or not, you can run the MSINFO utility to find out the BIOS Mode inside the System Information screen. Here’s a quick guide on how to do this:
- Press Windows key + R to open up a Run dialog box. Then, type “msinfo32” and press Enter to open up the System Information screen.
- Inside the System Information window, select System Summary from the left-hand side pane.
- Then, move over to the right pane and scroll down through the items to find BIOS Mode. If the value of BIOS Mode is UEFI, then your computer is equipped with UEFI. IF the value is Legacy, then UEFI is not supported with this particular motherboard.
 Verifying the BIOS Mode
Method 2: Bypassing the Fast Startup function
If Fast Startup is turned on on your Windows 10 computer, chances are every time you start your computer up after doing a regular shutdown your computer will bypass the delay in BIOS/UEFI that allows you to enter the menu.
If this is the culprit that’s stopping you from accessing your UEFI settings, one way to go around preventing this from happening is to force a normal startup that will shut down the computer to the absolute power off state.
Here’s a quick guide on how to do this:
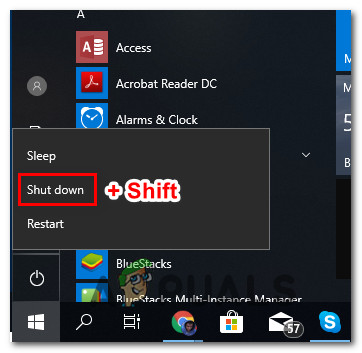
- Click the Start icon (or press the Windows key) to access the Start menu.
- Press and hold the Shift key while clicking the Power icon and then on Shut down.
 Bypassing Fast Startup
 - Your computer will shut down completely and fast startup will temporarily be disabled.
- Power on your computer again and start pressing the dedicated Setup key during the initial startup sequence to enter your UEFI settings. Pressing the Setup key to enter BIOS settings
 Bypassing Fast Startup
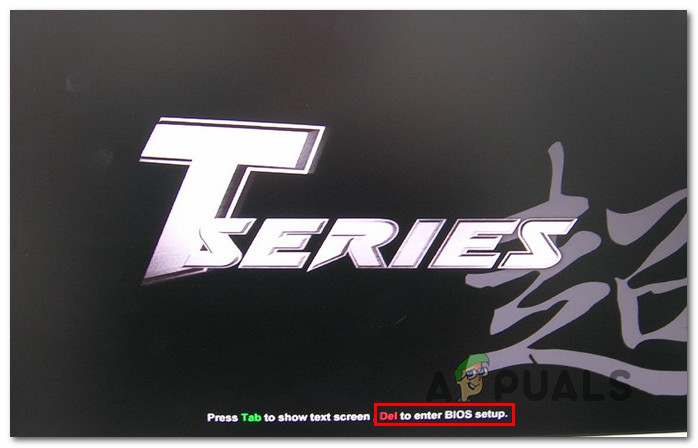 Pressing the Setup key to enter BIOS settings
 Note: The key should be displayed on the screen, but just in case you don’t spot it, try one of the following – Esc, Del, F2, F1, F4, F8, F10, F12. You can also search online for the specific key associated with your motherboard manufacturer.
If the issue was being caused by the Fast Startup feature, this procedure should have allowed you to access your UEFI settings.
In the event that you want to make UEFI accessible permanently or this method wasn’t applicable, move down to the next method below.
Method 3: Disabling Fast Startup
If the method above has confirmed your suspicions that Fast Startup is causing this particular issue, you can disable the feature for good to make the UEFI menu accessible at all times. But before doing this, you’ll need to know that disabling the fast startup feature will mean longer booting up times.
If you’re prepared for that, here’s what you need to do to disable fast startup:
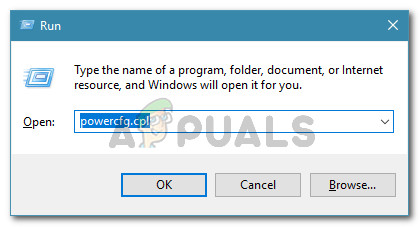
- Press Windows key + R to open up a Run dialog box. Then, type “powercfg.cpl” and press Enter to access the Power Options menu. Running dialog: powercfg.cpl
- Inside the Power Options menu, go over to the left-hand side menu and click on Choose what the power buttons do. Choose what Power Buttons do – Control Panel
- Inside the System Settings menu, click on Change settings that are currently unavailable. This will grant us the ability to disable the fast startup feature.
- Move down below to Shutdown settings and uncheck the box associated with Turn on fast startup.
 Running dialog: powercfg.cpl
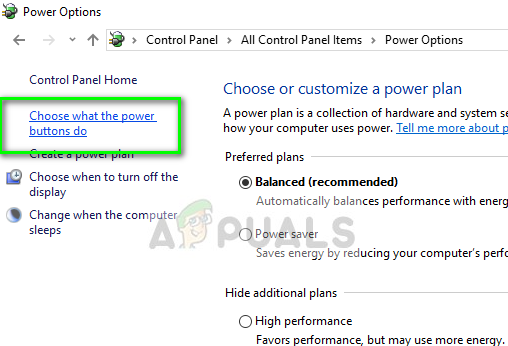 Choose what Power Buttons do – Control Panel
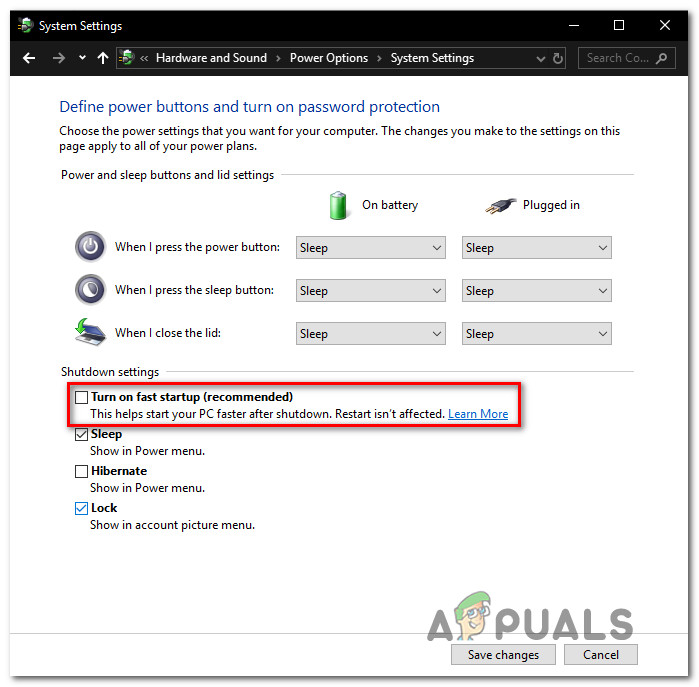 Disabling fast startup
If this method didn’t allow you to regain access into your UEFI settings, move down to the next method below.
Method 4: Clearing the CMOS (if applicable)
Another possible reason why you might be having trouble accessing your UEFI settings is due to a BIOS/UEFI feature called Extra Fast Startup. This option will shave off a couple of good seconds from the overall startup time by disabling everything that is not essential to the bootup procedure – on some computers, this option will also disable keypresses during the bootup sequence, which will effectively disable the ability to access the UEFI menu again.
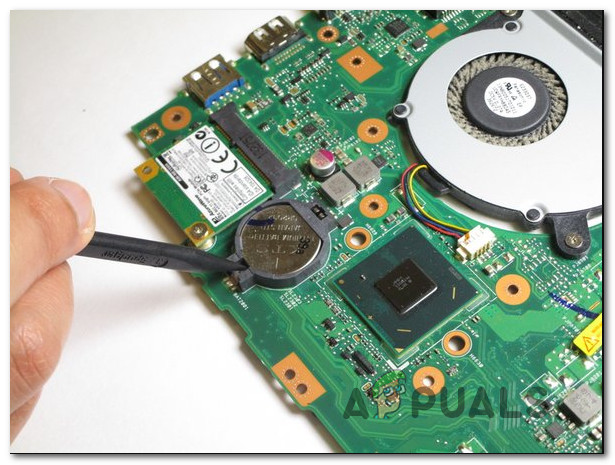
If this particular scenario is applicable, you can work-around the problem by clearing the CMOS (Complementary Metal-Oxide Semiconductor) battery. Here’s a quick guide on how to do this:
Note: The steps below are only applicable to desktop PCs. Replicating this issue on a laptop is far more complicated since you’ll have to take everything apart until you reach the motherboard.
- Turn off your computer and unplug it from the power source.
- Remove the side cover and equip a static wrist band if you have one. This grounds you to the frame of the computer and evens out the electrical energy which ends up eliminating the risk of producing damage to your PC’s components.
- Take a look at your motherboard and identify the CMOS battery. Once you see it, use your fingernail or a non-conductive screwdriver to remove it from the slot. Removing the CMOS battery
- Wait a couple of seconds before putting it back into place.
- Put the side cover back, plug your computer to a power source and start it up.
- The procedure that we just did ensures that every previously BIOS / UEFI setting that was saved is no forgotten. Try accessing your UEFI settings during the startup sequence and see if your keystrokes are getting registered.
 Removing the CMOS battery
If you’re still encountering the exact issue, move down to the next method below.
Method 5: Creating a Boot to UEFI Firmware Shortcut
Another way of forcing your system to boot into the UEFI Firmware settings menu is to create a shortcut capable of making your PC boot directly into that menu. Several affected users have reported that this procedure allowed them to finally access the UEFI Firmware settings menu.
Here’s a quick guide on how to do this:
- On your desktop, right-click on an empty spot and choose New > Shortcut.
- At the next screen, enter the following command and click the Next button:
- Name the newly created shortcut to whatever you want, then click Finish.
- Right-click on the newly created shortcut and choose Properties.
- Inside the Properties menu, go to the Shortcut tab and click the Advanced menu.
- Then, inside the Advanced Properties menu, make sure that the box associated with Run as administrator is checked. Once it is, click Ok and then Apply to save the changes.
 Creating a UEFI menu shortcut
To use the shortcut, simply double-click on it. After granting access at the UAC (User Account Control), your computer will restart directly into the UEFI settings menu.
Method 6: Reinstalling Windows 10 with UEFI enabled
If you’ve come this far without a result, chances are you didn’t install Windows 10 via UEFI. UEFI needs to be enabled when you do a clean installation of Windows 10 because it will tell your OS to use this mode instead of the legacy BIOS.
If that’s the case, one way to convince your system to use the newer UEFI menu is to use a utility capable of converting your MBR drive to GPT – you can follow this article (here) to do this.
Or, if you want to start from scratch, access your BIOS settings and make sure that the Boot Mode is set to UEFI and save the changes before you exit.
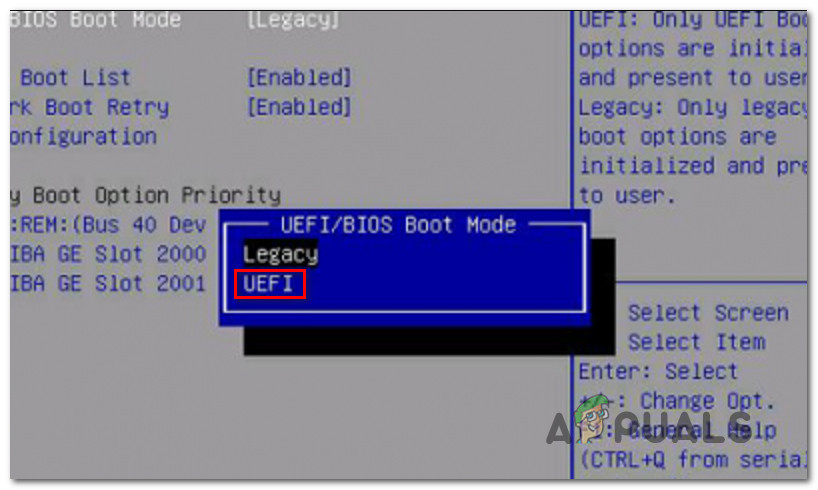 Setting the boot mode to UEFI
Once UEFI is enforced as the default boot mode, use this article (here) to clean install Windows 10. Once the installation is complete, your computer should be able to access the UEFI firmware settings normally.
FixWin for Windows 10 [2020] Download Latest Version
FixWin 10 – FixWin 10 tool is the best app to fix windows 10 issues. Its a third party Winfix tool. It truly serves it’s purpose.
Although Microsoft doesn’t recommend this app but it has proved a reliable tool to fix windows 10.
What is FixWin10 App
FixWin 10 for Windows 10 is a portable windows software that can allows you to fix and repair Windows 10 problems, issues and annoyances. FixWin is also available for Windows 8 as well as Windows 7, Vista and XP.
 FixWin10 App Preview
FixWin 10 Features
When you download FixWin 10 utility is displays options in 6 different categories.
- First is file explorer. Here you can Fix Windows 10 recycle bin, internet explorer and startup issues.
- Second, when you upgrade Windows internet connectivity issues occurs. That’s why second category fix internet and connectivity problem is Windows 10.
- Third category of FixWin 10 for Windows 10 fixes several new issues. Like reset setting app, Windows 10 start menu issue, wi-fi doesn’t work after upgrade Windows 10, Windows 10 update download error, Windows 10 registry repair etc.
- The fourth category of FixWin 10 for windows 10 revolves around system tool fix. Sometimes built-in tools doesn’t work properly that’s why a new Advanced System Information tab is also available. This Windows 10 fix it tool also displays some advance information like number of threads in processor, number of logical processors, maximum display resolution, maximum refresh rate, etc.
- Fifth category of FixWin 10 for Windows 10 deals with Windows 10 troubleshoot fix
- Sixth category is for additional fixes.
Download FixWin for Windows 10
Download FixWin 10 for windows 10 with fast download link. The FixWin 10 for windows 10 supports both 32 bit and 64 bit Windows 10 PC. Now repair your Windows fix with FixWin 10 for Windows 10.
| App Name | FixWin for Windows 10 10.1 |
| License | Freeware |
| File Size | 9.9 MB |
| Developer | Paras Shidu – The Windows Club |
| Update | July, 11th 2019 |
| Version | FixWin 10 10.0.1.0 LATEST |
| Requirement | Windows 7 / Windows 7 64 / Windows 8 / Windows 8 64 / Windows 10 32-bit/ Windows 10 64-bit |
How To Use Fix Win 10
1. We first suggest that you run the System File Checker. The button provided on the Welcome page, will ‘run sfc /scannow‘ and will check for and replace any corrupted Windows system files. It is expected to take anywhere from 5-10 minutes. If asked to, reboot your computer.
2. If you are facing problems relating to the Windows Store or the Store apps, re-register the Store apps. A 1-click button has been provided on the Welcome page that lets you do so easily.
3. If you are facing major issues with Windows 10, running the DISM utility to repair your Windows System Image, might be a real good idea. A button for this too has been conviniently placed on the Welcome page.
4. Next we insist that you create a System Restore Point. The provided button will create one. We always recommend that you create one before making any changes to your system. Should you wish or need too, you can always go back to this Restore Point.
5. Having done that, apply at most one fix at a time and restart your computer. Please check if things are to your satisfaction; and if not, you have the option of restoring back immediately.
6. If you want to know first, what each fix does, click on the ‘?‘ Help button next to the Fix button. A pop out will tell you what exactly the fix does. Double-clicking on it will copy the command to your clipboard, which will be helpful I you want to run the fixes manually.
7. Some problems cannot be fixed with a click. So if you do not find your fix here, click on the Search For More Fixes button on FixWin’s Welcome page, and search and see if you find what you want.
Some security software may give out false positives, but rest assured that it is clean. If you wish to give feedback, suggestions or request some help, you can visit The Windows Club Forums.
If you are still confused with using this fix tool, please watch the video on below
How To Use FixWin10 – Tutorial Video
Conclusions
The solutions to repair and fix the most common Windows annoyances, issues & problems have been categorized under 5 tabs, viz : Windows Explorer, Internet & Connectivity, Windows Media, System Tools & Misc Additional Fixes.
Yeah we said 50 problems and just 1 solution! FixWin is the Windows Doctor all have been waiting for. Download FixWin10 for free now.


