- FIX: Check your virus protection error on Windows 10
- What can I do if getting Check your virus protection error?
- 1. Temporarily disable your antivirus security software
- ESET Internet Security
- 2. Perform a clean boot
- 3. Perform a full scan on Windows Defender
- 4. Run the Microsoft Safety Scanner
- 5. Check if the antivirus is updated
- 6. Turn on Windows Defender and Firewall
- 7. Schedule a scan on Windows Defender
- Fix: Operation did not complete successfully [Virus, PUP]
- How to fix the ERROR VIRUS INFECTED issue?
- 1. Change your antivirus
- ESET Internet Security
- 2. Turn off Windows Defender
- 3. Add the problematic file to the exclusions list
- 4. Disable your antivirus software
- 5. Perform a detailed scan
- 6. Update the problematic software
- 7. Use Command Prompt to repair the problematic file
- 8. Perform a clean boot
- 9. Perform a system restore
- 10. Reset Windows 10
FIX: Check your virus protection error on Windows 10

- The check virus protection notification appears due to problems with your antivirus software.
- To quickly get rid of this notification, try disabling the antivirus or switch to a better one.
- Easily fix the turn on virus protection notification on Windows 10 by performing a clean boot.
- One other solution would be performing a full scan with the Windows Defender.

Do you keep getting a notification that says Check your virus protection on your Windows 10 computer?
It can be quite irritating to repeatedly see such a nagging message when you try to sign in or while working on your computer.
There are several ways to fix the virus protection notification from popping up all the time on your Windows 10 computer. To be more precise, here are seven tried solutions to help you resolve this issue.
What can I do if getting Check your virus protection error?
1. Temporarily disable your antivirus security software

- Right-click Start.
- Click Control Panel.
- Select System and Security.
- Click Security and Maintenance.
- Click Change Security and Maintenance Settings to change the settings for both Windows Defender and your installed third-party antivirus program.
Whenever you install a third-party antivirus protection program on the Windows operating system, Windows Defender shuts off automatically.
You can temporarily disable the antivirus because you still need it to protect your computer against security threats. Immediately after you’re done fixing connection error, re-enable your antivirus.
You can also apply the above procedure to stop the constant notification alerts.
Moreover, if you have conflicting software either fully or partially installed, then remove all other security software apps using a software removal tool from this useful article.
We also recommend switching to antivirus software that is trusted by people around the world. Thankfully, there are lots of premium products you can choose from.

ESET Internet Security
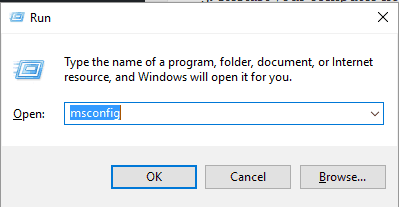
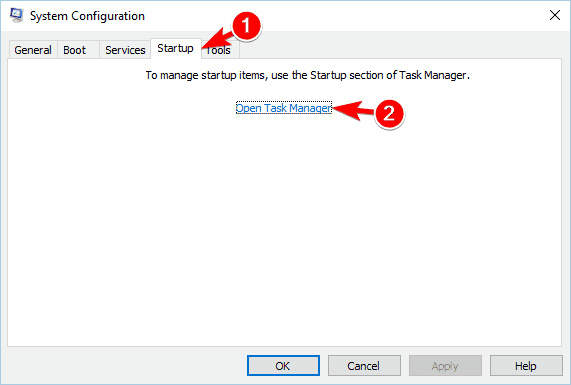
2. Perform a clean boot
- Go to the search box.
- Type msconfig.

- Select System Configuration.
- Find the Servicestab.
- Select Hide all Microsoft servicesbox.
- Click Disable all.
- Go to the Startup tab.
- Click Open Task Manager.
- Close Task Manager, then click OK.
- Reboot your computer.
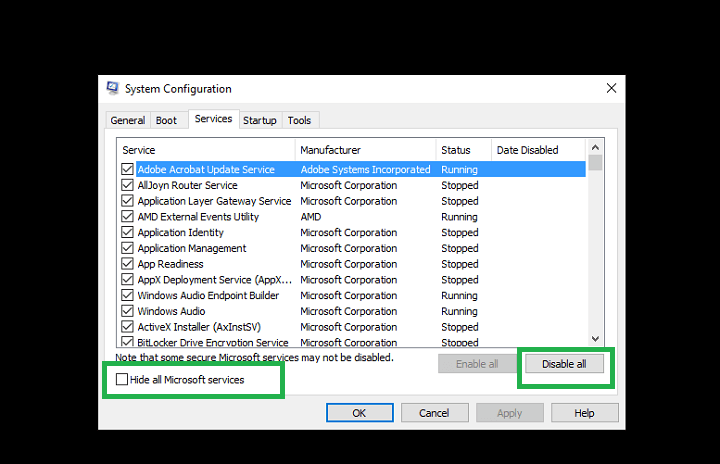
Performing a clean boot for your computer reduces conflicts related to software that can bring up the root causes that lead to the Windows 10 check your virus protection error to keep popping up.
These conflicts can be caused by applications and services that start up and run in the background whenever you start Windows normally.
In order to successfully perform a clean boot, you have to be logged on as the administrator, then follow the steps above.
Learn everything there is to know about the administrator account and how you can enable/disable it by reading this quick article.
You will have a clean boot environment after all these steps are carefully followed, after which you can try and check if the Check your virus protection notification persists.
3. Perform a full scan on Windows Defender
- Click Start.
- Type Windows Defender.
- Click Windows Defender from the search results.
- Go to Scan options on the right pane.
- Select Full.
- Click Scan now.
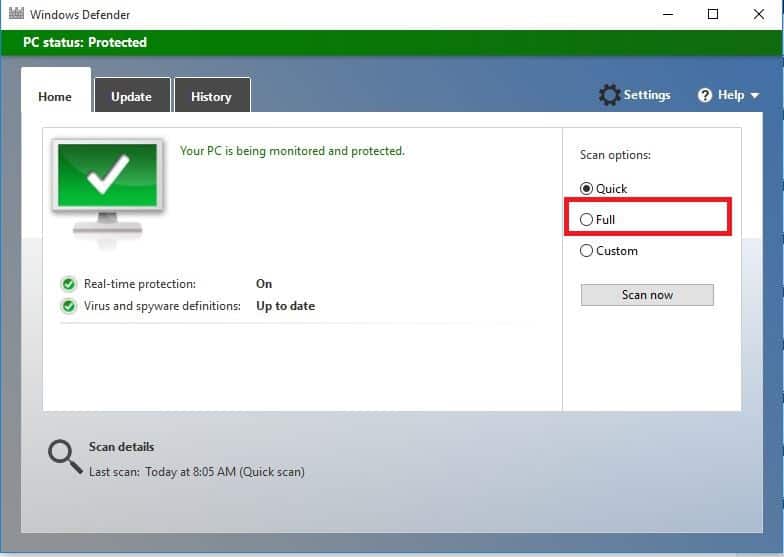
That should start the Windows auto-scanning feature. If you encounter any problems with it, you can take a look at this dedicated article about fixing Windows full scanning problems.

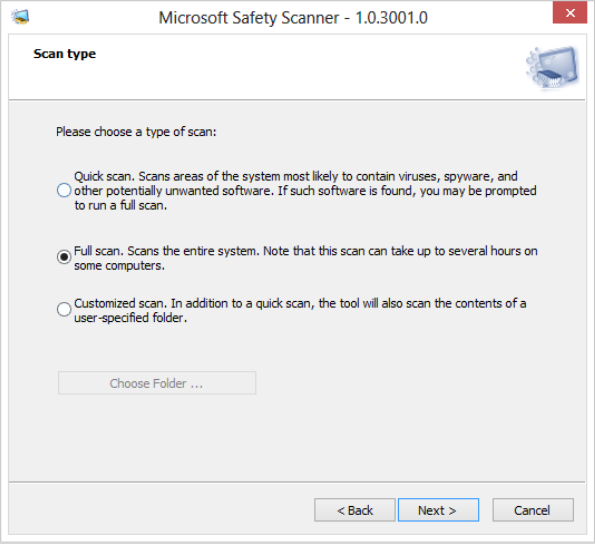
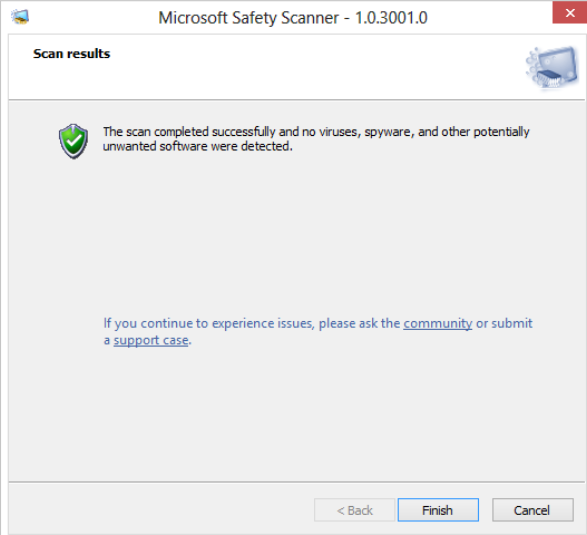
4. Run the Microsoft Safety Scanner
- Download the Microsoft Safety Scanner tool.
- Open it.
- Select the type of scan you want to run.
- Start the scan.
- Review scan results on the screen, which lists all malware identified on your computer.
When a virus infects your computer, it makes the machine’s performance slow down greatly, and can also lead to system failure.
Therefore, running a malware scan means any infected files may be cleaned by deleting the file completely, so you may experience data loss.
Microsoft Safety Scanner is a tool designed to locate and remove malware from Windows PCs. It only scans when manually triggered, then you get to use it 10 days after you download it.
This means you need to download the latest version of the tool before you perform each scan on your computer. However, the Microsoft Safety Scanner tool doesn’t replace your antimalware program.
It helps remove malicious software from your Windows 10 computer. Then, to remove the Microsoft Safety Scanner tool, delete the msert.exe file by default.
5. Check if the antivirus is updated
- Go to the Start menu on your computer.
- Choose All programs, followed by your antivirus tools.
- Select SecurityCenter.
- When the SecurityCenter opens, you should see a green tick with the message You are protected or something similar.
- If not, click the Update button to update it manually.
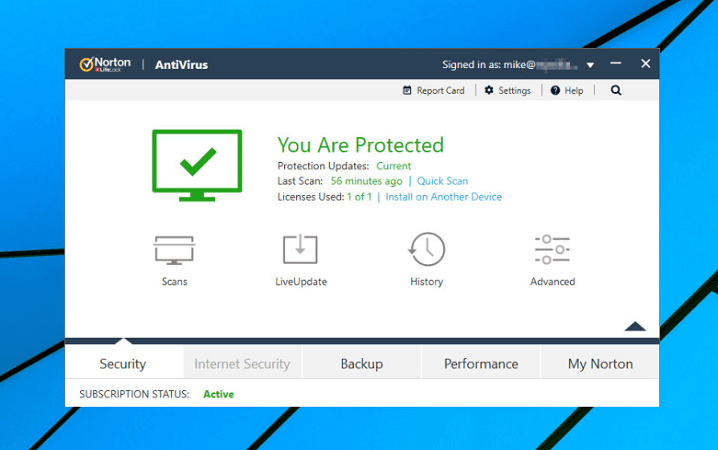
This involves checking whether the virus definitions on your installed third-party antivirus program are up to date.
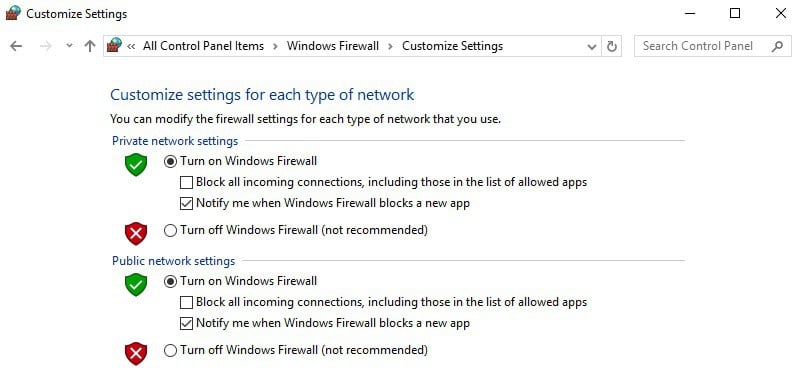
6. Turn on Windows Defender and Firewall
- Click Start.
- Type Windows Defender.
- Check whether its status says On.
- Next, right-click Start.
- Select Control Panel.
- Click System and Security.
- Select Windows Firewall.
- Click Turn Windows Firewall On or Off on the left pane.
- Ensure it is turned On.
Additionally, you should read this thorough guide if you are unable to open the Control Panel.
7. Schedule a scan on Windows Defender
- Click Start.
- Go to the search field box and type Schedule Tasks.
- Open it from the Search results.
- On the left pane, click Library Task Manager to expand it.
- Click Microsoft, then Windows.
- Scroll down, then double-click the Windows Defenderfolder.
- Double-click the top middle pane on the Windows Defender Scheduled Scan.
- Go to Scheduled Scanning (Local Computer) >Properties.
- Select the Triggertab.
- Go to the lower part of the window.
- Click New.
- Specify the frequency the scans should run, and when they should start.
- Click OK.
Windows Defender already scans your device regularly to keep it protected, but you can schedule it to scan based on the frequency you want it to so that it doesn’t become nagging and disturb you as you work.
You just need to follow the steps above to schedule a scan on Windows Defender right away.
Let us know in the comments section below whether these solutions worked to remove the nagging check your virus protection notification on your computer.
Keep in mind that Windows Defender automatically becomes inactive when you install a third-party antivirus.
Fix: Operation did not complete successfully [Virus, PUP]
- The operation did not complete successfully error happens when your computer gets infected with a virus.
- The first thing you can do to remove the virus is to change your antivirus software.
- Sometimes, the Windows Defender mistakes certain files for being infected, so try disabling it.
- You can also use the Command Prompt to let Windows scan and fix the problematic file.

Computer viruses can be a security threat, and they can also cause system errors such as ERROR_VIRUS_INFECTED to occur.
This error is usually followed by Operation did not complete successfully because the file contains a virus message, and today we’re going to show you how to fix this error on Windows 10.
We have to mention that your PC’s antivirus or Windows Defender might also mistake uninfected files for being problematic, resulting in the error message.
Thankfully, we covered all the aspects regarding this problem in the article below, so we advise you to follow our instructions thoroughly.
How to fix the ERROR VIRUS INFECTED issue?
1. Change your antivirus
Removing the antivirus isn’t the best solution, but if it helps, you might want to try switching to a different antivirus tool that is known for fixing such errors.
Perhaps, your current antivirus software wasn’t able to stop the virus from entering your device, or it simply malfunctioned and it’s giving you the error.
Therefore, you need a new antivirus that has a Home Network scanner which keeps an eye on all your home network, thus allowing you to track all possible attacks on every computer in the network.
What you also need from your antivirus is an advanced machine learning AI feature that continuously scans for signatures and blocks them the same second they look suspicious.

ESET Internet Security
2. Turn off Windows Defender
- Press Windows Key + I to open the Settings app.
- Once the Settings app opens, go to the Update & security section.
- In the left pane navigate to Windows Defender and in the right pane disableReal-time protection.

Using an antivirus is rather important, and Windows 10 comes with its own antivirus software called Windows Defender.
For the most part, this is a solid antivirus, but few users reported that Windows Defender can cause this and other errors to occur.
To fix this problem, it’s advised that you turn off Windows Defender completely.
Before we show you how to do that, you need to be sure that the file you’re trying to run isn’t malicious.
If you’re trying to run a file from a safe source, it’s most likely not infected. To turn off Windows Defender, do the following:
After doing that, Windows Defender will be disabled and you’ll be able to run the file without any problems.
Some users reported that this method will disable Windows Defender temporarily, so it will turn itself on again after a short period of time.
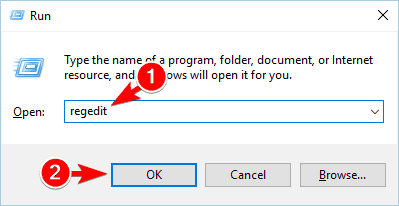
To completely disable Windows Defender, you need to edit your registry.
To do that, follow these steps:
- Press Windows Key + R and enter regedit.
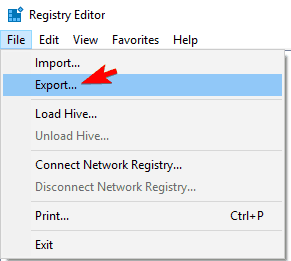
- Optional: Before making any changes to the registry, it’s always good to create a backup in case anything goes wrong.
- To back up your registry, go to File > Export.
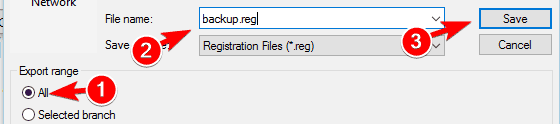
- Select All as Export range and enter the desired name.
- Choose a safe location and click on the Save button to export your registry. In case any problems occur, you can simply run this file and restore the registry to its original state.
- Choose a safe location and click on the Save button to export your registry. In case any problems occur, you can simply run this file and restore the registry to its original state.
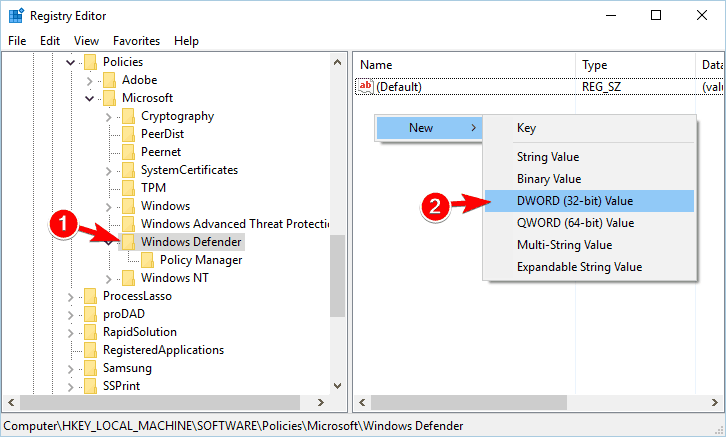
- In the left pane, navigate to the following path: HKEY_LOCAL_MACHINE\SOFTWARE\Policies\Microsoft\Windows Defender
- Look for DisableAntiSpyware DWORD in the right pane.
- If this DWORD isn’t available, right-click the empty space in the right pane and choose New > DWORD (32-bit Value).
- Enter DisableAntiSpyware as the name of the new DWORD and double click it.
- Set Value data to 1 and click OK to save changes.
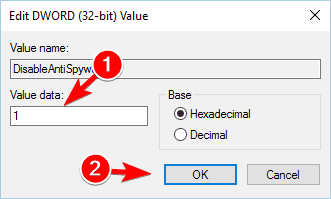
After doing that, Windows Defender will be permanently disabled and you won’t see this error anymore.
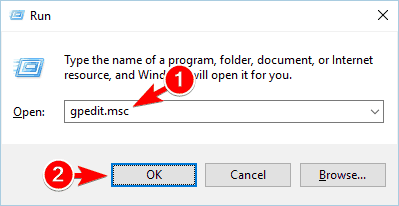
If you don’t want to edit your registry, you can disable Windows Defender by using Group Policy Editor. To do that, follow these steps:
- Press Windows Key + R and enter gpedit.msc.
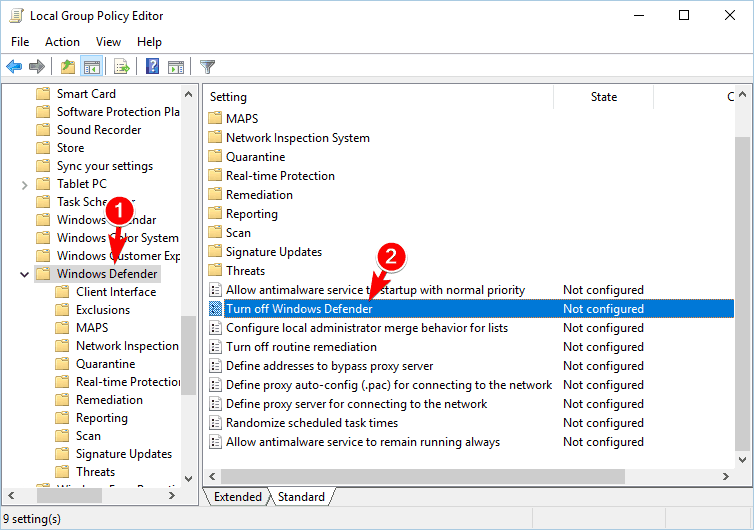
- Once Group Policy Editor opens, in the left pane navigate to the following path: Computer Configuration\Administrative\Templates\Windows\Components\Windows\Defender
- In the right pane, double click on Turn off Windows Defender.
- Select Enabled option and click on Apply and OK to save changes.
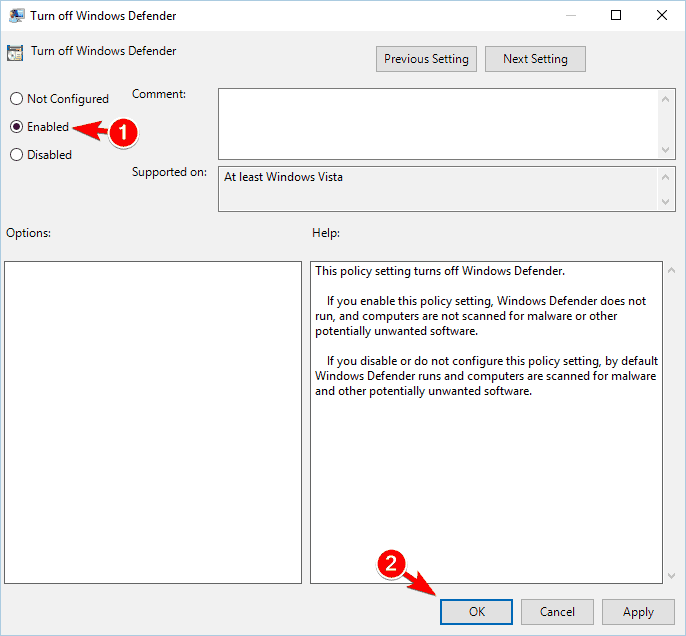
Keep in mind that disabling Windows Defender can leave your PC vulnerable to malware, so we advise you to download and install a third-party antivirus tool as soon as possible.
3. Add the problematic file to the exclusions list
If you’re getting this error while trying to access a certain file, it’s possible that the file is falsely identified as a threat. If you’re sure that the file isn’t malicious, add it to the exclusions list and check if that solves the problem.
Developers reported this problem while trying to test their applications on their PC.
However, the issue can occur with downloaded files as well, so if you’re positive that the downloaded file isn’t infected, add it to the list of exclusions to fix this problem.
4. Disable your antivirus software

Sometimes these types of problems can occur due to third-party antivirus tools. Some antivirus might not be fully compatible with your PC or with other software, and that can lead to this error.
To fix the problem, try disabling your antivirus for a short time.
Try to run the file again and check if the problem still persists. If that doesn’t help, you might have to uninstall your antivirus completely and check if that solves the problem.
5. Perform a detailed scan
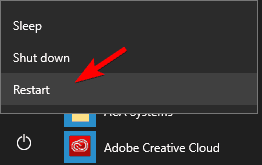
- Open the Start Menu and click the Power button.
- Press and hold the Shift key on your keyboard and choose the Restart option from the menu.
- A list of options will appear. Click on Troubleshoot > Advanced options > Startup Settings.
- Now click the Restart button.
- Once your PC restarts, you’ll see a list of options.
- Select any version of Safe Mode by pressing the corresponding key.
- Once you enter Safe Mode, perform all the necessary scans and try to remove the malware.
Sometimes this error can occur due to an actual malware infection, and if that’s the case, you need to perform a detailed scan.
In addition to your current antivirus software, you’re advised to use other tools to scan your system. To be sure that your system is clean, we advise you to scan it with multiple tools just to be sure.
6. Update the problematic software
If the error appears when trying to run specific software on your PC, you might want to try updating that application.
Several users reported this error with certain applications, and according to them, you need to download and install the latest version of these apps to fix the problem.
Sometimes these applications can have few bugs and glitches that can cause this error, but you can avoid this problem by keeping them up to date.
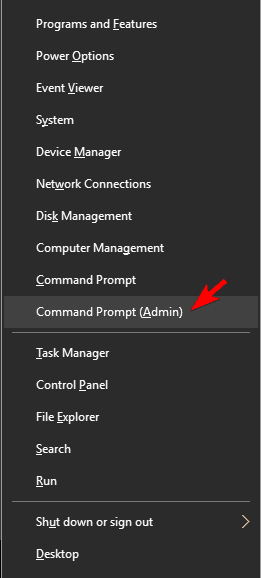
7. Use Command Prompt to repair the problematic file
- Press Windows Key + X and choose Command Prompt (Admin) from the menu.
- Once the Command Prompt opens, enter the following lines: sfc /SCANFILE=C:windowsexplorer.exesfc /SCANFILE=C:WindowsSysWow64explorer.exe
- We used c:windowsexplorer.exe as an example, so be sure to replace it with the correct path on your PC
If just a single file is affected by this error, you can fix it by using Command Prompt.
Several users reported problems with explorer.exe and Operation did not complete successfully because the file contains a virus message, but you can fix them easily by following these steps:
After running those commands the problematic file should be fixed and you’ll be able to access it again.
This error can sometimes appear due to corrupted system files, and in our example, we showed you how to use SFC scan to fix those files.
We used c:windowsexplorer.exe as an example, so be sure to replace it with the correct path on your PC.
8. Perform a clean boot
- Press Windows Key + R and enter msconfig.
- Go to Services tab, check to Hide all Microsoft services option and click on Disable all.
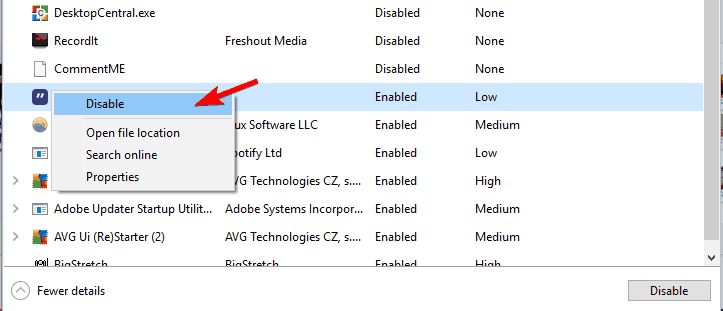
- Now go to the Startup tab and click on OpenTask Manager.
- When Task Manager opens, you’ll see a list of all startup applications.
- Right-click each application on the list and choose Disable from the menu.
- Repeat this step for all entries on the list.
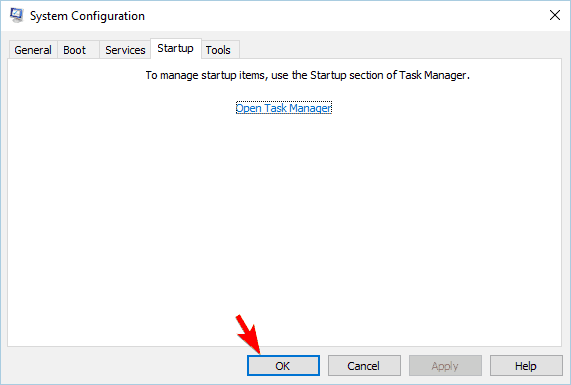
- Close Task Manager and go back to the System Configuration window.
- Click Apply and OK to save changes.
- After doing that, restart your PC.

Sometimes third-party applications can cause this error to appear on your PC. These applications will often start with Windows automatically and cause this and other errors to occur.
To fix this problem you need to perform Clean boot and find the problematic application.
If disabling startup services and applications fixes the problem, you need to repeat these steps again and turn on services and startup applications one by one or in groups.
After enabling each set of apps or services you need to restart your PC or log out and log back into your Windows 10 profile. Repeat this step until you find the application that is causing this problem.
After finding it, uninstall it or update it to the latest version and check if that solves the problem.
9. Perform a system restore
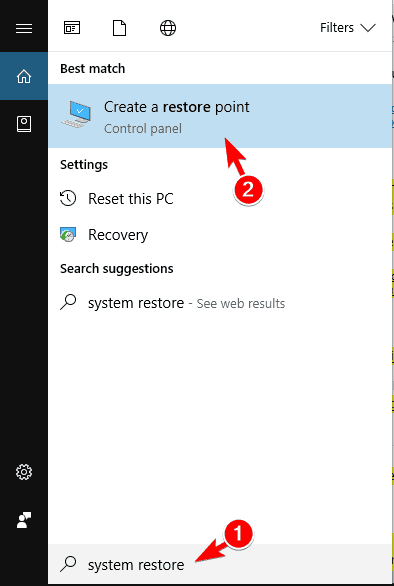
- Press Windows Key + S and enter system restore.
- Choose Create a restore point from the menu.
- System Properties window will now appear.
- Click on the System Restore button.
- System restore window will now open.
- Click on Next, and choose the desired restore point and click Next.
- Follow the instructions on the screen to complete the restoration process.
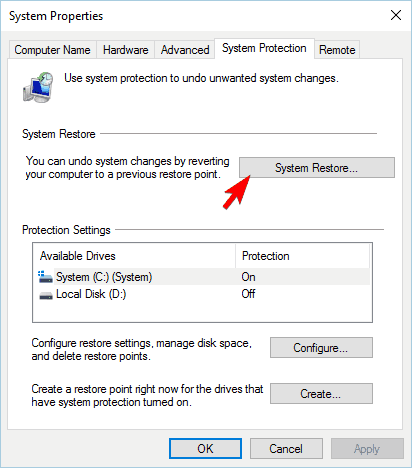
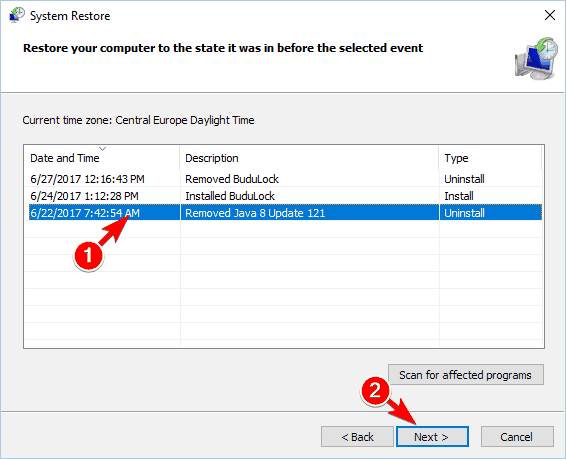
If you’re having this error, you might be able to fix it by performing System Restore. By using this feature you can restore your PC and prevent this problem from appearing.
After restoring your system, check if the problem still persists.
10. Reset Windows 10
- Open the Start Menu, press the Power button, press and hold the Shift key and click on Restart.
- Now choose Troubleshoot > Reset this PC > Remove everything.
- If you’re asked to insert Windows 10 installation media, be sure to do so.
- Select the version of Windows you have installed and click on Only the drive where Windows is installed.
- By using this option only your system drive, in most cases, C will be cleaned. This means that the installation will remove all files from this drive.
- Now select Just remove my files option.
- You’ll now see the list of changes that will occur after performing the reset.
- To start the reset process, click the Reset button.
- Follow the instructions on the screen to complete the reset.

Note: we have to mention that this solution will remove all files from your system, so it’s highly recommended to back up all your important files.
This solution will also remove all installed apps, so you’ll have to install them again. To perform this solution you might need a Windows 10 installation media, so create one using Media Creation Tool.
After you reset Windows 10, you’ll have a clean installation of Windows and the error should be fixed.
ERROR_VIRUS_INFECTED error and Operation did not complete successfully because the file contains a virus message can cause a lot of problems on your PC.
In some cases, these errors can be caused by a false alarm, but you should be able to fix this problem by using one of our solutions.


