Get help with Windows 10 upgrade and installation errors
There are many reasons why you might receive an error message when upgrading or installing Windows 10, but common errors can be fixed with a few steps that you can do on your own. Note: An upgrade takes your device from an older version of Windows, such as Windows 7 or Windows 8.1, to Windows 10.
Before searching for a specific error code, try the tips listed in General fixes. If those don’t fix your upgrade or installation problem, check the table of error codes at the bottom of this article.
General fixes
Here are some things you can try to fix upgrade and installation errors:
Unplug any nonessential hardware devices. These could include headphones, printers, scanners speakers, USB flash drives, and external hard drives.
If you’re using a laptop and it’s plugged in to a docking station, undock it.
It’s a good idea to make sure that all important updates are installed before trying to upgrade Windows. This includes updates to hardware drivers on your device.
For information and to make sure you’re up-to-date, see Windows Update: FAQ.
Use Windows Defender to protect your device during the upgrade—non-Microsoft antivirus software can sometimes cause upgrade problems. As long as you have installation media and all required activation information, you can always reinstall the software after you upgrade.
To remove an antivirus application, go to Control Panel\Programs\Programs and Features. Select the program, and then select Uninstall. Select Yes to confirm.
Outdated software can cause problems with a Windows upgrade, so removing old or nonessential applications can help.
If you plan to reinstall the application later, make sure you have the installation media and all required activation information before removing it.
To uninstall software, go to Control Panel\Programs\Programs and Features. Select the program, and then select Uninstall. Select Yes to confirm.
To upgrade to Windows 10, you need enough space on your hard drive for the installation to take place.
To view how much hard drive space is available on your computer, select the Start button, then in the search box on the taskbar, type File Explorer (known as Windows Explorer in Windows 7).
Then select Computer or This PC and look under Hard Disk Drives or under Devices and drives. If there are multiple drives listed, the system drive is the drive that includes a Microsoft Windows logo above the drive icon. You’ll see the amount of available space under the drive.
If it looks like your drive is running low on space, see Tips to free up drive space on your PC.
0xC1900101 Errors
An error that begins with 0xC1900101 is usually a driver error. If you see any of these error codes, try the following steps first to fix the problem. If these steps don’t work, see Resolve Windows 10 upgrade errors for more detailed technical info.
Make sure that your device has enough space. Your device requires at least 16 GB of free space to upgrade a 32-bit OS, or 20 GB for a 64-bit OS. For more info, see Free up drive space in Windows 10.
Run Windows Update a few times. Download and install any available updates in Windows Update, including software updates, hardware updates, and some third-party drivers. Use the troubleshooter for Windows 10 to fix Windows Update errors.
Check third-party drivers and download any updates. You can find third-party drivers and installation instructions for any hardware you’ve added to your device on the manufacturer’s website.
Unplug extra hardware. Remove all external storage devices and drives, docks, and other hardware you might have plugged into your device that isn’t needed for basic functionality.
Check Device Manager for errors. Select the Start button, then in the search box on the taskbar, type device manager. Choose Device Manager from the results. In the window that pops up, look for any device with a yellow exclamation mark beside it (you may have to select each category to switch to the list of devices). Press and hold (or right-click) the device name and select either Update Driver Software or Uninstall to correct the errors.
Remove third-party security software. Make sure you know how to reinstall your programs and that any necessary product keys are on hand. Windows Defender will help protect your device in the meantime.
Repair hard-drive errors. Select the Start button, then in the search box on the taskbar, type command prompt. Choose Command Prompt from the list of results. In the window that pops up, type chkdsk/f C: and press the Enter key. Repairs automatically start on your hard drive, and you’ll be asked to restart your device.
Note: You must have administrator permissions on your device to do this.
Do a clean restart into Windows. Learn how.
Restore and repair system files. Select the Start button, then in the search box on the taskbar, type command prompt. Choose Command Prompt from the list of results. In the window that pops up, type DISM.exe /Online /Cleanup-image /Restorehealth and press the Enter key. (Learn to repair a Windows image)
Note: You must have administrator permissions on your device to do this.
Other Common Errors
The following table lists the most common upgrade and installation errors and some things you can try to fix them. If you continue having problems upgrading or installing Windows 10, contact Microsoft support.
What it means and how to fix it
This indicates that there was a problem downloading and installing the selected update. Windows Update will try again later and there is nothing you need to do at this time.
This could indicate that an incompatible app installed on your PC is blocking the upgrade process from completing. Check to make sure that any incompatible apps are uninstalled and then try upgrading again.
A cleanup operation from a previous installation attempt is still pending, and a system restart is required to continue the upgrade. Restart the device and run setup again. If restarting device does not resolve the issue, then use the Disk Cleanup utility and clean up the temporary files and the System files. For more information, see Disk cleanup in Windows 10.
A file needed by Windows Update is likely damaged or missing. Try repairing your system files: Select the Start button and type command prompt in the search box on the taskbar. Choose Command Prompt from the list of results. In the window that appears, type DISM.exe /Online /Cleanup-image /Restorehealth and press the Enter key.
This may signify that your PC doesn’t meet the minimum requirements to download or install the upgrade to Windows 10. Learn more about the minimum requirements for Windows 10
This might indicate that a driver or other software on your PC isn’t compatible with the upgrade to Windows 10. For info about how to fix this problem, contact Microsoft support.
This could mean that the upgrade process was interrupted because you accidentally restarted your PC or signed out of your PC. Try upgrading again and make sure your PC is plugged in and stays turned on.
This error might mean that your PC couldn’t connect to the Windows Update servers. If you’re using a VPN connection to connect to a work network, disconnect from the network and turn off the VPN software (if applicable) and try upgrading again.
The error could also mean there isn’t enough free space in the System Reserved partition. You might be able to fix this problem by using third-party software to increase the size of the System Reserved partition.
Error: We couldn’t complete the updates. Undoing changes. Don’t turn off your computer.
Error: Failure configuring Windows Updates. Reverting changes.
These are generic errors that might appear any time a Windows update fails. You’ll need to determine the specific error code to investigate how to best resolve this problem.
You can find the error code for the failed update by viewing your update history. Look for the update that wasn’t installed, note the error code, and then contact Microsoft support.
To view your update history in Windows 8.1:
Open Windows Update by swiping in from the right edge of the screen (or, if you’re using a mouse, pointing to the lower-right corner of the screen and moving the mouse pointer up), select Settings > Change PC settings > Update and recovery > View your update history.
To view your update history in Windows 7:
Select the Start  button. In the search box, type Update, and then, in the list of results, Select Windows Update > View update history.
Error: The update isn’t applicable to your computer.
This error might mean that your PC doesn’t have the required updates installed.
Check to make sure that all important updates are installed on your PC before you try upgrading.
This likely indicates that your PC doesn’t have enough space available to install the upgrade.
Free some space on the drive and try again. Get tips for freeing up drive space
The specified disk operation is not supported by the target disk, partition, or volume.
Make sure your machine meets the minimum requirements to install Windows 10.
The system cannot find the file specified.
If you have a disk or disks where you are not installing Windows 10 on, remove those disks.
A driver has caused a problem.
Disable or remove all 3rd party antivirus or antispyware from your system. Disconnect all peripheral devices that are connected to the system, except for the mouse, keyboard and display.
Contact your hardware vendor to obtain updated device drivers.
Windows Setup terminated unexpectedly due to another process running in the background.
When you start Windows by using a normal startup, several applications and services start automatically, and then run in the background. These programs include basic system processes, antivirus software, system utility applications, and other software that has been previously installed. These applications and services can cause interference when you attempt to upgrade to the latest version of Windows 10.
To help you determine whether a background program is interfering with the upgrade, a «clean boot» may be needed. See How to perform a clean boot in Windows.
Windows Setup terminated unexpectedly due to another process running in the background.
Uninstall any antivirus or antispyware software and update again.
How to troubleshoot Windows Installer errors
Symptoms
When you install, uninstall, or update a program on a Windows-based computer, you may receive one of the following error messages.
Error message 1
The Windows Installer Service could not be accessed.
Error message 2
Windows Installer Service couldn’t be started.
Error message 3
Could not start the Windows Installer service on Local Computer. Error 5: Access is denied.
Resolution
To fix this problem automatically, run the «Fix problems that programs cannot be installed or uninstalled» troubleshooter to repair issues that block program installation or removal because of corrupted registry keys.
Important To perform many of the methods and steps in this article, you must be logged on to your computer as an administrator.
To determine whether you’re using an account that has administrator rights
To determine whether you’re using an account that has administrator rights, use one of the following methods, as appropriate for the operating system that you’re running.
Windows 7 and Windows Vista
Open the Date and Time dialog box.
Type the following command in the Start Search or Search programs and files box, and then press Enter:
timedate.cpl
The Date and Time dialog box appears.

Click Change date and time. When the User Account Control dialog box appears, click Continue.
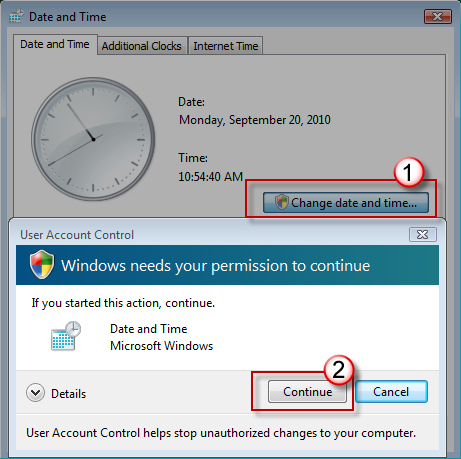
Do one of the following, depending on what happens when you click Continue:
If your computer does not prompt you for a password, you are already logged on with an administrator account. Click Cancel two times to close the Date and Time dialog box. You are ready to fix the Windows Installer issues.
If your computer prompts you for a password, you are not logged on with an administrator account.
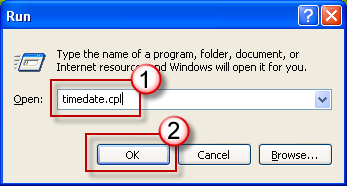
Windows XP and Windows Server 2003
Open the Date and Time dialog box.
Click Start, and then click Run.
Type the following command in the Run dialog box, and then press OK:
timedate.cpl
Do one of the following, depending on the result:
If the Date and Time Properties dialog box appears, you are already logged on as an administrator. Click Cancel to close the dialog box.
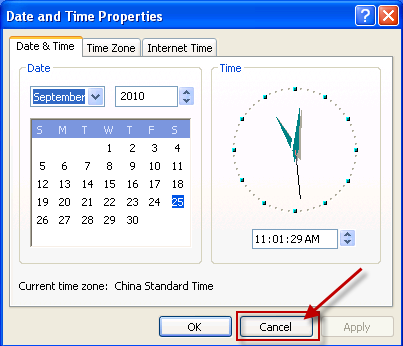
If you receive the following message, you are not logged on as an administrator:

After you’ve verified that you’re logged on to your computer as an administrator, you can start troubleshooting Windows Installer issues.
If the Windows Installer engine is corrupted, disabled, or installed incorrectly, this may cause program installation issues.
Use the following methods to identify any Windows Installer issues that may be causing problems when you install, uninstall, or update programs.
Method 1: Determine whether the Windows Installer engine is working
Click Start  , type cmd in the Search box or click Run then type cmd in the dialog (Windows XP or Windows Server 2003), and then press Enter to open a Command Prompt window.
At the command prompt, type MSIExec, and then press Enter.
If the MSI engine is working, you should not receive any error messages. If you receive an error message, enter the error message text into a search engine such as Bing or Google to locate troubleshooting information about the issue.
Try to install or uninstall again.
Method 2: Make sure that the Windows Installer service is not set to Disabled
Click Start , type services.msc in the Search box or click Run then type services.msc in the dialog (Windows XP or Windows Server 2003), and then press Enter to open Services.
Right-click Windows Installer, and then click Properties.
If the Startup type box is set to Disabled, change it to Manual.
Click OK to close the Properties window.
Right-click the Windows Installer service, and then click Start. The service should start without errors.
Try to install or to uninstall again.
Method 3: Check your version of Windows Installer, and upgrade to the latest version if necessaryImportant This method applies to Windows XP, Windows Vista, Windows Server 2003, Windows Server 2003 R2, and Windows Server 2008 only.
Click Start , type cmd in the Search box or click Run then type services.msc in the dialog (Windows XP or Windows Server 2003), and then press Enter to open a Command Prompt window.
At the command prompt, type MSIExec, and then press Enter. If the MSI engine is working, you should not receive any error messages, and a separate dialog box should open. This shows the MSI version.
If the installer is not version 4.5, download and install Windows Installer 4.5.
Try to install or to uninstall again.
Method 4: Reregister the installer engineImportant This method applies to Windows XP and to Windows Server 2000 only.
Click Start, click Run, type cmd, and then click Command Prompt.
At the command prompt, type the following, and then press Enter after each line:
Try to install or to uninstall again.
The installation or update method doesn’t run to completion
There are several methods that can be used to install, to uninstall, or to update a program. Additionally, the method or methods that are used may not have started or completed successfully. In this situation, try some other method to install, or to update the program.
The following are common methods that are used to install software:
Insert the CD or DVD media, and then let the installation auto-start.
Browse to the CD, DVD, removable media, or other location where the programs installation files are stored, and then double-click the Setup program. The setup file is typically one of the following:
Autorun or Autorun.exe
Setup or Setup.exe
Install or Install.exe
Click Run when you download the program from a website.
The installation media is unreadable
Installation media such as CD and DVD media may be dirty or scratched and therefore be unreadable by the CD or DVD reader. To resolve this issue, follow these methods:
Method 1: Clean the CD or DVDTo do this, use a CD or DVD disc-cleaning kit. Or, use a soft, lint-free cotton cloth to gently wipe the silver side of the disc. Do not use paper cloth, as this can scratch the plastic or leave streaks. When you clean the disc, wipe from the center of the disc outward. Do not use a circular motion. If the problem continues to occur, clean the disc by using a damp cloth or a commercial CD or DVD disc-cleaning solution. Dry the disc thoroughly before you insert it into the drive.
Method 2: Copy the installation files to your computer or to other removable mediaWhen you do this, note the location, and then run the installer from that location. The installation file is typically named Autorun.exe or Setup.exe, but this may vary. If you’re not sure, check the Readme file in the folder for instructions about how to run the installation process. If an executable file (.exe) is available, we do not recommend that you run .msi files directly without specific instructions from the vendor.
Note If multiple CDs or DVDs are required, we recommend that you copy all the disks to the same folder, in reverse order (higher disk numbers first). Be prepared to approve the overwriting of existing files if you are prompted, and then install from that location.
Method 3: Obtain a fresh version of the installation packageIf you tried to install from a CD or DVD, do the following:
Check the software manufacturer’s website for a more recent version of the software package. Download and install the new version.
If you already have the latest version, download the program from the manufacturer’s website, and then run the installation.
Downloaded or copied installation files are corrupted
Method 1: Copy the installation files to your computerCopy the installation files to a local hard disk on your computer or to other removable media. Note the location, and then run the installation from that location. The installation file is typically named Autorun.exe or Setup.exe, but this may vary. If you’re not sure, check the Readme file in the folder for instructions about how to run the installation. If an executable file (.exe) is available, we do not recommend that you run .msi files directly without specific instructions from the vendor.
If you are installing a program from the Internet, redownload the file (select Save instead of Run in the download dialog box), save the file to a folder on a local hard disk on your computer or to other removable media. Then, run the installation from that location.
If your installation files are on a network (for example, a commercial or corporate environment), copy all the files to a folder on a local hard disk on your computer, and then run the installation from that location.
Method 2: Obtain a fresh version of the installation packageIf some time has elapsed between when you downloaded the package and when you tried to install it, do the following:
Check the software manufacturer’s website for a more recent version of the software package. Download and install the new version.
If you already have the latest version, download the program again, and then run the installation.
Programs that are currently running on your computer are interfering with the installation process
Disable programs that might be interfering with the installation process. To do this, follow these steps:
Click Start , type msconfig in the Search box, and then click msconfig.exe.
 If you are prompted for an administrator password or confirmation, type the password, or provide confirmation.
On the General tab, click Selective startup, and then clear the Load startup items check box.
Click Services, click Hide all Microsoft services, and then click Disable all.
Click OK, and then click Restart.
Try running your software program installation.
When you are finished troubleshooting the problem, restart the computer in Normal Startup mode. To do this, follow these steps:
Click Start , type msconfig in the Search box, and then click msconfig.exe.
If you are prompted for an administrator password or confirmation, type the password, or provide confirmation.
On the General tab, click Normal startup, click OK, and then click Restart.
There are typically several ways to remove any program. In this situation, try some other method to remove the program.
The following are common methods that are used to install software:
Method 1: Use the uninstall option (if available)
Click Start , and then click All Programs.
Select the folder for the program that you are trying to uninstall, and then open the folder.
If there is an uninstall option, try using it.
Method 2: Use Control Panel options
Click Start , click Control Panel, click Add and Remove Programs or Programs and Features, and then click Uninstall a program.
Select the program, and then click Uninstall. Follow the instructions.
Note The following steps are appropriate for advanced users only.
Make sure that you don’t have any file or folder names that are longer than 260 characters.
For more about the maximum path length limitation, see Naming files, paths, and namespaces.
Most programs create an installation log. If you can’t locate such a log, you can enable verbose MSI logging. For more information, see How to enable Windows Installer logging.
Note If you’re running the .msi log file without the bootstrapping application (.exe), you can add parameters for verbose logging. For example, you can run the following command:
Msiexec path\ your_msi.msi /L*v path\ your_msi_log.txt For a list of msiexec command-line parameters, see Command-line options.
A failed installation typically logs «Return Value 3» where the problem occurred and where the installation rollback began. The description of the failure appears immediately before the Return Value 3 log entry.
You can use the Wilogutl.exe tool to analyze log files from a Windows Installer installation. This tool may suggest solutions to errors that are found in a log file. It is available in the latest Windows Software Development Kit.
The following is an example of how to use the Wilogutl.exe tool at a command line:
wilogutl /q /l c:\mymsilog.log /o c\outputdir\
You may be able to manually uninstall some parts of the program through the Windows interface. For example, you may be able to delete program files and folders. Because the steps to do this may differ widely, depending on the version of Windows that you’re running and on the program that you’re trying to uninstall, no prescriptive steps are provided here. If you’re not sufficiently familiar with the program that you’re trying to uninstall to positively identify the files and folders for that program, we do not recommend that you try this method. Generally, when you begin to delete program files and folders, you run the risk of damaging your operating system. Use this method at your own risk.
If you are considering uninstalling the program manually, be aware of the following:
Before you use this method, make sure that you create a system restore point.
Before you get started, move any personal data or documents that may have ended up in the installation folder of the program that you’re uninstalling. For example, move this material into the Documents folder.
If you cannot manually delete a program file, this may mean that the file is being used or that some other program is accessing the file and preventing you from deleting it. For example, antivirus software may be accessing the file. When antivirus software is accessing a program file and making it impossible to delete it, it’s likely that this same antivirus software was preventing you from uninstalling the program by more traditional means.
For general information about how to install or to uninstall a program, see the following:


