- System Restore not working, failed or did not complete successfully in Windows 10
- System Restore not working
- System Restore did not complete successfully
- 1. Manually create a system restore point
- 2. Disable security software temporarily
- 3. Boot into Safe Mode and create it
- 4. Run System File Checker
- 5. Repair system image
- 6. Run ChkDsk
- 7. Ensure that that System Restore is enabled
- 8. Check available disk space
- 9. Check the status of Services
- 10. Check Event Logs
- 11. Consult your administrator
- 12. Reset the Repository
- FIXED: System Restore not working in Windows 10
- How can I fix System Restore not working after update?
- Windows 10/8/7 System Restore Points Not Working
- Five Solutions to Fix System Restore Not Working in Windows 10/8/7
- Fix 1: Run System Restore in Safe Mode
- Fix 2: Check System Protection Settings and Configure Disk Space Usage
- Fix 3: Check the Status of Volume Shadow Copy Service & System Restore Service
- Fix 4: Repair Corrupted System Files
- Fix 5: Windows System Restore Alternative — EaseUS Todo Backup
- Create a system restore point with EaseUS Todo Backup
System Restore not working, failed or did not complete successfully in Windows 10
The System Restore feature is a very useful feature in the Windows operating system, and it can be a real life-saver at times. But if you, for some reason, find your System Restore not working in Windows 10 or Windows 8/7, and that (a) System Restore points are not being created, even automatically, (b) you are unable to create a system restore points manually or (c) your System Restore failed & did not complete successfully, and you are unable to restore your computer, here are a few troubleshooting steps you may want to try.
System Restore not working
While you may be unable to create a system restore points manually, it is quite possible however that the Automatic Restore Points may continue to get created, but you face the problem only when you try to create one manually.
The following Error Messages may also pop up:
- System Restore failed.
- System Restore did not complete successfully
- Error 0x80070005: System Restore could not access the file. Temporary disable your antivirus program and try again.
- Error 0x800423F3: The writer experienced a transient error. If the backup process is retried, the error may not reoccur.
- A shadow copy could not be created for the following reason. The writer experienced a transient error (0x800423F3)
- System Restore did not complete successfully. Your computer’s system files and settings were not changed.
- Can’t system restore, file or directory is corrupted and unreadable (0x80070570)
- System Restore failed to extract the original copy of the directory from the restore point.
- A restore point could not be created for this reason: Error detected in the Volume Shadow Copy Services (VSS).
System Restore did not complete successfully
In any case, you may try one or more of the steps, in no particular order, and see if something helps you.
- Manually create a system restore point
- Disable security software temporarily
- Boot into Safe Mode and create it
- Run System File Checker
- Repair system image
- Run ChkDsk
- Ensure that that System Restore is enabled
- Check available disk space
- Check status of Services
- Check Event Logs
- Consult your administrator
- Reset the Repository.
1. Manually create a system restore point
Try to create a System Restore point manually and make a note of the Error Message you get. If you don’t get one, check if one has been created or not.
2. Disable security software temporarily
Disable your antivirus or security software and then try to create a system restore point.
3. Boot into Safe Mode and create it
Boot into Safe Mode and see if you create a system restore point or restore to a prior restore point. Many times, non-Microsoft services or Drivers can interfere with the proper functioning of System Restore. Alternatively, you could also execute a Clean Boot and see if you are able to get system restore working.
4. Run System File Checker
Run the System File Checker, i.e., Run sfc /scannow from an elevated command prompt. Reboot on completion and try now.
5. Repair system image
6. Run ChkDsk
Run Check Disk, by opening an elevated command prompt. Type chkdsk /f /r and hit Enter. Let the process complete and then try again.
7. Ensure that that System Restore is enabled
Make sure that System Restore is enabled on the drives where you want System Restore enabled. Right-click Computer > Properties > System Protection. Check Protection settings. To store restore points, you need at least 300 MB of free space on each hard disk that has System Protection turned on.
8. Check available disk space
Make sure that you have sufficient disk space on all the drives where System Restore is enabled
9. Check the status of Services
Type Services.msc in Start Menu Search Box, hit Enter. Make sure that the Volume Shadow Copy & Task Scheduler & Microsoft Software Shadow Copy Provider Service is Running and set on Automatic. If the Status of System Restore Service is Not Started, Start it. Also, set it to Automatic if it is not. A reboot may be required. Re-confirm again, and now try.
10. Check Event Logs
Type eventvwr . msc /s in Search Box & hit Enter to open the Event Viewer. Double-click on Applications & Services Logs and see if you are able to evaluate the event description or the cause of the problem.
11. Consult your administrator
See this post if System Restore is grayed out or System Restore tab is missing or if you receive a System Restore is disabled by your system administrator message.
Check with your system administrator if he has disabled System Restore, and if so, ask him to re-enable system restore.
12. Reset the Repository
Reset the Repository. To do so follows these steps:
- Boot into Safe Mode without networking and open a command prompt as administrator.
- Now Type net stop winmgmt and hit Enter.
- This will stop the Windows Management Instrumentation Service
- Next go to C:\Windows\System32\wbem and rename the repository folder to repositoryold
- Restart.
Again open a command prompt as administrator, type the following and hit Enter:
Next, type the following and hit Enter:
Restart and see if you can create a System Restore Point manually.
Hope something helps.
If nothing helps, then you may use some free backup software or go in for a Refresh or Reset Windows 10/8 or Repair Install Windows 7.
FIXED: System Restore not working in Windows 10

- As System Restore is a key feature in Windows 10, if you are experiencing troubles getting your system restored, rename the WindowsApp folder from Safe Mode. Read all about it in our guide below.
- One of the recommendations in this case is to create a system restore point in Windows 10. Follow the guide to do this if you don’t know how to.
- If you have any other issues with the System Restore feature, please check our System Restore section for guidance.
- Unfortunately, there are plenty of Windows 10 errors to go around, but if you consult our Windows 10 errors hub you will definitely find your solution.

- Download Restoro PC Repair Tool that comes with Patented Technologies (patent available here).
- Click Start Scan to find Windows issues that could be causing PC problems.
- Click Repair All to fix issues affecting your computer’s security and performance
- Restoro has been downloaded by 0 readers this month.
The Windows 10 update brought new much-needed features and options, but along with all that’s new, came the problems, as well.
Here’s what some users have been saying about System Restore which doesn’t work for them. 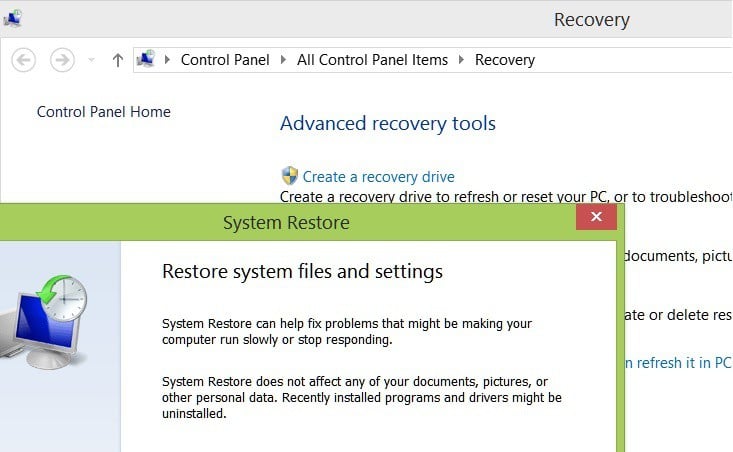
Hello all, I was wondering if you could help me with this problem.
I recently reformatted my computer with the Windows 8.1 Pro with the iso with the recently released update and after installing a WiFi update for my card, I needed to use System Restore as I was loosing internet connection like crazy to no avail.
When I try to use System Restore, it looks like it’s going to work and gets as far as System Restore is restoring the registry and it reboots the computer with the common System restore couldn’t access a file, this could be due to a antivirus, I made no changes to my system since the reformat except the wifi driver and the only antivirus I have is Windows Defender.
I have tried booting into clean boot and also selecting System Restore from the advanced boot menu with the same error.
I even tried creating a restore point on my freshly cleaned laptop, but the error still happens even with Volume Shadow copy on Automatic.
I have contacted Intel too regarding their drivers, but you need to fix System Restore and the issue with reverting WiFi driver, causing my connection not to always auto connect when my computer boots up.
I am computer savy so if you have any suggestions regarding regedits or advanced suggestions besides the ones I have tried on various forums, let me know.
How can I fix System Restore not working after update?
As you can see, the issue has been affecting the user and the problem is detailed in the above excerpt.
After many possible fixes, I’m glad to announce that Microsoft has officially acknowledged the problem and has issued a solution.
Here’s the link to the official support page where Microsoft is discussing this problem in detail:
You create a restore point on a computer that is running Windows 10. You change some settings or install live updates. You try to restore the system to the system restore point that you created.
This issue occurs because the desktop.ini file for the Microsoft OneDrive folder is read-only. The System Restore fails because the desktop.ini file does not change.
So, you need to make sure that you have performed the latest check on Windows Update, or follow the above link to download the specific file to solve the issue.
If the issue persists, here are some additional solutions that you can use.
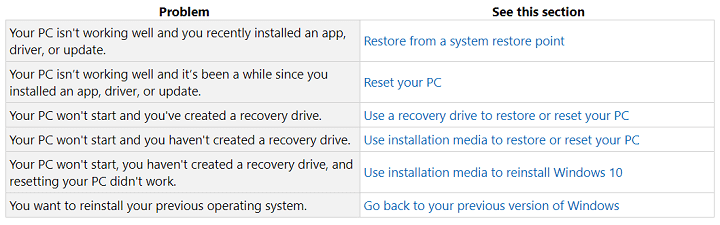
- Use Windows 10 Recovery Options
If you are experiencing troubles getting your system restored in Windows 10, check the official Microsoft’s dedicated page for this kind of issue.
- Rename WindowsApp folder from Safe Mode by running the following commands in Command Prompt as an administrator:
- cd C:Program Files
- takeown /f WindowsApps /r /d Y
- icacls WindowsApps /grant “%USERDOMAIN%%USERNAME%”:(F) /t
- attrib WindowsApps -h
- rename WindowsApps WindowsApps.old
- Run SFC and chkdsk scan in Command Prompt
- Remove the problematic updates that caused System Restore not to work
- Restore Windows in Safe Mode.
Let us know if this guide helped you solve this issue. If it didn’t, we’ll try to look further into the issue.
Windows 10/8/7 System Restore Points Not Working
Do you receive any of the following error messages that indicate your System Restore is not working?
- System Restore failed
- A shadow copy could not be created
- Error 0x80070005/0x800423F3/0x80070570
- System Restore did not complete successfully
- System Restore failed to extract the original copy of the directory from the restore point.
- Restore point could not be created for this reason: Error detected in the Volume Shadow Copy Services (VSS).
When Windows System Restore is not working, it usually happens after users update the system, install an application, or their computer becomes infected with malware or a virus. However, there are many other factors that result in failure toВ restore a previous version of Windows. We provide several methods to fix System Restore within this page, but it is an all-too-common problem that can be caused at no fault to the user. There are simpler alternatives to restoring your System besides using Windows System Restore and reconfiguring your PC every time something inevitably fails with it.В В
You can create restore points of the status of your system, applications, and personal files using third-party software. EaseUS Todo BackupВ is capable of doing just that, and it allows users to perform a complete system restore in Windows 10/8/7. More details are provided in theВ FINAL PARTВ first we’ll discuss how to directly fix Windows System Restore.
Five Solutions to Fix System Restore Not Working in Windows 10/8/7
To fix the matter, there are five fixes you can try.
Fix 1: Run System Restore in Safe Mode
There are different ways to enter Windows Safe Mode, depending on the version of your Windows OS. The specifics of the procedure vary slightly between Windows 10/8.1/8 and Windows 7, but the general method is the same.
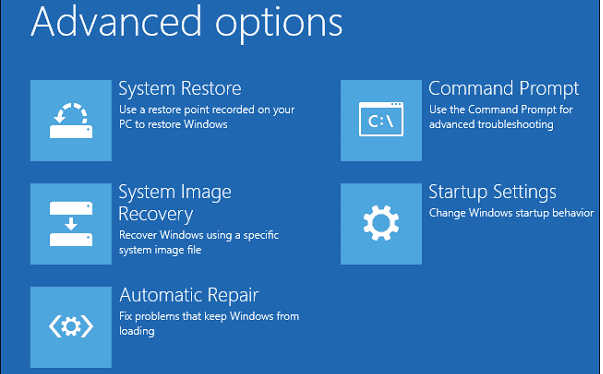
Step 1. Restart your computer, press «F8″В during the boot process to open the Windows «Advanced Boot Options» menu and enter «Safe Mode».
Step 2. In the Safe Mode menu, type recovery into the Start Menu search bar and select «Recovery» from the list.
Step 3. Open «System Restore» from the Advanced recovery tools menu.
By booting into Safe Mode, you may be able to create a system restore point or restore to a prior restore point. Alternatively, if the issue is not resolved, you could execute a Clean Boot to see if you are able to get system restore working without potentially-interfering applications.
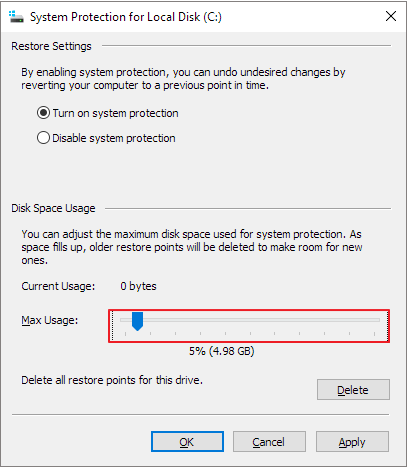
Fix 2: Check System Protection Settings and Configure Disk Space Usage
If the size of your created system restore points exceeds the maximum disk space configuration in the System Protection settings, you will lose many new backup images. In this case, you cannot restore your Windows to the desired restore point because it has not truly been saved. To resolve this, allocate more space for system restore points.
Step 1. Right-click «Computer/This PC» icon and select «Properties» -> «System Protection»В -> «Configure».
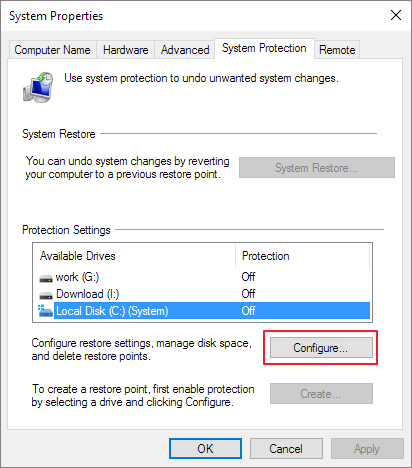
Step 2. When you arrive at the Configure area, drag the «Max Usage«В bar and consider increasing from the default 3 percent to over 5 percent.
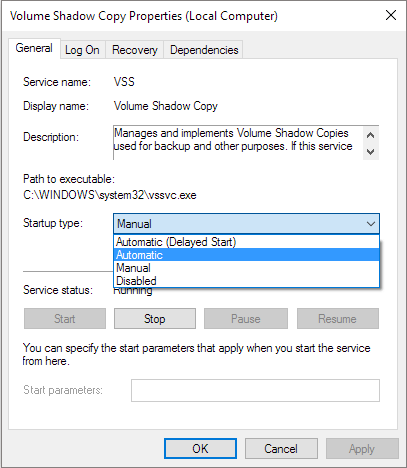
Fix 3: Check the Status of Volume Shadow Copy Service & System Restore Service
You should be aware of another facet of the system that can cause System Restore to not work properly. Volume Shadow Copy Service (VSS) is an implementation that allows volume backups to be performed while applications are running. If VSS is not enabled or the registry value of the Volume Shadow Copy Service has been changed in the Registry, it will lead to Windows System Restore issues.
To set the Volume Shadow Copy Service to «Automatic»:
Step 1. Type Services.msc in theВ Start Menu search box and hit «Enter».
Step 2. Search for «Volume Shadow Copy,В Task Scheduler, andВ Microsoft Software Shadow Copy Provider Service»;В check if they are Running and have their «Startup type» set toВ «Automatic».
Step 3. Reboot your computer and retry System Restore.
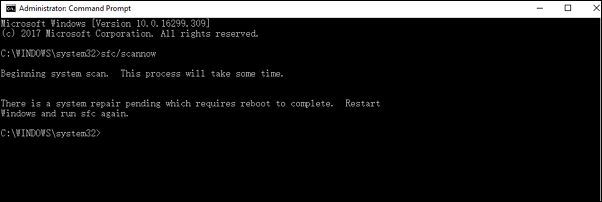
Fix 4: Repair Corrupted System Files
If system restore loses functionality, one possible reason is that system files are corrupt. So, you can run System File Checker (SFC) to check and repair corrupt system files from the Command Prompt to fix the issue.
Step 1. Press «Windows + X»В to bring up a menu and click «Command Prompt (Admin)».
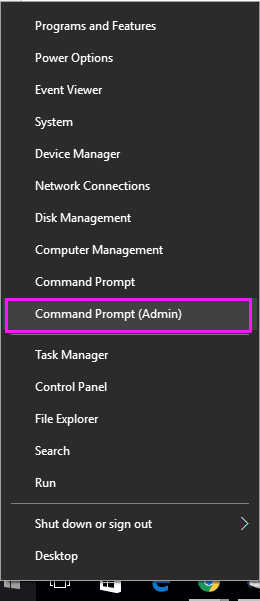
Step 2. On the Command Prompt window, type: sfc /scannow and press «Enter».
Fix 5: Windows System Restore Alternative — EaseUS Todo Backup
The System Restore feature is undoubtedly a very useful feature that is a life-saver when your computer runs into an accident and requires a restore. But at times, no matter how many restore points Windows automatically created for you, you are unable to restore your computer:В System Restore simply won’t work!
What’s worse, you don’t get the luxury of having a specialized consultant help solve your problems. If you find your Windows System Restore not working time and time again,В it is wise to prepare a backup plan that can perfectly replace the Windows function.
Alternatively, backup software can provide double protection of your system restore points. EaseUS Todo Backup is the best tool for the job.В You can use it to create a backup image of everything — including system data, applications, and files — onto internal/external hard drives, Network, or Cloud storage. Furthermore, you have direct access to a dedicated support team if you ever have an issue using the product. Ensure that you can always bring your computer back to a safer state with thisВ backup and recovery program.
Support Windows 10/8.1/8/7/Vista/XP
Create a system restore point with EaseUS Todo Backup
The detailed steps are provided here:
Part 1. Create a system backup
Step 1. Download and launch EaseUS Todo Backup.
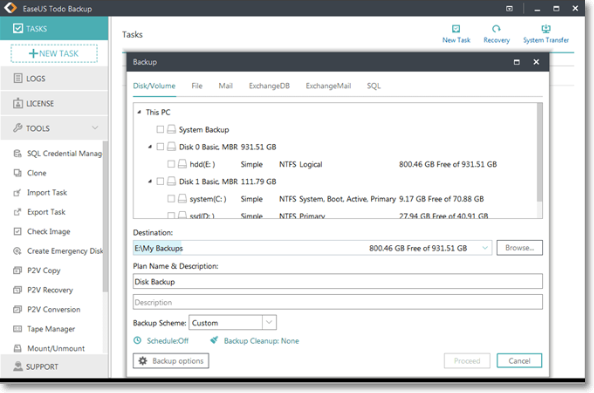
Step 2. Click «OS» on the home screen to back up your Operating System (Windows 10/8/7). Then a mini window pops up, it will detect and display the operating system information automatically.
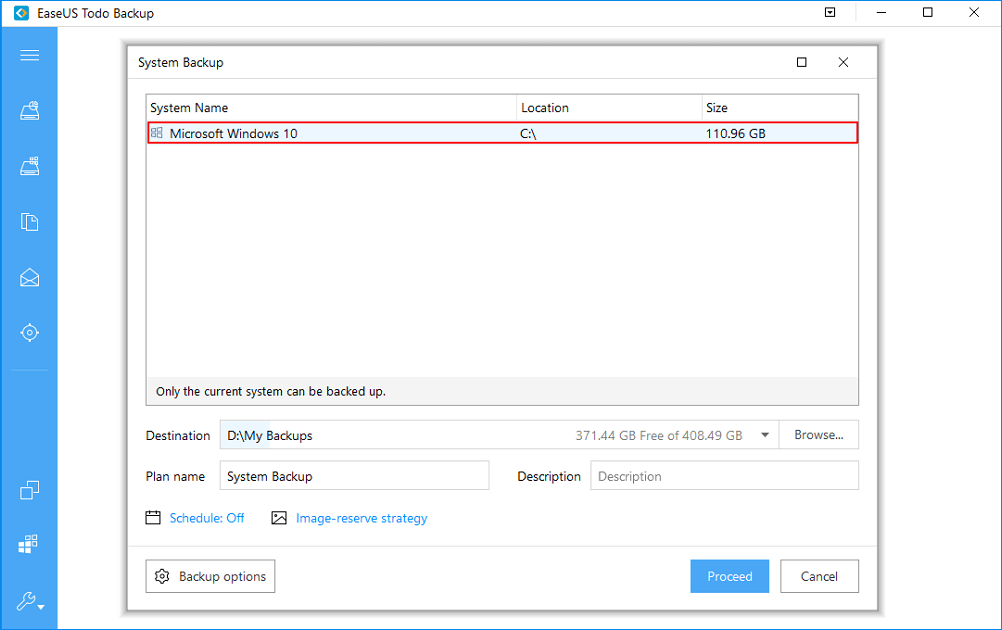
Step 3. Select the backup destination, the software will choose the most suitable location by default.
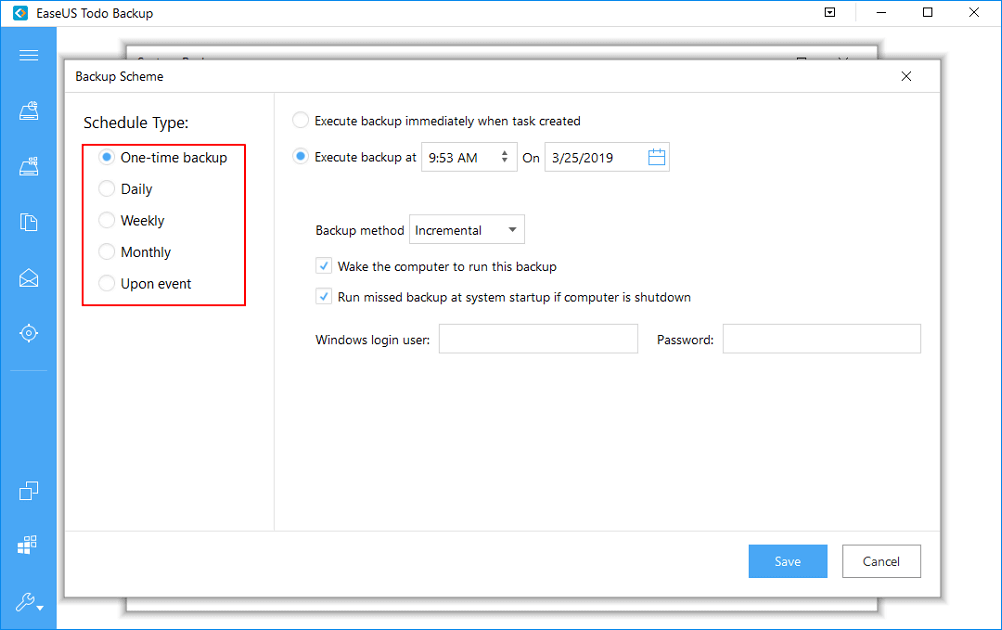
Step 4. Click «Schedule» option to open the Backup Scheme window, here you can create a scheduled backup plan to back up your OS later, daily, weekly, monthly or upon an event. Then, your OS will be automatically backed up.
Step 5. Save all of the changes. Click «Proceed» to start Windows 10 system backup.
Part 2. Restore the system
After you back up the system, you can refer to the detailed guide toВ restore the system from its restore pointsВ or follow the simple guide below to get things done.
Choose a system backup image -> Click «System Recovery» -> Choose a recovery drive -> Click «Proceed».


