- Fixing (C:) Stage Windows 10 при включении: что делать?
- Что происходит?
- Почему появляется Fixing (C:) Stage 1?
- Если компьютер зависает при такой проверке
- Как пропустить сканирование и восстановление диска C?
- Fixing Error Code 80004001 in Windows
- Run System File Control (SFC)
- April 2021 Update:
- Restart your PC in a Clean Boot State
- Utilize Safe Mode Startup
- Fix Windows Update errors
- Fix Windows Update errors by using the DISM or System Update Readiness tool
- Symptom
- Resolution for Windows 8.1, Windows 10 and Windows Server 2012 R2
- Resolution for Windows 7 Service Pack 1 (SP1) and Windows Server 2008 R2 SP1
- Resolution — Download the package from Microsoft Update Catalog directly
- Description of the common corruption errors
- What does the System Update Readiness tool do
- Verify the integrity of resources
- Logging
- How to fix errors that are found in the CheckSUR log file
Fixing (C:) Stage Windows 10 при включении: что делать?
Разбираемся с ситуацией, когда появляется строка Fixing (C:) Stage 1 или 2 в Windows 10. Что это при включении? Как пропустить и что делать?
Fixing (C:) Stage 1 отсчитывает проценты и указывает на количество файлов, которые уже обработаны. После этого начинает работу следующий процесс – Stage 2, а диагностику проходит только один системный диск (C или D).
Что происходит?
Fixing (C:) Stage 1 или 2 – это диагностика системных дисков в Windows 10, которая начинается при включении компьютера, если ранее были выявлены какие-то ошибки . Во время этой диагностики устанавливаются дополнительные элементы, а поврежденные файлы заменяются. Нередко перед этой проверкой приходят уведомления системы от «Центра безопасности», в которых содержатся просьбы перезагрузки компьютера для устранения ошибок.

Встроенная утилита CHKDSK отвечает как раз за эту диагностику. Программа анализирует файлы на дисках, выявляя поврежденные, а потом заменяет их. CHKDSK можно открыть с помощью одноименной команды CHKDSK C: /F – введите в поисковой строке. Вместо С: можно вписать название нужного диска.
Если компьютер слабый, то диагностика продлится дольше. В этом случае вы можете отключить опцию Fixing. Сделать это поможет команда CHKNTFS /X C: , которую нужно также вписать в командную строчку и вместо C: поставить название подходящего диска.
Почему появляется Fixing (C:) Stage 1?
Основные причины этого:
- Аварийное выключение. Подобная диагностика запускается каждый раз, когда компьютер выключился в аварийном режиме. Например, случились перебои с электроэнергией или вы принудительно выключили компьютер.
- Обновления. В Windows 10 часто приходят обновления, которые запускаются в процессе выключения ОС. В случае, если процесс длится слишком долго, выключите компьютер и снова включите.
- Вирусы. Иногда вмешиваются вредоносные программы. Вирусы ломают системные файлы, поэтому они частями блокируются системой. Когда вы запускаете компьютер, Центр безопасности проверяет поврежденные файлы и пытается их заменить. Также на это могут влиять сторонние программы (например, антивирусные программы или пиратское ПО).
- Баг системы в единичном случае. Обычно тогда Fixing (C:) Stage 2 все исправляет. Все последующие включения ПК пройдут без проблем.
Если компьютер зависает при такой проверке
На мощном компьютере с «чистым» Windows проверка проходит быстро. Однако, если система работает не очень хорошо или давно не обновлялась, то могут возникнуть сложности: долгая проверка, зависание, появление синего экрана.
Если Fixing (C:) Stage 1 появляется слишком часто и занимает много времени, то можно выполнить следующее:
- Почистите автозагрузку от неиспользуемых программ. Выключите ненужное.
- Запустите проверку обновлений.
- Проверьте компьютер на наличие вирусов.
- Запустите CCleaner, которая должна почистить систему и реестр.
- В свойствах проблемного диска откройте раздел «Сервис» и запустите его оптимизацию.

Если даже после этого компьютер не может загрузиться, поможет только восстановление операционной системы. Для начала запустите компьютер в безопасном режиме и найдите точки восстановления. Если и это не помогло, остается переустановить Windows, как вариант.
Как пропустить сканирование и восстановление диска C?
Это поможет, если диск еще работает и данные не окончательно потеряны. Обратите внимание, что сообщение «Scanning and repairing drive C: X % complete» может висеть около часа и даже больше.
Чтобы пропустить диагностику:
- Перезагрузитесь.
- Нажмите F8 + Delete одновременно. В этом случае должно появиться сообщение «To skip disk checking press any key within X seconds». Система просит, чтобы вы нажали любую клавишу в течение X секунд. Действуйте быстро — нажать на клавишу нужно тогда, когда это сообщение еще висит на экране. Если вы не успели нажать клавишу, а сообщение уже исчезло, то нужно повторить все сначала — с перезагрузки.
Теперь вы знаете, что это – Fixing (C:) Stage в Windows 10 при включении, а также знаете, как пропустить сообщение и что делать. По сути это исправление ошибок, появившихся во время предыдущего сеанса. Если у вас остались еще вопросы, напишите их в комментариях к этой статье.
Fixing Error Code 80004001 in Windows
The 80004001 error code is often caused by poorly configured system files in your Windows operating system. This can happen when users try to update an older Windows application or run a particular application. If this error appears on the screen, the system automatically restarts to stop further processing. The error results in a blue screen after the system starts.

There are different files in the Windows operating system that are responsible for their proper operation. Sometimes, problems such as viruses or incorrect entries in the registry can damage or damage these files. In this case, error 80004001 appears.
However, Microsoft is continually working on solving this problem.
Follow the methods below and check if it works.
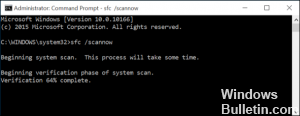
Run System File Control (SFC)
Run the System File Checker (SFC) and check if it helps.
Please follow these steps.
April 2021 Update:
We now recommend using this tool for your error. Additionally, this tool fixes common computer errors, protects you against file loss, malware, hardware failures and optimizes your PC for maximum performance. You can fix your PC problems quickly and prevent others from happening with this software:
- Step 1 : Download PC Repair & Optimizer Tool (Windows 10, 8, 7, XP, Vista – Microsoft Gold Certified).
- Step 2 : Click “Start Scan” to find Windows registry issues that could be causing PC problems.
- Step 3 : Click “Repair All” to fix all issues.

a. Press the Windows + X buttons and click the command prompt (admin).
b. Type the following command at the command prompt and press Enter.
Restart your PC in a Clean Boot State
You can start the computer in a clean boot state and check if the problem persists.
When you start Microsoft Windows, there are usually several programs that start automatically and run in the background that can interfere. These programs can contain antivirus and system utilities. If you perform a clean start, you prevent these programs from starting automatically.
Utilize Safe Mode Startup
To identify the exact cause of the problem, I suggest you use the media creation tool to access the safe mode and check that your hardware and driver are working.
a) After starting your computer with Windows DVD or USB, a black screen with gray text “Press any key to boot from CD or DVD” appears. Press any key.
b) Choose the right time and type of keyboard.
c) In the lower left corner, click Repair Computer.
d) Select Troubleshooting from the options screen Select an option.
e) Choose Start Settings > Restart.
g) After restarting your PC, you will see a list of options. Select 4 or F4 to start your PC in safe mode. Or, if you need to use the Internet, select 5 or F5 for Safe Mode with Network.

CCNA, Web Developer, PC Troubleshooter
I am a computer enthusiast and a practicing IT Professional. I have years of experience behind me in computer programming, hardware troubleshooting and repair. I specialise in Web Development and Database Design. I also have a CCNA certification for Network Design and Troubleshooting.
Fix Windows Update errors
What does this guided walk-through do?
This guided walk-through provides steps to fix problems with Windows Updates for Windows 8.1 and 7, such as taking a long time to scan, or error codes while installing updates.
For help with Windows Update issues in Windows 10, see Troubleshoot problems updating Windows 10 instead.
A common cause of errors is inadequate drive space. If you need help freeing up drive space, see Tips to free up drive space on your PC.
Common error codes
The steps in this guided walk-through should help with all Windows Update errors and other issues— you don’t need to search for the specific error to solve it. As an example, here are some commonly seen error codes: 0x0xc1900223223; 0x80240034; 0x8007000E, 0x80242006, 0x80244018, 0x80D02002, 0x80246017, 0x80240438, 0x80070070, 0x8007000D, 0x80246008, 0x80096004, 0x80070020.
The steps provided here should help fix any errors that come up during the Windows Update process.
How does it work?
We’ll begin by asking you questions about the Windows version you’re using and the issue you’re experiencing. Next, we’ll take you through a series of troubleshooting steps that are specific to your situation. At the end of each step, you’ll be asked “Did this resolve the issue?” If it’s resolved, select Yes, and you’re done! If it isn’t resolved, select No and continue with the guided walk-through.
Fix Windows Update errors by using the DISM or System Update Readiness tool
Original product version: В Windows 10, version 1809 and later versions, Windows 8.1, Windows Server 2012 R2, Windows 7 Service Pack 1, Windows Server 2008 R2 Service Pack 1
Original KB number: В 947821
Symptom
Windows updates and service packs may fail to install if there are corruption errors. For example, an update might not install if a system file is damaged. The DISM or System Update Readiness tool may help you to fix some Windows corruption errors.
This article is intended for Support agents and IT professionals. If you are home users and looking for more information about fixing Windows update errors, see Fix Windows Update errors.
Resolution for Windows 8.1, Windows 10 and Windows Server 2012 R2
To resolve this problem, use the inbox Deployment Image Servicing and Management (DISM) tool. Then, install the Windows update or service pack again.
Open an elevated command prompt. To do this, open Start menu or Start screen, type Command Prompt, right-select Command Prompt, and then select Run as administrator. If you are prompted for an administrator password or for a confirmation, type the password, or select Allow.
Type the following command, and then press Enter. It may take several minutes for the command operation to be completed.
When you run this command, DISM uses Windows Update to provide the files that are required to fix corruptions. However, if your Windows Update client is already broken, use a running Windows installation as the repair source, or use a Windows side-by-side folder from a network share or from a removable media, such as the Windows DVD, as the source of the files. To do this, run the following command instead:
Replace the C:\RepairSource\Windows placeholder with the location of your repair source. For more information about using the DISM tool to repair Windows, reference Repair a Windows Image.
Type the sfc /scannow command and press Enter. It may take several minutes for the command operation to be completed.
Close the command prompt, and then run Windows Update again.
DISM creates a log file (%windir%/Logs/CBS/CBS.log) that captures any issues that the tool found or fixed. %windir% is the folder in which Windows is installed. For example, the %windir% folder is C:\Windows.
Resolution for Windows 7 Service Pack 1 (SP1) and Windows Server 2008 R2 SP1
To resolve this problem, use the System Update Readiness tool. Then, install the Windows update or service pack again.
Download the System Update Readiness tool.
select the download link in the following table that corresponds to the version of Windows that is running on your computer. For more information about how to find the version of Windows that you installed, see Find out if your computer is running the 32-bit or 64-bit version of Windows.
This tool is updated regularly, we recommend that you always download the latest version. This tool is not available in every supported language. Check the link below to see if it is available in your language.
| Operating system | Download link |
|---|---|
| x86-based (32-bit) versions of Windows 7 SP1 | Download the package now. |
| x64-based (64-bit) versions of Windows 7 SP1 | Download the package now. |
| x64-based (64-bit) versions of Windows Server 2008 R2 SP1 | Download the package now. |
| Itanium-based versions of Windows Server 2008 R2 SP1 | Download the package now. |
Install and run the tool.
Select Download on the Download Center webpage, then do one of the following:
- To install the tool immediately, select Open or Run, and then follow the instructions on your screen.
- To install the tool later, select Save, and then download the installation file to your computer. When you’re ready to install the tool, double-select the file.
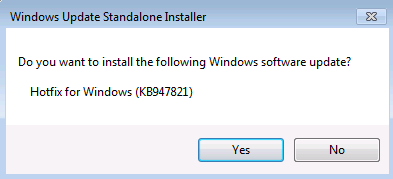
In the Windows Update Standalone Installer dialog box, select Yes.
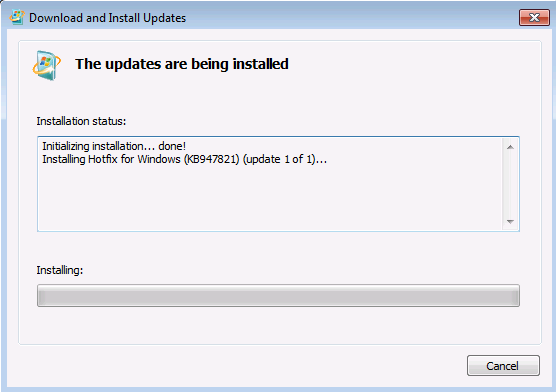
When the tool is being installed, it automatically runs. Although it typically takes less than 15 minutes to run, it might take much longer on some computers. Even if the progress bar seems to stop, the scan is still running, so don’t select Cancel.
When you see Installation complete, select Close.

Reinstall the update or service pack you were trying to install previously.
To manually fix corruption errors that the tool detects but can’t be fixed, see How to fix errors that are found in the CheckSUR log file.
Resolution — Download the package from Microsoft Update Catalog directly
You can also try to directly download the update package from Microsoft Update Catalog, and then install the update package manually.
For example, you may have problems when you try to install updates from Windows Update. In this situation, you can download the update package and try to install the update manually. To do this, follow these steps:
Open Microsoft Update Catalog in Internet Explorer.
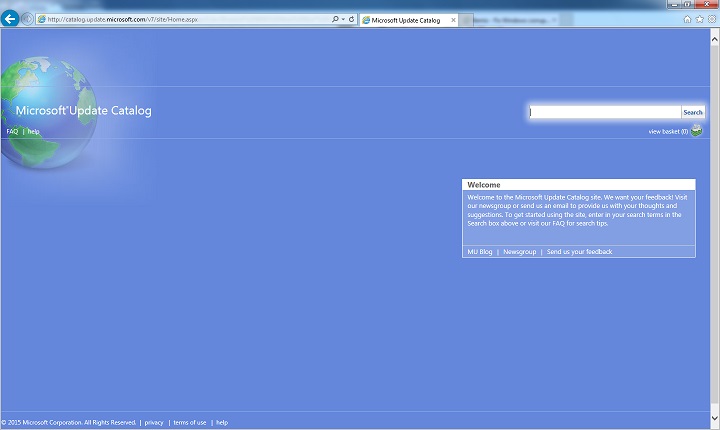
In the search box, input the update number that you want to download. In this example, input 3006137. Then, select Search.

Find the update that applies to your operating system appropriately in the search results, and then select Add to add the update to your basket.

Select view basket to open your basket.

Select Download to download the update in your basket.

Select Browse to choose a location for the update you are downloading, and then select Continue.

Select Close after the download process is done. Then, you can find a folder that contains the update package in the location that you specified.
Open the folder, and then double-select the update package to install the update.
If the Windows update or service pack installed successfully, you are finished. If the problem is not fixed, or if System Update Readiness Tool cannot find the cause, contact us for more help.
Description of the common corruption errors
The following table lists the possible error code with Windows Update for your reference:
| Code | Error | Description |
|---|---|---|
| 0x80070002 | ERROR_FILE_NOT_FOUND | The system cannot find the file specified. |
| 0x8007000D | ERROR_INVALID_DATA | The data is invalid. |
| 0x800F081F | CBS_E_SOURCE_MISSING | The source for the package or file not found. |
| 0x80073712 | ERROR_SXS_COMPONENT_STORE_CORRUPT | The component store is in an inconsistent state. |
| 0x800736CC | ERROR_SXS_FILE_HASH_MISMATCH | A component’s file does not match the verification information present in the component manifest. |
| 0x800705B9 | ERROR_XML_PARSE_ERROR | Unable to parse the requested XML data. |
| 0x80070246 | ERROR_ILLEGAL_CHARACTER | An invalid character was encountered. |
| 0x8007370D | ERROR_SXS_IDENTITY_PARSE_ERROR | An identity string is malformed. |
| 0x8007370B | ERROR_SXS_INVALID_IDENTITY_ATTRIBUTE_NAME | The name of an attribute in an identity is not within the valid range. |
| 0x8007370A | ERROR_SXS_INVALID_IDENTITY_ATTRIBUTE_VALUE | The value of an attribute in an identity is not within the valid range. |
| 0x80070057 | ERROR_INVALID_PARAMETER | The parameter is incorrect. |
| 0x800B0100 | TRUST_E_NOSIGNATURE | No signature was present in the subject. |
| 0x80092003 | CRYPT_E_FILE_ERROR | An error occurred while Windows Update reads or writes to a file. |
| 0x800B0101 | CERT_E_EXPIRED | A required certificate is not within its validity period when verifying against the current system clock or the time stamp in the signed file. |
| 0x8007371B | ERROR_SXS_TRANSACTION_CLOSURE_INCOMPLETE | One or more required members of the transaction are not present. |
| 0x80070490 | ERROR_NOT_FOUND | Windows could not search for new updates. |
| 0x800f0984 | PSFX_E_MATCHING_BINARY_MISSING | Matching component directory exist but binary missing |
| 0x800f0986 | PSFX_E_APPLY_FORWARD_DELTA_FAILED | Applying forward delta failed |
| 0x800f0982 | PSFX_E_MATCHING_COMPONENT_NOT_FOUND | Can’t identify matching component for hydration |
What does the System Update Readiness tool do
Verify the integrity of resources
The System Update Readiness tool verifies the integrity of the following resources:
- Files that are located in the following directories:
- %SYSTEMROOT%\Servicing\Packages
- %SYSTEMROOT%\WinSxS\Manifests
- Registry data that is located under the following registry subkeys:
- HKEY_LOCAL_MACHINE\Components
- HKEY_LOCAL_MACHINE\Schema
- HKEY_LOCAL_MACHINE\Software\Microsoft\Windows\CurrentVersion\Component Based Servicing
This list may be updated at any time.
When the System Update Readiness tool detects incorrect manifests, Cabinets, or registry data, it may replace the incorrect data with a corrected version.
Logging
The System Update Readiness tool creates a log file that captures any issues that the tool found or fixed. The log file is located here:
How to fix errors that are found in the CheckSUR log file
To manually fix corruption errors that the System Update Readiness tool detects but can’t fix, follow these steps:
%SYSTEMROOT% is an environment variable that saves the folder in which Windows is installed. For example, generally the %SYSTEMROOT% folder is C:\Windows.
Identify the packages that the tool can’t fix. For example, you may find the following in the log file:
In this case, the package that is corrupted is KB958690.
Copy the package (.msu) to the %SYSTEMROOT%\CheckSUR\packages directory. By default, this directory doesn’t exist and you need to create the directory.


