- Как очистить кеш DNS в MacOS Big Sur, MacOS Mojave, High Sierra
- Пошаговые инструкции по очистке кеша DNS в Mac OS X Big Sur, EI Capitan, OS X Yosemite, Sierra
- Вы хотите знать, что очистка DNS изменилась?
- How to Flush DNS Cache in MacOS Catalina & Big Sur
- How to Flush DNS Cache in macOS Catalina & Big Sur
- How to Flush DNS Cache in MacOS Monterey/ Big Sur, MacOS Mojave, High Sierra, EI Capitan
- Steps how to Flush DNS Cache in Mac OS X Monterey, Big Sur, EI Capitan, OS X Yosemite, Sierra
- Do you want to know flush DNS has changed?
- jaysukh patel
- Reset Mac DNS Cache in MacOS Monterey, Big Sur On MacOS (Flush DNS Cache)
- How to Flush or Reset DNS Cache in MacOS Monterey On Mac
- How to clear DNS Cache in MacOS Monterey on Mac
- How to Reset And Flush DNS Cache in macOS Monterey
- Using Dig to Check Query Times
- jaysukh patel
Как очистить кеш DNS в MacOS Big Sur, MacOS Mojave, High Sierra
Самый полезный способ, если вы сетевой администратор, администратор сервера или веб-разработчик. И вы работаете с Mac OS X, скорее всего, MacBook Pro, MacBook Air, iMac или Mac Mini. Более того, каждая версия Mac OS X имеет разные команды для сброса кеша DNS. Поэтому вы должны использовать точную команду в соответствии с версией вашей системы OS X.
Возможно, вы хорошо знакомы с DNS Cache, потому что вы можете столкнуться с ситуацией с DNS-кешем в Mac OS X. Но здесь о DNS-кеше, которые являются новичками в сети. DNS Cache — это небольшая база данных, поддерживаемая компьютерной системой (Mac, Windows, Linux) и т. Д., Она принимает запросы DNS от локальных клиентов, таких как веб-браузеры (Safari, Google Chrome) и агнаты передачи почты. Таким образом, он собирает ответы с удаленных DNS-серверов. Он кэширует ответ, чтобы сэкономить время позже.
Но иногда может потребоваться немедленно сбросить кэш и повторно использовать DNS-сервер. Кроме того, если ваш компьютер Mac не использует последние записи DNS с удаленного сервера, вы можете перезагрузить Mac, чтобы обновить его кэшированную информацию. Но вы не можете изменить записи DNS на своем сервере, перезагрузив Mac. Но вам следует выполнить очистку кеша DNS в Mac OS X El Capitan, OS X Yosemite и более ранних версиях OS X.
Мы рекомендуем вам команду терминала для очистки кеша DNS в MacOS Big Sur, Mac OS Mojave, X EI Capitan, OS X Yosemite (10.10.4), MacOS Sierra (10.12).
Для MacOS High Sierra и MacOS Mojave:
sudo killall -HUP mDNSResponder; sudo killall mDNSResponderHelper; sudo dscacheutil -flushcache; скажем, кеш DNS MacOS был очищен
Команда терминала для очистки кэша DNS в Mac OSX EI Capitan.
sudo dscacheutil -flushcache; sudo killall -HUP mDNSResponder; скажем, очищен
Пошаговые инструкции по очистке кеша DNS в Mac OS X Big Sur, EI Capitan, OS X Yosemite, Sierra
Чтобы сбросить очистку кеша DNS на Mac, вам необходимо использовать Терминал (известный как CMD в Windows).
Шаг 1. Запустите Терминал, используя Spotlight (Command + Space) для Mac и Ctrl + Space для клавиатуры Windows.
Шаг 2. Введите команду ниже для Apple Mac OS X 10.10.4, OS X 10.11, 10.12 и в будущем OS X,
- Sudo killall -HUP mDNSResponder

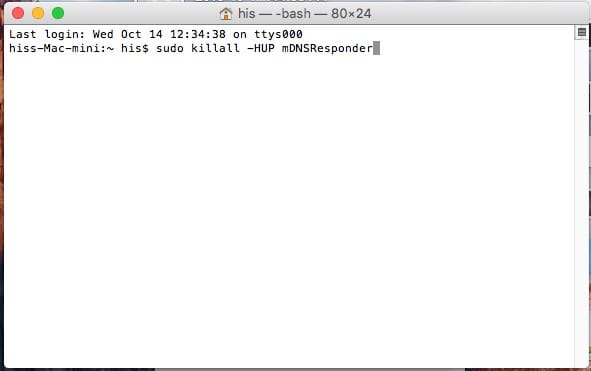
Шаг 3. Нажмите клавишу возврата и введите пароль администратора, когда потребуется.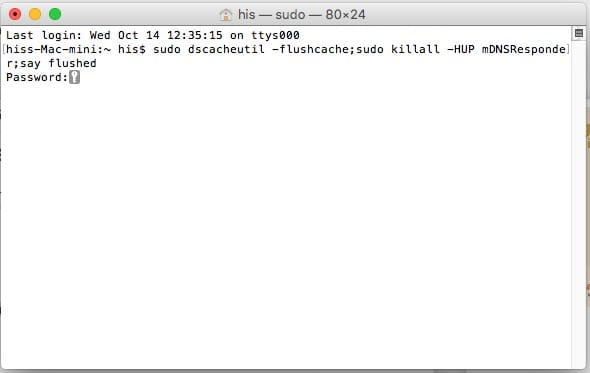
Сэй покраснел. Итак, это все.
Хотя вы можете использовать приведенную ниже команду для сброса кеша DNS в OS X Yosemite 10.10. OS X 10.10.1, OS X 10.10.2 и OS X Yosemite 10.10.3, MacOS Sierra
- sudo discoveryutil mdnsflushcache
Вы хотите знать, что очистка DNS изменилась?
Затем, чтобы определить, действительно ли изменился сервер имен или IP-адрес, вы можете использовать команду ‘dig’ с вероятным URL-адресом:
Давайте узнаем, есть ли у вас какая-нибудь последняя версия трюков с кешированием OS X. Напишите нам в поле для комментариев.
Источник
How to Flush DNS Cache in MacOS Catalina & Big Sur

MacOS users may occasionally need to flush DNS cache on their Macs in order to access certain websites, domains, or for troubleshooting purposes. Flushing DNS cache is particularly common with web developers and network admins, but it’s used with some regularity by other advanced users too. This guide will walk through how to flush DNS cache in MacOS Big Sur and MacOS Catalina.
If you’re unable to access a website that you visited recently, then of course the first thing you’d check is whether you have a working internet connection. But if you’re only facing connectivity issues on that particular website, then it could be a DNS error, and this is an example when clearing out DNS cache can be helpful.
Your Mac stores the IP addresses of web servers that contain pages that you’ve recently visited. However, if this IP address changes prior to the entry in your DNS cache updates, you won’t be able to access the site without resetting your DNS cache. Flushing the DNS cache on your Mac removes all the invalid entries and forces the system to recollect those addresses the next time you visit the website.
How to Flush DNS Cache in macOS Catalina & Big Sur
Before you go ahead with the following procedure, make sure that your Mac is running macOS Catalina or later, as clearing DNS cache on older versions of macOS varies slightly. Now, without further ado, let’s take a look at the necessary steps.
- We’ll be using Terminal to flush the DNS cache on your machine. You can open Terminal using Spotlight search. Click on the “magnifying glass” icon located at the top-right corner of your desktop to access Spotlight search. Alternatively, you can open Spotlight by pressing Command + Space bar.
Next, type “Terminal” in the search field and open the app from the search results.
Now, type the following the following command in terminal.
sudo dscacheutil -flushcache; sudo killall -HUP mDNSResponder
Hit the Return key and you’ll now be prompted to enter the macOS user password. Type in your password and press Return again.
Close the Terminal window when finished.
That’s pretty much all there is to it. You’ve successfully cleared and reset the DNS cache on your macOS machine.
It’s worth noting that you won’t get a “successful” message after you’ve typed in the command. Just know that it’s done and you can confirm it by opening the website you weren’t able to access before.
It’s good to clear DNS cache every now and then, as occasionally, they could get corrupted due to technical glitches. Similarly, your Wi-Fi router has a DNS cache as well. This is why most people recommend rebooting the router as a troubleshooting step, as it flushes the DNS cache as well.
If your Mac is running an older version of macOS, you might want to learn how to reset DNS cache in macOS High Sierra, or flushing the DNS cache in macOS Sierra and so on. The procedure is similar and involves the Terminal, except for the fact that you’d be typing in a slightly different command.
We hope you were able to correct whatever network issues you were experiencing, or you’re able to access all the websites again after flushing the DNS cache on your Mac. And if you’re having general internet connectivity problems, you may want to try troubleshooting steps to resolve Wi-Fi connectivity issues on your Mac as well.
If you know of another approach to flushing DNS cache on the latest macOS releases, or you have any particular insight, opinions, or advice, share in the comments!
Источник
How to Flush DNS Cache in MacOS Monterey/ Big Sur, MacOS Mojave, High Sierra, EI Capitan
Last Updated on Jul 10, 2021
Most useful way if you’re a network administrator, Server administrator or web developer. And you’re working with Mac OS X machines likely MacBook Pro, MacBook Air, iMac, or Mac Mini. Furthermore, each version of Mac OS X has a different- different commands to reset the DNS cache. So you should use the exact command according to your system version of OS X.
we are happy to help you, submit this Form, if your solution is not covered in this article.
You may be very familiar with DNS Cache because you may face a situation with DNS cache in Mac OS X. but here about DNS cache who is the beginner in networking. DNS Cache is a small database maintained by a computer system (Mac, Windows, Linux), etc. it accepts DNS quires from local clients such as web browsers (Safari, Google Chrome) and mail transfer agnates. So it collects responses from remote DNS servers. It caches the response to save time later.
But sometimes it might be necessary to reset the cache immediately and re-quarry a DNS Server. Also, if your Mac machine isn’t using the latest DNS entries from the remote server, then you can restart your Mac to update its cached info. But you can’t change DNS entries on your server through restarting your Mac. But you should do Flush DNS Cache in Mac OS X Monterey, El Capitan, OS X Yosemite, and earlier OS X.
We recommend you a terminal command to flush DNS cache in MacOS Monterey, Big Sur, Mac OS Mojave, X EI Capitan, OS X Yosemite (10.10.4), MacOS Sierra (10.12).
For MacOS High Sierra and MacOS:
Terminal Command to flush the DNS Cache in Mac OSX.
Steps how to Flush DNS Cache in Mac OS X Monterey, Big Sur, EI Capitan, OS X Yosemite, Sierra
To reset flush DNS cache in Mac you need to use the Terminal (known as CMD in windows).
Step 1. Launch Terminal using Spotlight (Command + Space) for Mac and Ctrl + Space for Windows keyboard.
Step 2. Enter bellow Command for Apple Mac OS X 10.10.4, OS X 10.11, 10.12 and in future coming OS X,


Step 3. Press return key and enter the Admin password when requested.
It’s Say flushed. So that’s it.
While you can use the below command to reset DNS cache on OS X Yosemite 10.10. OS X 10.10.1, OS X 10.10.2 and OS X Yosemite 10.10.3, MacOS Sierra
Do you want to know flush DNS has changed?
Then to determine if a name server or IP has actually changed, you can use the ‘dig’ command with the URL likely:
Let’s know do you have any latest version of OS X cache tricks. Text us in the comment box.
jaysukh patel
Jaysukh Patel is the founder of howtoisolve. Also self Professional Developer, Techno lover mainly for iPhone, iPad, iPod Touch and iOS, Jaysukh is one of responsible person in his family. Contact On: [email protected] [OR] [email protected]
Источник
Reset Mac DNS Cache in MacOS Monterey, Big Sur On MacOS (Flush DNS Cache)
Last Updated on Jun 26, 2021
flushdns mac with MacOS Monterey is easy with MacOS Monterey on All Macs (iMac, MacBook, MacBook Pro, MacBook Air, Mac Mini). Are you looking to clear and reset the DNS cache in macOS Monterey? Then we have listed some best methods to do so. Periodically users need to reset the DNS cache because sometimes a specific domain or name server is cached or Mac DNS settings have been changed. At that time you need to remove the existing DNS cache. So moving further we will see how to reset the DNS cache in macOS Monterey.
we are happy to help you, submit this Form, if your solution is not covered in this article.
Execute Command in Terminal: Below commands are case sensitive and use space where it needs
How to Flush or Reset DNS Cache in MacOS Monterey On Mac
Step 1: Launch “Terminal” directly from the Home screen using Spotlight. Or “Applications” > “Utilities” > “Terminal.app” or Type “Terminal” in Spotlight search.
Step 2: Now, enter the command below, To execute use your Mac’s system administrator password [Not an Apple ID].
sudo killall -HUP mDNSResponder; sleep 2; echo macOS DNS Cache Reset | say

Step 3: Hit “return key” and then enter the Admin password and again enter.
Step 4: Wait until “DNS cache has been cleared” appears on the terminal screen.
Step 5: Quit “Terminal”.
You must close all the applications running connected to the internet and wait for the changes to take place. Sometimes the changes take place through a simple refresh in the apps.
If in case the above terminal code doesn’t workout for you then you should break that command and write like this,
sudo killall -HUP mDNSResponder && echo macOS DNS Cache Reset
How to clear DNS Cache in MacOS Monterey on Mac
If you have made DNS servers and still you didn’t encounter any changes, then you should clear the DNS cache and again check it this workout for you. It is not necessary to close all the applications which use DNS like Firefox, Safari and other web browsers.
Step 1: Launch “Terminal” from the “Utilities” which you will find in “Applications”.
Step 2: Enter the command with accuracy,
Sudo killall –HUP mDNSResponder;say DNS cache has been flushed

Step 3: Hit return key and enter Admin password.
Step 4: It will take some time to “clear DNS cache”.
Also, you will get a kind of voice message from the system that DNS cache has been flushed.
Alternatively, we have one more command to clear DNS cache if the above one doesn’t work for you,
sudo killall -HUP mDNSResponder;sudo killall mDNSResponderHelper;sudo dscacheutil -flushcache;say MacOS DNS cache has been cleared
![]()
How to Reset And Flush DNS Cache in macOS Monterey
Follow the steps to Reset and flush the DNS Cache,
Step 1: Launch “Terminal”.
Step 2: Enter the following command,
sudo killall -HUP mDNSResponder && echo macOS DNS Cache Reset
Step 3: Once you enter the command tap return key and enter the Admin password.
Step 4: It will take few moments to clear cache.
Using Dig to Check Query Times
This method is used to check whether the DNS is perfectly working or not.
Step 1: Open “Terminal”.
Step 2: Type “dig howtoisolve.com”. In place of our website, you can enter any website to check query time.

Step 3: You can check result in “Query Time”.If query time is more then change macOS DNS settings to Google DNS.
After changing the DNS server to Google DNS, you can verify the query time again by the same dig command.
Hope you get pro tips, why you shouldn’t share this helpful guide with others. Share this page on your profile and recommend to your friends for more tips and guide on MacOS Monterey issues and problems.
jaysukh patel
Jaysukh Patel is the founder of howtoisolve. Also self Professional Developer, Techno lover mainly for iPhone, iPad, iPod Touch and iOS, Jaysukh is one of responsible person in his family. Contact On: [email protected] [OR] [email protected]
Источник


