- Введение в Flutter
- Что такое Flutter. Установка
- Установка Flutter SDK
- Установка Flutter на Windows
- Установка Flutter на MacOS
- Обновление Flutter
- Build and release a macOS app
- Preliminaries
- Register your app on App Store Connect
- Register a Bundle ID
- Create an application record on App Store Connect
- Review Xcode project settings
- Updating the app’s version number
- Add an app icon
- Create a build archive with Xcode
- Create a build archive with Codemagic CLI tools
- Distribute to registered devices
- Release your app to the App Store
- Troubleshooting
Введение в Flutter
Что такое Flutter. Установка
Flutter представляет фреймворк от компании Google, который позволяет создавать кроссплатформенные приложения, которые могут использовать однин и тот же код. Спектр платформ широк — это веб-приложения, мобильные приложения под Android и iOS, графические приложения под настольные операционные системы Windows, MacOS, Linux, а также веб-приложения.
Особенностью работы с Flutter является то, что приложения под разные платформы могут иметь один и тот же код. Поскольку используемые платформы не эквиваленты, то какие-то отдельные части кода необходимо настраивать под определенную ОС, например, под iOS, но тем не менее большая часть кода может совпадать. Это позволяет разработчикам существенно сэкономить время и ресурсы на создание приложений под все поддерживаемые платформы.
В качестве языка разработки используется язык программирования Dart.
При постороении приложения Flutter транслирует код на Dart в нативный код приложения с помощью Dart AOT (компиляция приложения перед его запуском), которое можно запускать на Android или iOS или другой платформе. Однако при разработке приложения для ее ускорения Flutter использует JIT (компиляция приложения в процессе его запуска).
Надо отметить, что Flutter относительно новый фреймворк. Хотя прототип фреймворка появился еще в 2015 году, а первая альфа-версия вышла в мае 2017 года, но первый стабильный релиз — Flutter 1.0 увидел свет только в декабре 2018 года. Тем не менее регулярно с небольшой периодичностью ыходят подверсии, добавляя новую функциональноть и исправляя имеющиеся баги. На момент публикации данной статьи последней стабильной версией является Flutter 2.0, которая вышла в марте 2021 года.
Что используется для разрабоки под Flutter? Для для написания кода программы можно использовать любой полюбившийся текстовый редактор и затем с помощью утилит командной строки из Flutter SDK компилировать приложение. Однако для таких сред как Android Studio и IntelliJ IDEA, а также текстового редактора Visual Studio Code компания Google выпустила специальные плагины, которые позволяют упростить разработку. Поэтому зачастую для разработки под Flutter используются именно Android Studio и IntelliJ IDEA.
Установка Flutter SDK
На странице https://flutter.dev/docs/get-started/install/ можно найти ссылки на на загрузку SDK для разных операционных систем. Рассмотрим, как установить Flutter SDK на Windows и MacOS.
Установка Flutter на Windows
Чтобы начать разрабатывать приложения с помощью Flutter, необходимо установить SDK. Но прежде всего следует отметить, что для работы Flutter SDK в Windows в системе должен быть установлен Git for Windows, который можно найти по адресу https://git-scm.com/download/win.
Также Flutter использует Android SDK. Самый легкий способ установить Android SDK — сразу установить Android Studio, вместе с которой будут установлены вс необходимые инструменты.
Непосредственно для установки Flutter SDK перейдем на страницу https://flutter.dev/docs/get-started/install/windows. На этой странице найдем в секции Get the Flutter SDK ссылку на zip-архив с Flutter SDK и загрузим его:
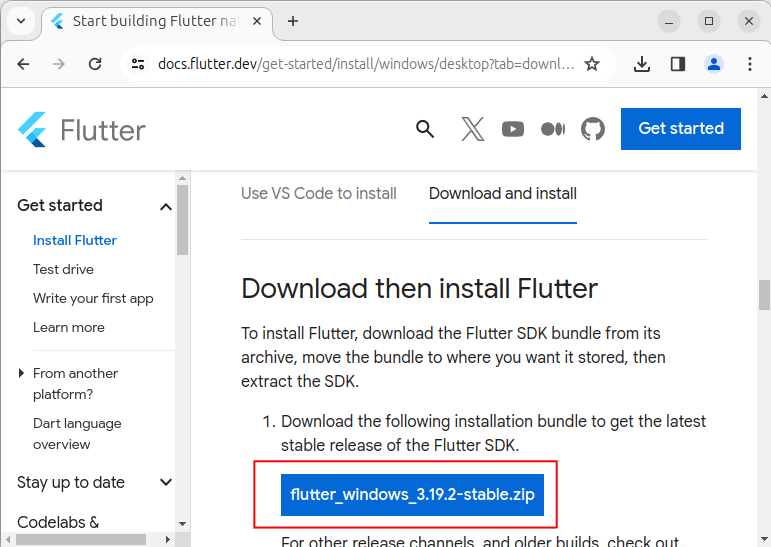
Далее распакуем архив, например, на диске С. Например, в моем случае архив распакован в папку C:\flutter .
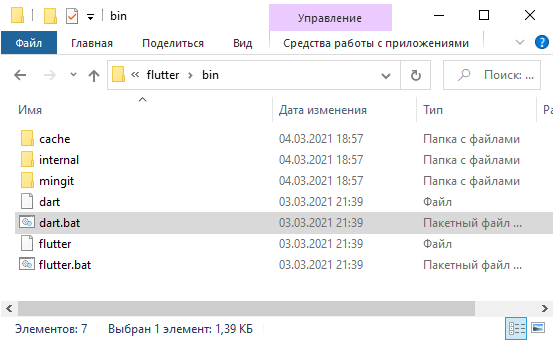
В распакованном архиве в папке flutter\bin мы найдем инструменты для компиляции приложения. Например, в моем случае полный путь к этой папке C:\flutter\bin :
Путь к этой папке нам надо добавить в переменные среды. (Переменные среды можно открыть через Панель управления -> Система -> Дополнительные параметры системы -> Переменные среды).
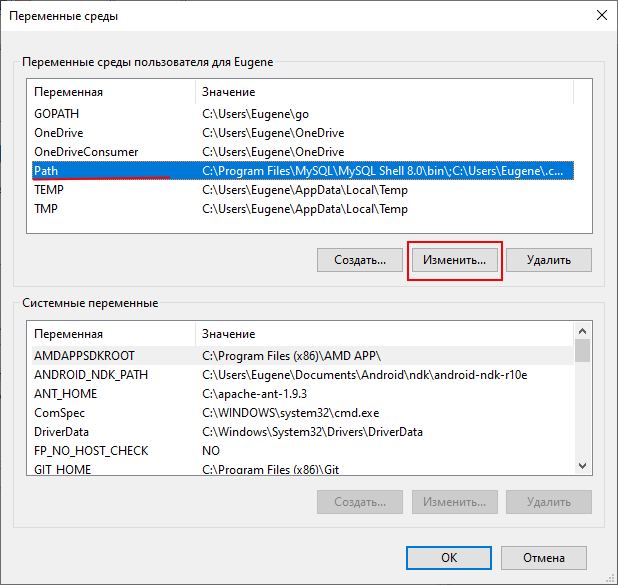
Здесь нам надо изменить переменную Path, добавив путь к папке bin в Flutter SDK:

Чтобы проверить корректность установки Flutter, откроем командную строку и введем команду flutter . Если Windows распознает ее, и последует вывод некоторой справочной информации (например, как использовать те или иные команды в консоли), то flutter установлен и настроен.

В качестве альтернативы установить Flutter SDK можно через Git. Для этого необходимо в командной строке перейти к папке, где должен располагаться SDK и далее выполнить в командной строке следующую команду:
В данном случае с репозитария на гитхабе будет загружена последняя стабильная версия Flutter SDK. И опять же подчеркиваю, что для выполнения этой команды необходимо установить Git for Windows, как было написано выше.
Установка Flutter на MacOS
Для установки и обновления Flutter использует git , поэтому необходимо установить git. Однако если установлен Xcode , то git устанавливать не надо, так как Xcode уже включает git.
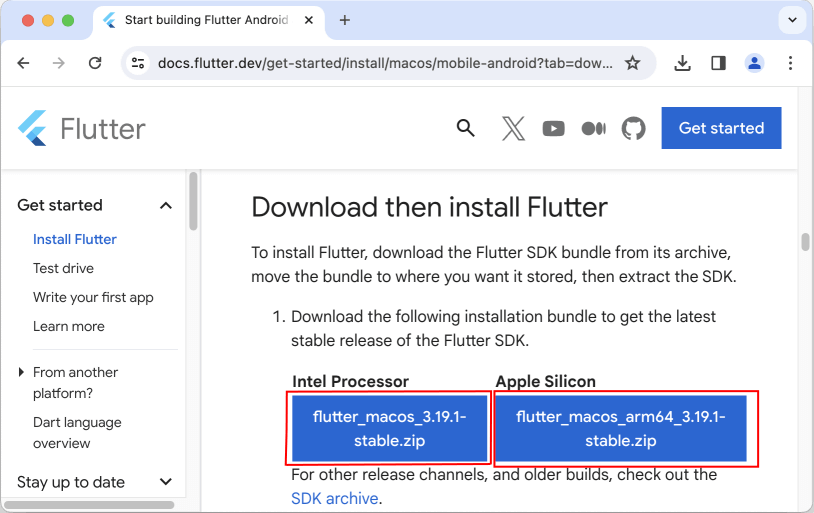
Для установки Flutter SDK перейдем на страницу https://flutter.dev/docs/get-started/install/macos и найдем на странице ссылку на Flutter SDK и загрузим его:
Далее поместим папку с Flutter SDK где-нибудь на жестком диске. Например, в моем случае Flutter SDK расположен в корневой папке текущего пользователя ( Users/eugene ).
Для использования Flutter SDK в треминале, необходимо добавить путь к папке bin в SDK в системные переменные. Добавление для текущего окна терминала:
При первом использовании команды flutter произойдет загрузка Dart SDK.
Обновление Flutter
Если впоследствии необходимо будет обновить Flutter, то для этого достаточно будет выполнить в командной строке команду
Поскольку Flutter активно развивается, то лучше обновляться регулярно.
Источник
Build and release a macOS app
This guide provides a step-by-step walkthrough of releasing a Flutter app to the App Store.
Preliminaries
Before beginning the process of releasing your app, ensure that it meets Apple’s App Review Guidelines.
In order to publish your app to the App Store, you must first enroll in the Apple Developer Program. You can read more about the various membership options in Apple’s Choosing a Membership guide.
Register your app on App Store Connect
Manage your app’s life cycle on App Store Connect (formerly iTunes Connect). You define your app name and description, add screenshots, set pricing, and manage releases to the App Store and TestFlight.
Registering your app involves two steps: registering a unique Bundle ID, and creating an application record on App Store Connect.
For a detailed overview of App Store Connect, see the App Store Connect guide.
Register a Bundle ID
Every macOS application is associated with a Bundle ID, a unique identifier registered with Apple. To register a Bundle ID for your app, follow these steps:
- Open the App IDs page of your developer account.
- Click + to create a new Bundle ID.
- Enter an app name, select Explicit App ID, and enter an ID.
- Select the services your app uses, then click Continue.
- On the next page, confirm the details and click Register to register your Bundle ID.
Create an application record on App Store Connect
Register your app on App Store Connect:
- Open App Store Connect in your browser.
- On the App Store Connect landing page, click My Apps.
- Click + in the top-left corner of the My Apps page, then select New App.
- Fill in your app details in the form that appears. In the Platforms section, ensure that iOS is checked. Since Flutter does not currently support tvOS, leave that checkbox unchecked. Click Create.
- Navigate to the application details for your app and select App Information from the sidebar.
- In the General Information section, select the Bundle ID you registered in the preceding step.
For a detailed overview, see Add an app to your account.
Review Xcode project settings
This step covers reviewing the most important settings in the Xcode workspace. For detailed procedures and descriptions, see Prepare for app distribution.
Navigate to your target’s settings in Xcode:
- In Xcode, open Runner.xcworkspace in your app’s macos folder.
- To view your app’s settings, select the Runner project in the Xcode project navigator. Then, in the main view sidebar, select the Runner target.
- Select the General tab.
Verify the most important settings.
In the Identity section:
App Category The app category under which your app will be listed on the Mac App Store. This cannot be none. Bundle Identifier The App ID you registered on App Store Connect.
In the Deployment info section:
Deployment Target The minimum macOS version that your app supports. Flutter supports macOS 10.11 and later.
In the Signing & Capabilities section:
Automatically manage signing Whether Xcode should automatically manage app signing and provisioning. This is set true by default, which should be sufficient for most apps. For more complex scenarios, see the Code Signing Guide. Team Select the team associated with your registered Apple Developer account. If required, select Add Account…, then update this setting.
The General tab of your project settings should resemble the following:

Updating the app’s version number
The default version number of the app is 1.0.0 . To update it, navigate to the pubspec.yaml file and update the following line:
The version number is three numbers separated by dots, such as 1.0.0 in the example above, followed by an optional build number such as 1 in the example above, separated by a + .
Both the version and the build number may be overridden in Flutter’s build by specifying —build-name and —build-number , respectively.
In macOS, build-name uses CFBundleShortVersionString while build-number uses CFBundleVersion . Read more about iOS versioning at Core Foundation Keys on the Apple Developer’s site.
Add an app icon
When a new Flutter app is created, a placeholder icon set is created. This step covers replacing these placeholder icons with your app’s icons:
- Review the macOS App Icon guidelines.
- In the Xcode project navigator, select Assets.xcassets in the Runner folder. Update the placeholder icons with your own app icons.
- Verify the icon has been replaced by running your app using flutter run -d macos .
Create a build archive with Xcode
This step covers creating a build archive and uploading your build to App Store Connect using Xcode.
During development, you’ve been building, debugging, and testing with debug builds. When you’re ready to ship your app to users on the App Store or TestFlight, you need to prepare a release build. At this point, you might consider obfuscating your Dart code to make it more difficult to reverse engineer. Obfuscating your code involves adding a couple flags to your build command.
In Xcode, configure the app version and build:
- In Xcode, open Runner.xcworkspace in your app’s macos folder.
- Select Runner in the Xcode project navigator, then select the Runner target in the settings view sidebar.
- In the Identity section, update the Version to the user-facing version number you wish to publish.
- In the Identity section, update the Build identifier to a unique build number used to track this build on App Store Connect. Each upload requires a unique build number.
Finally, create a build archive and upload it to App Store Connect:
Open Xcode and select Product > Archive. Run flutter build macos to produce a build archive.
Click the Validate App button. If any issues are reported, address them and produce another build. You can reuse the same build ID until you upload an archive.
After the archive has been successfully validated, click Distribute App. You can follow the status of your build in the Activities tab of your app’s details page on App Store Connect.
You should receive an email within 30 minutes notifying you that your build has been validated and is available to release to testers on TestFlight. At this point you can choose whether to release on TestFlight, or go ahead and release your app to the App Store.
Create a build archive with Codemagic CLI tools
This step covers creating a build archive and uploading your build to App Store Connect using Flutter build commands and Codemagic CLI Tools executed in a terminal in the Flutter project directory.
Install the Codemagic CLI tools:
You’ll need to generate an App Store Connect API Key with App Manager access to automate operations with App Store Connect. To make subsequent commands more concise, set the following environment variables from the new key: issuer id, key id, and API key file.
You need to export or create a Mac App Distribution and a Mac Installer Distribution certificate to perform code signing and package a build archive.
If you have existing certificates, you can export the private keys by executing the following command for each certificate:
Or you can create a new private key by executing the following command:
Later, you can have CLI tools automatically create a new Mac App Distribution and Mac Installer Distribution certificate. You can use the same private key for each new certificate.
Fetch the code signing files from App Store Connect:
Where cert_key is either your exported Mac App Distribution certificate private key or a new private key which automatically generates a new certificate.
If you do not have a Mac Installer Distribution certificate, you can create a new certificate by executing the following:
Use cert_key of the private key you created earlier.
Fetch the Mac Installer Distribution certificates:
Set up a new temporary keychain to be used for code signing:
Restore Login Keychain! After running keychain initialize you must run the following:
This sets your login keychain as the default to avoid potential authentication issues with apps on your machine.
Now add the fetched certificates to your keychain:
Update the Xcode project settings to use fetched code signing profiles:
Install Flutter dependencies:
Install CocoaPods dependencies:
Enable the Flutter macOS option:
Build the Flutter macOS project:
Package the app:
Publish the packaged app to App Store Connect:
As mentioned earlier, don’t forget to set your login keychain as the default to avoid authentication issues with apps on your machine:
Distribute to registered devices
TestFlight is not available for distributing macOS apps to internal and external testers. See distribution guide to prepare an archive for distribution to designated Mac computers.
Release your app to the App Store
When you’re ready to release your app to the world, follow these steps to submit your app for review and release to the App Store:
- Select Pricing and Availability from the sidebar of your app’s application details page on App Store Connect and complete the required information.
- Select the status from the sidebar. If this is the first release of this app, its status is 1.0 Prepare for Submission. Complete all required fields.
- Click Submit for Review.
Apple notifies you when their app review process is complete. Your app is released according to the instructions you specified in the Version Release section.
Troubleshooting
The Distribute your app guide provides a detailed overview of the process of releasing an app to the App Store.
Except as otherwise noted, this work is licensed under a Creative Commons Attribution 4.0 International License, and code samples are licensed under the BSD License.
Источник


