- Get Started: Install on macOS
- System requirements
- Get the Flutter SDK
- Clone the repo
- Run flutter doctor
- Update your path
- Editor setup
- Platform setup
- iOS setup
- Install Xcode
- Set up the iOS simulator
- Deploy to iOS devices
- Android setup
- Install Android Studio
- Set up your Android device
- Set up the Android emulator
- Flutter I — Введение и установка
- Почему именно Flutter?
- Установка
- Первые шаги (Пишем Hello World!)
- Заключение
Get Started: Install on macOS
System requirements
To install and run Flutter, your development environment must meet these minimum requirements:
- Operating Systems: macOS (64-bit)
- Disk Space: 700 MB (does not include disk space for Xcode or Android Studio).
- Tools: Flutter depends on these command-line tools being available in your environment.
- bash , mkdir , rm , git , curl , unzip , which
Get the Flutter SDK
To get Flutter, use git to clone the repository and then add the flutter tool to your path. Running flutter doctor shows any remaining dependencies you may need to install.
Clone the repo
If this is the first time you’re installing Flutter on this machine, clone the beta branch of the repository and then add the flutter tool to your path:
The above command sets your PATH variable temporarily, for the current terminal window. To permanently add Flutter to your path, see Update your path.
To update an existing version of Flutter, see Upgrading Flutter.
Run flutter doctor
Run the following command to see if there are any dependencies you need to install to complete the setup:
This command checks your environment and displays a report to the terminal window. The Dart SDK is bundled with Flutter; it is not necessary to install Dart separately. Check the output carefully for other software you may need to install or further tasks to perform (shown in bold text).
The first time you run a flutter command (such as flutter doctor ), it downloads its own dependencies and compiles itself. Subsequent runs should be much faster.
The following sections describe how to perform these tasks and finish the setup process. You’ll see in flutter doctor output that if you choose to use an IDE, plugins are available for IntelliJ IDEA, Android Studio, and VS Code. See Editor Setup for the steps to install the Flutter and Dart plugins.
Once you have installed any missing dependencies, run the flutter doctor command again to verify that you’ve set everything up correctly.
The flutter tool uses Google Analytics to anonymously report feature usage statistics and basic crash reports. This data is used to help improve Flutter tools over time. Analytics is not sent on the very first run or for any runs involving flutter config , so you can opt out of analytics before any data is sent. To disable reporting, type flutter config —no-analytics and to display the current setting, type flutter config . See Google’s privacy policy:www.google.com/intl/en/policies/privacy.
Update your path
You can update your PATH variable for the current session only at the command line, as shown in Clone the Flutter repo. You’ll probably want to update this variable permanently, so you can run flutter commands in any terminal session.
The steps for modifying this variable permanently for all terminal sessions are machine-specific. Typically you add a line to a file that is executed whenever you open a new window. For example:
- Determine the directory where you placed the Flutter SDK. You will need this in Step 3.
- Open (or create) $HOME/.bash_profile . The file path and filename might be different on your machine.
- Add the following line and change [PATH_TO_FLUTTER_GIT_DIRECTORY] to be the path where you cloned Flutter’s git repo:
- Make sure the Xcode license agreement is signed by either opening Xcode once and confirming or running sudo xcodebuild -license from the command line.
Run source $HOME/.bash_profile to refresh the current window.
Verify that the flutter/bin directory is now in your PATH by running:
Editor setup
Using the flutter command-line tools, you can use any editor to develop Flutter applications. Type flutter help at a prompt to view the available tools.
We recommend using our plug-ins for a rich IDE experience supporting editing, running, and debugging Flutter apps. See Editor Setup for detailed steps.
Platform setup
macOS supports developing Flutter apps for both iOS and Android. Complete at least one of the two platform setup steps now, to be able to build and run your first Flutter app.
iOS setup
Install Xcode
To develop Flutter apps for iOS, you need a Mac with Xcode 7.2 or newer:
- Install Xcode 7.2 or newer (via web download or the Mac App Store).
Configure the Xcode command-line tools to use the newly-installed version of Xcode by running sudo xcode-select —switch /Applications/Xcode.app/Contents/Developer from the command line.
This is the correct path for most cases, when you want to use the latest version of Xcode. If you need to use a different version, specify that path instead.
With Xcode, you’ll be able to run Flutter apps on an iOS device or on the simulator.
Set up the iOS simulator
To prepare to run and test your Flutter app on the iOS simulator, follow these steps:
- On your Mac, find the Simulator via Spotlight or by using the following command:
- Make sure your simulator is using a 64-bit device (iPhone 5s or later) by checking the settings in the simulator’s Hardware > Device menu.
- Depending on your development machine’s screen size, simulated high-screen-density iOS devices may overflow your screen. Set the device scale under the Window > Scale menu in the simulator.
- Start your app by running flutter run .
Deploy to iOS devices
To deploy your Flutter app to a physical iOS device, you’ll need some additional tools and an Apple account. You’ll also need to set up physical device deployment in Xcode.
- Install homebrew.
- Open the terminal and run these commands to install the tools for deploying Flutter apps to iOS devices.
If any of these commands fails with an error, run brew doctor and follow the instructions for resolving the issue.
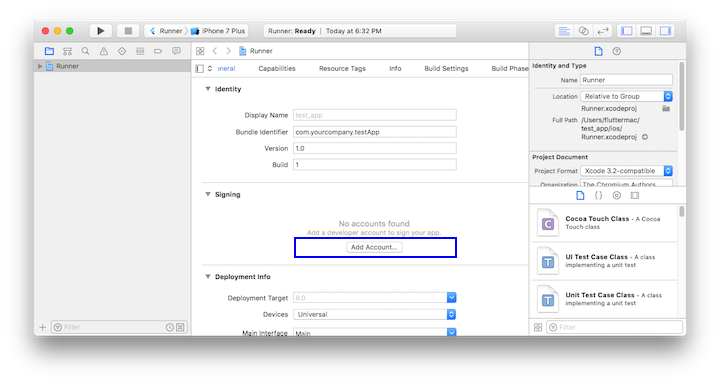
- Follow the Xcode signing flow to provision your project:
- Open the default Xcode workspace in your project by running open ios/Runner.xcworkspace in a terminal window from your Flutter project directory.
- In Xcode, select the Runner project in the left navigation panel.
- In the Runner target settings page, make sure your Development Team is selected under General > Signing > Team. When you select a team, Xcode creates and downloads a Development Certificate, registers your device with your account, and creates and downloads a provisioning profile (if needed).
- To start your first iOS development project, you may need to sign into Xcode with your Apple ID.

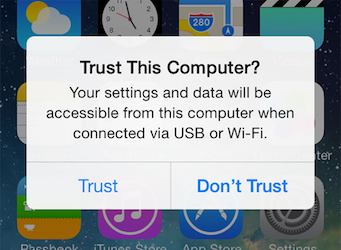
Development and testing is supported for any Apple ID. Enrolling in the Apple Developer Program is required to distribute your app to the App Store. View the differences between Apple membership types. - The first time you use an attached physical device for iOS development, you will need to trust both your Mac and the Development Certificate on that device. Select Trust in the dialog prompt when first connecting the iOS device to your Mac.
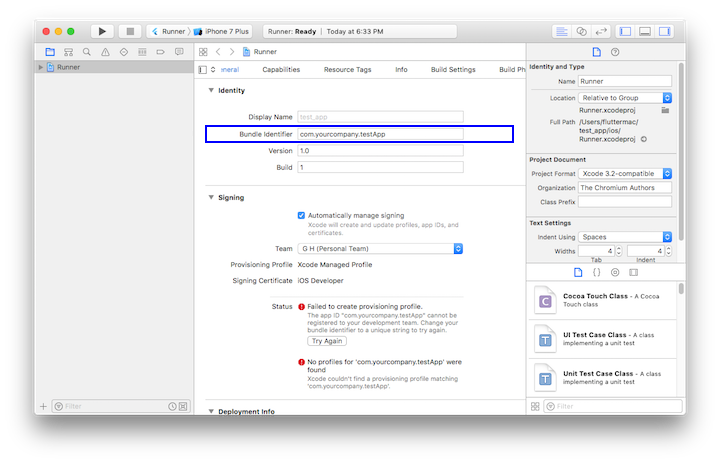
Then, go to the Settings app on the iOS device, select General > Device Management and trust your Certificate. - If automatic signing fails in Xcode, verify that the project’s General > Identity > Bundle Identifier value is unique.
- To start your first iOS development project, you may need to sign into Xcode with your Apple ID.
- Start your app by running flutter run .
Android setup
Note: Flutter relies on a full installation of Android Studio to supply its Android platform dependencies. However, you can write your Flutter apps in a number of editors; a later step will discuss that.
Install Android Studio
Download and install Android Studio.
Start Android Studio, and go through the ‘Android Studio Setup Wizard’. This will install the latest Android SDK, Android SDK Platform-Tools, and Android SDK Build-Tools, which are required by Flutter when developing for Android.
Set up your Android device
To prepare to run and test your Flutter app on an Android device, you’ll need an Android device running Android 4.1 (API level 16) or higher.
- Enable Developer options and USB debugging on your device. Detailed instructions are available in the Android documentation.
- Using a USB cable, plug your phone into your computer. If prompted on your device, authorize your computer to access your device.
- In the terminal, run the flutter devices command to verify that Flutter recognizes your connected Android device.
- Start your app by running flutter run .
By default, Flutter uses the version of the Android SDK where your adb tool is based. If you want Flutter to use a different installation of the Android SDK, you must set the ANDROID_HOME environment variable to that installation directory.
Set up the Android emulator
To prepare to run and test your Flutter app on the Android emulator, follow these steps:
- Enable VM acceleration on your machine.
- Launch Android Studio>Tools>Android>AVD Manager and select Create Virtual Device.
- Choose a device definition and select Next.
- Select one or more system images for the Android versions you want to emulate, and select Next. An x86 or x86_64 image is recommended.
- Under Emulated Performance, select Hardware — GLES 2.0 to enable hardware acceleration.
Verify the AVD configuration is correct, and select Finish.
For details on the above steps, see Managing AVDs.
, where platform is the chip family, such as x86.
Источник
Flutter I — Введение и установка
Flutter — новый инструмент от Google, позволяющий разработчикам писать кроссплатформенные приложения, которые можно запускать на различных системах (например, на Android или iOS) с общей кодовой базой.

Сам инструмент написан на C и C++. Предоставляет движок для 2D рендеринга, React-подобный FRP фреймворк и набор виджетов в стиле Material Design. На данный момент распространяется версия alpha:0.0.20, но несмотря на довольно «сырую» версию, уже можно создавать продвинутый интерфейс, работать с сетью и даже с файловой системой.
Подход Flutter отличается от инструментов, работающих через WebView и выполняющих HTML, CSS и Javascript (например Cordova), — он заключается в использовании Dart как единственного язык программирования. Dart довольно прост в изучении, а если вы ещё и знаете Java, то, считайте, 75% работы сделано, и на Dart можно перейти всего за пару дней.
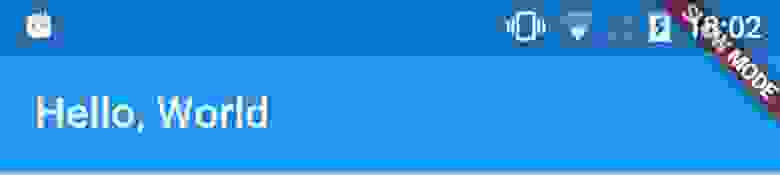
Приложения компилируются в нативный код при сборке для релиза. Благодаря этому повышается производительность и уменьшается задержка при работе с интерфейсом. При сборке в режиме отладки (и выявлении возможных багов) Flutter также выполняет некоторые задачи, которые могут замедлять приложение. В таких случаях Flutter будет показывать надпись “Slow Mode” в правом верхнем углу экрана.
Почему именно Flutter?
Кроме того, что вы делаете приложение сразу под несколько систем (Android и iOS), код Flutter очень выразителен. То есть потребуется написать меньше кода чем если бы вы писали нативное приложение под одну платформу.
Производительность и отклик пользовательского интерфейса.
Ещё один плюс Flutter — он ориентирован на Material Design и предоставляет множество возможностей для работы с ним.
Google также использует Flutter для разработки пользовательского интерфейса своей новой системы Fuchsia.
Установка
Так как Flutter ещё в процессе разработки и постоянно обновляется, процесс установки со временем может поменяться. Актуальную инструкцию по установке можно найти на сайте Flutter.
Мы будем пользоваться версией 0.0.20+.alpha. (Прим.перев.: на данный момент установка возможна только под Mac и Linux (64-bit))
Шаг 1. Клонирование
Клонируйте ветку alpha из репозитория Flutter при помощи Git (SourceTree, Github Desktop…) и добавьте директорию bin в PATH.
Шаг 2. Проверка зависимостей
Запустите Flutter doctor, чтобы установить все необходимые зависимости.
Шаг 3. Установка платформ
Дальше мы установим платформы для разработки. Мы можем установить обе или ограничиться одной, для которой хотим написать приложение.
В случае с Android необходимо установить Android SDK. Можете просто установить Android Studio, SDK будет в комплекте. В случае, если Android Studio установлена не в директорию по умолчанию, необходимо добавить переменную ANDROID_HOME в PATH, указав новое расположение, куда был установлен SDK.
В случае с iOS необходим xCode версии 7.2 или выше. Для запуска приложений на физическом устройстве необходим дополнительный инструмент. Его можно установить при помощи Homebrew.
Шаг 4. Конфигурация Atom
Рекомендуется использовать текстовый редактор Atom с установленными плагинами Flutter и Dart.
Установка плагина Flutter для Atom:
- Запустите Atom.
- Packages > Settings View > Install Packages/Themes.
- Напишите в поле Install Packages слово ‘flutter’, затем нажмите кнопку Packages.
- Выберите Flutter и установите.
Откройте Packages > Flutter > Package Settings и выставьте в FLUTTER_ROOT путь, куда был склонирован Flutter SDK.
Затем Packages > Dart > Package Settings и выставьте переменную с расположением dart sdk, обычно это bin/cache/dart-sdk в директории Flutter.
Если у вас Mac, запустите Atom > Install Shell Commands чтобы установить shell-команды.
И напоследок запустите ещё раз Flutter doctor, чтобы удостовериться, что всё в порядке.
Вывод из консоли ниже показывает, что процесс установки успешен, но среда iOS ещё не отвечает всем необходимым требованиям.
Первые шаги (Пишем Hello World!)
Давайте создадим простенькое приложение и посмотрим Flutter в действии. В последующих статьях примеры будут куда сложнее и увлекательнее.
Запустите Packages → Flutter → create new Flutter Project. В директории lib есть файл main.dart, откройте его и сотрите весь код.
Выполнение кода Dart начинается с функции main, которая должна быть включена в файл main.dart.
Теперь импортируем библиотеку material, она предоставляет нам функцию для запуска приложений.
Эта функция называется runApp и принимает виджет (Widget) в качестве параметра. Виджет можно сравнить с представлением (View) в Android или iOS, чтобы иметь общее представление, но, само собой, между ними есть и отличия. То есть в Flutter весь интерфейс строится на использовании виджетов и весь код пишется на Dart. Например в Android надо было бы использовать XML для описания представлений.
Начнём с того, что выведем при помощи виджета Text произвольный текст.
Теперь запускаем приложение через Atom.

Как видно, текст появился за статус-баром. Так произошло потому, что туда установлены координаты Flutter (0,0).

Давайте добавим отступов, чтобы исправить это. Поскольку пользовательский интерфейс Flutter строится на виджетах, отступы тоже будут виджетом. Возможно, для людей с опытом разработки на Android и iOS (где отступы всего лишь свойства представления) это звучит дико. Нам же сейчас нужно добавить виджет Padding и указать виджет Text как дочерний элемент.
В примере выше создан виджет Padding, в котором отступы установлены на 24 при помощи объекта EdgeInsets, а в качестве дочернего элемента указан виджет Text. Запустите приложение и увидите, что текст теперь ниже.
Примечание: если вы знакомы с Java, то имейте в виду, const EdgeInsets.only(top: 24.0) всего лишь вызов конструктора EdgeInsets. Он возвращает экземпляр объекта, который будет константой времени компиляции. В этом разница между Java и Dart, больше информации о конструкторах в Dart можете найти здесь.

Воспользуемся виджетом Center, чтобы разместить текст в центре экрана.

Оба виджета, Padding и Center, предоставляют атрибут, называемый child, используемый для указания дочернего элемента. На самом деле это одна из особенностей, делающих Flutter таким мощным инструментом. Каждый виджет может иметь дочерние элементы, благодаря чему одни виджеты могут быть вложены в другие виджеты. Так, например, Text может быть вложен в Padding, который будет вложен в Center.

Заключение
В первой статье из цикла статей про Flutter мы рассмотрели, как можно при помощи всего нескольких строк кода вывести текст в приложении. В последующих статьях мы сосредоточимся на более сложных интерфейсах, чтобы показать, как их просто реализовать (по сравнению с нативным способом).
Источник


