- 4 Ways to Forget a Wi-Fi Network on Windows 10: from GUI, CMD & Registry
- Why Delete Wi-Fi Network Profiles?
- The Easiest Way to Forget a Wi-Fi Network on Windows 10
- Method #2. Forget a Wi-Fi Network from Settings App in Windows 10
- Method #3 for Geeks and Admins: Use Powershell or CMD
- Method #4: Delete a Saved Wi-Fi Network Profile via Windows 10 Registry Editor
- How to Forget Wireless Network Profiles in Windows 10
- Remove or forget Wireless Network Profiles in Windows 10
- How to: Delete or Forget Unused Network Names for WiFi in Windows 10
- Delete or forget unused Network names for WiFi connections in Windows 10
- 1. Forget from network Settings
- 2. Forget from Connections
- 3. Forget using Command Prompt
- 4. Forget all networks at once
- How to forget wireless networks: Windows 10
- How to Delete or Forget Wireless Network Profiles in Windows 8.1
- How It Worked in Windows 8
- How to Forget a Wireless Network in Windows 8.1, from the Networks List
- How to Forget a Wireless Network in Windows 8.1, from PC Settings
- How to Forget a Wireless Network in Windows 8.1, from the Command Prompt
- How to Forget All Wireless Networks in Windows 8.1
- Conclusion
4 Ways to Forget a Wi-Fi Network on Windows 10: from GUI, CMD & Registry
In this guide we will explain 4 ways to forget and manually delete a saved Wi-Fi network profile on Windows 10 to prevent your PC to automatically connect to it.
Every time you connect to a Wi-Fi network Windows 10 saves the password, security mode and other settings.
The primary goal behind this is to free you from entering the security key each time you connect to this hotspot or just reboot your PC or laptop.
Your PC can store an unlimited number of saved Wi-Fi network profiles that you have ever connected to.
You may no longer remember what kind of hotpot is ‘tp-link123’ but the profile will still be saved. And in particular cases you might want your computer to forget some of them.
Why Delete Wi-Fi Network Profiles?
You may run into some situations when you really need it:
- you want to delete the name of the Wi-Fi network you don’t use anymore
or that no more exist (for instance, if you renamed your Wi-Fi on the router, moved to another place or changed the job); - you wish to forget a dangerous or insecure Wi-Fi hotspot not to connect to it again by mistake in the future. For example, some Open neighbor network configured to sniff traffic and steal sensitive personal data – your content, account credentials and banking cards requisites;
- you goal is to hide a secret network and the fact you were connected to it;
- other mysterious intentions 🙂
The Easiest Way to Forget a Wi-Fi Network on Windows 10
I think, this common method will suit the majority of Windows 10 users. Follow the steps:
- Click the Network icon on the lower right corner of the desktop:
- Right-click on the network name.
- Select Forget:
Method #2. Forget a Wi-Fi Network from Settings App in Windows 10
Frankly, I don’t know why you might want to use this method except the situation if you still have a very old build of Windows 10 for some reason.
As you may know, the method #1 was brought to us by Fall Creators update released on October 2017.
Do the following:
- Right-click the network icon in the Taskbar.
- Select Open Network and Internet Settings.
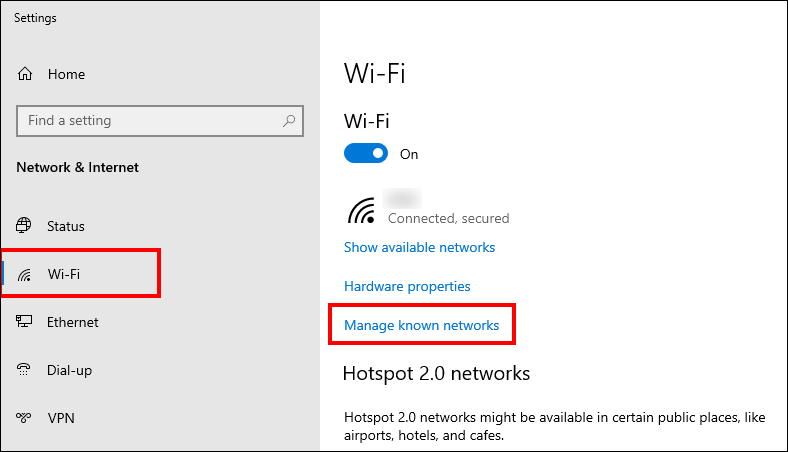
- Click Wi-Fi in the right pane of the Settings.
- Click on the Manage known networks link:

- Select the right profile and click Forget: Make your computer forget Wi-Fi network from Windows 10 Settings app
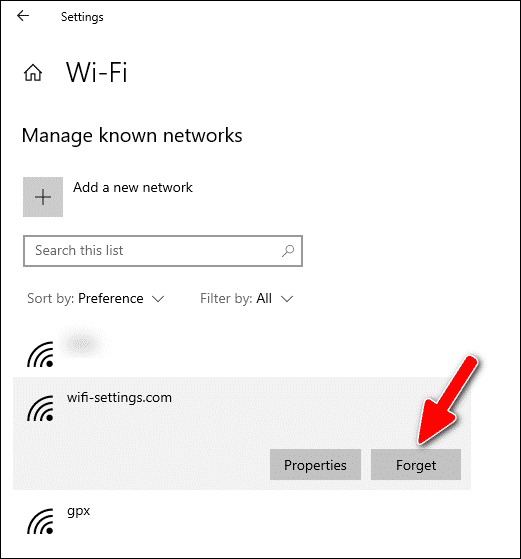 Make your computer forget Wi-Fi network from Windows 10 Settings app
Method #3 for Geeks and Admins: Use Powershell or CMD
If you don’t know, you can forget the wireless network using command line or powershell.
All you need to do is:
- Open powershell or command prompt. The best way to do it in Windows 10 is right-click the Start button and select Windows PowerShell.
- type netsh wlan show profile and press Enter. Now you will see all the profiles saved on the current computer. Find the one you wish to get rid of.
- now when you know the exact wi-fi name type
netsh wlan delete profile name=”wifi-settings.com“
Method #4: Delete a Saved Wi-Fi Network Profile via Windows 10 Registry Editor
Some people love to modify the registry. And deleting a wireless profile is a marvelous opportunity!
Here is what you do:
- Open the registry editor. You need to press Win+R, type regedit and click OK.
- Navigate to HKEY_LOCAL_MACHINE\SOFTWARE\Microsoft\Windows NT\CurrentVersion\NetworkList\Profiles\
- Check the ProfileName value in each subkey under Profiles and find the key related to the Wi-Fi network profile you want to delete.
- Right-click it and select Delete to delete a whole registry key. In such a way you will remove all information about a certain wireless network and make your PC really ‘forget’ everything about it.
In the comments you may tell us which way of deleting Wi-Fi network profiles you prefer and why. Enjoy using Wi-Fi!
How to Forget Wireless Network Profiles in Windows 10
Windows OS usually connects to networks in this order – Ethernet, Wi-Fi, and then Mobile broadband. Whenever do you connect to a new Wi-Fi network, it’s added and stored in the list of profiles by Windows OS. The details stored in the profile could include its name, password, an encryption method used, SSID, etc. Over a period of time, this list of profiles can increase. At such a time, or to preserve your privacy, you may want to delete or remove the profiles. While there are four ways to delete WiFi Network Profile, in this post, we will see how you can remove, delete, or forget Wireless Network Profiles using Windows 10 Settings app.
Remove or forget Wireless Network Profiles in Windows 10
Press Win+I to open the Settings app. Select Network & Internet. Next click on Wi-Fi in the left panel. There you will see a link Manage Wi-Fi Settings. Click on it.
In the window which opens, you will see two settings – Wi-Fi Sense and Manage known networks. Under Manage known networks, select the network, and you will see two options – Share and Forget.
Click on Forget.
This will delete the Wireless Network’s profile and connection details.
You can also manually delete WiFi Network Profiles in Windows 10 using the netsh wlan command in the Command Prompt and then by editing the Windo ws Registry.
How to: Delete or Forget Unused Network Names for WiFi in Windows 10


How to delete WiFi networks that I do not use anymore on my Windows 10, 8.1 PC?
When you are using the Windows 10 operating system and you try to connect to a nearby WiFi network or you just want to connect to your own wireless router in your home, you might be annoyed by all the other networks that pop up in the Available WiFi networks feature in Windows 10, 8.1. Therefore you will learn below a few methods on how to delete or forget unused Network names for WiFi connections in Windows 10, 8.1 and it will only take you a couple of minutes of your time. 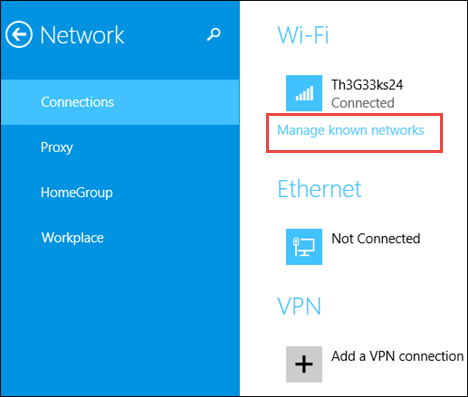
In the Windows 8.1 operating system, the “forget wireless network” feature was a little bit hard to get to but with the help of a few Windows 8.1 updates, it made it possible and by applying the three methods below you will see how easy it is to do it yourself. Also, the methods below will describe how to forget the wireless networks by using the command prompt feature, the Windows PC settings feature as well as disabling them from the “Network List” menu.
Delete or forget unused Network names for WiFi connections in Windows 10
1. Forget from network Settings
- For this method to work you will need to be in the range of the specific WiFi network.
- Move the mouse cursor over to the bottom right side of the screen.
- In the Charms bar that pops up, you will need to left click or tap on the “Settings” feature.
- In the “Settings” feature you need to find and left click on “Network” icon.
- Now in the “Network” window, you will have a list of available WiFi networks for you to connect to.
- Left click or tap on the specific network you want to remove and left click or tap on the “Connect” button.
- Now if you cannot connect to that network, it will give you access to two buttons “Forget Network” or “Close”. In this window, you will need to left click or tap on the “Forget Network” feature.
2. Forget from Connections
- If you have the latest updates for Windows 8.1 then go to the PC settings feature by moving the mouse cursor over to the lower right side of the screen and left clicking on “Settings”.
- Now left click on the “Network” feature present there.
- Left click or tap on the “Connections” tap present in the “Network” window.
- Left click or tap on the desired WiFi network you wish to remove.
- Left click or tap on the “Manage known networks” link present in the lower side from the WiFi network you want to remove.
- You now have a list of available WiFi networks.
- Left click or tap on the WiFi network you wish to forget.
- Left click or tap on the “Forget” button in the lower right side of that window.
- Now the network should be forgotten and no longer saved in your Windows 8.1 system.
3. Forget using Command Prompt
- From the start screen in your Windows 8.1 system write the following: “cmd” without the quotes.
- Right click on the “Command Prompt” icon that shows after the search is finished.
- Left click or tap on the “Run as administrator” feature in the menu that shows.
- Left click or tap on the “Yes” button if you are prompt by a user account control message.
- In the black window that appears write the following: “netsh wlan show profiles” without the quotes.
- Press the “Enter” button on the keyboard.
- Now in the Command prompt window you should get a list of all available WiFi networks.
- Look for the name of the wireless network you wish to disable.
- Write in the command prompt window the following: netsh wlan delete profile name=”name of the network”
Note: Instead of the “name of the network “ from the command above you will need to write the actual name of the network you wish to disable.
Press the “Enter” button on the keyboard.
4. Forget all networks at once
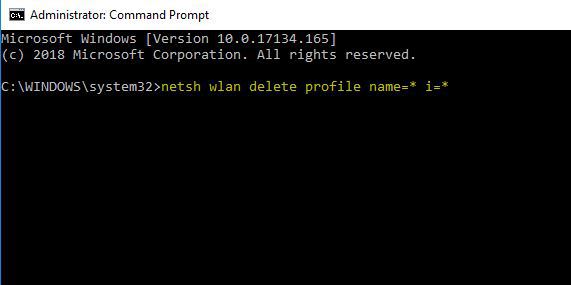
- Open Commander Prompt as Administrator
- Type the following command (whithout the quotes): ‘netsh wlan delete profile name=* i=*’, and press the ‘Enter’ key
- The PC disconnects and forget all available networks and remove their profile. Try to reconnect to the network you was using before this.
These are the four easy methods you need to do in order to delete or forget a WiFi network of your choosing in Windows 8.1. You can write us below in the comments section of this page if you need further assistance in the article posted above.
How to forget wireless networks: Windows 10
An important step in troubleshooting wireless network issues is to isolate and remove any potential conflicts. These steps will show you how to delete a wireless network profile in Windows 10: *
Method 1: Wi-Fi menu from system tray
- Click the Wi-Fi button from the bottom-right corner of the taskbar. This opens the list of networks available in your area.
- Right-click on the name of the network that you want to remove.
- Choose the Forget option

Method 2: Settings app
- Click the Wi-Fi button from the bottom-right corner of the taskbar.
- Click Network & Internet settings.
- Choose Wi-Fi on the left panel and click Manage Wi-Fi settings.
- Under Manage known networks, click the network you want to delete.
- Click Forget. The wireless network profile is deleted.


How to Delete or Forget Wireless Network Profiles in Windows 8.1
As soon as I installed Windows 8.1 on my laptop, I noticed a pretty big annoyance: the absence of the “Forget this network” option in the Networks pane. I was left with no intuitive way of removing wireless networks that no longer worked because their password has been changed. How do you get around this problem and remove wireless networks in Windows 8.1? Let’s find out in this tutorial.
How It Worked in Windows 8
In Windows 8, when you want to remove a wireless network, you open the Networks pane (this tutorial explains how: How to Manage Wireless Network Connections & Profiles in Windows 8) and right-click or press and hold the network you wanted removed.
A contextual menu is opened and it includes the option to “Forget this network”.
Unfortunately, in Windows 8.1 you can no longer right-click in the Networks pane and there is no contextual menu to display. However, you do have several new methods for doing the same thing.
How to Forget a Wireless Network in Windows 8.1, from the Networks List
In Windows 8.1 you can remove/forget a wireless network after you try to connect to it. The network has to be in range and visible to your laptop or tablet. If it isn’t, you can’t remove it using this method. If the network is available, here’s how its done:
In the Networks pane, select the network you want removed and press Connect.
If Windows 8.1 can’t connect to it, you will see an error message and a button that says “Forget network”.
Press on it and the network is removed. You can reconnect to the network as if it were a newly detected network.
How to Forget a Wireless Network in Windows 8.1, from PC Settings
If you have Windows 8.1 Update installed, which was released for free to all Windows 8.1 users as of April 8th 2014, then you have one more way of forgetting a wireless network. This method doesn’t work on Windows 8.1 devices without this update.
In the Connections section, look for Wi-Fi and the “Manage known networks” link. Click or tap on it.
Windows 8.1 displays a list with the wireless networks for which its stores connection details.
Select the network you want to forget and press Forget.
The selected network is no longer stored by Windows 8.1 and the next time you connect to it, you will have to enter its password again.
How to Forget a Wireless Network in Windows 8.1, from the Command Prompt
You can remove any wireless network profile stored by Windows 8.1, even if the network is not in range, with the help of the Command Prompt.
Start the Command Prompt as administrator and type the following command: netsh wlan show profiles .
It will display all the wireless network profiles stored by Windows 8.1. The list can be long if you used your laptop or tablet for more than a couple of weeks.
Identify the name of the wireless network profile you want removed, then type the following command to remove it: netsh wlan delete profile name=»profile name» .
As an example, I wanted to remove a wireless network profile named swisscom and I typed: netsh wlan delete profile name=»swisscom» .
How to Forget All Wireless Networks in Windows 8.1
In some scenarios you may need to remove all the wireless network profiles stored in Windows 8.1. Luckily, you don’t have to remove them one by one. That would be really awful.
All you have to do is to type this command: netsh wlan delete profile name=* i=* .
You will see it deleting all profiles in less than a second.
NOTE: The netsh command has many other parameters than the ones shared in this article. If you want to learn more about it, I recommend reading its documentation on TechNet: Netsh Commands for Wireless Local Area Network (WLAN).
Conclusion
The initial release of Windows 8.1 made it hard to forget wireless networks but, luckily, this Windows 8.1 Update fixes this problem as well as a couple of other problems. I hope that you have found this guide useful. If you know other ways of forgetting wireless networks in Windows 8.1, don’t hesitate to share them using the comments form below.


