- How to Format a Bootable USB Drive in Windows 10
- Solution 1. Format bootable USB drive with EaseUS Partition Master
- Solution 2.В How to Format Bootable Pendrive in Windows 10 via Disk Management
- Solution 3. Format bootable USB drive by using Diskpart command
- More Information: How to Make a Bootable USB Drive
- 2021 Best Bootable USB Hard Disk Format Tool Free Download
- BootableВ USB Hard Drive Format Utility for Windows [Free Download]
- Is there a free bootable USB hard drive format utility?
- Bootable USB Hard Drive Format Utility Free Download
- #1. Create a Bootable USB Format Tool
- #2. How to Use EaseUS BootableВ USB Hard DriveВ Format Utility
- How to Format Bootable USB Flash Drive to Normal in Windows 7, 8, 10?
- Why Need to Format Bootable USB Drive?
- Can We Format Bootable USB Drive in Windows 10/8/7/XP?
- How to Format Bootable USB Drive via AOMEI Partition Assistant?
How to Format a Bootable USB Drive in Windows 10
«Hi, I’m thinking about formatting a bootable USB drive in Windows 10, but it’s so weird that the USB drive is now showing several MBs capacity. It should be a 4GB size in total. What should I do to format the bootable USB drive properly and restore its full capacity?»
Solution 1. Format bootable USB drive with EaseUS Partition Master
EaseUS Partition Master is a disk/partition management software tool that allows users to fully manage their hard drive storage. This free partition manager is selected as the most powerful yet free USB formatting tool that helps to format a bootable USB drive, memory card, pen drive, and other hard disk storage devices easily and quickly without losing the original size.
Download and install EaseUS Partition Master on your Windows computer and follow the steps below to perform the storage device formatting with ease.
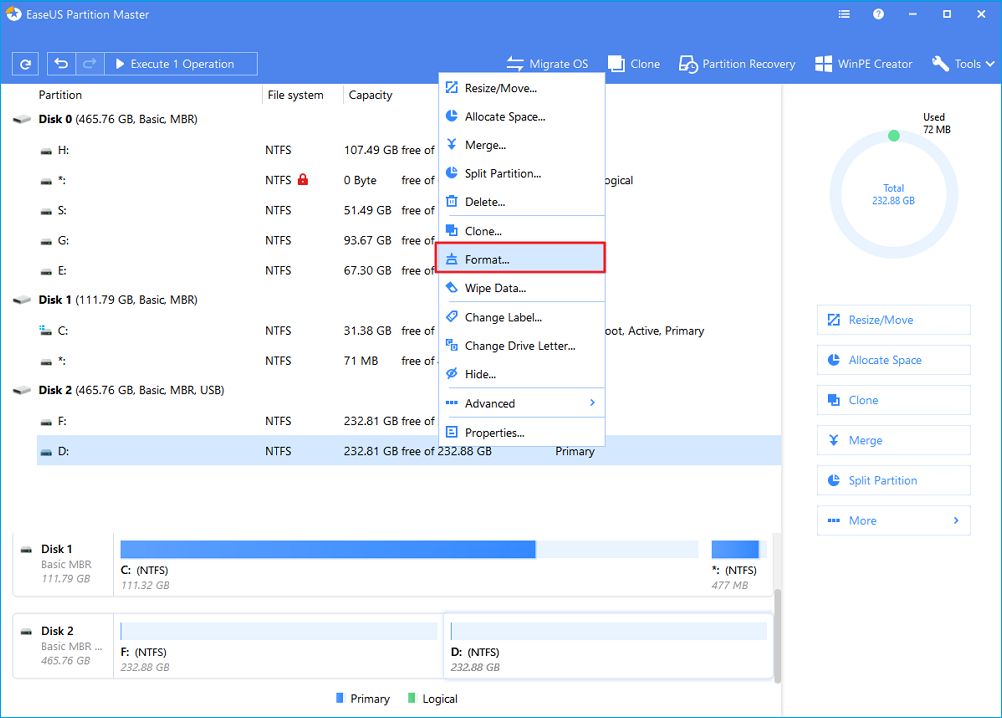
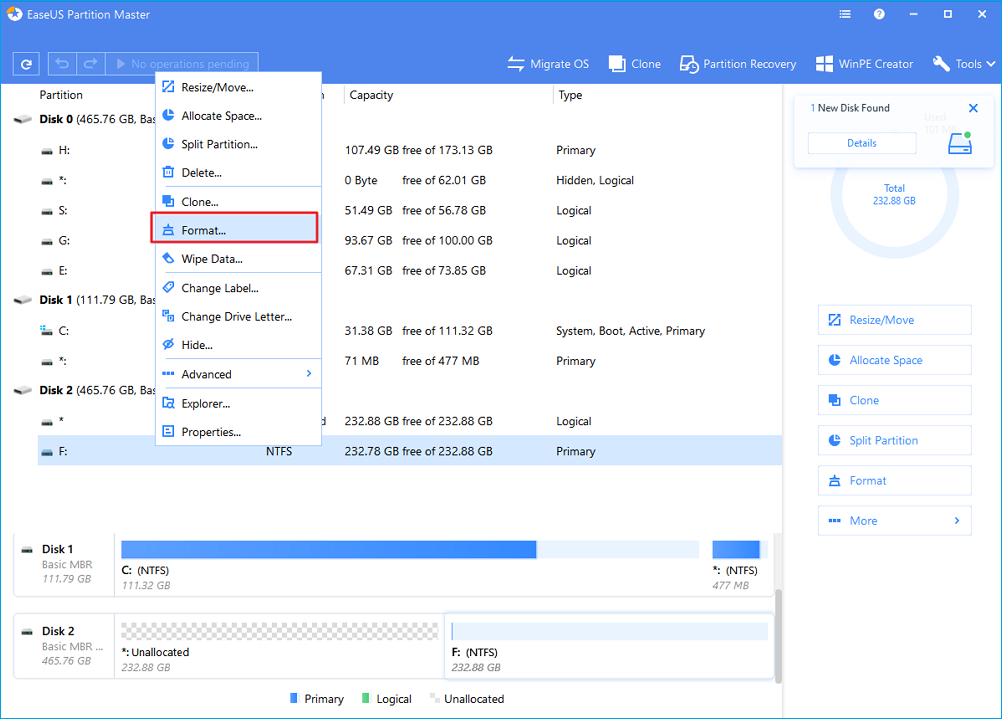
Step 1. Launch EaseUS Partition Master, right-click the partition on your external hard drive/USB/SD card which you want to format and choose the «Format» option.
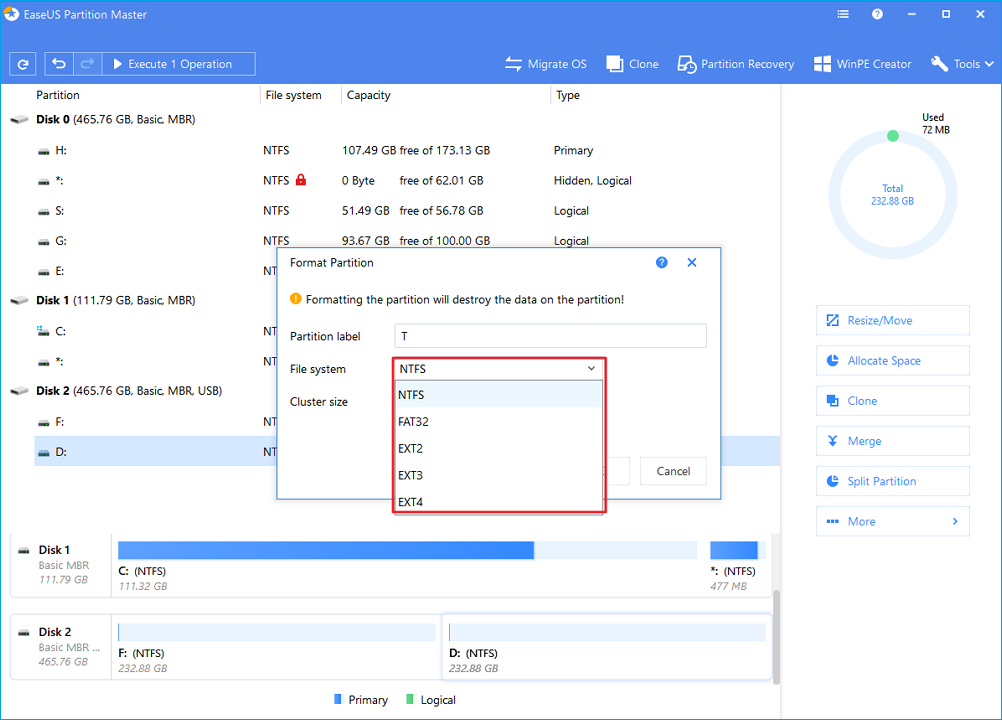
Step 2. Assign a new partition label, file system (NTFS/FAT32/EXT2/EXT3), and cluster size to the selected partition, then click «OK».
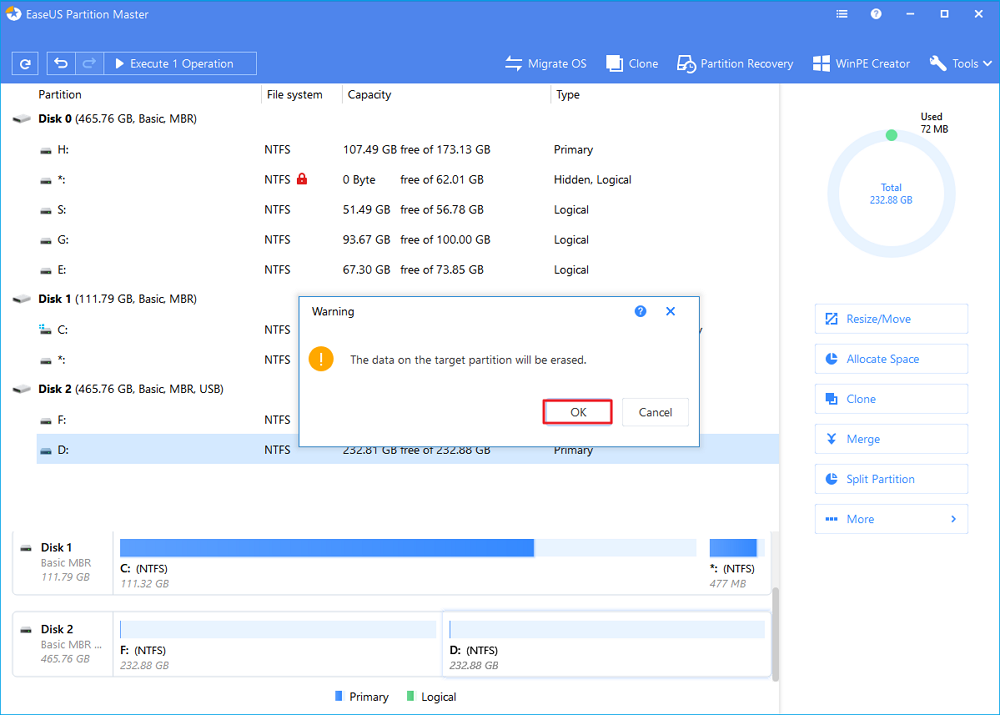
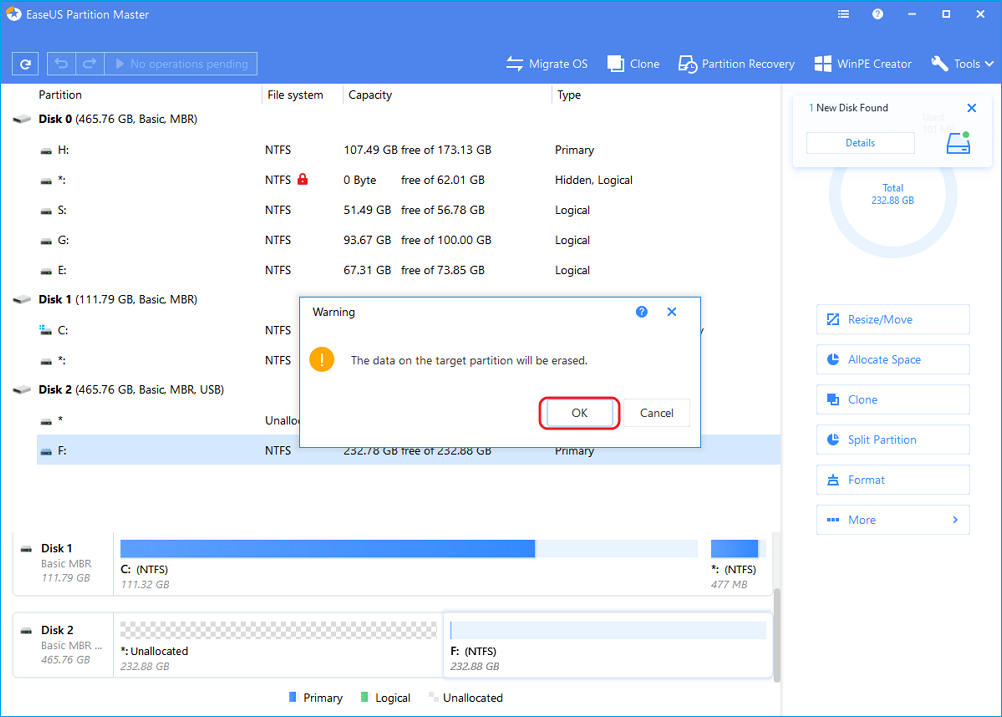
Step 3. In the Warning window, click «OK» to continue.
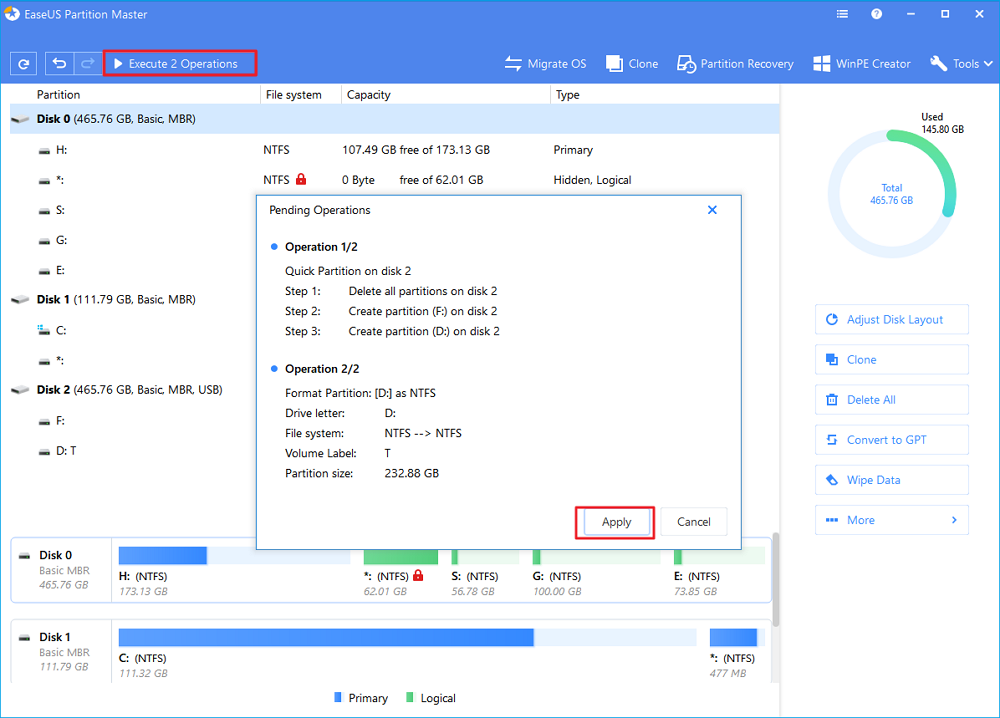
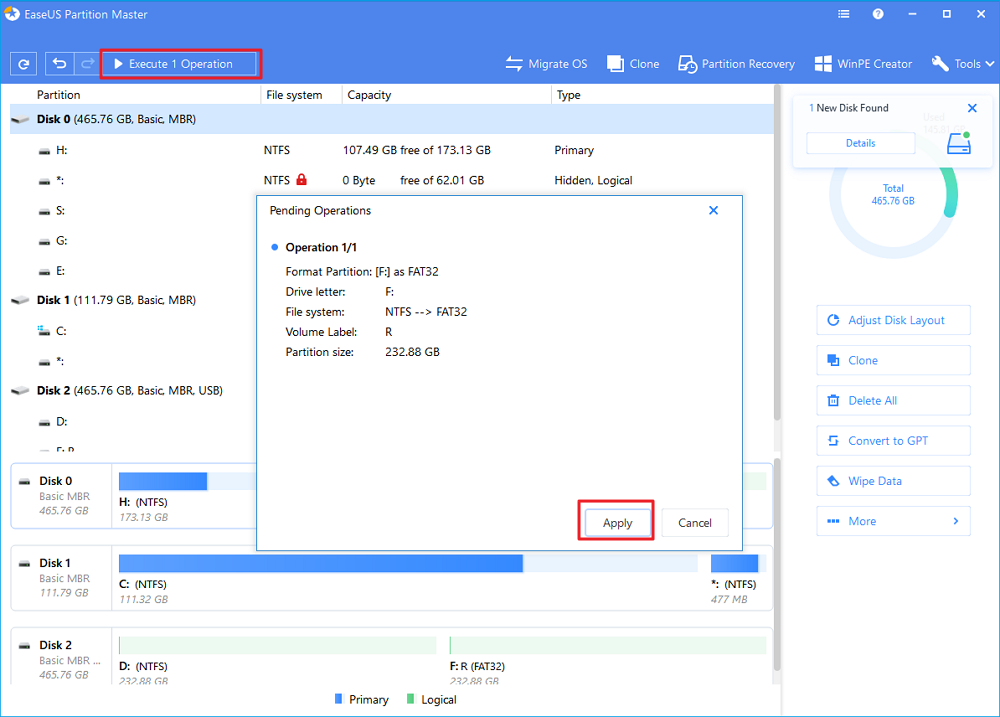
Step 4. Click the «Execute Operation» button in the top-left corner to review the changes, then click «Apply» to start formatting your external hard drive/USB/SD card.
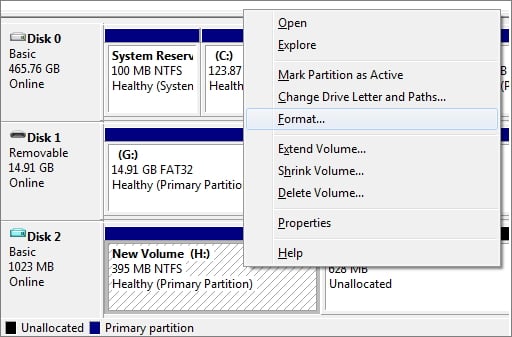
Solution 2.В How to Format Bootable Pendrive in Windows 10 via Disk Management
On Windows, you canВ utilize two bootable USB drive format utilities: Disk Management and Command Prompt. There introduces Disk Management to solve how to format a bootable USB in Windows 10.
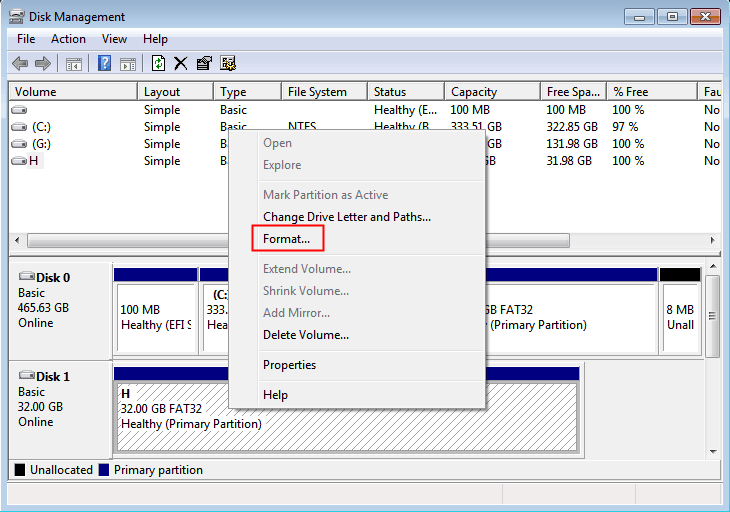
First, when you run Windows PC, connect your bootable USB drive to it. Second, press «Windows + R» to openВ disk management on the pop-up window. Third, right-click the bootable drive and choose «Format».
Solution 3. Format bootable USB drive by using Diskpart command
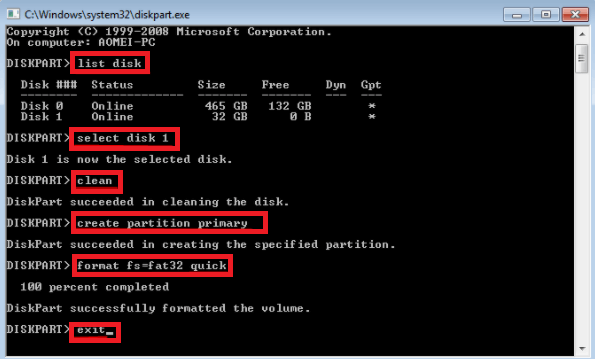
It’s also practical to use the diskpart command to format your USB drive. If you are quite familiar with the use or command prompt, this method is also a good choice for you.
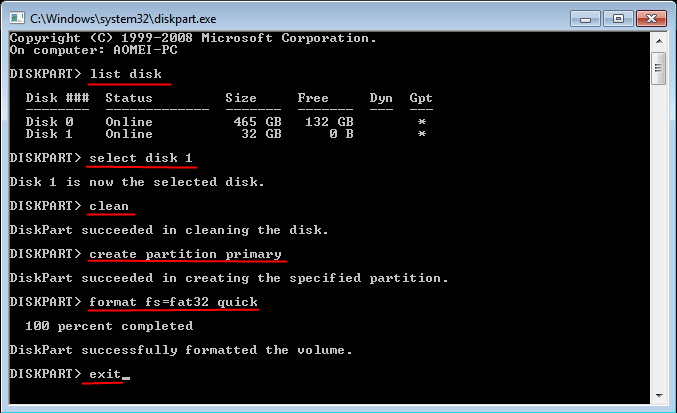
Step 1: Press «Windows key + R» simultaneously, type cmd in the search box and open «Command Prompt».
Step 2: Type diskpart. Run the Pop-up window that appears.
Step 3: Type list disk.
Step 4: Type select disk 0 (or disk 1. the number is the drive of the bootable USB that is going to be formatted).
Step 6: Type createВ partitionВ primary.В
Step 7: Go to «My Computer» or «This PC» (Windows 10), right-click on the bootable USB drive and select the «Format» option to format it.
The two methods given above will help to format a bootable USB drive successfully and restore it to original condition.
More Information: How to Make a Bootable USB Drive
Speaking of making a bootable drive, some of you focus on two targets to finish the making process. One is for resizing partition, and the other helps you bring the Windows system back to a healthy environmentВ when it corrupted or failed to boot. The below guide suits to resize partitions with EaseUS Partition Master. If you want to deploy the Windows system, check to create boot disks on another guide.
Step 1. To create a bootable disk of EaseUS Partition Master, you should prepare a storage media, like a USB drive, flash drive or a CD/DVD disc. Then, correctly connect the drive to your computer.
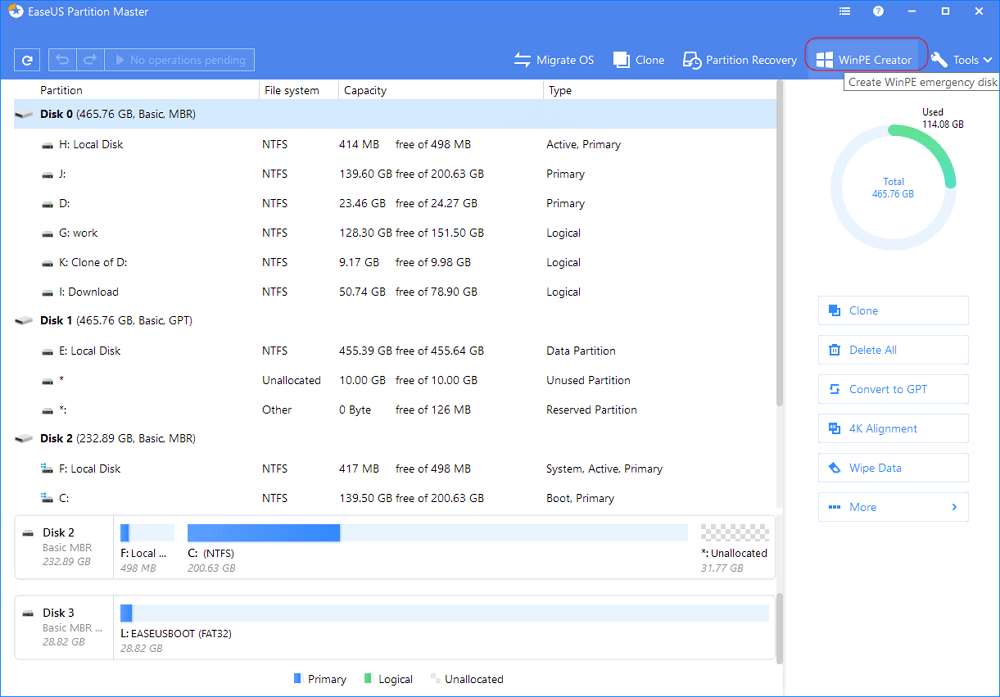
Step 2. Launch EaseUS Partition Master, findВ the «WinPE Creator» feature on the top. Click on it.
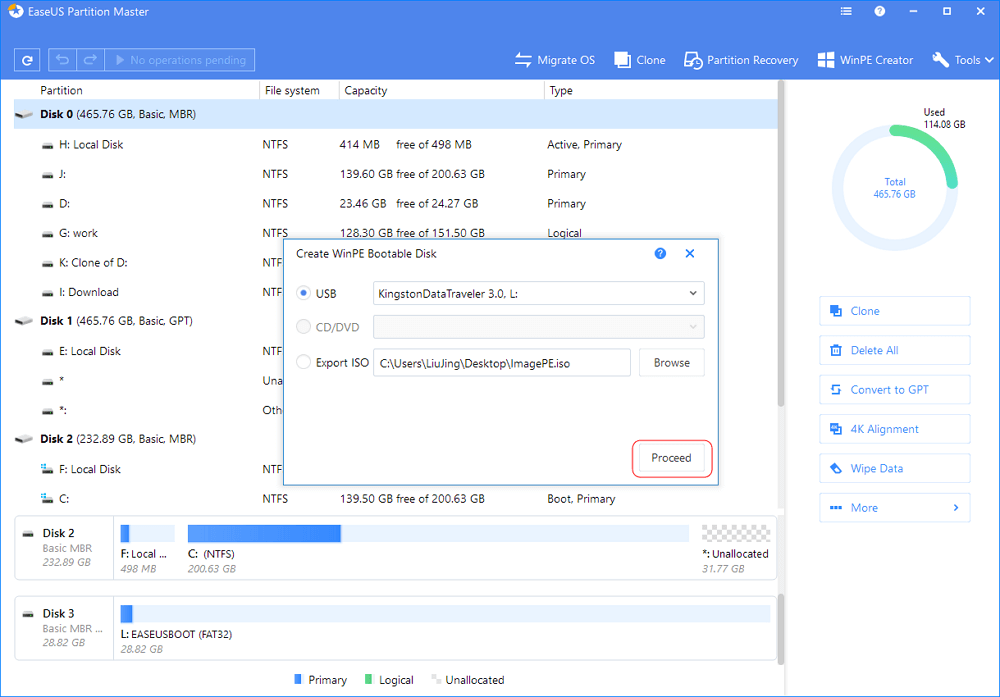
Step 3.В You can choose the USB or CD/DVD when the drive is available. However, if you do not have a storage device at hand, you can also save the ISO file to a local drive, and later burn it to a storage media. Once made the option, click the «Proceed» button to begin.
When the process finishes, you have successfully created an EaseUS Partition Master WinPE bootable disk. Now, you can manage your hard disks and partitions through the bootable drive whenever the computer fails to boot normally.
If you have RAID drives, load the RAID driver first by clicking Add Driver from the menu bar, which can help you add the driver of your device under WinPE environment, as some specific device cannot be recognized under WinPE environment without drivers installed, such as RAID or some specific hard disk.
2021 Best Bootable USB Hard Disk Format Tool Free Download
«My PC infected with an unknown virus and could not boot properly. I am wondering if there is a USB bootable format tool that allows me to format the hard drive to fix it. Any suggestions?»
BootableВ USB Hard Drive Format Utility for Windows [Free Download]
Are you looking for a format utility that can boot itself from a USB drive so that you can use it to format a hard drive without requiring an OS or a Windows installation disk?В Here,В you’ll find the bestВ USB formatterВ available to help youВ resolve these issuesВ in Windows 10/8/7 immediately.
Is there a free bootable USB hard drive format utility?
The answer is No. Some of you may think that the Windows PE bootable disk might help. Unfortunately, the Windows PE bootable disk only works to boot up an unbootable computer and temporarily access files onВ hard drive partitions.
What about third-party formatting tools? Most formatting tools that support creating a bootable USB disk are not free. Some are even extremely complex.В
Bootable USB Hard Drive Format Utility Free Download
Fortunately,В topВ bootable USB hard drive format utility —В EaseUS partition softwareВ canВ format any type ofВ hard drive for normal usage.
EaseUS Partition Master enables youВ to create a bootable USB flash drive and start the PC from the bootableВ disk,В and then it allows you toВ format a hard drive even when the Windows OS cannot boot within this tool.
After getting this software, let’s move on and follow the guidelines below to resolve your problems now.
#1. Create a Bootable USB Format Tool
EaseUS Partition Master bootable software is handy when something goes wrong with your computer operating system, especially when you can not boot it at all.
To format a hard drive on an unbootable computer, you need first create a bootable USB format disk first. Let’sВ start creatingВ a bootable USB format tool with the steps below:
Step 1. To create a bootable disk of EaseUS Partition Master, you should prepare a storage media, like a USB drive, flash drive or a CD/DVD disc. Then, correctly connect the drive to your computer.
Step 2. Launch EaseUS Partition Master, findВ the «WinPE Creator» feature on the top. Click on it.
Step 3.В You can choose the USB or CD/DVD when the drive is available. However, if you do not have a storage device at hand, you can also save the ISO file to a local drive, and later burn it to a storage media. Once made the option, click the «Proceed» button to begin.
When the process finishes, you have successfully created an EaseUS Partition Master WinPE bootable disk. Now, you can manage your hard disks and partitions through the bootable drive whenever the computer fails to boot normally.
If you have RAID drives, load the RAID driver first by clicking Add Driver from the menu bar, which can help you add the driver of your device under WinPE environment, as some specific device cannot be recognized under WinPE environment without drivers installed, such as RAID or some specific hard disk.
#2. How to Use EaseUS BootableВ USB Hard DriveВ Format Utility
How to manage your hard drive or removable storage devices at this moment? With a created bootable USB hard drive format utility at hand, you can freely perform a quick format on your problematic hard disk.
You can take the following steps to format your hard disk without running Windows now:
Step 1. Run EaseUS Partition Master, right-click the hard drive partition you intend to format and choose «Format».
Step 2. In the new window, set the Partition label, File system (NTFS/FAT32/EXT2/EXT3), and Cluster size for the partition to be formatted, then click «OK».

Step 3. Then you will see a warning window, click «OK» in it to continue.
Step 4. Click the «Execute Operation» button in the top-left corner to review the changes, then click «Apply» to start formatting the partition on your hard drive.
Besides,В you can execute many more operations with the bootable USB hard drive disk, such as resize, delete all partitions, wipe a partition, migrate OS to SSD, optimize operating system, and so on.
How to Format Bootable USB Flash Drive to Normal in Windows 7, 8, 10?
This article illustrates how to format bootable USB stick to normal flash drive with NTFS or FAT32-based file system using reliable bootable USB drive format tool in Windows 7, 8, 10.
![]()
By Teresa  / Last Updated February 21, 2021
Why Need to Format Bootable USB Drive?
Bootable USB drive is a kind of helpful assistant in many situations. If you cannot access Windows, the bootable USB drive you created before can help you enter into Windows PE or Linux environment for further operations. Sometimes, to backup hard drive or system, the bootable USB stick helps backup hard drive without booting Windows. What’s more, USB drives are easy to carry and easy to save. One bootable USB stick can apply to different computers.
Well, with so many conveniences it brings to us, why would we want to format bootable USB stick? As we know, USB flash drive comes with larger capacity and reasonable price in recent years. As time goes by, current bootable USB may not meet your computing requirements anymore. In that case, you can choose to copy bootable USB drive to another USB or to format bootable USB drive in Windows 7 and create another new bootable device. Also, when you no longer need the bootable USB, it is not a bad choice to reformat it to FAT32 for new files. Surely, other conditions might result in bootable USB drive formatting as well. The key point is to find out how to format bootable USB to normal.
Can We Format Bootable USB Drive in Windows 10/8/7/XP?
Obviously, the answer is positive. Bootable USB drive is no different than normal USB drive except for the starting programs and Windows pre-installed environment. Therefore, you can format bootable flash drive as usual in some cases. On Windows alone, there are two bootable USB drive format utilities: Disk Management and Diskpart in Command Prompt.
Plug in the bootable USB drive when you running Windows and then type “diskmgmt.msc” in Run box to start Disk Management. Right-click the bootable drive and select “Format”. Then follow the wizard to complete the formatting.
One can not only create bootable USB using Diskpart but also format bootable USB stick with this application. Steps are quite easy as well. First, type “diskpart” in Run box to start Command Prompt. Second, input following commands in turn and remember to press Enter after each move.
select disk X (X stands for the disk number of your bootable USB drive)
create partition primary
format fs=fat32 quick or format fs=ntfs quick (select one file system based on your own needs)
No cumbersome steps required can you format the bootable USB flash drive. Nevertheless, sometimes you cannot complete formatting using both methods. Besides, all operations take place immediately so that you cannot step back. No matter from which side, finding another powerful bootable USB drive formatter is recommendable.
How to Format Bootable USB Drive via AOMEI Partition Assistant?
AOMEI Partition Assistant Professional is reliable and well-known disk partition manager that allows you to, for example, format SD card for 3DS in Windows 10, 8.1, 8, 7, XP, and Vista. This bootable flash drive format utility can assist you format USB drive to NTFS, FAT32, Ext 2 or Ext3 for different uses. During the format process, you are allowed to change cluster size of the file system. If you just want to wipe data on the USB drive like erasing files on SanDisk USB, it supports wipe partition up to 100 times. It has user-friendly interface and provides demo version. You can download the demo version of AOMEI Partition Assistant Professional to have a try.
1. Plug in the bootable USB drive when you running Windows. Install and launch AOMEI Partition Assistant.
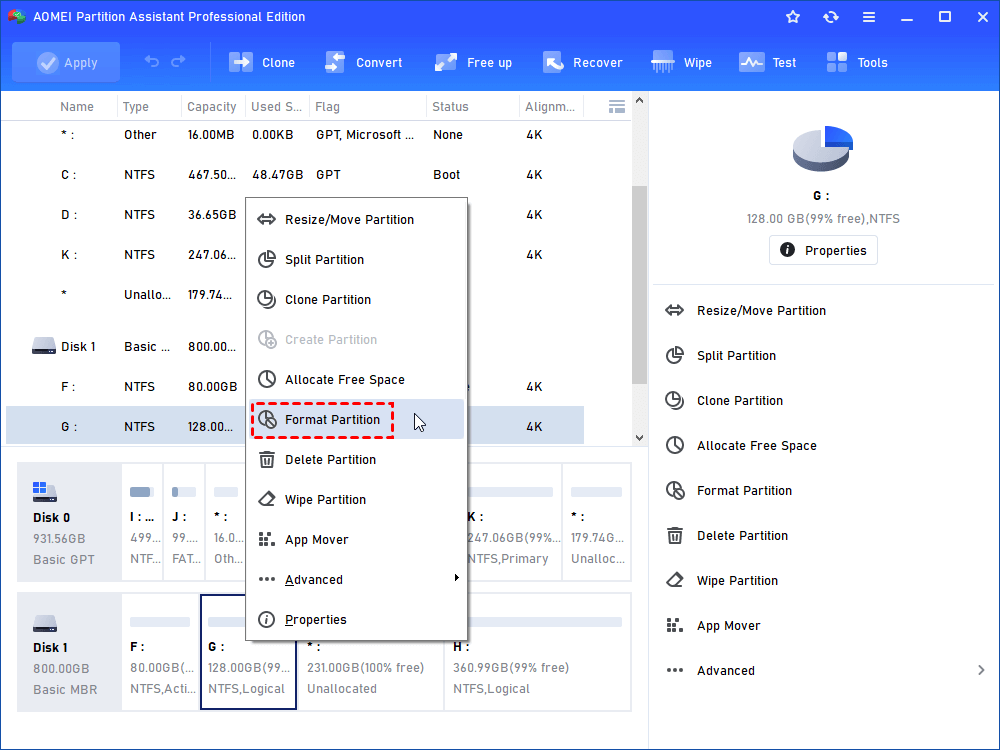
2. Right-click the bootable flash drive and select “Format Partition”.
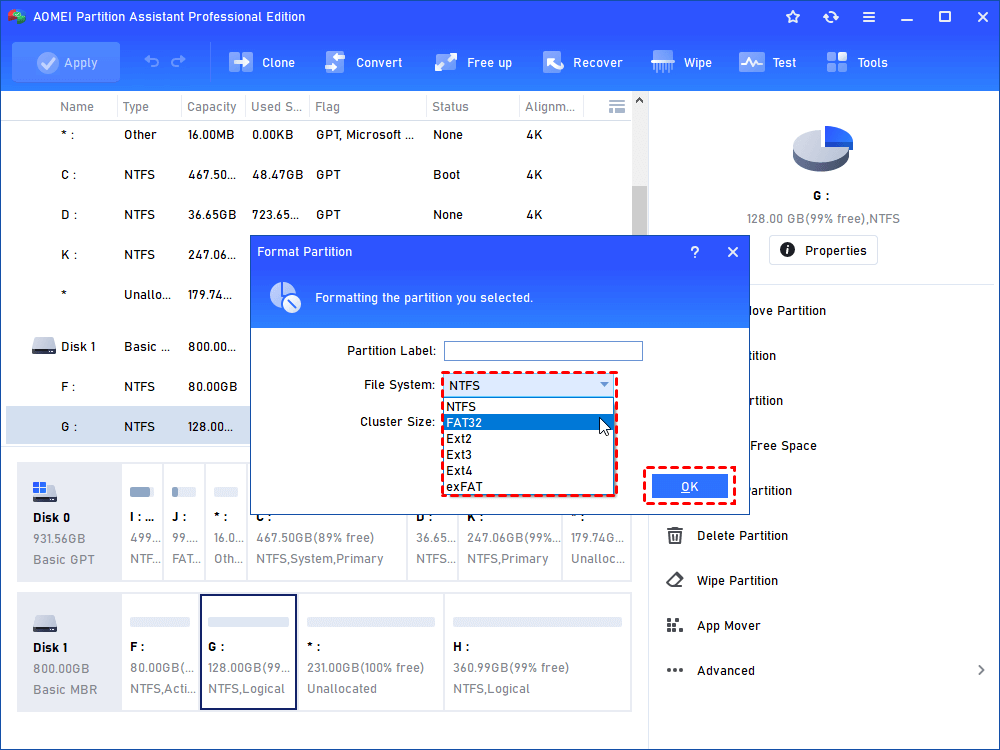
3. Set file system and cluster size and then click “OK”.
4. This is the virtual result. Click “Apply” to make it real.
Tips: If you want the USB drive to bootable again, try “Make Bootable Media” in this software to create a bootable device with Windows PE, and you can use this bootable USB to format hard drive in WinPE mode without booting Windows.
Except for formatting bootable USB drive, AOMEI Partition Assistant is also an Intenso USB format tool, HP USB format tool and Lexar USB format utility. In addition, you are able to migrate OS from HDD to SSD while keeping files on HDD if the need ever arises.


