- File system formats available in Disk Utility on Mac
- Apple File System (APFS)
- Mac OS Extended
- Windows-compatible formats
- How to erase an Intel-based Mac
- Before erasing your Mac
- Use Disk Utility to erase your Mac
- If you don’t see Macintosh HD in Disk Utility
- Стирание и переформатирование устройств хранения в приложении «Дисковая утилита» на Mac
- Форматирование диска для компьютеров Windows в приложении «Дисковая утилита» на Mac
- How to Format USB on Mac? Formatting External Hard Drive or USB Drive
- How to Format USB on MAC?
- Format USB on Mac using Disk Utility
- Format USB Drive Mac using Terminal
File system formats available in Disk Utility on Mac
Disk Utility on Mac supports several file system formats:
Apple File System (APFS): The file system used by macOS 10.13 or later.
Mac OS Extended: The file system used by macOS 10.12 or earlier.
MS-DOS (FAT) and ExFAT: File systems that are compatible with Windows.
Apple File System (APFS)
Apple File System (APFS), the default file system for Mac computers using macOS 10.13 or later, features strong encryption, space sharing, snapshots, fast directory sizing and improved file system fundamentals. While APFS is optimised for the Flash/SSD storage used in recent Mac computers, it can also be used with older systems with traditional hard disk drives (HDD) and external, direct-attached storage. macOS 10.13 or later supports APFS for both bootable and data volumes.
APFS allocates disk space within a container (partition) on demand. When a single APFS container has multiple volumes, the container’s free space is shared and automatically allocated to any of the individual volumes as needed. If desired, you can specify reserve and quota sizes for each volume. Each volume uses only part of the overall container, so the available space is the total size of the container, minus the size of all the volumes in the container.
Choose one of the following APFS formats for Mac computers using macOS 10.13 or later.
APFS: Uses the APFS format. Choose this option if you don’t need an encrypted or case-sensitive format.
APFS (Encrypted): Uses the APFS format and encrypts the volume.
APFS (Case-sensitive): Uses the APFS format and is case-sensitive to file and folder names. For example, folders named “Homework” and “HOMEWORK” are two different folders.
APFS (Case-sensitive, Encrypted): Uses the APFS format, is case-sensitive to file and folder names and encrypts the volume. For example, folders named “Homework” and “HOMEWORK” are two different folders.
You can easily add or delete volumes in APFS containers. Each volume within an APFS container can have its own APFS format — APFS, APFS (Encrypted), APFS (Case-sensitive) or APFS (Case-sensitive, Encrypted).
Mac OS Extended
Choose one of the following Mac OS Extended file system formats for compatibility with Mac computers using macOS 10.12 or earlier.
Mac OS Extended (Journaled): Uses the Mac format (Journaled HFS Plus) to protect the integrity of the hierarchical file system. Choose this option if you don’t need an encrypted or case-sensitive format.
Mac OS Extended (Journaled, Encrypted): Uses the Mac format, requires a password, and encrypts the partition.
Mac OS Extended (Case-sensitive, Journaled): Uses the Mac format and is case-sensitive to folder names. For example, folders named “Homework” and “HOMEWORK” are two different folders.
Mac OS Extended (Case-sensitive, Journaled, Encrypted): Uses the Mac format, is case-sensitive to folder names, requires a password, and encrypts the partition.
Windows-compatible formats
Choose one of the following Windows-compatible file system formats if you are formatting a disk to use with Windows.
MS-DOS (FAT): Use for Windows volumes that are 32GB or less.
ExFAT: Use for Windows volumes that are over 32GB.
Источник
How to erase an Intel-based Mac
Erase (format) built-in startup disk of an Intel-based Mac.
These steps do not apply to Mac computers with Apple silicon. The steps to erase a Mac with Apple silicon are different.
Before erasing your Mac
- Make a backup of any files that you want to keep. Erasing your Mac permanently deletes its files.
- If you want to restore your Mac to factory settings, such as to prepare it for a new owner, first learn what to do before you sell, give away, or trade in your Mac. Then erase your Mac as the final step.
Use Disk Utility to erase your Mac
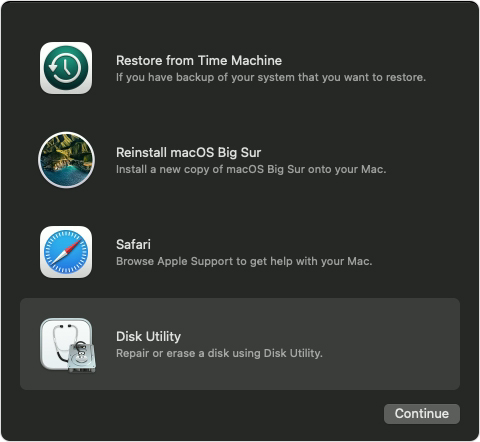
- Start up from macOS Recovery: Turn on your Mac, then immediately press and hold these two keys until you see an Apple logo or other image: Command (⌘) and R.
- If asked, select a user you know the password for, then enter their administrator password.
- From the utilities window, select Disk Utility and click Continue.

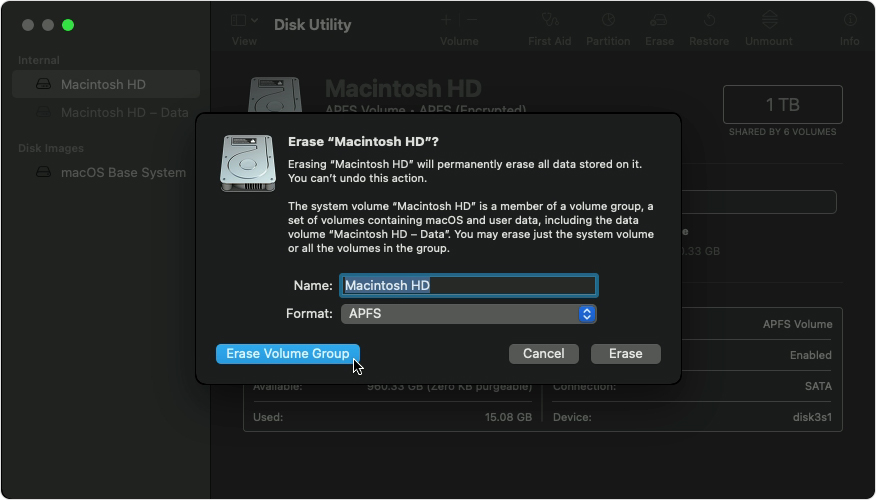
- Select Macintosh HD in the sidebar of Disk Utility. Don’t see Macintosh HD?
- Click the Erase button in the toolbar, then enter the requested details:
- Name: Macintosh HD
- Format: APFS or Mac OS Extended (Journaled), as recommended by Disk Utility
- Click Erase Volume Group. If you don’t see this button, click Erase instead.
- If asked, enter your Apple ID. Forgot your Apple ID?
- After the erase is done, select any other internal volumes in the sidebar, then click the delete volume (–) button in the toolbar to delete that volume.
During this step, disregard any internal volume named Macintosh HD or Macintosh HD — Data, as well as any volumes in the External and Disk Images sections of the sidebar. - Quit Disk Utility to return to the utilities window.
- If you want to start up again from the disk you erased, select Reinstall macOS in the utilities window, then click Continue and follow the onscreen instructions to reinstall macOS.
If you don’t see Macintosh HD in Disk Utility
Your built-in startup disk should be the first item listed in the Disk Utility sidebar. It’s named Macintosh HD, unless you changed its name. If you don’t see it there, choose Apple menu > Shut Down, then unplug all nonessential devices from your Mac and try again.
If your disk still doesn’t appear in Disk Utility, or Disk Utility reports that the erase process failed, your Mac might need service. If you need help, please contact Apple Support.
Источник
Стирание и переформатирование устройств хранения в приложении «Дисковая утилита» на Mac
С помощью Дисковой утилиты на Mac можно стирать и переформатировать устройства хранения, используемые с Mac. При стирании устройства хранения с него удаляются все данные.

Если Вы хотите сохранить какие-либо файлы, скопируйте их на другое устройство хранения.
Откройте приложение «Дисковая утилита»  на Mac одним из следующих способов в зависимости от типа диска или тома, который Вы собираетесь стереть.
Если Вы хотите стереть загрузочный диск. Выполните запуск из раздела восстановления macOS, затем выберите Дисковую утилиту в окне «Восстановление».
Если Вы хотите стереть любое другое устройство хранения. Дважды нажмите Дисковую утилиту в папке /Программы/Утилиты.
Выберите «Вид» > «Показать все устройства».
В боковой панели выберите устройство хранения, которое нужно стереть, затем нажмите кнопку стирания  .
.
Нажмите всплывающее меню «Схема», затем выберите «Схема разделов GUID».
Нажмите всплывающее меню «Формат», а затем выберите формат файловой системы.
Введите имя закладки.
(Необязательно) Если доступно, нажмите «Параметры безопасности», затем при помощи бегунка укажите количество циклов записи поверх стертых файлов и нажмите «OK».
Параметры безопасного стирания доступны только для некоторых типов устройств хранения. Если кнопка «Параметры безопасности» недоступна, Дисковая утилита не может выполнить безопасное стирание на данном устройстве хранения.
Нажмите «Стереть», затем нажмите «Готово».
Примечание. Для полупроводниковых дисков (SSD-дисков) функция безопасного стирания в Дисковой утилите недоступна. Для повышения безопасности можно включить шифрование FileVault, когда Вы начнете пользоваться SSD-диском.
Источник
Форматирование диска для компьютеров Windows в приложении «Дисковая утилита» на Mac
С помощью Дисковой утилиты можно отформатировать внешний диск таким образом, чтобы он поддерживался как компьютерами на базе Microsoft Windows, так и компьютерами Mac. Это может потребоваться, например, если у Вас есть флеш-накопитель для хранения файлов данных, которые Вам нужно использовать на компьютере Mac дома и на компьютере Windows в школе или библиотеке.
ПРЕДУПРЕЖДЕНИЕ. При форматировании с диска или из тома стираются все файлы. Перед форматированием сохраните все нужные файлы в другом томе.
В приложении «Дисковая утилита» на компьютере Mac выберите пункт меню «Вид» > «Показать все устройства».
Если Дисковая утилита еще не открыта, нажмите значок Launchpad  в панели Dock, введите «Дисковая утилита» в поле поиска, затем нажмите значок Дисковой утилиты .
В боковом меню выберите диск, который нужно отформатировать для использования с компьютерами Windows.
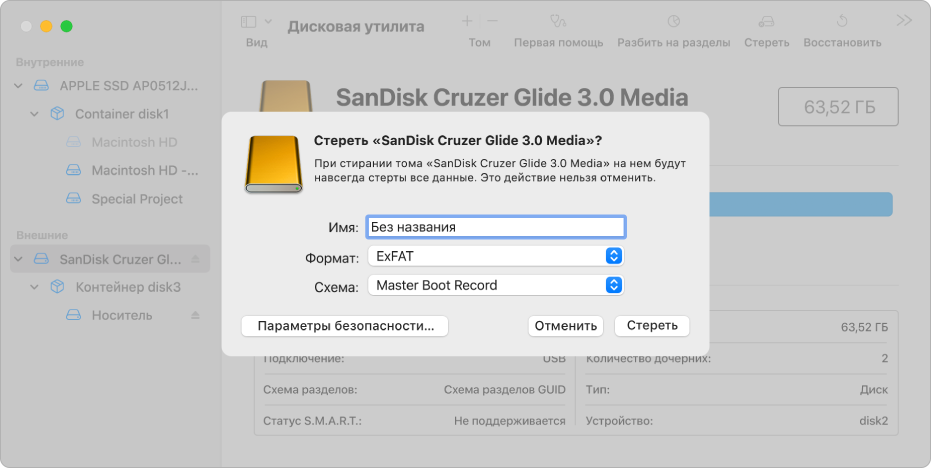
Нажмите кнопку «Стереть» на панели инструментов.
В диалоговом окне «Стереть» нажмите всплывающее меню «Схема», затем выберите схему разделов.
Нажмите всплывающее меню «Формат», затем выберите один из следующих вариантов.
MS-DOS (FAT). Выбирайте этот формат для дисков размером 32 ГБ или меньше.
ExFAT. Выбирайте этот формат для дисков размером более 32 ГБ.
Введите имя тома.
Максимальная длина имени тома составляет одиннадцать символов.
Источник
How to Format USB on Mac? Formatting External Hard Drive or USB Drive
Formatting in context of USB or Hard Drives means deleting everything from that drive and rebuilding the file system so that we can use it with an Operating System. And we usually perform formatting in our USB or External Hard Drive when we want to get rid of viruses, or we want to clean the disk as it was when we purchased it. Also when we buy a new USB or Hard Drive, it often comes with windows compatible not the mac so formatting it even needed in this case. So in this post, I will tell you “How to Format USB on Mac?”.
How to Format USB on MAC?
If you never formatted a USB drive then don’t worry it is effortless. And here I will tell you two answers to this question that “How to Format USB on Mac?”. First, we will go with the straightforward way of doing it; then we will move to the easy way. 😉
So first, we will use the Disk Utility program, which is a GUI and very straightforward so that any kid can do it. Then in the next method, we will format USB drive from mac terminal. So let’s start.
Format USB on Mac using Disk Utility
- Connect the USB Drive to your Mac. (This is obvious we need a USB first, then only we can format it 😛 )
- Now we need to open Disk Utility. (Here I will give you one more tip. To open any program in your Mac just press the command + spacebar. It will start the Spotlight Search, now from here you can search for any program, but now we need Disk Utility, so search it).
spotlight search mac
» data-medium-file=»https://i0.wp.com/www.simplifiedios.net/wp-content/uploads/2017/11/spotlight-search-mac.png?fit=300%2C190&ssl=1″ data-large-file=»https://i0.wp.com/www.simplifiedios.net/wp-content/uploads/2017/11/spotlight-search-mac.png?fit=682%2C431&ssl=1″ loading=»lazy» src=»https://i0.wp.com/www.simplifiedios.net/wp-content/uploads/2017/11/spotlight-search-mac.png?resize=682%2C431&ssl=1″ alt=»spotlight search mac» width=»682″ height=»431″ srcset=»https://i0.wp.com/www.simplifiedios.net/wp-content/uploads/2017/11/spotlight-search-mac.png?w=682&ssl=1 682w, https://i0.wp.com/www.simplifiedios.net/wp-content/uploads/2017/11/spotlight-search-mac.png?resize=300%2C190&ssl=1 300w» sizes=»(max-width: 682px) 100vw, 682px» data-recalc-dims=»1″/>
- Now, on the Disk Utility window you will see External Drives on the left.
» data-medium-file=»https://i0.wp.com/www.simplifiedios.net/wp-content/uploads/2017/11/Disk-Utility.png?fit=300%2C187&ssl=1″ data-large-file=»https://i0.wp.com/www.simplifiedios.net/wp-content/uploads/2017/11/Disk-Utility.png?fit=923%2C576&ssl=1″ loading=»lazy» src=»https://i0.wp.com/www.simplifiedios.net/wp-content/uploads/2017/11/Disk-Utility.png?resize=923%2C576&ssl=1″ alt=»Disk Utility» width=»923″ height=»576″ srcset=»https://i0.wp.com/www.simplifiedios.net/wp-content/uploads/2017/11/Disk-Utility.png?w=923&ssl=1 923w, https://i0.wp.com/www.simplifiedios.net/wp-content/uploads/2017/11/Disk-Utility.png?resize=300%2C187&ssl=1 300w, https://i0.wp.com/www.simplifiedios.net/wp-content/uploads/2017/11/Disk-Utility.png?resize=768%2C479&ssl=1 768w» sizes=»(max-width: 923px) 100vw, 923px» data-recalc-dims=»1″/>
- Here I have my USB Drive connected, and its name is No Name. In the top we have options like First Aid, Partition, Erase, Restore, Unmount . To format the drive we need to click on the Erase Button .
» data-medium-file=»https://i0.wp.com/www.simplifiedios.net/wp-content/uploads/2017/11/format-usb-on-mac-.png?fit=300%2C110&ssl=1″ data-large-file=»https://i0.wp.com/www.simplifiedios.net/wp-content/uploads/2017/11/format-usb-on-mac-.png?fit=925%2C338&ssl=1″ loading=»lazy» src=»https://i0.wp.com/www.simplifiedios.net/wp-content/uploads/2017/11/format-usb-on-mac-.png?resize=925%2C338&ssl=1″ alt=»format usb on mac» width=»925″ height=»338″ srcset=»https://i0.wp.com/www.simplifiedios.net/wp-content/uploads/2017/11/format-usb-on-mac-.png?w=925&ssl=1 925w, https://i0.wp.com/www.simplifiedios.net/wp-content/uploads/2017/11/format-usb-on-mac-.png?resize=300%2C110&ssl=1 300w, https://i0.wp.com/www.simplifiedios.net/wp-content/uploads/2017/11/format-usb-on-mac-.png?resize=768%2C281&ssl=1 768w, https://i0.wp.com/www.simplifiedios.net/wp-content/uploads/2017/11/format-usb-on-mac-.png?resize=270%2C100&ssl=1 270w» sizes=»(max-width: 925px) 100vw, 925px» data-recalc-dims=»1″/>
Format USB on Mac
- Here, we have two options, the first one is the Name that you can set for your USB Drive. The second one is the Format. If you want to make it windows compatible you need to select MS-DOS (FAT) here. And you can also use the Mac OS Format. So its up to you what you want.
- Now, just click on the Erase Button to complete the format.
» data-medium-file=»https://i2.wp.com/www.simplifiedios.net/wp-content/uploads/2017/11/how-to-format-usb-on-mac.png?fit=300%2C136&ssl=1″ data-large-file=»https://i2.wp.com/www.simplifiedios.net/wp-content/uploads/2017/11/how-to-format-usb-on-mac.png?fit=497%2C226&ssl=1″ loading=»lazy» src=»https://i2.wp.com/www.simplifiedios.net/wp-content/uploads/2017/11/how-to-format-usb-on-mac.png?resize=497%2C226&ssl=1″ alt=»how to format usb on mac» width=»497″ height=»226″ srcset=»https://i2.wp.com/www.simplifiedios.net/wp-content/uploads/2017/11/how-to-format-usb-on-mac.png?w=497&ssl=1 497w, https://i2.wp.com/www.simplifiedios.net/wp-content/uploads/2017/11/how-to-format-usb-on-mac.png?resize=300%2C136&ssl=1 300w» sizes=»(max-width: 497px) 100vw, 497px» data-recalc-dims=»1″/>
How to Format USB on Mac?
- And thats it. Your drive is formatted.
For formatting any External Hard Drive, we can follow the same steps.
Format USB Drive Mac using Terminal
We also have a Command Line Disk Utility interface in Mac. And we can use it to format the USB on Mac as well. Now lets see how we do this.
- First open the terminal (Again press command + space, write terminal and hit enter).
- In terminal now type the following command.
- The above command will display all the disk connected with your machine.
diskutil terminal mac
» data-medium-file=»https://i0.wp.com/www.simplifiedios.net/wp-content/uploads/2017/11/diskutil-terminal-mac.png?fit=300%2C186&ssl=1″ data-large-file=»https://i0.wp.com/www.simplifiedios.net/wp-content/uploads/2017/11/diskutil-terminal-mac.png?fit=971%2C603&ssl=1″ loading=»lazy» src=»https://i0.wp.com/www.simplifiedios.net/wp-content/uploads/2017/11/diskutil-terminal-mac.png?resize=971%2C603&ssl=1″ alt=»diskutil terminal mac» width=»971″ height=»603″ srcset=»https://i0.wp.com/www.simplifiedios.net/wp-content/uploads/2017/11/diskutil-terminal-mac.png?w=971&ssl=1 971w, https://i0.wp.com/www.simplifiedios.net/wp-content/uploads/2017/11/diskutil-terminal-mac.png?resize=300%2C186&ssl=1 300w, https://i0.wp.com/www.simplifiedios.net/wp-content/uploads/2017/11/diskutil-terminal-mac.png?resize=768%2C477&ssl=1 768w» sizes=»(max-width: 971px) 100vw, 971px» data-recalc-dims=»1″/>
- Here the USB Drive that is connected, is disk2 and we will format this disk only. To format the USB drive here we will write the following command.
- In the above command eraseDisk is the format command. Then comes JHFS+ is the Disk Type which is Mac OS Extended (Journaled). Then Belal is the name of the disk that will be assigned after formatting. Finally we are writing the name of the disk that we need to format, which disk2 is in this case. Now hit enter.
how to format usb on mac from terminal
» data-medium-file=»https://i1.wp.com/www.simplifiedios.net/wp-content/uploads/2017/11/how-to-format-usb-on-mac-from-terminal.png?fit=300%2C91&ssl=1″ data-large-file=»https://i1.wp.com/www.simplifiedios.net/wp-content/uploads/2017/11/how-to-format-usb-on-mac-from-terminal.png?fit=973%2C294&ssl=1″ loading=»lazy» src=»https://i1.wp.com/www.simplifiedios.net/wp-content/uploads/2017/11/how-to-format-usb-on-mac-from-terminal.png?resize=973%2C294&ssl=1″ alt=»how to format usb on mac from terminal» width=»973″ height=»294″ srcset=»https://i1.wp.com/www.simplifiedios.net/wp-content/uploads/2017/11/how-to-format-usb-on-mac-from-terminal.png?w=973&ssl=1 973w, https://i1.wp.com/www.simplifiedios.net/wp-content/uploads/2017/11/how-to-format-usb-on-mac-from-terminal.png?resize=300%2C91&ssl=1 300w, https://i1.wp.com/www.simplifiedios.net/wp-content/uploads/2017/11/how-to-format-usb-on-mac-from-terminal.png?resize=768%2C232&ssl=1 768w» sizes=»(max-width: 973px) 100vw, 973px» data-recalc-dims=»1″/>
- And the disk is formatted. 😉 Super Easy, isn’t it?
So that’s it for this tutorial friends if you got some problems then tell me in the comments. And if you think this post was useful for you, or it helped you in any way, then I request you to please SHARE it with your friends. I hope you got the answer very clearly that “How to Format USB on Mac?”. So thank you, guys. Will catch you in the next post.
Источник


