- How To Format USB Drive in Linux Command Line
- Step 1 – Attach USB to System
- Step 2 – Format USB Drive in Linux
- Conclusion
- How to Format a USB or SD Card in Ubuntu Linux
- Format USB disks on Ubuntu & other Linux distributions
- Troubleshooting when you cannot format the USB disk on Ubuntu Linux
- Step 1:
- Step 2:
- Step 3:
- Step 4:
- Step 5:
- How To Partition and Format Storage Devices in Linux
- Introduction
- Install the Tools
- Identify the New Disk on the System
- Partition the New Drive
- Choose a Partitioning Standard
- Create the New Partition
- Create a Filesystem on the New Partition
- Mount the New Filesystem
- Mounting the Filesystem Temporarily
- Mounting the Filesystem Automatically at Boot
- Testing the Mount
- Conclusion
- Форматирование флешки в Linux
- Форматирование флешки в Linux с помощью терминала
- Шаг 1. Определить имя флешки
- Шаг 2. Размонтирование флешки
- Шаг 3. Форматирование
- Форматирование флешки в Gparted
- Шаг 1. Установка Gparted
- Шаг 2. Поиск флешки
- Шаг 3. Размонтирование флешки
- Шаг 4. Полная очистка флешки
- Шаг 5. Форматирование флешки
- Как форматировать флешку с помощью Disks
- Шаг 1. Запуск Disk Utility
- Шаг 2. Поиск флешки
- Шаг 3. Форматирование
- Форматирование флешки в Nautilus
- Выводы
How To Format USB Drive in Linux Command Line
USB formatting is the process of erasing all data from the disk and prepare it for use. Sometimes we are required to change the filesystem on our USB drive, In that case, we have to format the USB drive with the new filesystem type. Formatting a USB drive in Ubuntu using Terminal commands is much easier than formatting it in Windows systems.
This tutorial will help Ubuntu (Linux) users with the simple steps for format a USB flash drive using the command line.
Step 1 – Attach USB to System
Insert a USB drive into your system and identify your USB drive correctly. This is the step you need to take care, because you may format the wrong disk if not correctly identify your disk.
Now, You can see that the USD drive is attached as /dev/sdc1 device. Which is mounted on /media/tecadmin.
Step 2 – Format USB Drive in Linux
Whenever we attach a USB drive in Ubuntu, it is automatically mounted to the system. We can not format any disk on Linux systems that are already mounted. So first un-mount /dev/sdc1 USB drive on your system.
Now, Use one of the following commands as per the file system you want. To format a USB drive, most of the users prefer VFAT and NTFS file systems because they can be easily used on the Windows operating system.
- Format with vFat File System
- Format with NTFS File System
- Format with EXT4 File System
Similarly, you can format a USB Flash drive with any required file system.
Conclusion
In this tutorial, you have learned to format a USB drive on a Linux system via the command-line interface.
Источник
How to Format a USB or SD Card in Ubuntu Linux
Brief: Wondering how to format a USB or SD card on Ubuntu Linux? This screenshot tutorial teaches you exactly that along with a few hints about possible troubleshooting.
Formatting removable media like a USB disk or an SD card is a pretty simple task on Ubuntu Linux. No, I won’t be using the terminal here although you can always use the command line on Linux. I’m going to show you how to format a USB on Ubuntu or other Linux distributions graphically.
Format USB disks on Ubuntu & other Linux distributions
I’m using Ubuntu with the GNOME desktop environment in this tutorial, but it should be applicable to other Linux distributions and other desktop environments as well.
Plug in your USB or SD card. Now go to the File manager. You should see your USB or SD Card here.
Right click on it and you should see the format option.
When you hit the format option, it will give you the option to name the device and choose the filesystem.
When you’ve selected the appropriate options, hit the Next button in the top right corner.
Chose the filesystem on the USB
You’ll see a warning that all the data on the USB disk/SD card will be erased. That’s obvious.
Just hit the format button in the top right corner.
Your USB disk will be formatted in a few seconds or a couple of minutes at the most.
Once it’s formatted, you’ll see that it has reappeared in the file manager with the new name you gave it.
That’s it. That’s the standard way of formatting a USB drive on Ubuntu Linux.
Troubleshooting when you cannot format the USB disk on Ubuntu Linux
I never thought I would have trouble formatting a simple SD card or USB/pen drive until I encountered this problem on Ubuntu. When I looked at the options available by right clicking on the mounted removable disk, I found none for formatting.
So I tried using the default disk utility of Ubuntu: Disks. But it failed and gave me the following error:
Error formatting disk – Error synchronizing after initial wipe: Timed out waiting for object (udisks-error-quark, 0)

The above mentioned error is a known bug which has been unresolved for months – despite this, Disks is still being served as the default disk utility program (why?).
I had to go around and format the removable disk with the help of GParted. And thus I came up with this tutorial to help others learn how to format a SD card or USB key in Ubuntu.
Step 1:
Install GParted. It’s a free and open source partition manager for Linux. You can install it using the terminal (Ctrl+Alt+T):
Step 2:
Insert the SD card or USB key. Now launch GParted. To do that, go to the Unity dash and search for GParted. It takes some time to search for all the disks present on the system. Have some patience. When it’s recognized the drives, you’ll see a screen as below. By default it goes to the hard drive of your computer. To access removable media, go to the top-right corner of the application and choose the removable media. You can see the size of the removable media to identify the right one :

Step 3:
Now you’ll see a screen like the one below. This shows the partitions of the removable disk. Before you go for formatting, unmount the disk by right-clicking on the partition in the following manner:

Step 4:
Once you have it unmounted, right-clicking on it will show you the Format To option. You can choose whatever type of file system you want on the disk. Once you’ve selected the drive to format, click on the Tick sign at the top to start the process:

Step 5:
Nothing more needs to be done now. You will see a couple of warnings and then the format procedure will start.


Voila! You are done.
There is another possible formatting related issue. I’ve written another tutorial to fix this ‘error formatting volume’ issue in Ubuntu.
Was the tutorial helpful to you and were you able to format a USB key in Ubuntu? Any questions? Feel free to go to the comments section of the page.
Like what you read? Please share it with others.
Источник
How To Partition and Format Storage Devices in Linux
Published on July 13, 2016
Introduction
Preparing a new disk for use on a Linux system can be quick and easy. There are many tools, filesystem formats, and partitioning schemes that may complicate the process if you have specialized needs, but if you want to get up and running quickly, it’s fairly straightforward.
This guide will cover the following process:
- Identifying the new disk on the system.
- Creating a single partition that spans the entire drive (most operating systems expect a partition layout, even if only one filesystem is present)
- Formatting the partition with the Ext4 filesystem (the default in most modern Linux distributions)
- Mounting and setting up Auto-mounting of the filesystem at boot
Install the Tools
To partition the drive, we’ll use the parted utility. In most cases, this will already be installed on the server.
If you are on an Ubuntu or Debian server and do not have parted yet, you can install it by typing:
If you are on a CentOS or Fedora server, you can install it by typing:
Identify the New Disk on the System
Before we set up the drive, we need to be able to properly identify it on the server.
If this is a completely new drive, the easiest way to find it on your server may be to look for the absence of a partitioning scheme. If we ask parted to list the partition layout of our disks, it will give us an error for any disks that don’t have a valid partition scheme. This can be used to help us identify the new disk:
You should see an unrecognized disk label error for the new, unpartitioned disk:
You can also use the lsblk command and look for a disk of the correct size that has no associated partitions:
Remember to check lsblk in every session before making changes. The /dev/sd* and /dev/hd* disk identifiers will not necessarily be consistent between boots, which means there is some danger of partitioning or formatting the wrong disk if you do not verify the disk identifier correctly.
Consider using more persistent disk identifiers like /dev/disk/by-uuid , /dev/disk/by-label , or /dev/disk/by-id . See our introduction to storage concepts and terminology in Linux article for more information.
When you know the name the kernel has assigned your disk, you can partition your drive.
Partition the New Drive
As mentioned in the introduction, we’ll create a single partition spanning the entire disk in this guide.
Choose a Partitioning Standard
To do this, we first need to specify the partitioning standard we wish to use. GPT is the more modern partitioning standard, while the MBR standard offers wider support among operating systems. If you do not have any special requirements, it is probably better to use GPT at this point.
To choose the GPT standard, pass in the disk you identified like this:
If you wish to use the MBR format, type this instead:
Create the New Partition
Once the format is selected, you can create a partition spanning the entire drive by typing:
If we check lsblk , we should see the new partition available:
Create a Filesystem on the New Partition
Now that we have a partition available, we can format it as an Ext4 filesystem. To do this, pass the partition to the mkfs.ext4 utility.
We can add a partition label by passing the -L flag. Select a name that will help you identify this particular drive:
If you want to change the partition label at a later date, you can use the e2label command:
You can see all of the different ways to identify your partition with lsblk . We want to find the name, label, and UUID of the partition.
Some versions of lsblk will print all of this information if we type:
If your version does not show all of the appropriate fields, you can request them manually:
You should see something like this. The highlighted output indicate different methods you can use to refer to the new filesystem:
Mount the New Filesystem
Now, we can mount the filesystem for use.
The Filesystem Hierarchy Standard recommends using /mnt or a subdirectory under it for temporarily mounted filesystems. It makes no recommendations on where to mount more permanent storage, so you can choose whichever scheme you’d like. For this tutorial, we’ll mount the drive under /mnt/data .
Create the directory by typing:
Mounting the Filesystem Temporarily
You can mount the filesystem temporarily by typing:
Mounting the Filesystem Automatically at Boot
If you wish to mount the filesystem automatically each time the server boots, adjust the /etc/fstab file:
Earlier, we issued a sudo lsblk —fs command to display three filesystem identifiers for our filesystem. We can use any of these in this file. We’ve used the partition label below, but you can see what the lines would look like using the other two identifiers in the commented out lines:
You can learn about the various fields in the /etc/fstab file by typing man fstab . For information about the mount options available for a specific filesystem type, check man [filesystem] (like man ext4 ). For now, the mount lines above should get you started.
For SSDs, the discard option is sometimes appended to enable continuous TRIM. There is debate over the performance and integrity impacts of performing continuous TRIM in this manner, and most distributions include method of performing periodic TRIM as an alternative.
Save and close the file when you are finished.
If you did not mount the filesystem previously, you can now mount it by typing:
Testing the Mount
After we’ve mounted the volume, we should check to make sure that the filesystem is accessible.
We can check if the the disk is available in the output from the df command:
You should also be able to see a lost+found directory within the /mnt/data directory, which typically indicates the root of an Ext* filesystem:
We can also check that the file mounted with read and write capabilities by writing to a test file:
Read the file back just to make sure the write executed correctly:
You can remove the file after you have verified that the new filesystem is functioning correctly:
Conclusion
Your new drive should now be partitioned, formatted, mounted, and ready for use. This is the general process you can use turn a raw disk into a filesystem that Linux can use for storage. There are more complex methods of partitioning, formatting, and mounting which may be more appropriate in some cases, but the above is a good starting point for general use.
Источник
Форматирование флешки в Linux
Форматирование флешки — это довольно простая задача, с которой часто сталкивается каждый пользователь. В операционной системе Windows всё делается интуитивно понятно и буквально в пару кликов. Но в Linux всё не так однозначно. Может даже показаться, что форматировать флешку в Linux очень сложно. На самом деле это не так.
Для решения такой простой задачи в Linux есть несколько способов, и сегодня мы рассмотрим самые интересные из них. А именно форматирование флешки с помощью Gparted, терминала и утилиты Disks в Ubuntu или любом другом дистрибутиве, использующем Gnome. Сначала рассмотрим приём, который будет работать во всех дистрибутивах — с помощью терминала и утилиты mkfs.
Форматирование флешки в Linux с помощью терминала
Форматировать флешку в терминале не очень сложно, но сначала вам нужно знать, как идентифицировать эту флешку в системе. Все устройства в Linux определяются в виде файлов в каталоге /dev и ваша флешка тоже.
Но если вы просто зайдете в этот каталог, вам будет сложно определить, какой из файлов отвечает за флешку, потому что все файлы для дисков выглядят похоже. Обычно имя начинается на sd, затем идёт ещё одна буква: a,b,c,d и далее, в зависимости от порядка подключения диска к системе. Дальше следует цифра номера раздела на флешке, обычно это 1, потому что на флешке, как правило, содержится только один раздел. Например /dev/sdb1 или /dev/sdc1.
Шаг 1. Определить имя флешки
Самый простой способ определить имя флешки в системе — это использовать утилиту fdisk, но такой вариант подойдет, только если вы знаете размер или метку флешки. Просто выполните команду:
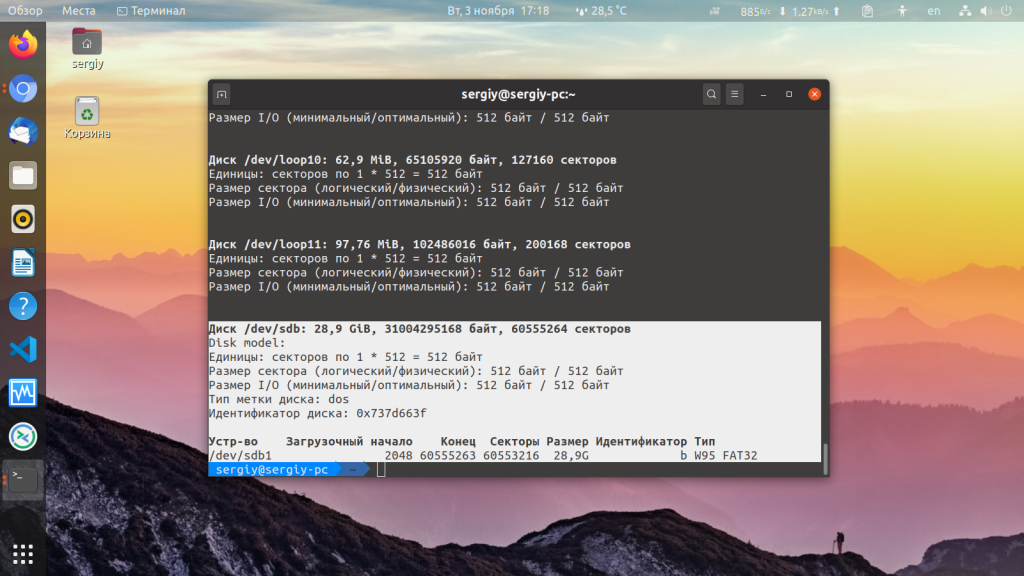
Она выведет в терминал все подключённые устройства, в том числе и вашу флешку. Вам останется только найти её по размеру, который написан в колонке Размер или Size. В нашем примере флешка представлена файлом /dev/sdb1.
Также вы можете узнать имя файла флешки с помощью утилиты df, только для этого она должна быть смонтирована в файловую систему. Обычно графические окружения автоматически монтируют флешку при подключении, так что это не будет проблемой. Чтобы посмотреть, какие устройства подключены к каким папкам, выполните:
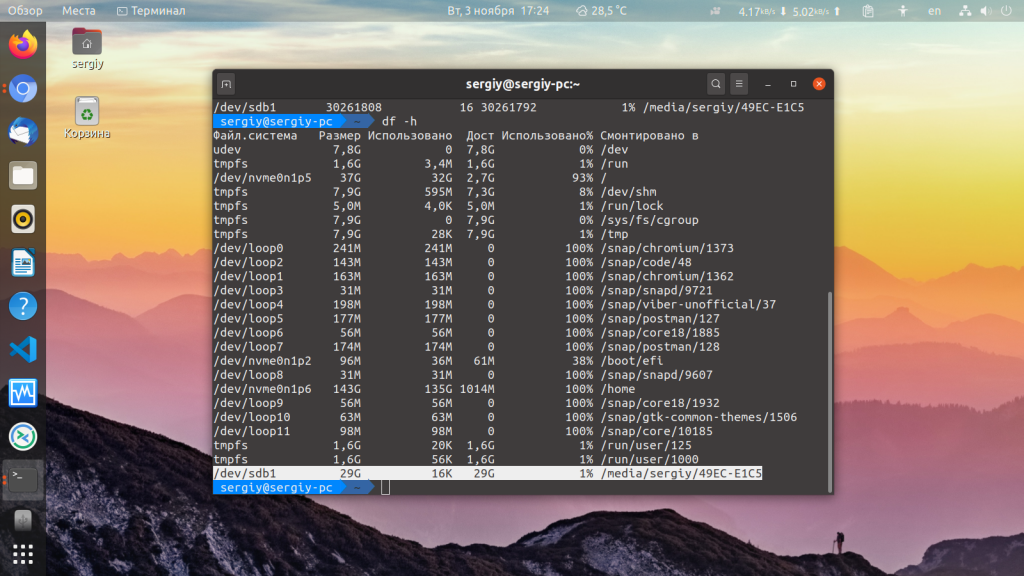
Теперь вы можете понять, что к папкам /mnt, /media, /run/media смонтирована именно флешка, также здесь указан размер в колонке доступно. Обычно этого вполне достаточно.
Шаг 2. Размонтирование флешки
Если флешка смонтирована в файловую систему, то форматировать её у вас не получится. Поэтому сначала нужно её размонтировать, для этого выполните:
sudo umount /dev/sdb1
Здесь /dev/sdb1 — имя флешки в файловой системе, которое мы узнали в предыдущем шаге.
Шаг 3. Форматирование
Дальше отформатировать флешку очень просто. Для этого используется утилита mkfs. Синтаксис команды очень прост:
$ sudo mkfs -t файловая_система устройство
В качестве файловой системы может использоваться любая поддерживаемая системой, например, ext4, ntfs, xfs, btrfs, vfat. Но для нормальной работы флешки в Windows рекомендуется использовать файловую систему vfat. С помощью опции -L можно задать метку раздела. Тогда команда будет выглядеть вот так:
sudo mkfs -t ext4 -L FLASH /dev/sdb1
Для файловой системы vfat опция -L не поддерживается, вместо неё нужно использовать -n:
sudo mkfs -t vfat -n FLASH /dev/sdb1

После того, как форматирование флешки в Linux завершится, флешка будет готова к использованию.
Форматирование флешки в Gparted
Ещё одним универсальным методом форматировать флешку в Linux является использование утилиты для управления дисками Gparted.
Шаг 1. Установка Gparted
Обычно она уже установлена в системе, если же нет, вы можете установить эту прорамму из официальных репозиториев. Для этого наберите в Ubuntu:
sudo apt install gparted
А в Red Hat и основанных на нём дистрибутивах:
sudo yum install gparted
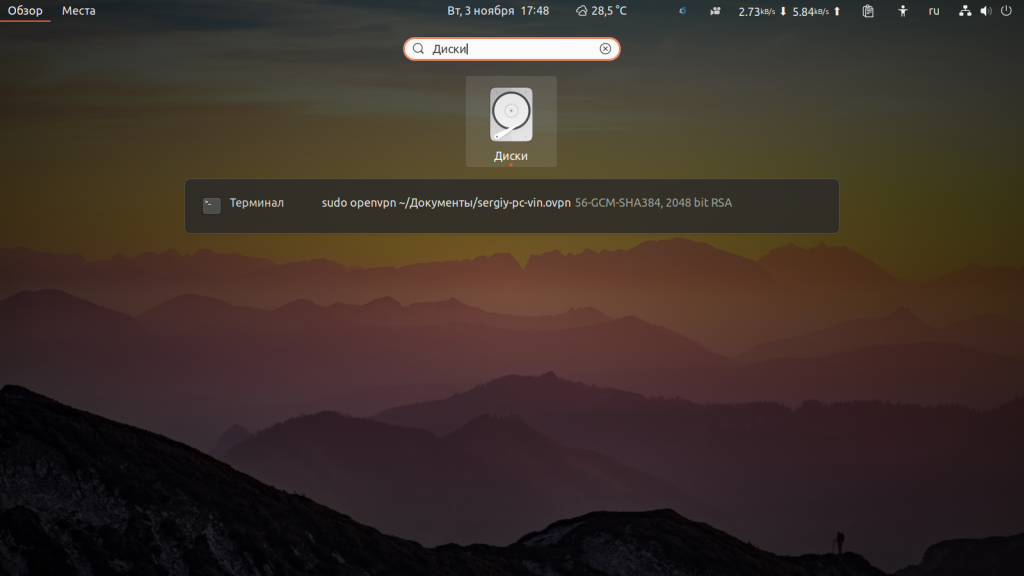
Дальше вы можете вызвать программу из главного меню системы или c помощью команды:
Шаг 2. Поиск флешки
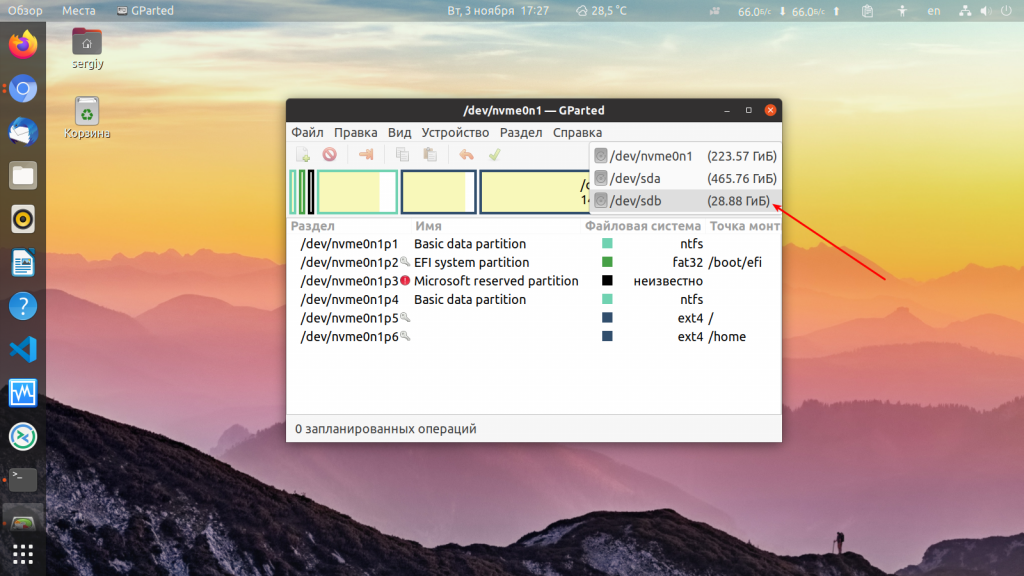
Найти флешку в этой программе у вас не составит труда. Переключаться между устройствами можно в верхнем правом углу. Свою флешку вы можете найти по метке, размеру, файловой системе — тут отображается вся информация, поэтому с поиском у вас не должно возникнуть проблем.
Шаг 3. Размонтирование флешки
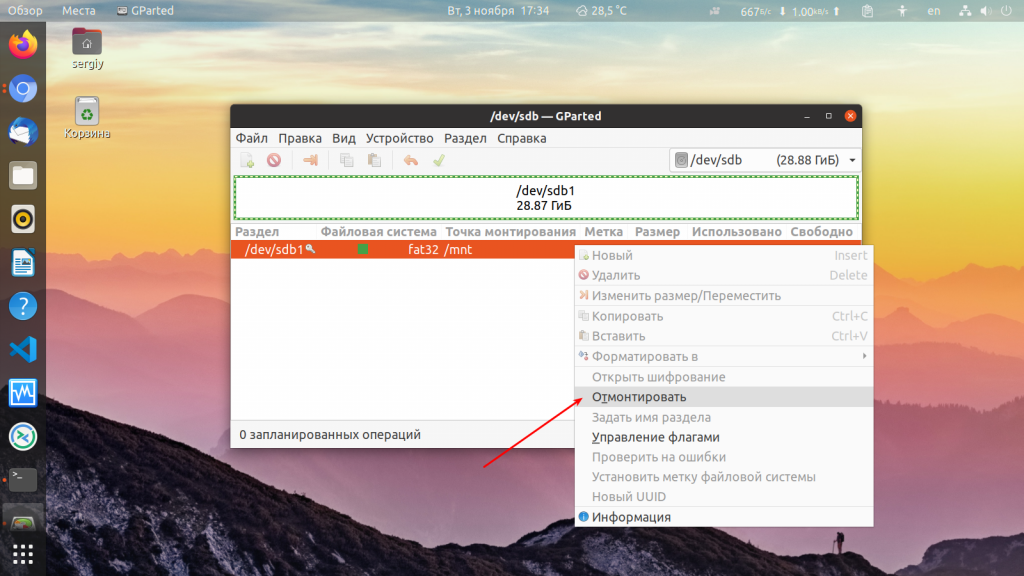
Также, как и в предыдущем случае, вам нужно размонтировать флешку, чтобы её отформатировать. Для этого щёлкните правой кнопкой по разделу флешки и выберите Размонтировать или Umount:
Я предполагаю, что на флешке только один раздел. Поэтому выполнять все действия нужно будет только для него. Если разделов несколько, размонтируйте их все.
Шаг 4. Полная очистка флешки
Если раньше на флешке был установлен Linux или другая операционная система, её нужно полностью очистить, включая таблицу разделов. Только так вы можете выполнить низкоуровневое форматирование флешки Linux. Если же нет, ничего подобного делать не нужно, переходите к следующему шагу. Откройте пункт меню Правка/Edit и нажмите Новая таблица разделов / New Partition Table:

Выберите тип таблицы MBR и подтвердите, что согласны с тем, что все данные на флешке будут утеряны. Затем с помощью кнопки со знаком «+» создайте новый раздел на все свободное место. Также здесь нужно выбрать файловую систему.
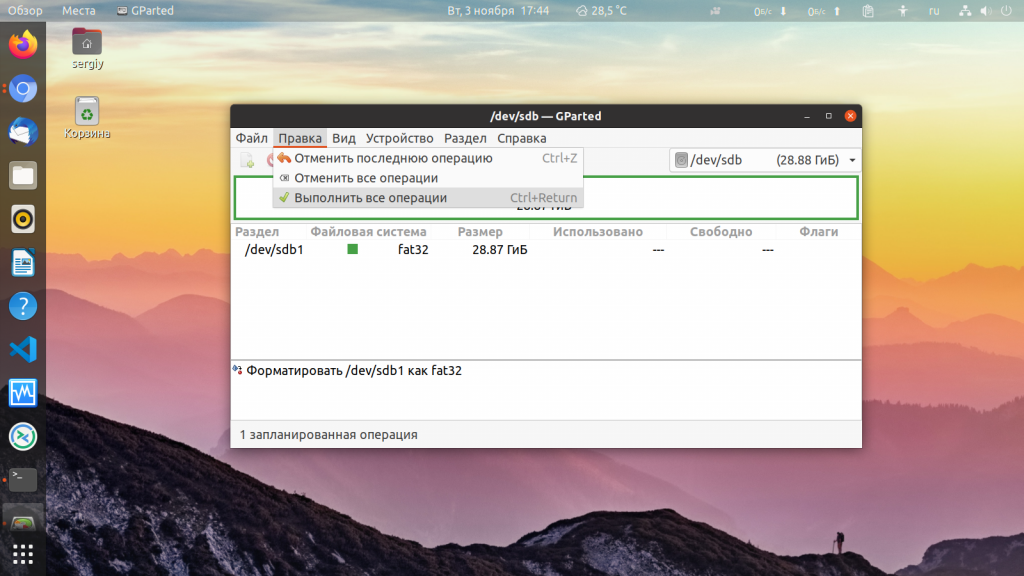
Затем опять откройте пункт Правка / Edit и нажмите Выполнить все операции / Apply, чтобы применить изменения. Готово, ваша флешка отформатирована, пятый шаг можете пропустить.
Шаг 5. Форматирование флешки
Если вы воспользовались предыдущим способом, то уже ничего делать не нужно. Флешка готова к использованию. Если же нет, вам будет достаточно только отформатировать один раздел. Для этого кликните по этому разделу и выберите Отформатировать в / Format to в контекстном меню:

Затем выберите файловую систему, опять же, чтобы флешка работала в Windows, нужно использовать Fat32.
Дальше вам останется только открыть меню Правка / Edit и нажать Выполнить все операции / Apply или зелёную галочку,чтобы применить изменения.
Вот и всё, теперь флешка готова к использованию, и вы можете её подключать к системе и записывать туда файлы. Но рассмотрим ещё один способ, который подходит только для Gnome.
Как форматировать флешку с помощью Disks
Программа Диски — это стандартная утилита управления дисками в дистрибутивах Linux, использующих окружение рабочего стола Gnome.
Шаг 1. Запуск Disk Utility
Вы можете запустить программу из главного меню Dash, просто набрав в поиске Disk, обычно утилита поставляется вместе с системой по умолчанию:
Шаг 2. Поиск флешки
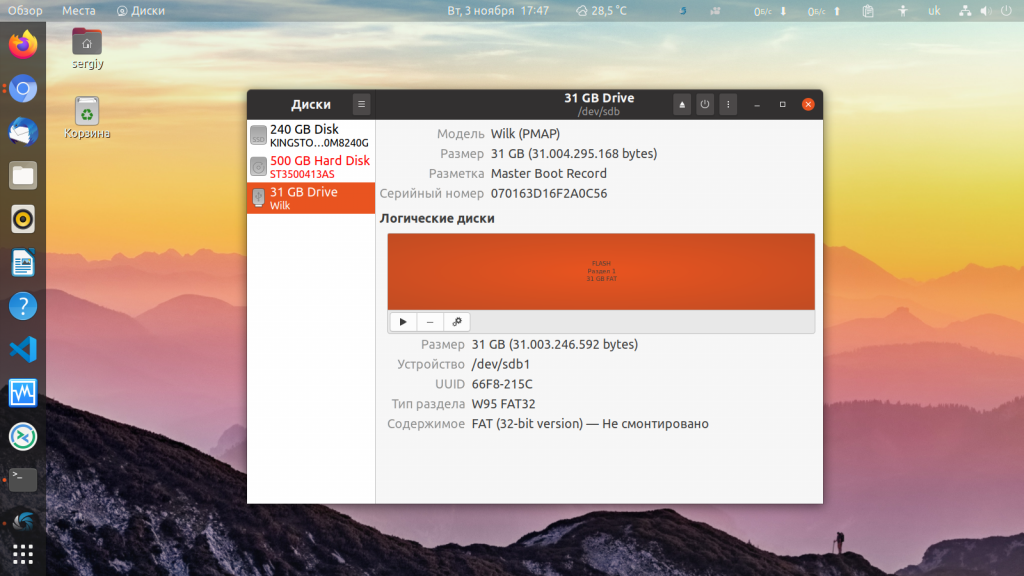
Вы очень просто найдете флешку в главном окне программы: во-первых, она на последнем месте, во-вторых, здесь отображается метка диска, размер и другие параметры:
Шаг 3. Форматирование
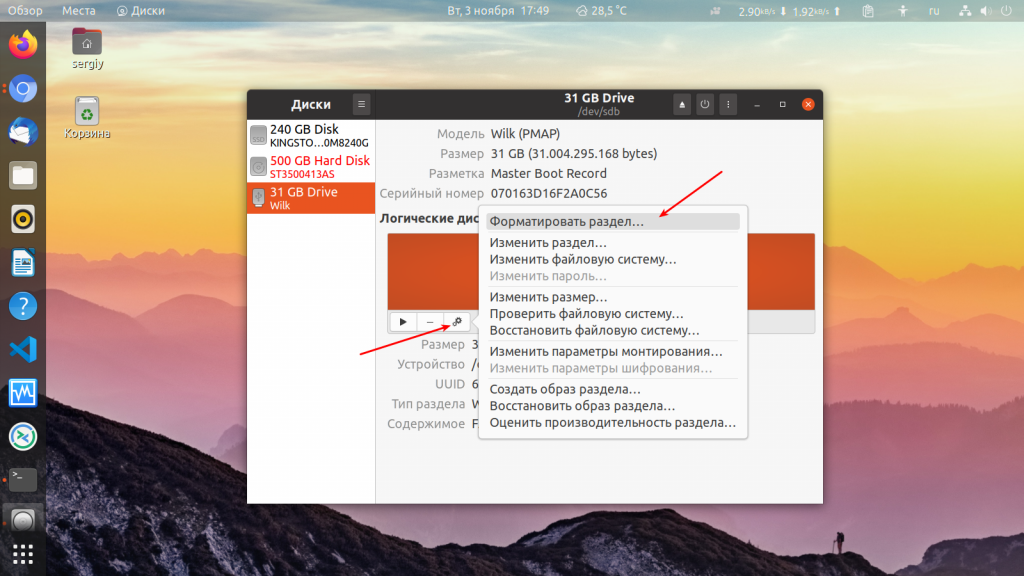
Форматирование здесь выполняется очень легко, для этого просто нажмите кликните по значку с рисунком шестерёнки и выберите Форматировать раздел:
Затем выберите введите метку для флешки, а также выберите файловую систему. По умолчанию утилита предлагает Ntfs чтобы с флешкой можно было работать в Windows:
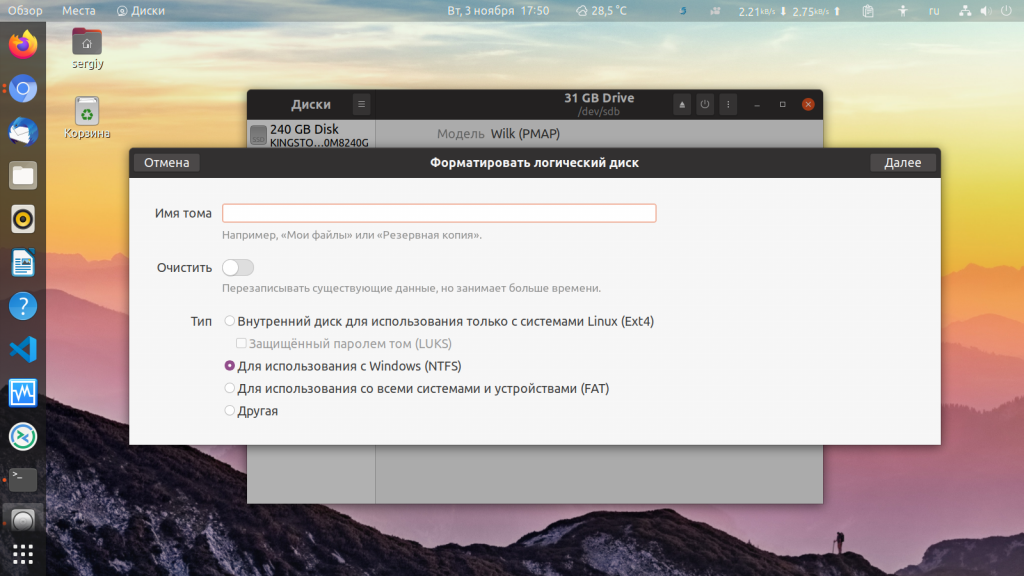
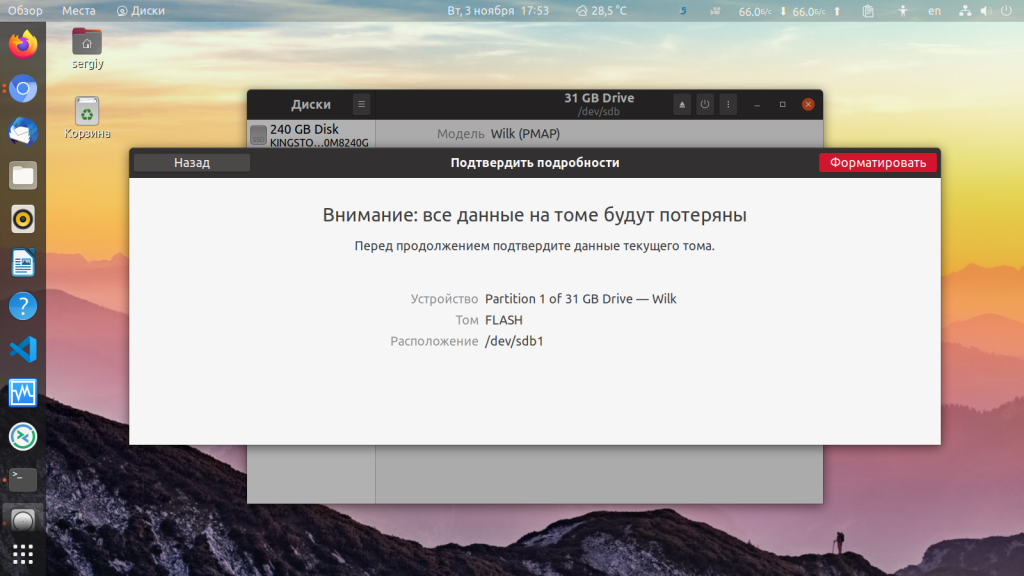
Останется только подтвердить действие, чтобы форматировать флешку Linux:
Форматирование флешки в Nautilus
Ещё один способ именно для этой операционной системы. Здесь вообще форматирование флешки Linux выполняется очень просто. Найдите ваше устройство в менеджере файлов Nautilus, кликните по нему правой кнопкой и выберите Форматировать. :
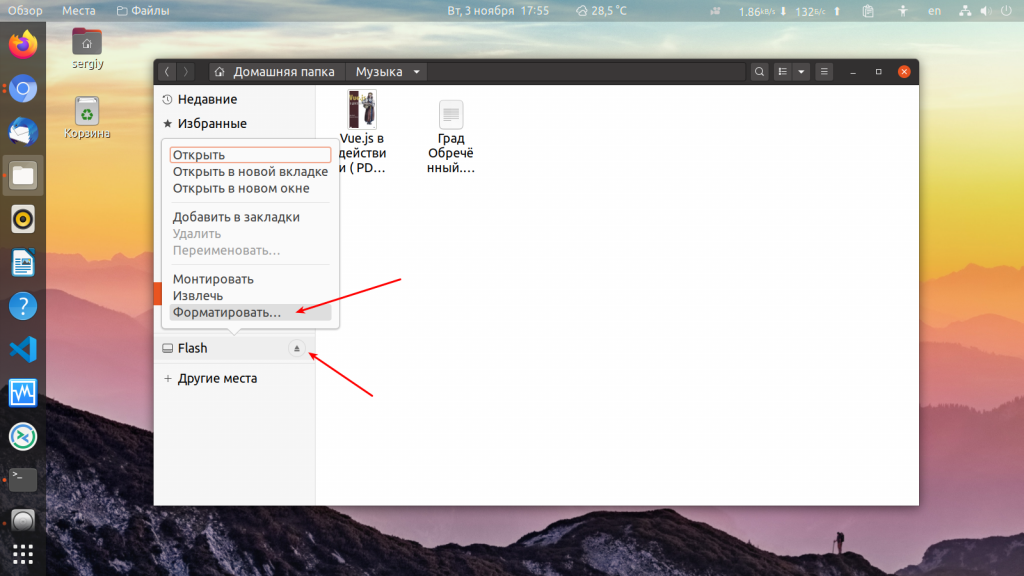
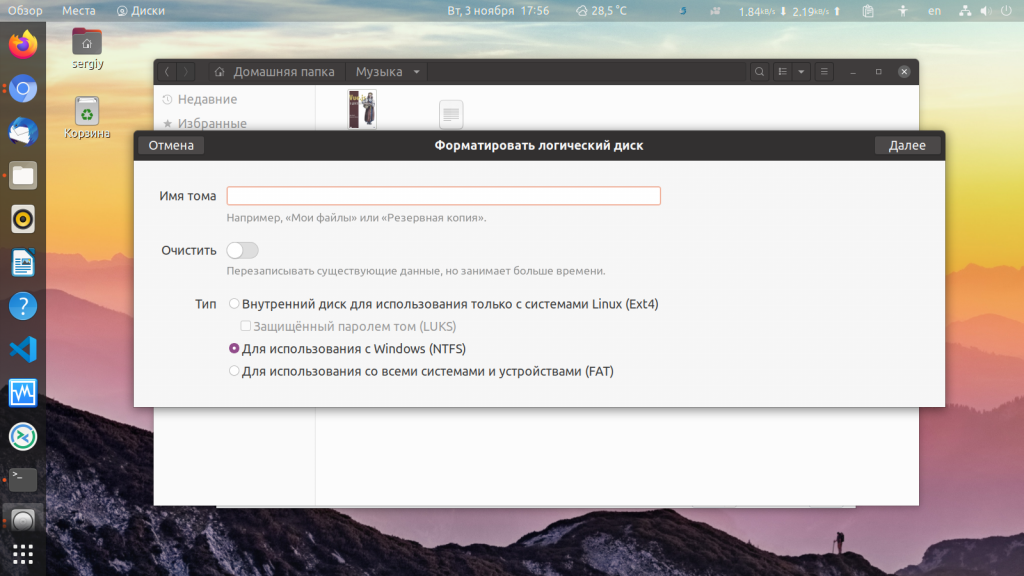
Возникнет такое же окно, как и в утилите Диски. Выберите файловую систему, метку флешки и нажмите Далее, а затем Форматировать:
Готово. Когда процесс завершится, ваша флешка будет полностью чиста и готова к использованию.
Выводы
Вот и всё. Теперь вы знаете, что форматирование флешки в Linux это не такая сложная задача. Достаточно выполнить несколько команд или пару кликов мышью. А в Ubuntu вообще всё делается элементарно. Если у вас остались вопросы, спрашивайте в комментариях!
На завершение видео о том, как делают флешки и микросхемы памяти:
Источник


