- How To Format USB Drive in Linux Command Line
- Step 1 – Attach USB to System
- Step 2 – Format USB Drive in Linux
- Conclusion
- How to Format USB Drive on Linux
- Method 2: Format USB Drive Through The Disks Utility
- About the author
- Zeeman Memon
- How to Format USB Drives in Linux
- Which File System to Use for USB Formatting?
- Method 1: Format USB Using the Terminal
- Step 1: Locate USB Drive
- Step 2: Unmount and Format USB Drive
- Step 3: Verify USB Drive Formatting
- Method 2: Format USB Using Disk Utility
- Step 1: Open Disk Utility
- Step 2: Identify the USB Drive
- Step 3: Format the USB Drive
- Method 3: Format USB Using GParted Tool
- Step 1: Install GParted Tool
- Step 2: Start the Formatting Process
- Step 3: Start the Process
How To Format USB Drive in Linux Command Line
USB formatting is the process of erasing all data from the disk and prepare it for use. Sometimes we are required to change the filesystem on our USB drive, In that case, we have to format the USB drive with the new filesystem type. Formatting a USB drive in Ubuntu using Terminal commands is much easier than formatting it in Windows systems.
This tutorial will help Ubuntu (Linux) users with the simple steps for format a USB flash drive using the command line.
Step 1 – Attach USB to System
Insert a USB drive into your system and identify your USB drive correctly. This is the step you need to take care, because you may format the wrong disk if not correctly identify your disk.
Now, You can see that the USD drive is attached as /dev/sdc1 device. Which is mounted on /media/tecadmin.
Step 2 – Format USB Drive in Linux
Whenever we attach a USB drive in Ubuntu, it is automatically mounted to the system. We can not format any disk on Linux systems that are already mounted. So first un-mount /dev/sdc1 USB drive on your system.
Now, Use one of the following commands as per the file system you want. To format a USB drive, most of the users prefer VFAT and NTFS file systems because they can be easily used on the Windows operating system.
- Format with vFat File System
- Format with NTFS File System
- Format with EXT4 File System
Similarly, you can format a USB Flash drive with any required file system.
Conclusion
In this tutorial, you have learned to format a USB drive on a Linux system via the command-line interface.
Источник
How to Format USB Drive on Linux
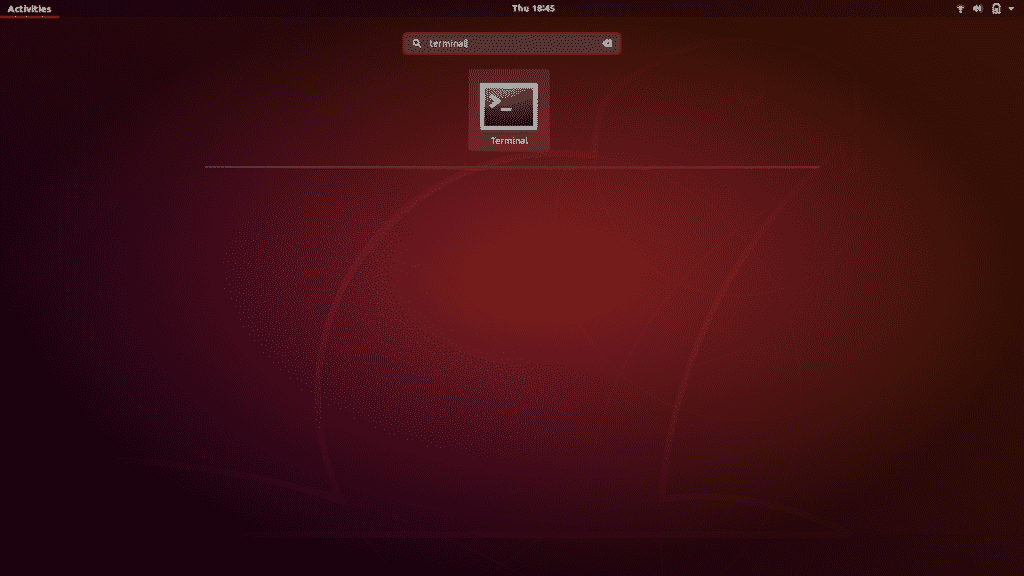
To access the terminal, you must first open the Ubuntu Dash. This is where all Ubuntu software is accessible from. Once inside the Dash (located on the bottom left corner of the screen in the form of a “Show Applications” icon, ), type “terminal” in the search bar and click on the application of the Terminal that appears.
Use the keyboard shortcut which is Ctrl+Alt+T. If you are not familiar with keyboard shortcuts, they are the shortest way of performing an operation. Simply hold these three keys together and the Terminal application will open.
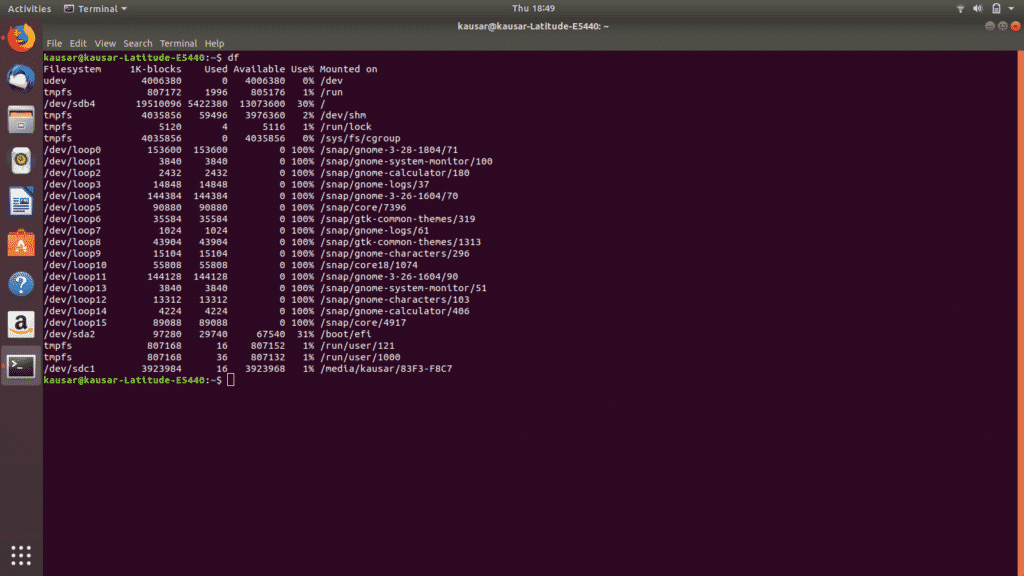
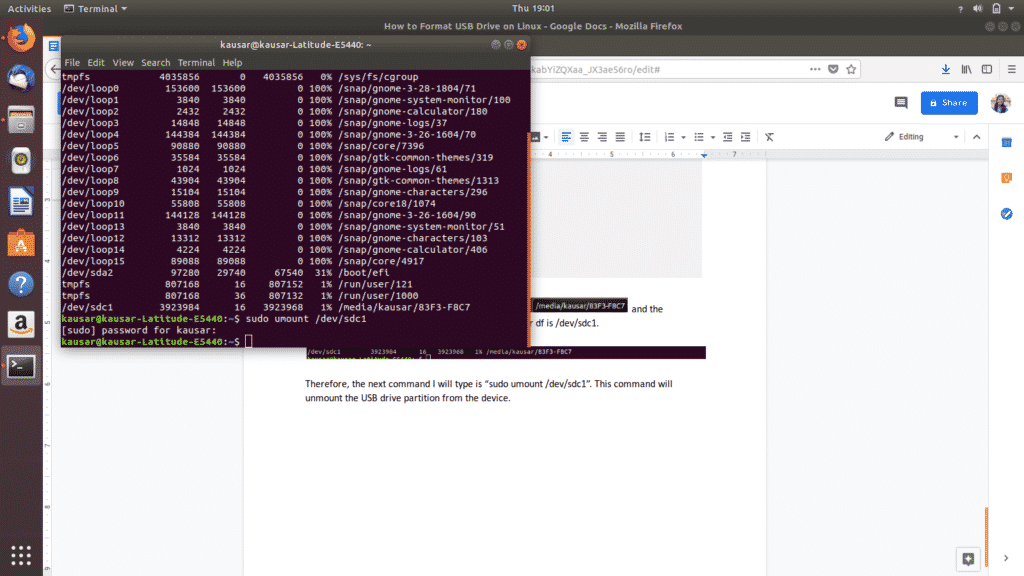
A new terminal window will open. Type the command “ df ” and press enter.
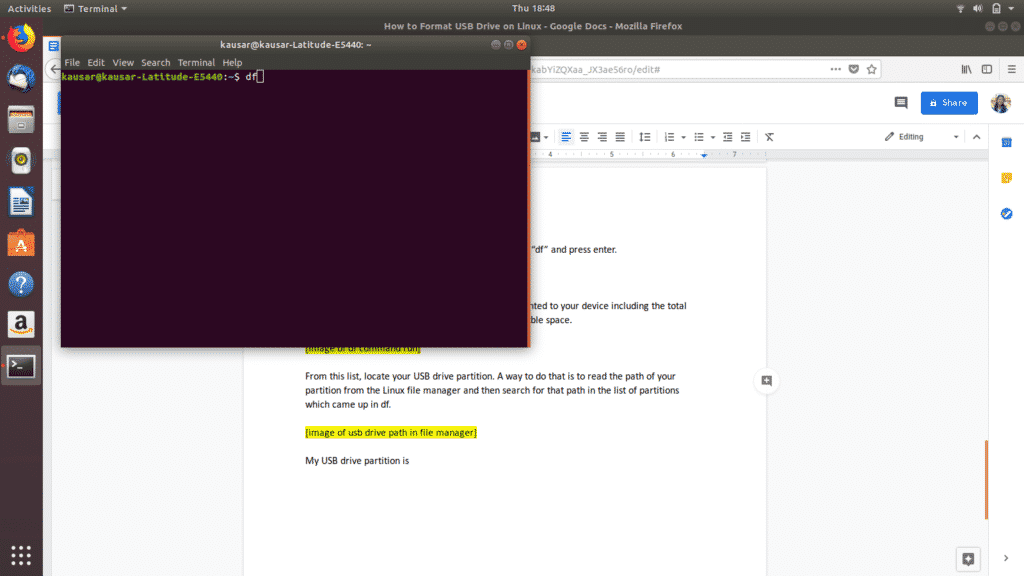
df returns a list of the details of all the partitions mounted to your device including the total space in each partition, the used space, and the available space.

From this list, locate your USB drive partition. A way to do that is to read the path of your partition from the Linux file manager and then search for that path in the list of partitions which came up in df.
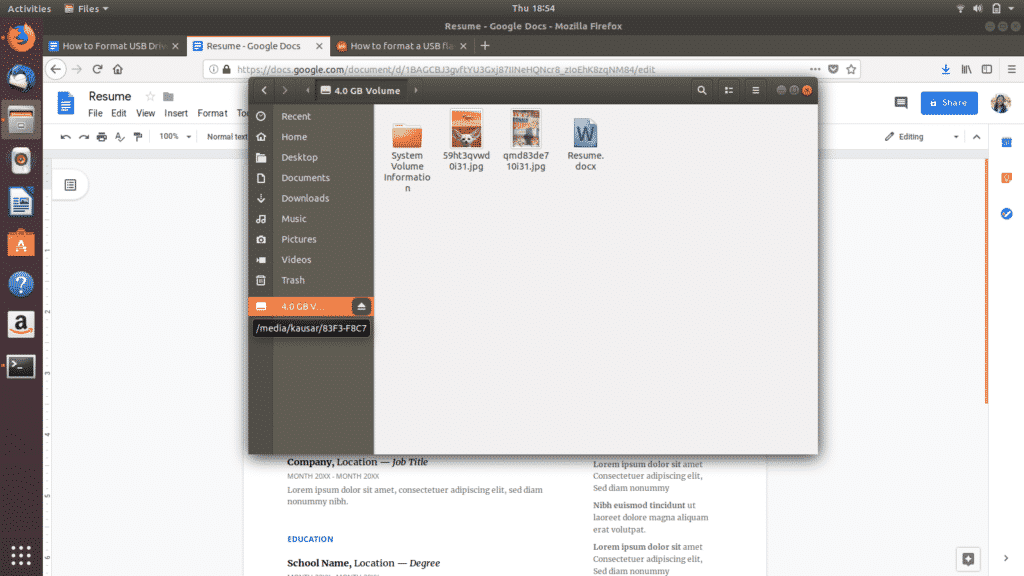
As you can see, my USB drive partition is mounted on media/kausar/83F3-F8C7 and the corresponding Filesystem name which comes up under df is / dev / sdc1.
Therefore, the next command I will type is “ sudo umount / dev / sdc1” . This command will unmount the USB drive partition from the device. Enter your Linux password and press enter.
The next and final (phew!) step is to format the USB drive. This is done with the command “ sudo mkfs.vfat / dev / sdc1”. Note: This command formats the drive with the FAT32 format file system.

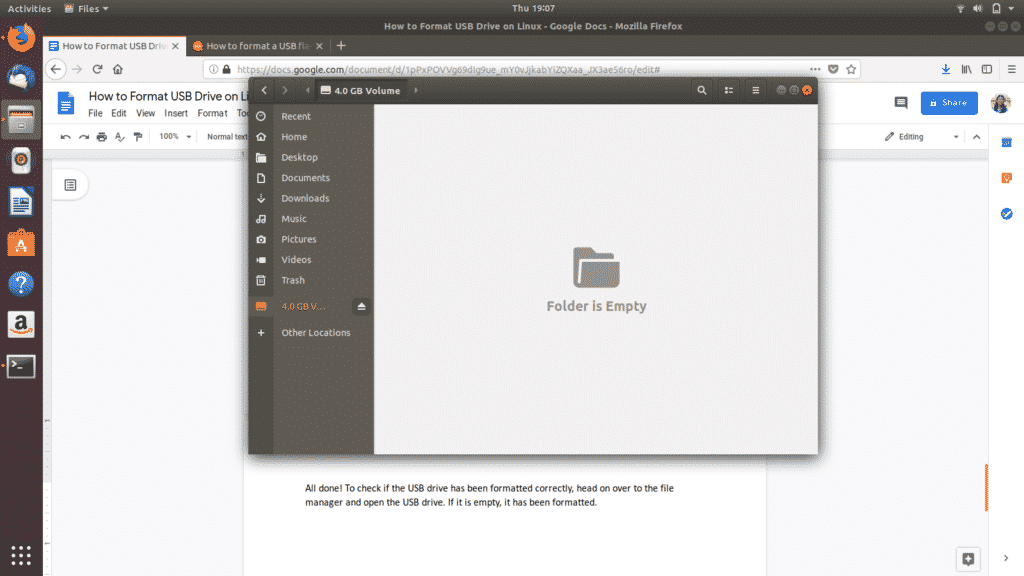
All done! To check if the USB drive has been formatted correctly, head on over to the file manager and open the USB drive. If it is empty, it has been formatted.
Method 2: Format USB Drive Through The Disks Utility
To access the Disks utility, navigate to the Dash icon (most probably located on the bottom left corner of the screen in the form of a “Show Applications” icon, , or as a Ubuntu icon). The Ubuntu Dash holds all the Ubuntu software available and installed on your device.
Type “Disks” in the resulting search bar and click on the Disks application that comes up.

It will open up in a new window. Locate your USB drive in the list of which appear in the left panel and click on it.
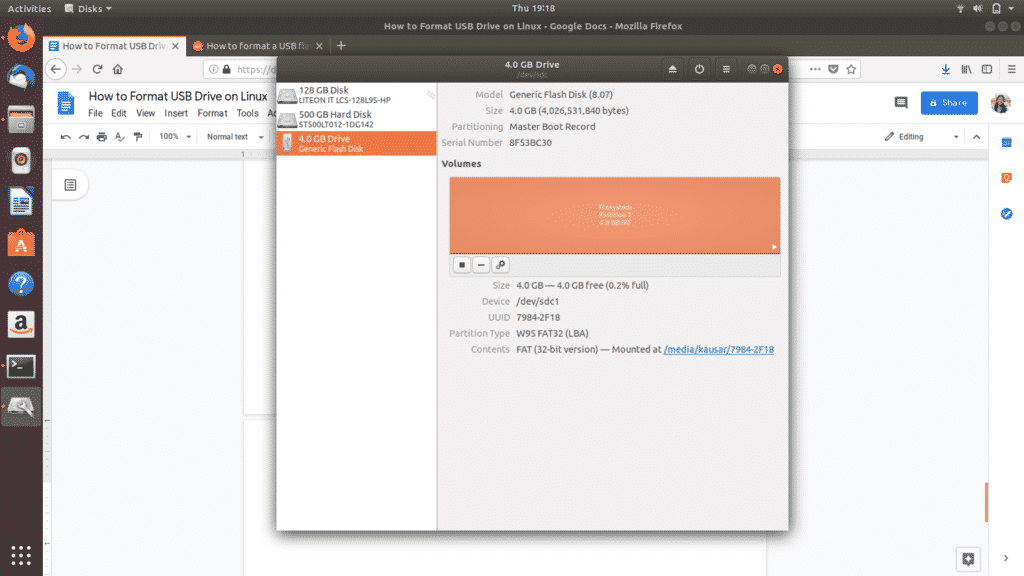
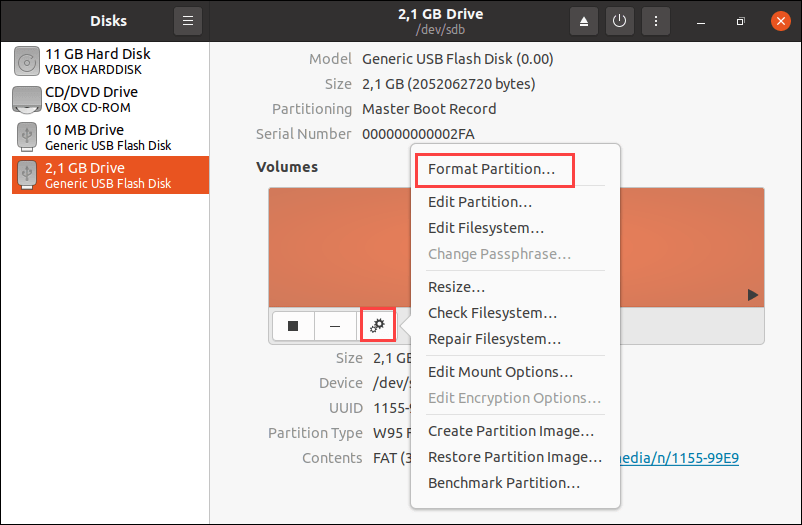
Next, under “Volumes”, of the three icons you see, click on the third gear icon, . A dropdown menu will appear. From the options displayed, click on “Format Partition”.
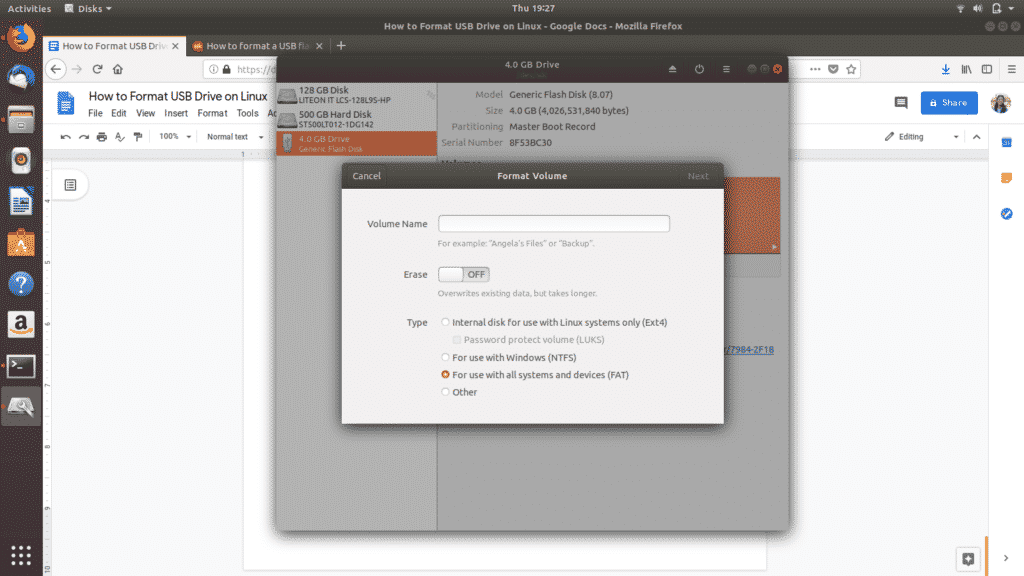
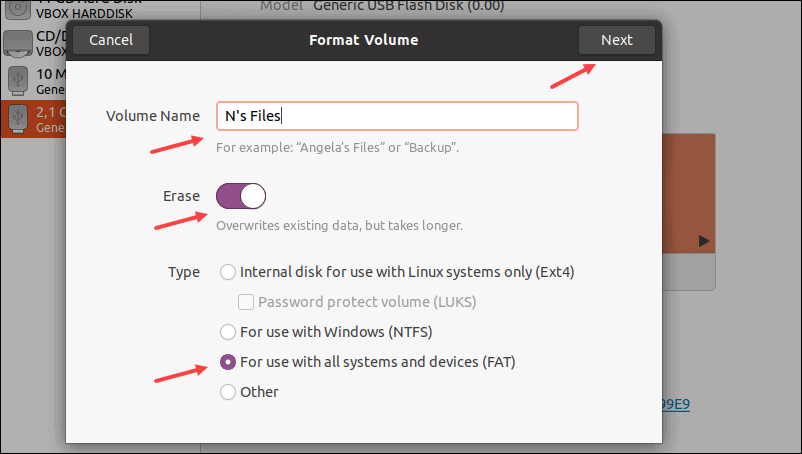
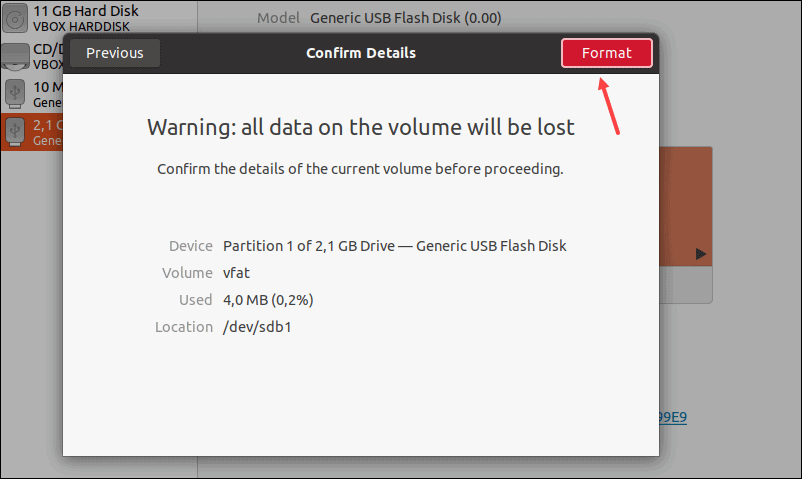
Set the name of your USB drive and select which type of file system format to format your USB to. Then select “Next”. A warning will pop up asking you to confirm the deletion of all your data in the USB drive. Select “Format” displayed in red on the top right corner to proceed with the formatting.
And that’s it. You’re done. These are the two easiest ways to format your USB drive and make it 100% available in space.
There are other methods of formatting a USB drive on Linux as well. For example, you can download a software called “GParted” from Ubuntu Software or the CLI. In case you experience trouble using the two methods described above, GParted offers a simple GUI to format USB drives and is an overall useful tool to have.
About the author
![]()
Zeeman Memon
Hi there! I’m a Software Engineer by degree, Blogger by skills who loves to write about tech, develop websites & do SEO. You can reach out to me on LinkedIn.
Источник
How to Format USB Drives in Linux
Home » Bare Metal Servers » How to Format USB Drives in Linux
Occasionally, it is necessary to format the USB drive (for example, when changing the file system or deleting data). However, many Linux users are afraid to start the formatting process, thinking it is either a very complicated or time-consuming task.
In this tutorial, you will learn how to format the USB drive in Linux using three quick and simple methods:
- Terminal
- Disk Utility
- GParted tool
- A system running Linux
- A USB drive
- Access to the terminal/command line
- A user account with sudo/root privileges
Which File System to Use for USB Formatting?
There are many file systems in use, differing by maximum file size and operating system compatibility. The most commonly used file systems when formatting a USB drive are:
Their main features and differences are:
| File System | Supported File Size | Compatibility | Ideal Usage |
| FAT32 | up to 4 GB | Windows, Mac, Linux | For maximum compatibility |
| NTFS | 16 EiB – 1 KB | Windows, Mac (read-only), most Linux distributions | For internal drives and Windows system files |
| exFAT | 16 EiB – 1 KB | Windows, Mac, Linux (requires extra drivers to access) | For files larger than 4 GB |
Method 1: Format USB Using the Terminal
The easiest and fastest way to format a USB drive in Linux is through the terminal. The procedure consists of three steps:
- Locating the USB drive.
- Unmounting and formatting the USB drive.
- Verifying the process was successful.
Follow the instructions below to format a USB drive using the terminal.
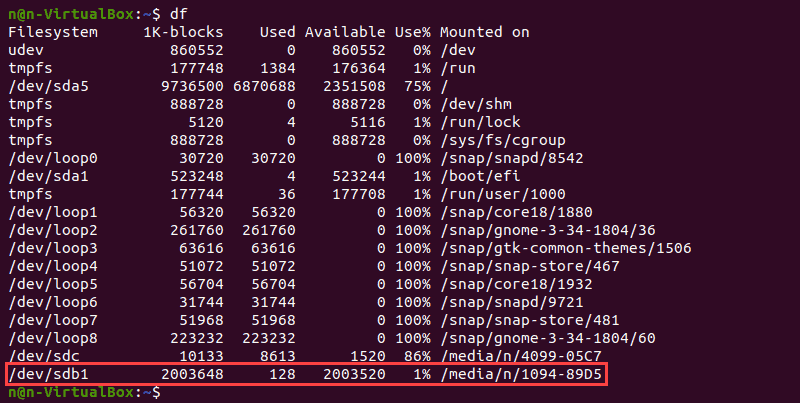
Step 1: Locate USB Drive
Open the terminal and run the following command:
The terminal prints out a list of all mounted partitions and relevant information: used space, available space, used space percentage, and the path.
Locate the USB in the list and find the corresponding device. In this example, the USB drive is /dev/sdb1 .
Note: If you are unsure of the drive designation, unplug the USB drive temporarily before running the df command again. The device that is now gone from the list is your USB device.
Step 2: Unmount and Format USB Drive
Unmount the USB drives before formatting. To do so, run this command:

After unmounting, format the USB drive using the preferred file system (replace sdb1 with the name of your device):
- To format a USB drive with FAT32 file system, use:
- To format a USB drive using the NTFS file system run:
- To format a USB drive in accordance with the exFAT file system use:
Step 3: Verify USB Drive Formatting
Confirm the formatting process has completed successfully:
A USB drive with no files indicates successful formatting.

Method 2: Format USB Using Disk Utility
The GNOME Disk Utility is a graphical tool for partitioning and formatting storage drives in Linux.
Follow the outlined steps to format a USB drive using the Disk Utility tool.
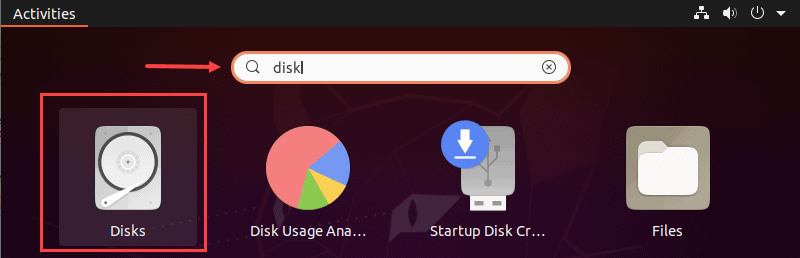
Step 1: Open Disk Utility
To open the Disk Utility:
- Launch the Application menu.
- Type “disk” in the search bar.
- Click the Disks icon.
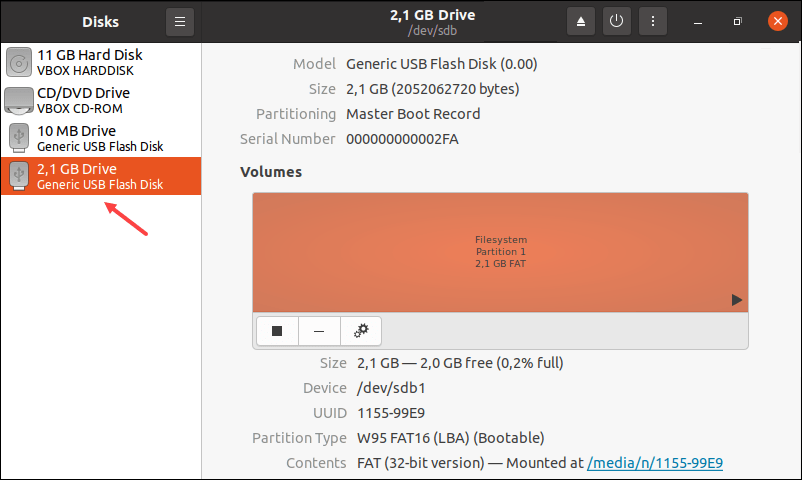
Step 2: Identify the USB Drive
Locate the USB drive from the left pane and select it. The right pane contains details about the drive, such as model name, size, serial number, and contents.
Step 3: Format the USB Drive
1. Click the gear icon and select the Format Partition option from the drop-down menu.
2. Type the preferred name for the USB drive.
Optionally, enable the Erase option to overwrite the existing data from the USB drive. Choose the file system format and click on the Next button.
3. A pop-up appears with a warning message about data deletion and formatting details. Start the formatting process by clicking the Format button.
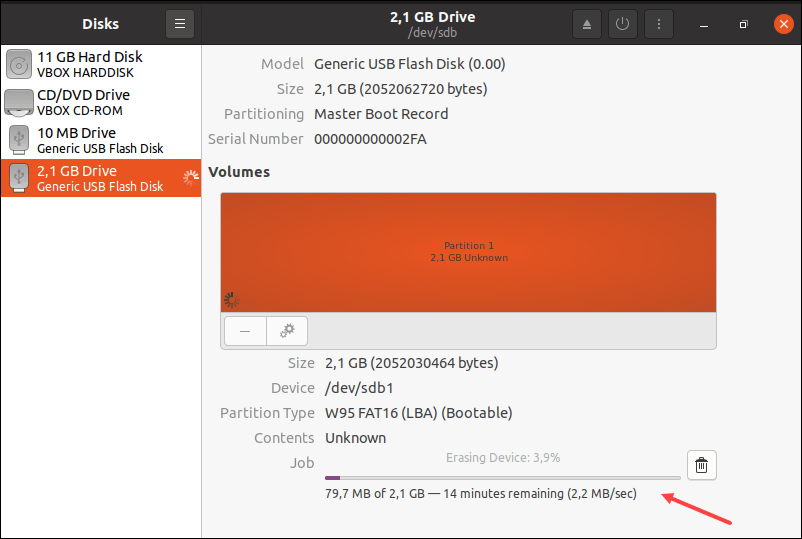
4. The progress line displays the remaining time until the formatting process completes. Close the Disk Utility when the job completes.
Method 3: Format USB Using GParted Tool
Formatting via GParted takes the most time as it involves an additional step – installing the tool. However, it is a handy tool that you can use even after you have finished formatting the USB drive.
Follow the steps below to format a USB drive using the GParted tool.
Step 1: Install GParted Tool
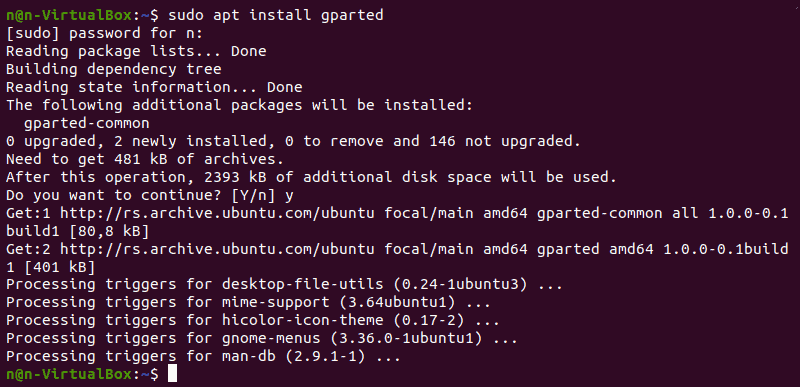
1. Open the terminal and install the GParted tool using this command:
Confirm the installation by pressing y and then hit Enter. Wait until the process completes.
2. Run the GParted tool with:
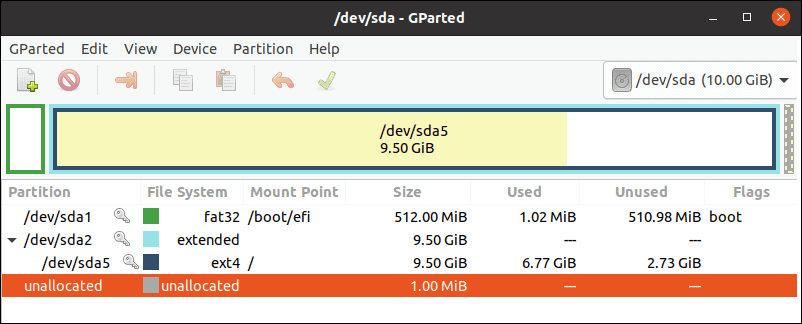
The terminal loads the GParted home screen.
Step 2: Start the Formatting Process
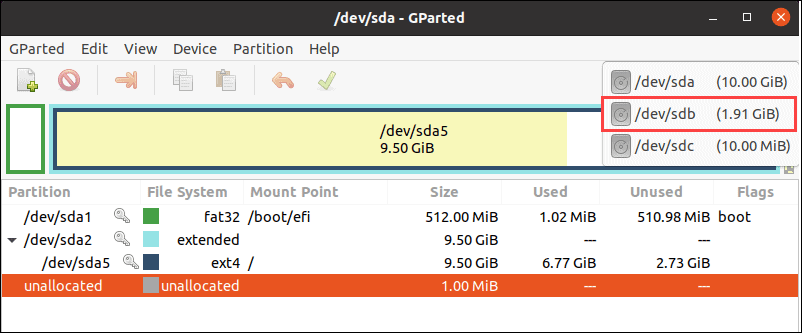
1. Select the /dev/sdb option from the drop-down menu at the top of the GParted home screen.
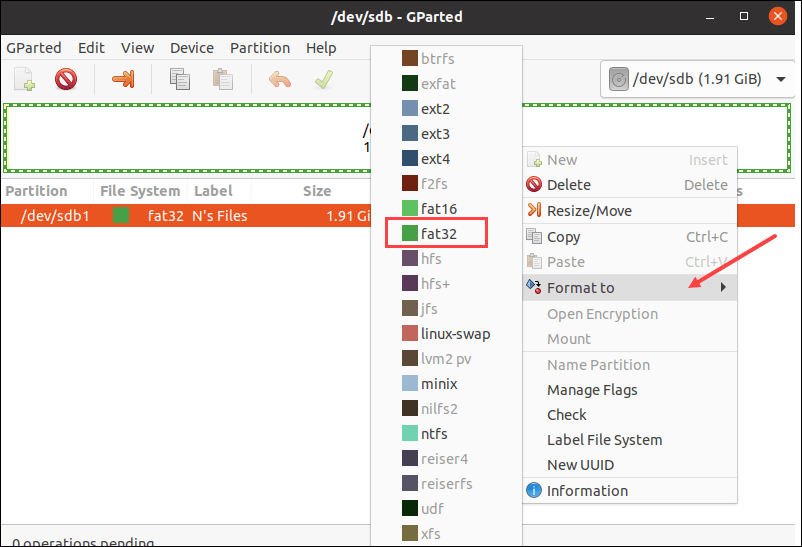
2. Right-click the /dev/sdb1 partition and select Format to. Choose the preferred file system from the list to continue.
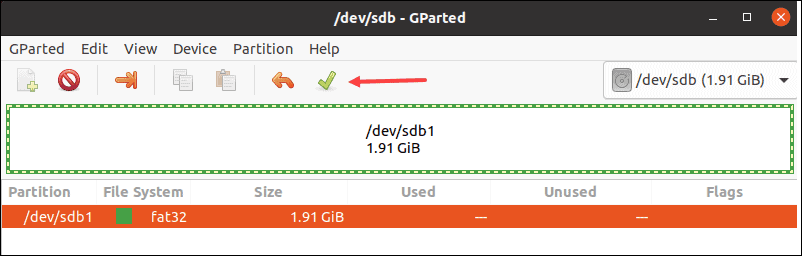
Step 3: Start the Process
1. Click the green checkmark button to apply all operations.
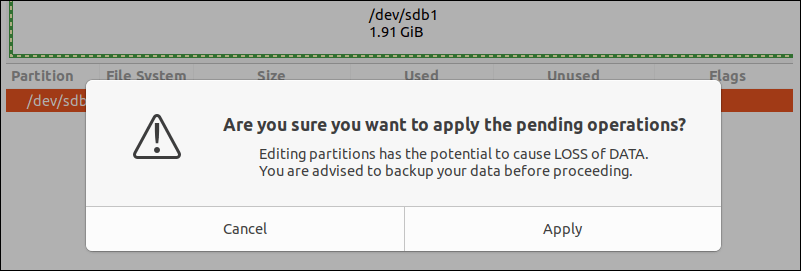
2. A pop-up appears with a warning message about data deletion. Click Apply to continue.
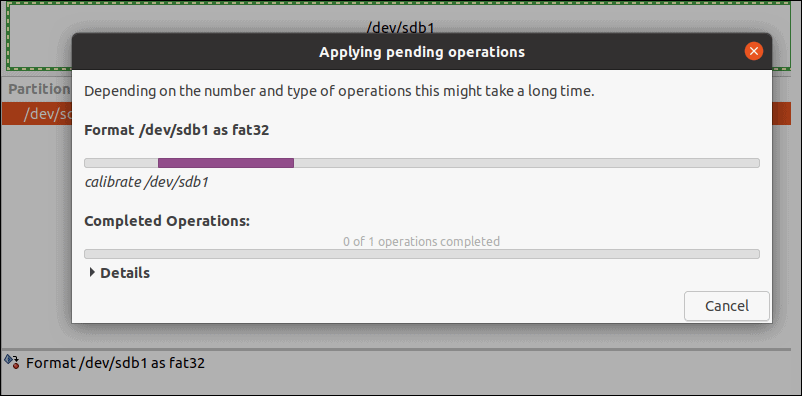
The GParted formats the drive. The time required for the formatting process varies depending on the size and type of the USB drive.
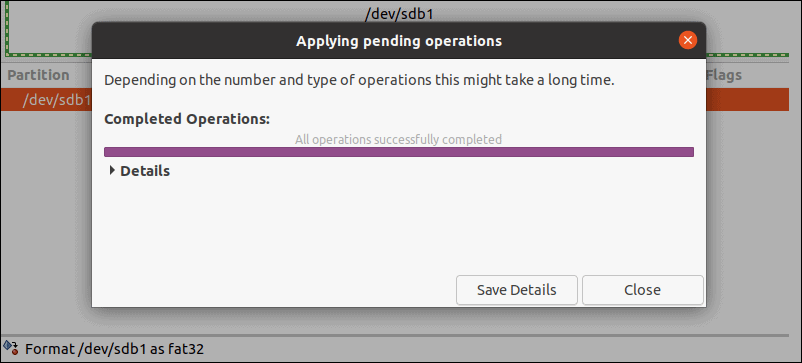
3. Click the Close button to exit the menu when the operation completes.
In this article, you learned how to format a USB drive in Linux using several methods. Additionally, we went through the main features and differences between the three most commonly used file systems.
Источник


