- How to Format USB Drive on Mac
- Choosing File Format System in Mac
- 1. FAT32
- 2. ExFAT
- 3. NTFS
- 4. OS X Extended
- Formatting Disk in Mac OS X
- 1. Using Disk Utility
- 2. Using Terminal
- Formatting Issue
- Reading and Writing to Windows NTFS Formatted Disk
- The Recommended Scenario
- How to Format USB Flash Drive to FAT32 on Mac without Data Loss
- How to Format a USB Flash Drive with Mac to FAT32
- Method 1. Format FAT32 on Mac [Disk Utility]
- To format the USB drive to FAT32, follow the next steps:
- Method 2. Format FAT32 on Mac [Terminal Command Line]
- To format FAT32 on Mac with Terminal, follow the next steps:
- Bonus Tip: How to Recover Data from Formatted USB
How to Format USB Drive on Mac
The battle for system domination has been going on for centuries, such as solar vs. lunar calendar system, metric vs. imperial, AC vs. DC, VHS vs. Betamax, and countless others. The technology world is full of these battles, so much that people don’t pay attention to them anymore and just use whatever system that they feel more comfortable with. One of these rivalries is the differences of file formatting types between different computer OSes.
Not many people are aware of these differences until they need to copy files into a storage formatted using the different file system. Due to the smaller worldwide user-based percentage, Mac OS X users are the ones who would likely stumble into these file format problems. If you are a Mac users, here are overviews of different file format systems, and how to choose which format to use for your USB drive to ensure compatibility with other operating systems.
Choosing File Format System in Mac
The mass adoption of USB drive makes it one of the most used storage media today. It’s a common thing to see people sharing and distributing files using USB drive. But that trend also makes file system compatibility problem more apparent. With several different formats available, which one should we choose? It will depend on your usage. Here are the overview of the commonly used file systems.
1. FAT32
This legacy file system is the next generation of FAT that comes a long way from the DOS era. Almost all USB flash drive comes pre-formatted with FAT 32 file system because it virtually works everywhere. The disadvantage of this system is that it doesn’t support files with size bigger than 4 GB and storage partition bigger than 2 TB. If you only deal with simple documents, small movie files, or other kinds of files below 4 GB, and your storage drive is 2 TB or smaller, you should be fine with this file system.
2. ExFAT
If you still need the universal support, but will exchange files bigger than 4 GB, you might want to use ExFAT file system. This format works on Windows, Linux (with FUSE), and Mac OS X. The system is commonly used for shared hard drive(s) that is plugged into computer most of the time. But it’s not as compatible as FAT32 as there are devices that don’t support it, such as Xbox 360 and PlayStation 3.
3. NTFS
This file system is perfect for those who only works among Windows computer. The format is the next generation of file format on Windows, supports big files, and can read and write faster than FAT32 – provided that other factors that influence speed are similar. The format has even less compatibility than ExFAT. Mac OS X and some Linux distributions can only read NTFS-formatted disk without the help of third-party software. NTFS is ideal for internal drives on Windows computers.
4. OS X Extended
At the opposite side of NTFS, is Mac OS X Extended file system (HFS Plus). If you only work within Mac OS X environment, then the HFS Plus is perfect for you. It supports volume size and file size up to 8EB (Exabytes) roughly equivalent to 8 Million Terabytes. Looking at the maximum commercial storage size available today, we are not going to reach that limit anytime soon.
Formatting Disk in Mac OS X
Even though external drives comes factory pre-formatted, there are occasions where you need to re-format the drive. For example, if you need to change the file format of the drive, create a bootable installer, or if one of your Windows-user neighbours ask your help to wipe clean his/her virus-infected USB flash drive (which happens more often than you think). There are several ways to format the USB (flash) drive in Mac OS X environment. Let’s discuss them in detail down below:-
1. Using Disk Utility
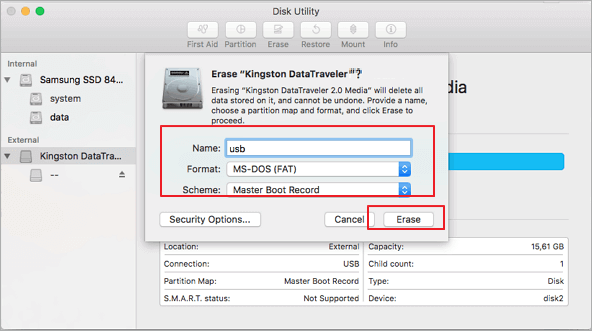
The easiest way to format a disk in Mac OS X is using Disk Utility. It’s Mac’s native disk maintenance tool. To format a USB flash drive, simply plug the drive into your Mac, and choose it from Disk Utility’s sidebar menu.

Then choose the Erase tab from the top bar. A pop-up menu will appear, and you can customize many options here.
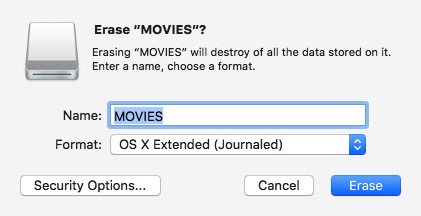
First is the type of file system that you want to use. Please refer to the previous section above to find the formatting type that fit your need.
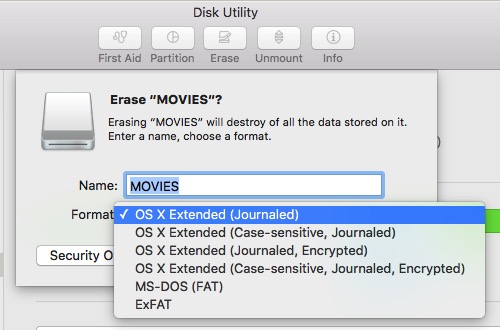
By default, Disk Utility chooses OS X Extended (Journaled). As mentioned above, this choice is perfect if you wanted to use the drive within Mac OS X environment.
The term “Case-sensitive” means that later on, the files on that drive will be case sensitive. For example, file “image.jpg” will be different from “Image.jpg”. While this option might work for some users, it’s not recommended for general users.
The term “Encrypted” means exactly that. That the data inside the drive will be secured by encryption. This option will help those who works with sensitive data.
You can also use FAT32 or ExFAT if you need to share your files with other operating systems. There’s no option to format your drive in NTFS as Mac OS X doesn’t support that format.
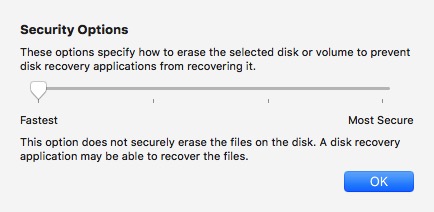
The last option is the Security. You can opt to prevent disk recovery applications from restoring your data from the disk by moving the security slider to Most Secure instead of Fastest.
Note: The more secure the erase mode that you choose, the longer the process will take.
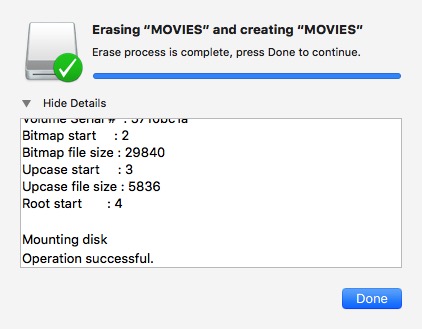
After you are done tinkering with the options, you can click the Erase button to start formatting your disk.
2. Using Terminal
For the geekier lot of you out there, there’s another way of formatting disk using command lines via the Terminal. Please be advised that erasing the disk using Terminal is dangerous. One typo and you could lose your data in an instant without warning. It’s not recommended for those who have never tinkered with command line before.
If you think you are up to the challenge and aware of the risk, open Terminal and write down (or copy and paste) this line of code to see the list of all connected disk on your computer:
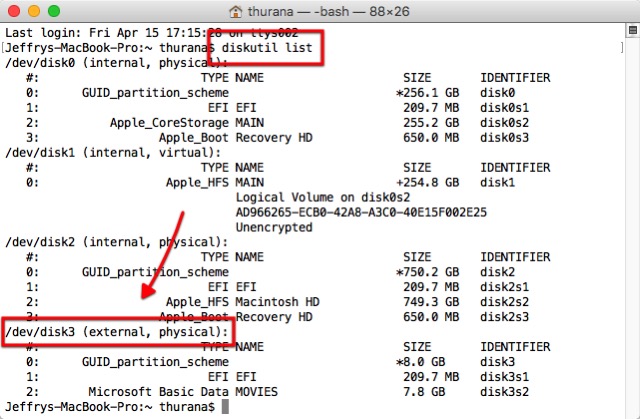
From the screenshot above, we can see that the external disk on my computer is identified as “disk3”. We need this identifier to choose the disk to erase.
To erase the disk, use this command line:
Where “
For example, if you want to format the disk in Journaled HFS Plus with Movie as the name, put JHFS+ in the
diskutil eraseDisk JHFS+ Movie /dev/disk3
Note: I use “disk3” in the example because my external drive is identified as “disk3”. You should use the identification that the Terminal gave you in the first step. Any data loss because of incorrect use of disk identification will be your responsibility. Consider yourself warned.

Formatting Issue
Due to the differences in handling file formatting system among different OSes, there might be some issues that arise. Some users reported that their USB drives, which were formatted using Disk Utility, can’t be recognized by Windows machines.
To fix the problem, you might need to enable Disk Utility’s MBR (Master Boot Record) option by closing the Disk Utility, and type this command line in Terminal:
defaults write com.apple.DiskUtility advanced-image-options 1
Then relaunch Disk Utility and format the disk using the ExFat system.
Reading and Writing to Windows NTFS Formatted Disk
While Mac users can correctly choose the file system to ensure compatibility with other OSes, most Windows users don’t even know the existence of different formatting system. Once in a while, you might stumble into NTFS formatted external drive.
Mac OS X can read NTFS-formatted drives, so you can copy files from them. The problem arises when you need to write files to those drives. Currently, the recommended safe and hassle-free way Mac OS X can write to NTFS drives is with the help of third-party software. Two most popular alternatives to such software are Paragon NTFS for Mac (US$ 19.99 with ten-day free trial) and Tuxera NTFS for Mac (US$ 31 with fifteen-day free trial). If you have Seagate external hard drive, you can download the free Seagate version of Paragon NTFS for Mac.
The other options to write to NTFS from Mac OS X are using free third-party software or enabling Mac OS X experimental NTFS support, but both options require messing around with the system via Terminal and known to cause problems with NTFS file system. So, they are not recommended.
The Recommended Scenario
The best file formatting settings that I can recommend for Mac users are: use HFS+ for the internal hard drive and backup drives and use ExFAT for USB flash drives and other external drives. This scenario enables you to have the best computing experience while keeping the compatibility with other OSes. You might need to opt for one of the third-party NTFS apps if you need to write a lot of data to NTFS drives. If not, you can go along just fine without the software.
What is your experience with different file formatting system? Share your thoughts and opinions using the comment below.
Источник
How to Format USB Flash Drive to FAT32 on Mac without Data Loss
For Apple Mac users, there are two ways to format USB flash drive to FAT32, including Disk Utility and Terminal command line. Refer to detailed steps of using both tools for FAT32 format. Formatting would erase data completely, make sure that you have a data backup. Otherwise, you can use data recovery software to recover data from a formatted USB drive.
Table of Contents
About the Author
Reviews and Awards
Are you looking for a secure way to format USBВ to FAT32 on Mac? You are at the right place. Follow here, you can find two methods that will assist you in doing so on your storage device. And if you lost data during the formatting, reliable Mac file recovery software is ready to help anytime:
| Workable Solutions | Step-by-step Troubleshooting |
|---|---|
| Method 1. Use Disk Utility | Connect USB to Mac > Go to Applications > Utilities > Disk Utility > Select USB and click «Erase». Full steps |
| Method 2. Use Terminal Command | Connect USB to Mac > Hit cmd + spaceВ keys > Type terminal and hit Enter. Full steps |
| Bonus Tip. Recover Formatted Data | If you lost data due to formatting, run EaseUS file recovery software > Scan and recover formatted data. Full steps |
How to Format a USB Flash Drive with Mac to FAT32
Computer users who use a USB might have the demand for formatting it to the FAT32 file system. Compare with the other commonly used NTFS file system on a flash drive, FAT32 has a compatibility advantage across many operating systems.
It’s a universal format that is compatible with Mac OS X/macOS, Windows, Linux, and DOS systems. So, if users anticipate using the flash drive with more than one operating system, they will definitely benefit from the FAT32 file system.В For Apple Mac users, there are two ways to format a USB flash drive to FAT32, namely Disk Utility and Terminal command line. Below are the detailed steps of the FAT32 format with both methods.
Method 1. Format FAT32 on Mac [Disk Utility]
To format USB to FAT32 with Disk Utility will erase all data on the flash drive, so before you doing so, please do remember to check whether you have saved useful data to another secure device in advance.
To format the USB drive to FAT32, follow the next steps:
Step 1. Connect the USB flash drive to your Mac computer.
Step 2. Go to Applications > Utilities > Double click and open Disk Utility.
Step 3. Select your USB flash drive on the sidebar, choose Erase.
Step 4. Rename the USB flash drive (optional).
Step 5. Choose the format as MS-DOS (FAT) for Format, Master Boot Record for Scheme. Then click Erase.
Wait for the process to complete, then you’ll get an empty new USB flash drive with FAT32 as the file system. You can use it for saving data again.
Method 2. Format FAT32 on Mac [Terminal Command Line]
The command-line behavior does the same way to erase data with the Disk Utility. Again, create a backup before taking this action.
To format FAT32 on Mac with Terminal, follow the next steps:
Step 1. Connect theВ USB flash drive to your Mac computer.
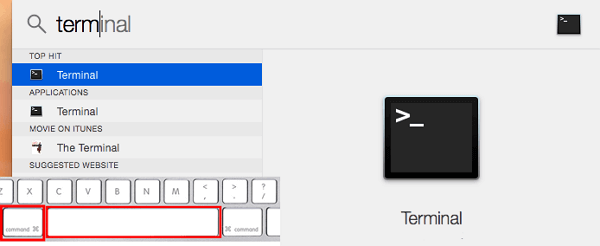
Step 2. Hit cmd + space to run Spotlight, type: terminal, and hit Enter.
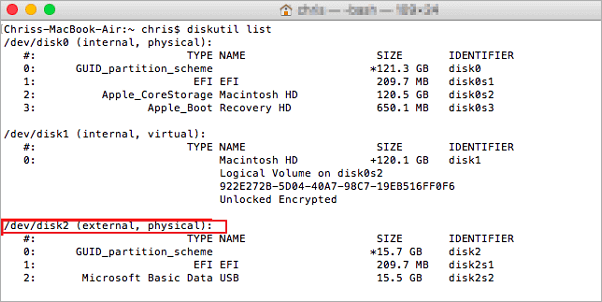
Step 3. Type: diskutil list and find out which disk is your USB drive.В
Step 4. Type: sudo diskutil eraseDisk FAT32 MBRFormat /dev/disk2.
- sudo gives you user right.
- Diskutil calls disk utility program.
- eraseDisk commands to format.
- FAT32 sets the file system.
- MBRFormat tells disk utility to format with a Master Boot Record.
- /dev/disk2 is the location of the USB drive.
Wait for the process to complete. After this, you can type «diskutil list»В in the command again to check if the formatting has been successful.В
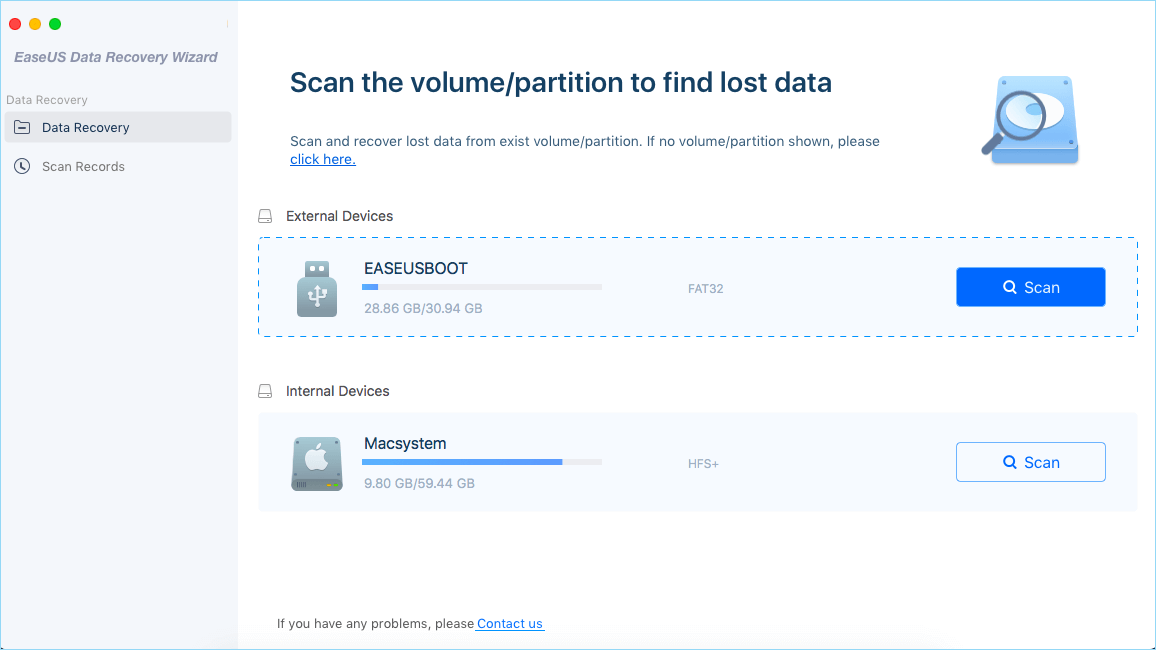
Bonus Tip: How to Recover Data from Formatted USB
Formatting the USB would erase the data on it completely, so please make sure that you have a backup. If you don’t, you can count on data recovery software to retrieve the lost data.
EaseUS Data Recovery Wizard has both Windows and Mac versions, so it’s a goodВ choice for data recovery, no matter you’re using a PC or Mac. For Mac users, it only takes a few clicks for the software to scan and display the formatted data. To guarantee an effective data recovery without spending money to no avail, you can install the Mac data recovery free version for the first trial. You can preview all the found data before the final recovery.
To recover data from a formatted USB flash drive on Mac, follow the next steps:
Step 1. Correctly connect your USB flash drive to your Mac. Launch EaseUS Data Recovery Wizard for Mac. Start selecting the flash drive and click «Scan» to let the software search lost files on it.
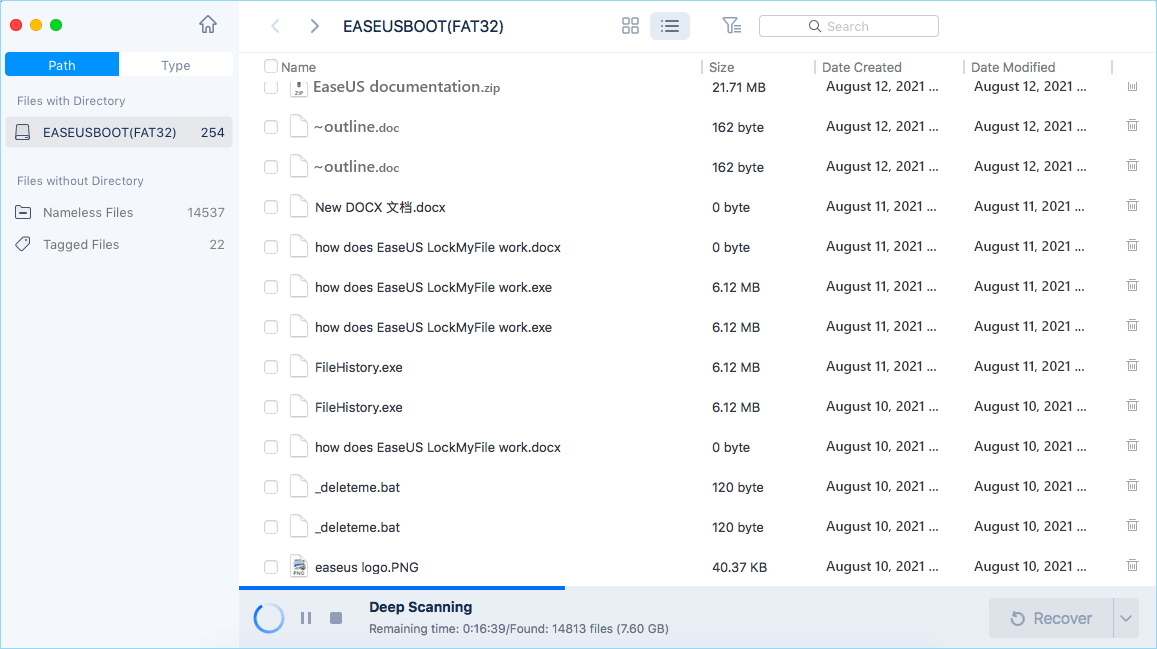
Step 2. After a quick scan and deep scan, all files will be presented in the left panel in the scan results.
Step 3. Select files you want to recover and click the «Recover» button. Don’t save the recoverable files to the USB drive itself in case of data overwriting.
Источник


