- How to Format USB Drive with Three Free USB Formatters Windows 10 [Partition Magic]
- Summary :
- Quick Navigation :
- Why Do You Need to Format USB Flash Drives
- USB Formatter 1: MiniTool Partition Wizard Free Edition
- USB Formatter 2: Windows Built-in Disk Management
- USB Formatter 3: Diskpart Format USB
- What if You Accidentally Format the Wrong Partition
- Bottom Line
- How to format a USB flash drive on Windows 10
- How to format a USB flash drive using File Explorer
- How to format a USB flash drive using Disk Management
- Formatting flash drive
- Cleaning and formatting flash drive
- Reliable storage
- SanDisk Extreme Go
- How to format a USB flash drive using Command Prompt
- Formatting flash drive
- Cleaning and formatting flash drive
- How to format a USB flash drive using PowerShell
- Formatting flash drive
- Cleaning and formatting flash drive
- More Windows 10 resources
- Halo: MCC’s live service elements make it better, not worse
- Microsoft’s Surface Duo is not ‘failing up’
- Here’s what you can do if Windows 10 update KB5001330 is causing issues
- These are the best PC sticks when you’re on the move
How to Format USB Drive with Three Free USB Formatters Windows 10 [Partition Magic]
By Irene | Follow | Last Updated January 27, 2021
Summary :
Sometimes we need to format USB flash drive for reuse. How to format USB drive Windows 10? Well, this article will show you how to format USB stick with three free USB formatters.
Quick Navigation :
USB flash drive is widely used nowadays and it has many brands like Kingston, SanDisk, Lexar, Sony, and more. And many persons need to format a USB device for different usage. The following content will show you why people need to format the devices.
Why Do You Need to Format USB Flash Drives
1. For reuse purpose.
When there are too many information on your Kingston USB and not enough space to store new data, you can perform a secure format to the drive to delete all files. All the data on the USB drive could be cleared in a sudden. Then you can use it as a new one with normal performace.
2. For a new file system.
By formatting, you can format the file system to NTFS, FAT32 or exFAT for different purpose. For example, if you want to use the Kingston USB on various storage media, you can format the file system to FAT32 as FAT32 offers the best compatibility.
3. Change cluster size.
Normally, cluster size is be set by default. After a period of time you may find the default cluster size is unreasonable with performance decrease. So, you want to change the situation via formatting it.
The ideal cluster size depends on what you want to do with the storage device. If the file size you want to save on it is large, a larger cluster size is better. If you store small files on your storage, a smaller cluster size will help utilize disk space.
4. Remove file system errors
File system error like you need to format the disk before you can use it could happen from now and then, and your device could become RAW or it would be shown as unformatted in some third-party partition managers.
And this is probably caused by virus attack/malicious software or improper removal, leading to data inaccessible. Under this situation, you can recover files and then format it to its full capacity.
You see, we do need to format USB drive sometimes. Well, how to do it? Are you still looking for a reliable USB stick formatter? Here are three reliable USB formatters for you to choose. Now let’s see some professional USB format utilities.
USB Formatter 1: MiniTool Partition Wizard Free Edition
MiniTool Partition Wizard Free Edition is an all-in-one partition software which is designed to reconfigure partitions and disks with its features like create partition, move/resize partition, extend partition, etc. It can be used on all versions of Windows Operating System.
This software has many advantages in conversions without data loss including convert FAT to NTFS, convert MBR to GPT, and convert primary to logical partition and so on. Youc can search this software on the internet to get more information.
Besides, it is also a powerful USB format function. It works with almost all of the USB stick brands, which means that it can be your hp USB formatter, your Kingston format utility or your SanDisk USB format utility, and other safe format applications.
You can feel free to format RAW drives to normal with tihs partition manager.
Firstly, you need to connect the USB storage to your computer. Then you can follow these steps to perform USB stick formatting.
1. Download the free USB formatter MiniTool Partition Wizard Free Edition by clicking the following button. Install it on your computer and launch it to get the main interface.
2. Select the target partition on Kingston and click Format.
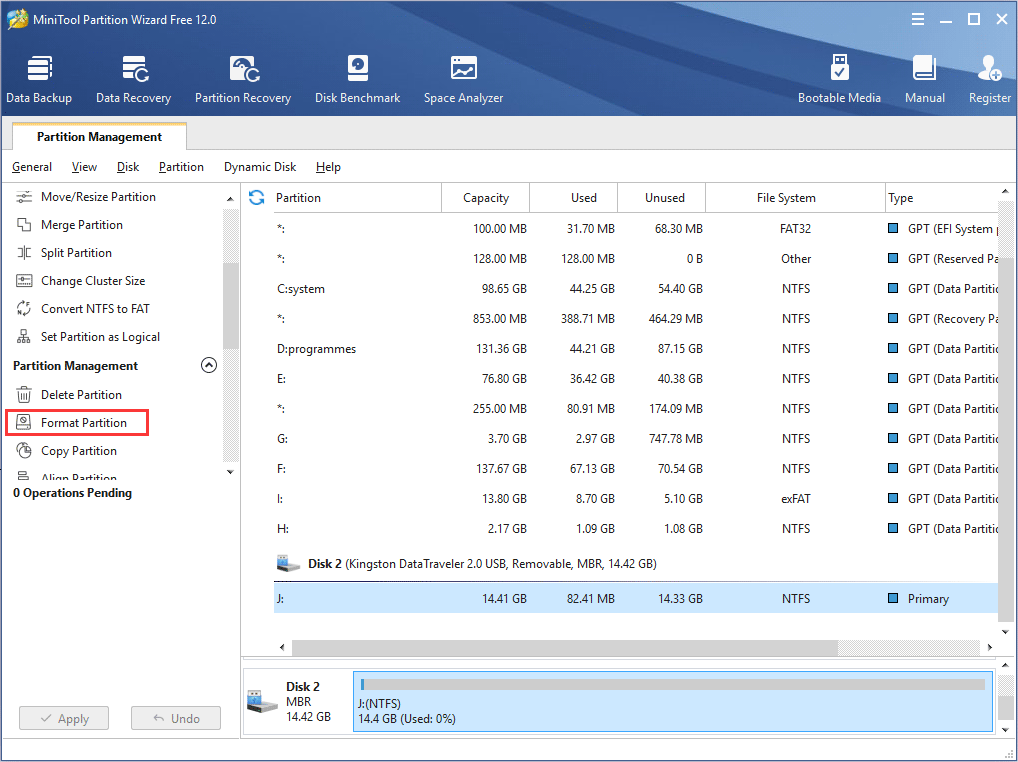
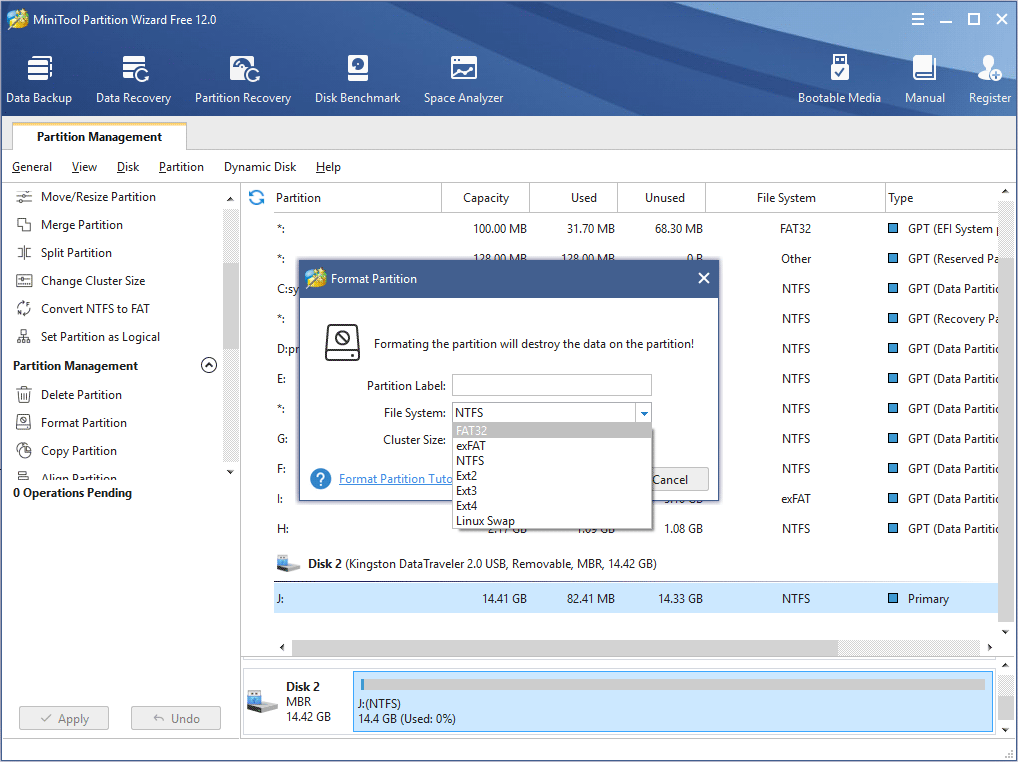
3. In this step, you can set partition label, file system, cluster size for the USB by yourself. Then click OK to continue. If you don’t know which file system to choose, check this post: NTFS vs. FAT32 vs. exFAT – Differences and How to Format to.
4. At last, click the Apply button on the upper left corner to quick format the select Kingston partition.
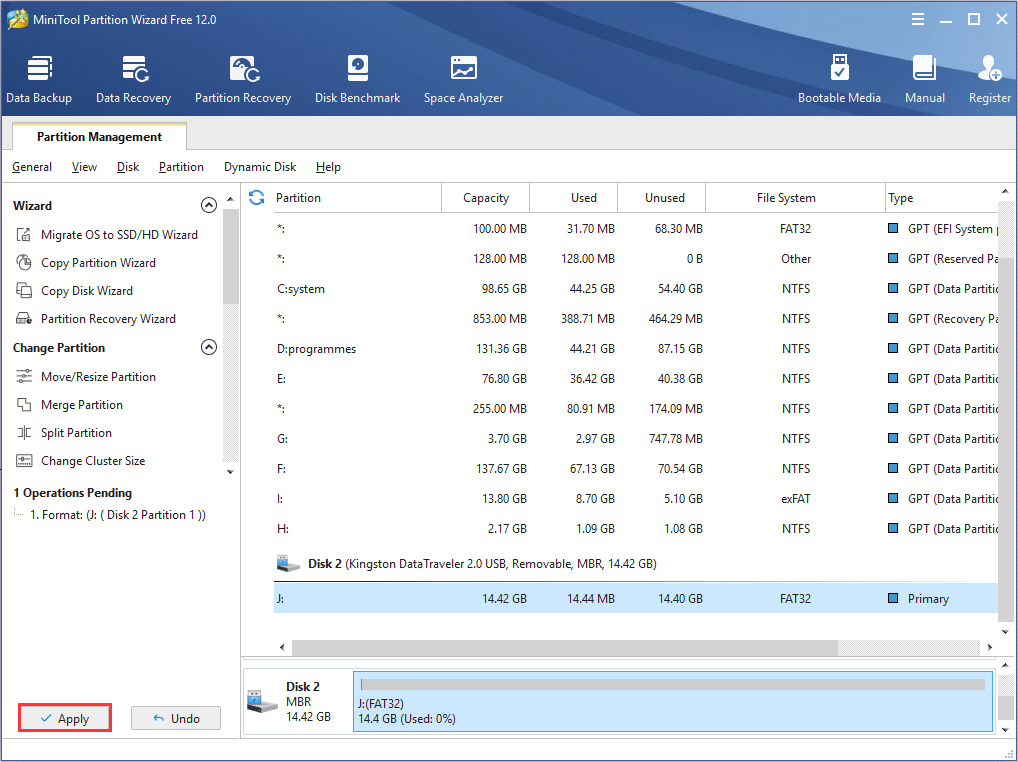
After application, you can reuse it to store new data.
Some of you may don’t like to install third-party USB formatting program, though it is reliable and safe. So next I will introduce you two Windows built-in USB formatters – Disk Management and Diskpart.
USB Formatter 2: Windows Built-in Disk Management
Disk Management can perform some simple operations like create partition, delete partition to help you manage their partitions on disk. You can use Disk Management to perform USB stick format. But to manage flash drive in all-rounded way, it is recommended to choose a professional USB storage manager.
Here are the simple steps to use this free USB formatter.
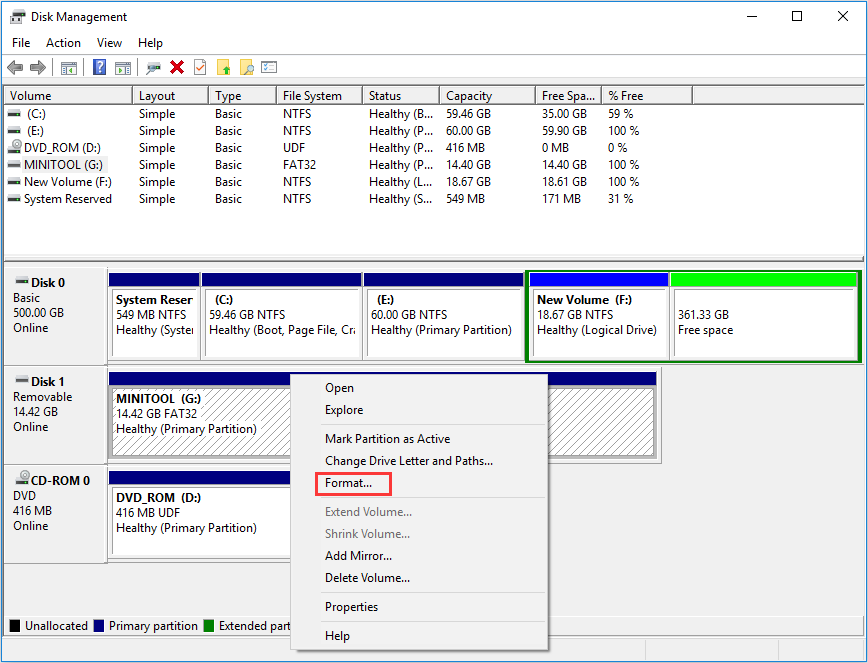
1. Right-click Start and choose Disk Management to launch the USB stick formatter.
2. Select the Kingston partition that needs to be formatted. Then right-click the partition and choose Format.
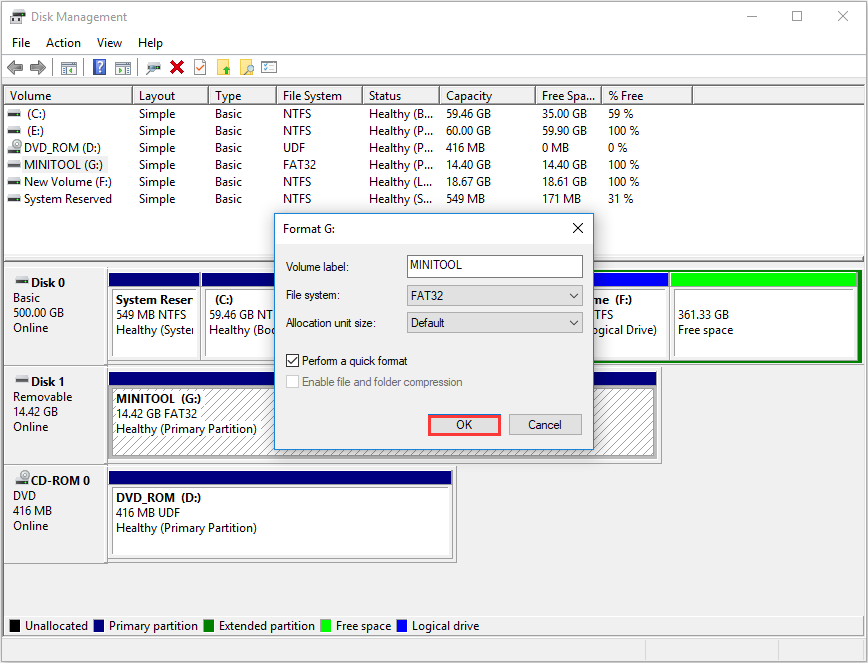
3. You need to type a label for USB and select your needed file system and allocation unit size at this page and then click OK to continue. If the quick format is checked, your device should only take several seconds to format. If it is unchecked, the time will depend almost completely on the size of the drive.
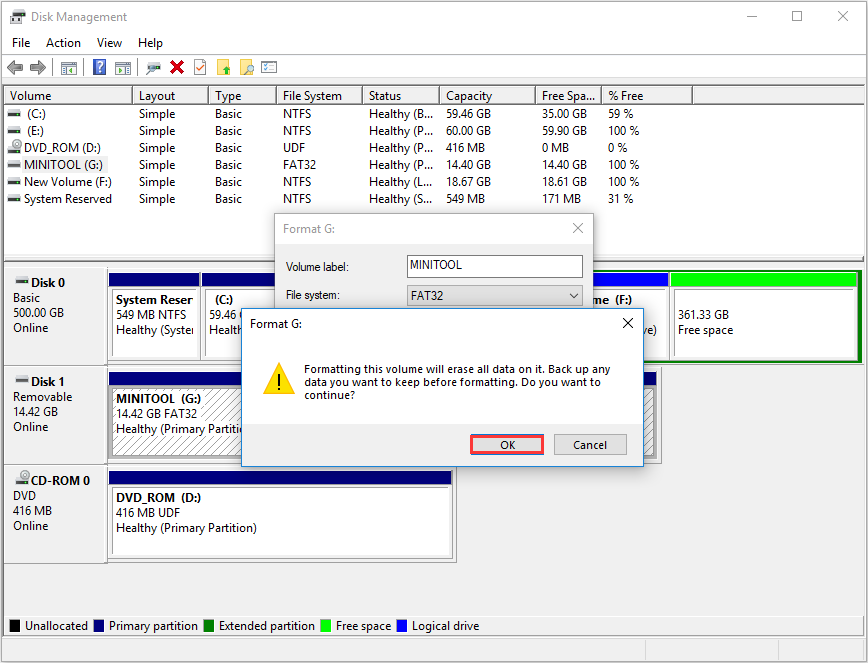
4. Make sure there is no needed file in this partition and click OK to start formatting.
Next I will show you another USB stick formatter, which can format it by using a few commands.
USB Formatter 3: Diskpart Format USB
Windows Diskpart Command — Advanced USB Formatter — is a command-line disk partitioning utility included in Windows 2000 and the later versions. It is designed to replace its predecessor, fdisk. Diskpart format USB is a little complicated for the user who is not familiar with Command lines.
So before you start to use the diskpart, it is recommended to make a backup of important files in case of any accidental data loss, especially for user who is a fresh hand.
This method is easy and you can follow these steps to do the job:
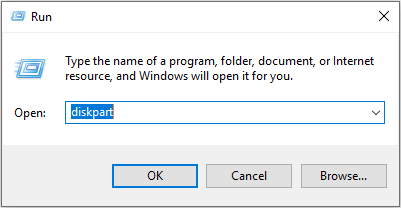
1. Right-click the Start menu and choose Run. Then input diskpart in the pop-up window and click Enter or click OK to launch the Kingston USB stick formatter.
2. Input list disk and hit Enter to list all disks on your computer.
3. Input select disk * (* represents disk number) and hit Enter.
4. Input list partition and hit Enter to list all the partitions on the disk.
5. Input select partition * (* represents partition number) and hit Enter to select the partition that you want to format.
6. Input format fs=ntfs quick and hit Enter.

7. The whole format process will last for a while. When it ends, you can type exit and hit Enter to close the diskpart command window.
Now you have learned how to format USB devices on Windows 10 or the older versions. If you want to choose the most simple and effortless USB formatter, it is recommended to use MiniTool Partition Wizard Free Edition as it has the simplest procedures and it is very powerful and user-friendly.
MiniTool Partition Wizard Free Edition can also help you format SSD, HDD, memory card, and external hard drive to NTFS, FAT32 or exFAT file system. So I believe that MiniTool Partition Wizard Free Edtition could be your best choice.
What if You Accidentally Format the Wrong Partition
Sometimes you may format the wrong partition by mistake. In this situation, how to unformat the partition?
Here, you still have the chance to recover its data. MiniTool Partition Wizard Pro Ultimate is capable of recovering lost data like deleted files and formatted files from various storage media.
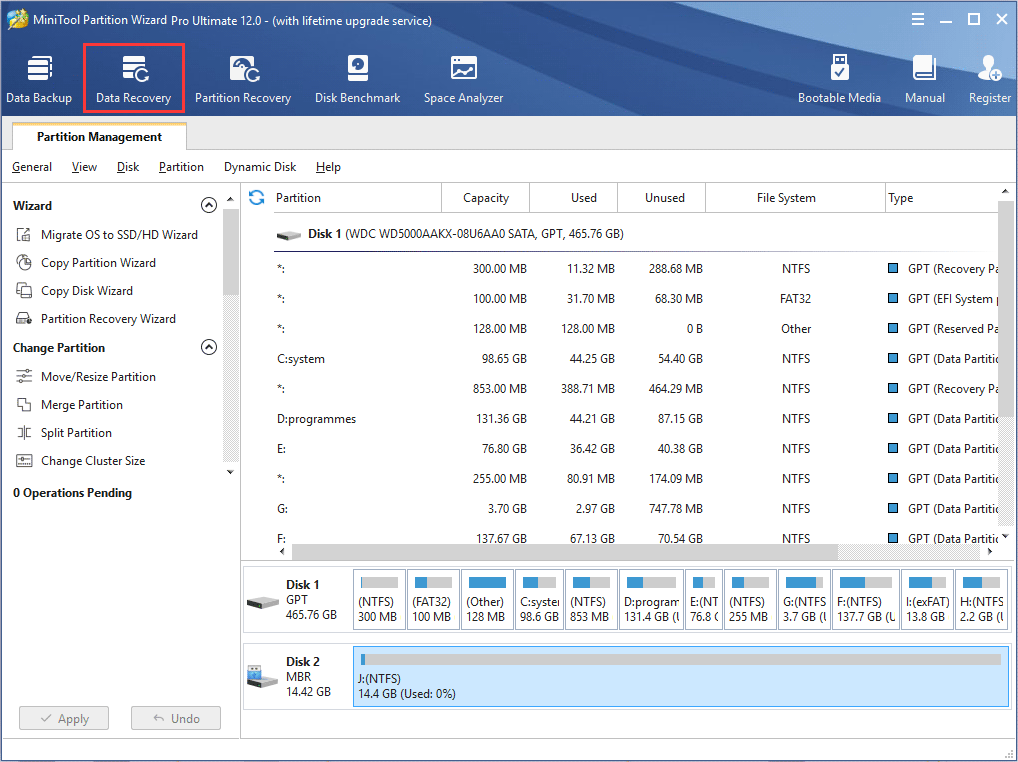
If you accidentally format the wrong partition by using the three USB formatters mentioned in this article, don’t be panic. Get tihs recovery software Now and recover formatted files immediately.
Bottom Line
If you are looking for a fantastic USB stick formatter, you can try using the best USB format tool MiniTool Partition Wizard Free Edition. With this free software, you can format a USB storage in just a few clicks. If you want to this work on other devices like HDD and SSD, you can also use the above Kingston USB format tools.
If you have any question about the three USB stick formatters, you can leave a message on the following comment zone and we will reply as soon as possible. If you need any help when using MiniTool software, you may contact us via [email protected] .
How to format a USB flash drive on Windows 10

On Windows 10, the ability to format a USB flash drive can come in handy in a number of scenarios. For example, you might want to reformat a new or used removable storage device to make sure it doesn’t contain any malicious code. Or if a thumb drive is inaccessible because of data corruption. Maybe you received a flash drive using a file system that isn’t compatible with your system configuration. Or you’re planning to give the drive away and want to make sure personal information doesn’t go along with it.
Whatever the reason, Windows 10 ships with several tools to format virtually any kind of storage, including USB flash drives, using File Explorer, Disk Management, Command Prompt, and PowerShell.
In this Windows 10 guide, we walk you through the different ways you can format a USB flash drive to quickly erase its contents or fix problems when the device isn’t recognized.
Warning: Using any of the instructions outlined below will erase the contents on the drive you select. If you have any important files, you should back them up before proceeding.
How to format a USB flash drive using File Explorer
To format a USB flash drive using File Explorer, use these steps:
- Open File Explorer.
- Click on This PC from the left pane.
Under the «Devices and drivers» section, right-click the flash drive and select the Format option.

Use the «File system» drop-down menu and select the NTFS option.
Quick tip: If you’re planning to use the removable drive on Windows 10 as well as on macOS systems, you may want to select the exFAT option for compatibility. However, if you’re also thinking about using the device on a Linux machine, FAT32 is the best option, even though you’ll be limited to 4GB file sizes.
Under the «Format options» section, select the Quick format option.

Note: The «Quick format» option only deletes the file system table and the root folder, but the data may still be recoverable on the drive. If you don’t check the option, a full format will take place, and it’ll perform a scan for bad sectors and writes zeros in all sectors to delete the data. As a result, the process can take a long time depending on the size of the storage.
Once you complete these steps, you can start storing documents, pictures, videos, and other files on the removable drive.
How to format a USB flash drive using Disk Management
Using Disk Management, there are at least two ways to format a removable drive. You can format the drive to rebuild the file system table and erase its content. Or you can delete the partition containing the file system and data, which can come in handy to fix problems with storage.
Formatting flash drive
To use Disk Management to format a USB drive, use these steps:
- Open Start.
- Search for Disk Management and click the top result to open the experience.
Right-click the removable drive and select the Format option.
Check the Perform a quick format option.
After completing the steps, the flash drive will be erased and ready to use in File Explorer.
Cleaning and formatting flash drive
If you’re dealing with errors and other problems, you can use these steps to clean the USB flash drive and start from scratch with a new partition and file system using Disk Management:
- Open Start.
- Search for Disk Management and click the top result to open the experience.
Right-click the removable drive and select the Delete volume option.
Right-click the «Unallocated» space and choose the New Simple Volume option.
Use the drop-down menu to select an available letter.
Quick tip: If you’re assigning a letter manually, it’s best to select a letter in reverse order (Z, Y, X, and so on).
Use the File system drop-down menu and select the NTFS option.
Note: Using this method, you can only use «NTFS» or «FAT32.» If you need to format the drive using «exFAT,» you’ll need to use Command Prompt or PowerShell
Check the Perform a quick format option. (If you clear the option, a full format will take place, which can take a long time.)
Once you complete these steps, a new partition will be created, and a new file system will be configured, fixing common problems with the flash drive, including data corruption.
If you’re unable to perform a format, it’s likely that the removable drive is physically damaged. If this is the case, you can always purchase another USB flash drive, such as the SanDisk Extreme Go (CZ800), which comes in 64GB and 128GB variants with enough space to save large files and small backups.
Reliable storage
![]()
SanDisk Extreme Go
If you’re in the market for a reliable thumb drive with enough storage for large projects and fast transfer speeds, the SanDisk Extreme Go (CZ800) is an excellent option. The USB drive offers up to 128GB of storage with transfers speeds up to 200MB/s, it’s backed by the strong brand, and it even includes some nifty features like password protection, recovery, and encryption. It’s also affordable, at around $31 for 128GB.
How to format a USB flash drive using Command Prompt
Alternatively, you can also use Command Prompt to format a USB flash drive to delete the file system table and data. Or you can also use the tool to clean the drive and start fresh with a new partition and file system table.
Formatting flash drive
To perform a quick or full format of a USB flash drive using Command Prompt, use these steps:
- Open Start.
- Search for Command Prompt, right-click the top result, and select the Run as administrator option.
Type the following command to perform a quick format of the USB flash drive and press Enter (twice):
format VOLUME: /v:FLASHDRIVE-LABEL /fs:FILE-SYSTEM /q
In the command, make sure to replace the «VOLUME» with the correct drive letter of the storage, «FLASHDRIVE-LABEL» with the name you want the drive to appear in File Explorer, «FILE-SYSTEM» with one of the available file systems, including «FAT32,» «exFAT,» or «NTFS» (recommended).
This example is a quick format of the E drive:
format E: /v:workFlash /fs:NTFS /q

(Optional) Type the following command to perform a full format of the USB flash drive and press Enter (twice):
format VOLUME: /v:FLASHDRIVE-LABEL /fs:FILE-SYSTEM
This example performs a full format of the E drive:
format E: /v:»workFlash» /fs:NTFS
After completing the steps, the thumb drive will be formatted with the option that you specified.
Cleaning and formatting flash drive
To clean and format a USB thumb drive with Command Prompt, use these steps:
- Open Start.
- Search for Command Prompt, right-click the top result, and select the Run as administrator option.
Type the following command to launch the diskpart tool and press Enter:
Type the following command to view a list of the available drives and press Enter:
Type the following command to select the flash drive you want to delete and press Enter:
select disk DISK-NUMBER
In the command, make sure to replace «DISK-NUMBER» for the correct number that represents the drive you’re trying to format.
This example selects the flash drive listed as disk number 1:
Type the following command to delete all the partitions and press Enter:
Type the following command to create a primary partition and press Enter:
create partition primary
Type the following command to perform a quick format and press Enter:
format fs=FILE-SYSTEM label=DRIVE-NAME quick
In the command, make sure to replace «NTFS» for your preferred file system, «workFlash» for the name you want to give the device, and if you don’t specify the «quick» option, then a full format will be performed.
This example quickly formats the removable storage using the NTFS file system:
format fs=NTFS label=workFlash quick
Type the following command to assign a drive letter and press Enter:
Quick note: You can append «letter=e» in the command to assign (in this case) «E» as the drive letter. Otherwise, the system will assign a letter automatically.
Type the following command to terminate diskpart and press Enter:
Once you complete these steps, diskpart will remove any information on the USB flash drive. It’ll create a new partition and configure a compatible file system to store files from your Windows 10, macOS, or Linux machine (depending on your settings).
How to format a USB flash drive using PowerShell
Similar to Command Prompt, you can use PowerShell to quickly format a removable flash drive to erase its content. Or you can also use the command-line tool to clean and format the device, deleting its contents and fixing issues.
Formatting flash drive
To format a USB flash drive using PowerShell commands, use these steps:
- Open Start.
- Search for PowerShell, right-click the top result, and select the Run as administrator option.
Type the following command to perform a quick format on the flash drive and press Enter:
Format-Volume -DriveLetter DRIVE-LETTER -FileSystem FILE-SYSTEM
In the command, make sure to replace «DRIVE-LETTER» with the correct letter that reflects the drive you want to format, and «FILE-SYSTEM» for FAT32, exFAT, or NTFS (recommended).
This example performs a quick format of the E: drive:
Format-Volume -DriveLetter E -FileSystem NTFS

(Optional) Type the following command to perform a full format on the USB flash drive and press Enter:
Format-Volume -DriveLetter DRIVE-LETTER -FileSystem FILE-SYSTEM -Full -Force
This example performs a full format of the E: drive:
Format-Volume -DriveLetter E -FileSystem NTFS -Full -Force
After completing the steps, PowerShell will format the removable storage with the settings you specified.
Cleaning and formatting flash drive
To clean and format a removable drive with PowerShell commands, use these steps:
- Open Start.
- Search for PowerShell, right-click the top result, and select the Run as administrator option.
Type the following command to view the flash drive you want to fix and press Enter:
Type the following command to delete the volume and press Enter:
Get-Disk DISK-NUMBER | Clear-Disk -RemoveData
In the command, change «DISK-NUMBER» for the correct number that represents the flash drive you’re formatting.
This example selects and cleans the disk number 1:
Get-Disk 1 | Clear-Disk -RemoveData
Type Y to confirm the action and press Enter.
Type the following command to create a new partition and press Enter:
New-Partition -DiskNumber DISK-NUMBER -UseMaximumSize
In the command, change «DISK-NUMBER» to the correct number that represents the flash drive you’re formatting.
This example creates a new partition using the entire space available on drive number 1:
New-Partition -DiskNumber 1 -UseMaximumSize
Type the following command to perform a quick format and assign a drive label, and press Enter:
Get-Partition -DiskNumber DISK-NUMBER | Format-Volume -FileSystem FILE-SYSTEM -NewFileSystemLabel DRIVE-NAME
In the command, change «DISK-NUMBER» to the correct number of your storage, «FILE-SYSTEM» for «NTFS,» «FAT32,» or «exFAT,» and «DRIVE-NAME» with the name you want the device to appear in File Explorer.
This example selects and formats drive number 1 using the NTFS file system:
Get-Partition -DiskNumber 1 | Format-Volume -FileSystem NTFS -NewFileSystemLabel workFlash
![]()
Type the following command to assign a new letter to the drive and press Enter:
Get-Partition -DiskNumber DISK-NUMBER | Set-Partition -NewDriveLetter DRIVE-LETTER
In the command, replace «DISK-NUMBER» for the correct number of your removable storage, and «DRIVE-LETTER» with the letter you want the device to appear in File Explorer.
This example sets E as the drive letter for disk number 1:
Get-Partition -DiskNumber 1 | Set-Partition -NewDriveLetter E
Once you complete these steps, similar to Command Prompt, PowerShell will remove any information in the USB flash drive to fix problems, including data corruption, write protection, and unrecognized drives. Then it’ll create a new partition and configure a compatible file system to store files from your Windows 10, macOS, or Linux machine (depending on your configuration).
More Windows 10 resources
For more helpful articles, coverage, and answers to common questions about Windows 10, visit the following resources:
We may earn a commission for purchases using our links. Learn more.
![]()
Halo: MCC’s live service elements make it better, not worse
Halo: The Master Chief Collection is more popular than ever, but some fans don’t agree with the live service approach 343 Industries has taken with it. Here’s why those elements are, at the end of the day, great for the game and for Halo overall.
![]()
Microsoft’s Surface Duo is not ‘failing up’
Microsoft announced this week that it was expanding Surface Duo availability to nine new commercial markets. While Surface Duo is undoubtedly a work in progress, this is not a sign of a disaster. It’s also doesn’t mean that Surface Duo is selling a ton either. Instead, the reason for the expansion is a lot more straightforward.
![]()
Here’s what you can do if Windows 10 update KB5001330 is causing issues
In this guide, we’ll show you the steps to get rid of the update KB5001330 to fix profile, gaming, and BSoD problems with the Windows 10 October 2020 Update and May 2020 Update.
![]()
These are the best PC sticks when you’re on the move
Instant computer — just add a screen. That’s the general idea behind the ultra-portable PC, but it can be hard to know which one you want. Relax, we have you covered!


