- How To: Quick Format FAT32 on Windows 10, 8, 7?
- Scenario
- About FAT32 quick format in Windows 10
- How to perform FAT32 quick format in Windows 10 with 2 methods?
- Method 1. Perform FAT32 quick format with diskpart
- Method 2. FAT32 quick format with AOMEI Partition Assistant
- Conclusion
- Format to FAT32 for USB or External Hard Drive in Windows 10
- What You Need to Know AboutВ File Systems
- Solution 1. Format to FAT32 Using FAT32 Formatter Windows 10
- EaseUS Partition Master
- Solution 2. Format to FAT32 Windows 10 via File ExplorerВ
- Solution 3. Format USB/External Drive to FAT32 with Disk Management
- Solution 4. Format to FAT32 Windows 10 Using Command Prompt
- Option 1. Use CMD — Command Prompt
- Option 2. Use DiskPartВ
- Option 3. Use PowerShell
- Additional Fixes for «Cannot Format to FAT32» in Windows 10
- Reasons for Why You Can’t Format to FAT32
- Fix 1. Check disk error, fix file system errors or soft bad sectors
- Fix 2. Delete all partitions and create a new FAT32 partition on USB drive
- Fix 3. Select NTFS as the file system or split USB larget partition to smaller FAT32 partitions
- Fix 4. Remove USB write protection and format USB to FAT32
- Final Word
How To: Quick Format FAT32 on Windows 10, 8, 7?
As for how to perform quick format FAT32 on Windows 10, 8, 7, you can study this post to learn how to perform it.

By Dylan  / Last Updated May 14, 2020
Scenario
How to quikly format my USB drive
I need to connect my USB to a Xerox machine, and the machine requires the USB to be formatted to FAT32. I am wondering if any of you know of a method for formatting a USB quickly in Windows 10. Thanks.»
— Question from Community.spiceworks.com
About FAT32 quick format in Windows 10
FAT32 quick format in Windows 10 is one of 2 most common format ways. It allows you to delete all the data from a hard drive, USB and other storage device quickly, and rebuild the FAT32 file system which provides great compatibility, especially, with some smart devices and game consoles. To finish this process as quickly as possible, quick format is recommended because it would not check for the hard drive sectors. Besides, the files would not really be erased, they could be recovered with proper methods.
Thus, according these features, quick format to FAT32 is often applied to dealing with incompatibility of file system. for example, many people use quick format to format hard drive to FAT32 for PS. Then next, let’s see how to perform FAT32 quick format in Windows 10.
вњЌNote:
в—Џ The other most commonly used format form is full format, which executes an extra step of checking the sectors making the formatting process a litter longer.
в—Џ Both quick format and full format are high-level format, which just makes data invisible for system. All files and data can be recovered by some data recovery tools. If you want to wipe data on a disk or partition completely, you can overwrite it.
How to perform FAT32 quick format in Windows 10 with 2 methods?
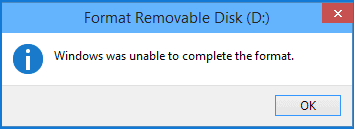
When it comes to format a disk or USB, you may think about do this task in Disk Management, but in Windows 10 DM, formatting to FAT32 file system is not available, and you may see the prompt windows that “Windows was unable to finish the format”. Don’t worry, there are still 2 methods you can adopt.
вњЌ Attention: Although quick format will not completely erase your data, we still suggest you to back up your disk before formatting, just in case.
Method 1. Perform FAT32 quick format with diskpart
Step 1. Open your computer, and on the desktop, press the «Windows + R» at the same time to open Run box. And type “diskpart” on the box, and press Enter.
Step 2. When the diskpart opened, type the following commands, and press Enter after inputting each one:
в—Џ list disk
в—Џ select disk nпј€n is the disk that contain the target driveпј‰
в—Џ clean
в—Џ create partition primary
в—Џ format fs=fat32 or format fs=fat32 quick

Wait for a while, when the format is finished, type “exit” to leave diskpart
Method 2. FAT32 quick format with AOMEI Partition Assistant
FAT32 Quick format via diskpart in Windows 10 is efficient and convenient if you are good at writing command lines. But it still has some limitations. On the one hand, most people can’t operate diskpart very well, they may mistype a command generate a problem they can’t solve. On the other hand, diskpart can’t format a drive over 32GB to FAT32 file system, and it will tell you the volume is too big for FAT32 if the drive is beyond 32 GB.
Fortunately, there is a easier-to-use and more flexible tool you can use, AOMEI Partition Assistant Standard. It is easy to format a 32GB+ hard drive, USB to FAT32 with its intuitive interface. Besides, it also supports formatting a disk to other file systems, such as NTFS, exFAT, Ext4, Ext3 and Ext2. Here are the steps as follow.
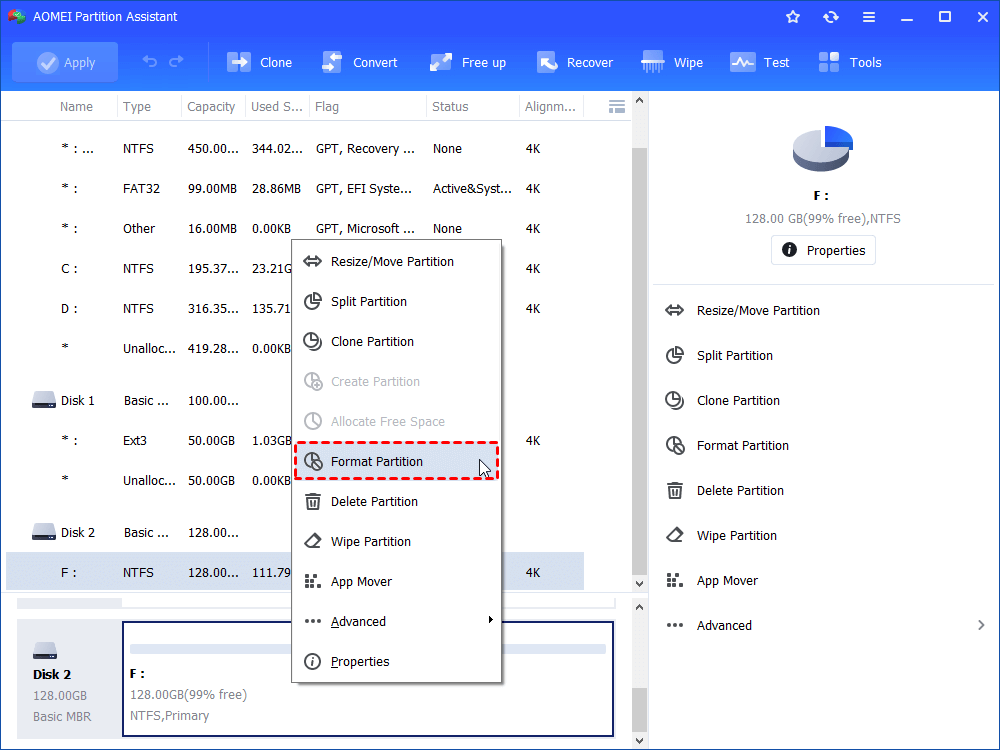
Step 1. Install and launch AOMEI Partition Assistant, you will see the disks and partitions listed on the main interface, and choose the drive you want to format and click “Format Partition”.
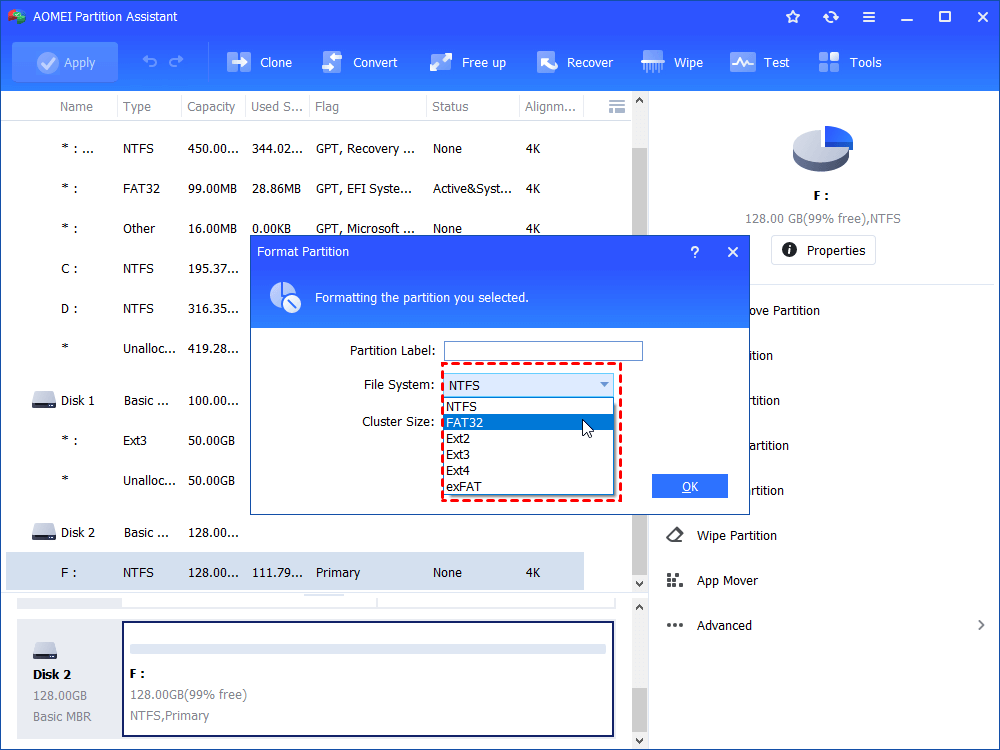
Step 2. Select “FAT32” as file system. You can also decide the Partition Label and Cluster Size. and click “OK”.
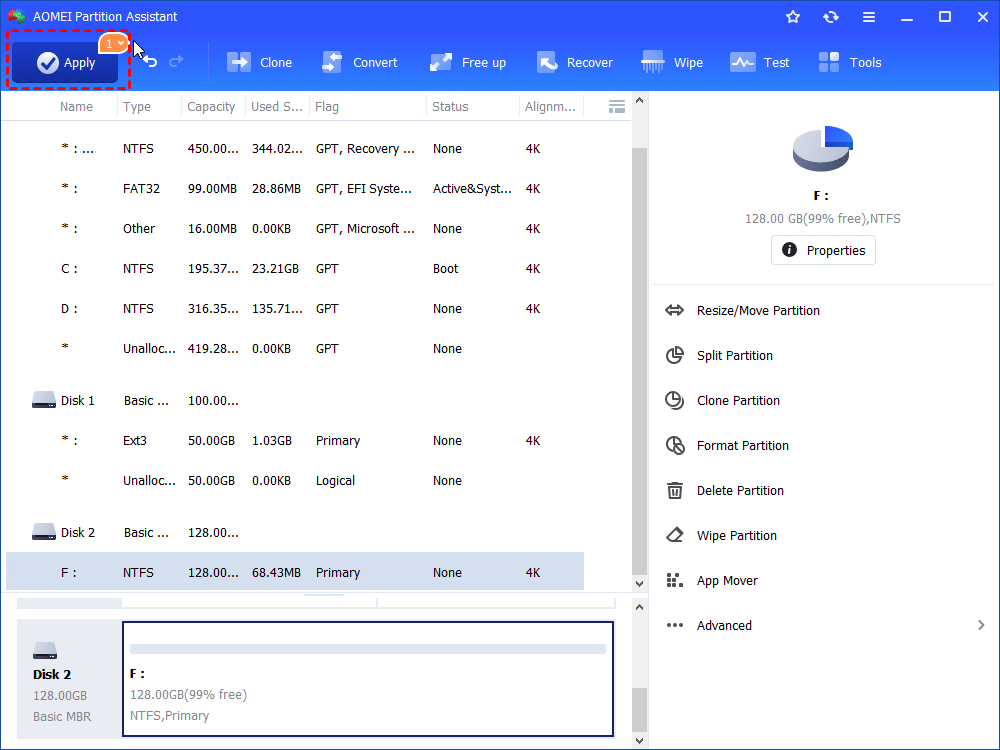
Step 3. Back to the main interface, click «Apply» to start quick format.
Conclusion
This is how to quick format a hard drive to FAT32 in Windows 10. The 2 methods can be applied to different storage devices, including HDD, SSD, SD card. If your disk is smaller than 32GB and you are good at writing commands, diskpart is good choice. Otherwise, method 2 is more suitable for you.
In addition, AOMEI Partition Assistant comes with many features allowing you to control and manage your disks and partitions. For instance, you can resize a partition size with this tool.
And there are AOMEI Partition Professional edition providing more advanced feature like convert NTFS to FAT32 file system without formatting, convert MBR system disk to GPT, convert primary partition to logical, and so on.
Format to FAT32 for USB or External Hard Drive in Windows 10
On Windows 10/8.1/8/7, there are typically four ways for both average and advanced users to format to FAT32, which has the greatest compatibility compared to other file systems. For small capacity flash drives, pen drives, or SD cards that range from 2GB-32GB, any of the four methods are workable. However, for USB flash drives, HDDs, or external hard drives that exceed 32GB, the applicable tools will be restricted to the third-party USB format tool and the Windows Command Prompt.
Can’t format to FAT32 in Windows 10 with all given disk formatting tools? Directly jump to the final part to get additional fixes for «Cannot Format to FAT32» in Windows 10.
What You Need to Know AboutВ File Systems
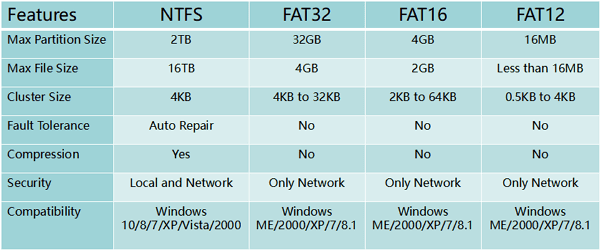
In computing, a file systemВ controls how data is stored and retrieved. The common Windows file systems include FAT16, FAT32, and NTFS, etc. Users can convert their USB flash drives or external hard drives between different file systems.В In the chart below, we have listedВ features of four common file systems, giving detailed information from max partition size to the compatibility of these file systems.
Solution 1. Format to FAT32 Using FAT32 Formatter Windows 10
USB requirements: none
A professional third-partyВ Windows 10 FAT32 formatting tool can make the formatting process simple and secure. We recommend you tryВ EaseUS Partition Master В with its Format feature. Besides FAT32, it also supports format USB to NTFS, EXT2, EXT3, and ReFS.В
EaseUS Partition Master
- Adjust a partition to a larger or smaller one for your need.
- Merge partitions into a larger one without losing data.
- Organize and optimize your hard disk.
- Migrate OS to SSD to speed up Windows.
Download this partition magic now, and follow the simple steps to freely format USB to FAT32 in Window 10.
- Right-click the external drive or USBВ you intend to format and choose «Format».
- Set the Partition label, File system (NTFS/FAT32/EXT2/EXT3/EXT4), and Cluster size, then click «OK».
- Click «OK» to continue.
- Click the «Execute Operation» buttonВ and click «Apply» to format the hard drive partition.
You May Also Like:

With this FAT32 formatted, you can also repartition the volumes on your HDD/SSD, external storage devices. Follow to learn how to partition a hard drive on your own.

Solution 2. Format to FAT32 Windows 10 via File ExplorerВ
USB requirements: no more than 32GB. Otherwise, you can only choose to format USB to NTFS.
To format USB under 32GB to FAT32 in Windows 10 Explorer, follow the three steps:
Step 1.В Connect USB or external hard drive to Windows 10 PC.
Step 2.В Open File Explorer, locate and right-click on the USB drive, select «Format».
Step 3.В Set the FAT32 as the target file system, tick «Quick Format» and click «Start» to start the formatting.
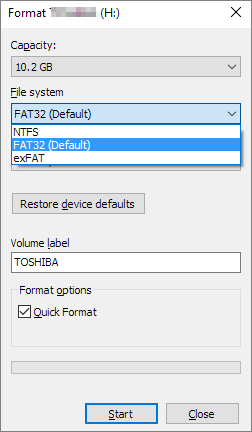
When the process completes, click «OK» to confirm. And now your USB is FAT32.
Solution 3. Format USB/External Drive to FAT32 with Disk Management
USB requirements: Similar to the Explorer, your USB drive has to be under 32GB in order to format to FAT32 within the program
Follow the 3-step guide here to format to FAT32:
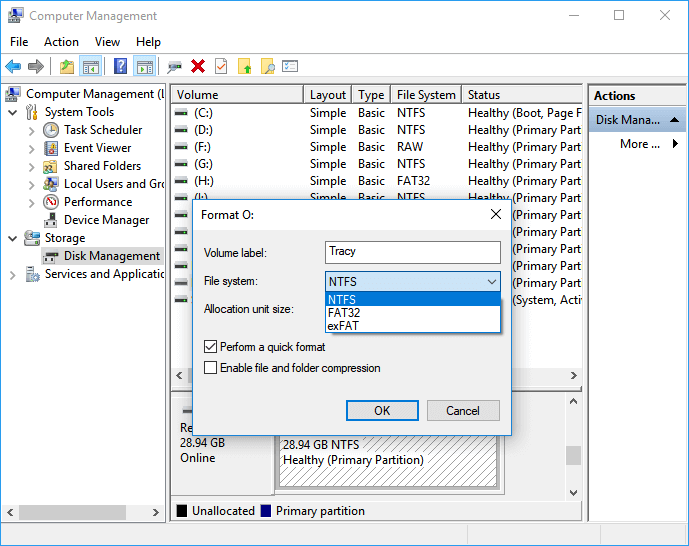
Step 1. InВ Windows 10, go toВ This PC > Manage > Disk Management.
Step 2.В Locate and right-click on your USB flash drive or external hard drive, select «Format».
Step 3.В Set the USB file system to FAT32, tick «Perform a quick format» and click «OK» to confirm.
Solution 4. Format to FAT32 Windows 10 Using Command Prompt
USB requirements: none
Some experienced users or administrators prefer to use command lines to execute some operations on Windows PC. It’s also an applicable way to format your flash drive or external hard drive to FAT32 in Windows 10.
Note:В Be carefulВ while using command lines on your PC to format USB drive. Any improper operations would cause serious issues.
Here are the details of how to use CMD, DiskPart, or PowerShell command lines formatting device:
Option 1. Use CMD — Command Prompt
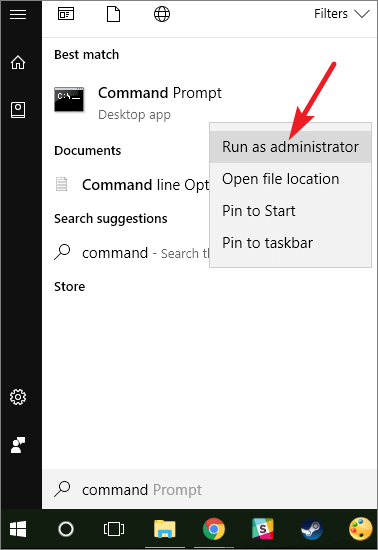
Step 1.В TypeВ command promptВ in Windows 10 search bar or right-click on «Windows icon» > select «Search», and typeВ cmd.
Step 2.В Right-click on «Command Prompt» and select «Run as Administrator».В
Step 3.В Check the USB label and typeВ Format /FS:FAT32 O:В at the prompt and hit «Enter».В (ReplaceВ O:В with the drive letter of your USB drive.)
Windows 10 will begin formatting the USB flash drive or external hard driveВ into FAT32.
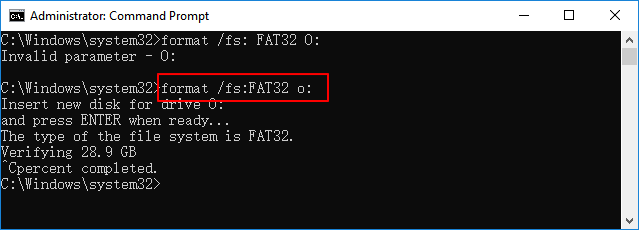
Step 4.В TypeВ exitВ when the process has completed.
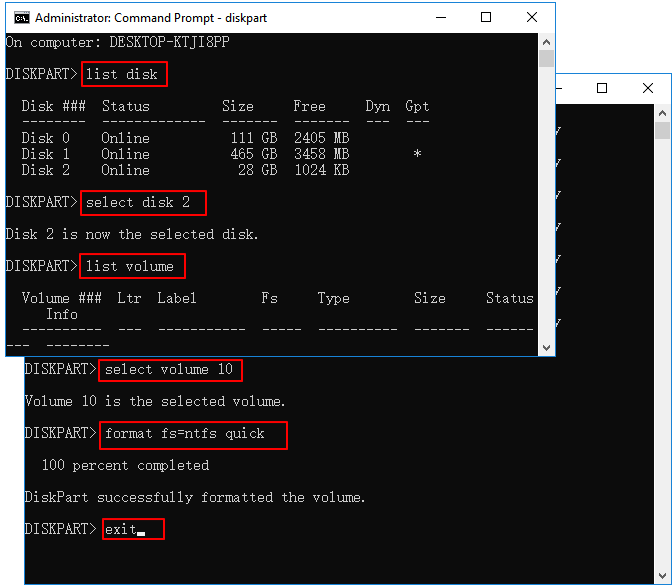
Option 2. Use DiskPartВ
Step 1.В TypeВ diskpartВ in Windows search barВ and hit Enter.
Step 2.В Hit Enter each time when you type the below command lines to quick format hard drive:
- list disk
- select disk 2 (Replace 2 with your USB disk number)
- list volume
- select volume 10В (Replace 10 with the volume number of the USB drive that you want to format)
- format fs=fat32 quick
Step 3.В TypeВ exitВ and hit Enter to close the program whenВ DiskPart reports it has successfully formatted the USB.
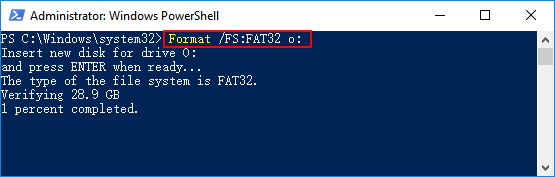
Option 3. Use PowerShell
Step 1. Right-click on the Windows icon and select «Windows PowerShell Admin», click «Yes» to open it.
Step 2. Check the USB drive label, type Format /FS:FAT32 o: in PowerShell, and hit Enter.
Step 3.Type exit when the formatting process completes.
Additional Fixes for «Cannot Format to FAT32» in Windows 10
If you met a problem while formatting USB or Windows warns that Windows was unable to complete the format, don’t worry. In this part, you’ll learn why you can’t format to FAT32 in Windows 10 and how to resolve this issue effectively.
Reasons for Why You Can’t Format to FAT32
To find the right solution for your case, it’s important to find out the causes that stop you from formatting devices to FAT32. Here are the main reasons:
- 1.В File system error, bad sectors exist on USB/external hard drive
- 2. The USB drive contains 2 partitions or the partition need for formatting to FAT32 is not the first primary partition
- 3. The partition inВ USB or external hard driveВ is larger than 32GB
- 4. The USB drive or external hard drive is write-protected
So how to resolve these issues, switching your USB drive to FAT32? Follow the quick fixes to troubleshoot the problem of FAT32 format in Windows 10.
Fix 1. Check disk error, fix file system errors or soft bad sectors
To do so, both the third-partyВ partition manager software — EaseUS Partition Master and Windows Disk Check will work.
Method 1. Use EaseUS Partition MasterВ to check and fix disk error
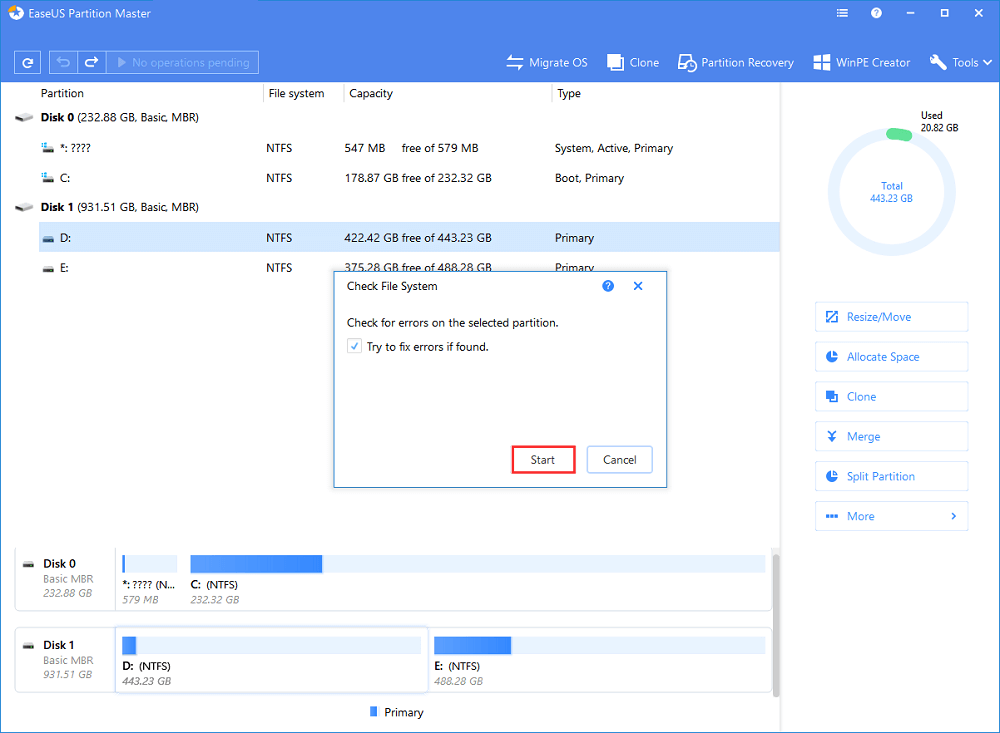
Step 1.В Open EaseUS Partition Master on your computer. Then, locate the disk, right-click the partition you want to check, and choose «Advaned» > «Check File System».
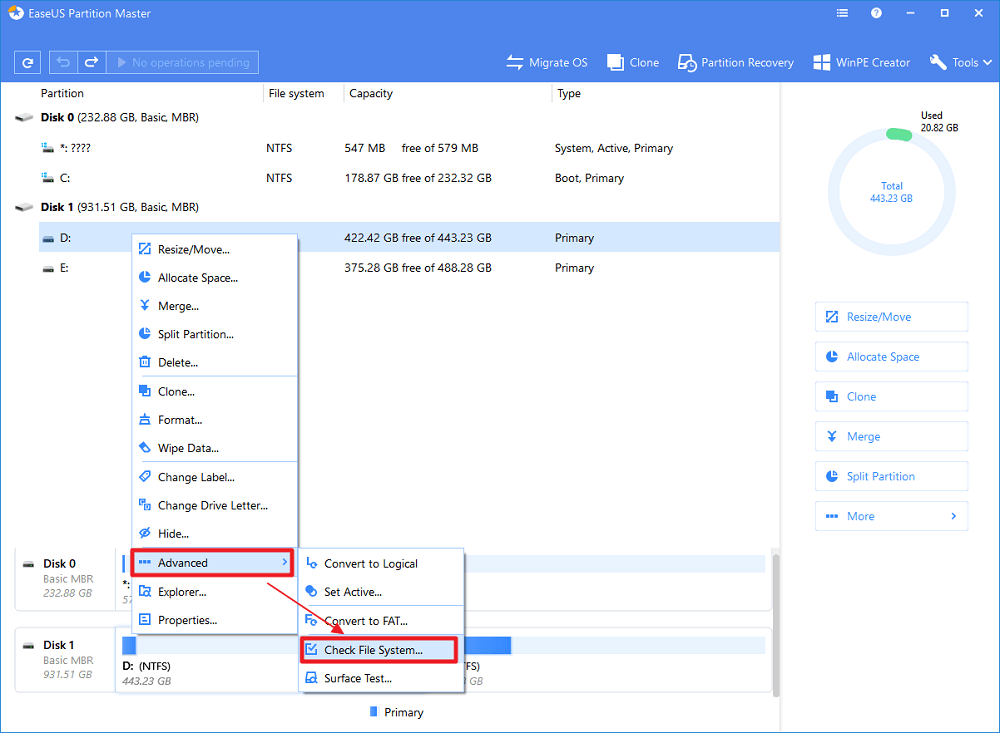
Step 2.В In the Check File System window, keep the «Try to fix errors if found» option selected and click «Start».
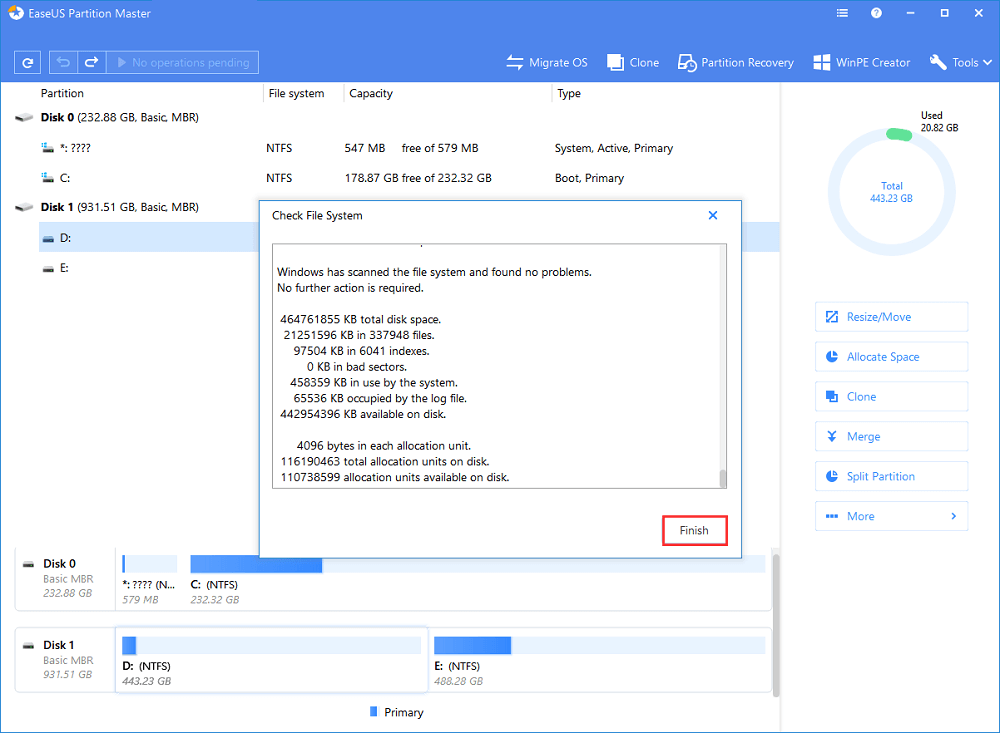
Step 3.В The software will begin checking your partition file system on your disk. When it complets, click «Finish».
Method 2. Run Disk Check in Windows File Explorer
Step 1.В Open File Explorer, locate and right-click the USB or external hard drive, and click «Properties».
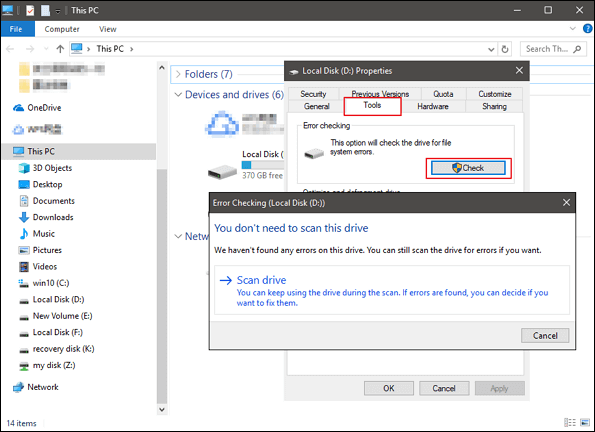
Step 2.В Go to «Tools» and click «Check» under Error-checking.
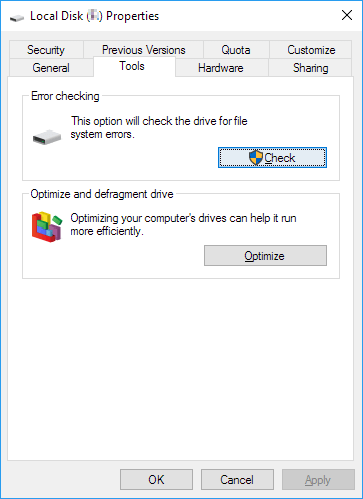
Step 3.В Select «Scan and repair drive».
OrВ select and check both «Automatically fix file system errors» and «Scan for and attempt recovery of back sectors», then click «Start».
Fix 2. Delete all partitions and create a new FAT32 partition on USB drive
If your Windows system (version before Windows 8.1) or your USB drive doesn’t support creating two primary partitions, the computer won’t be able to recognize nor format the non-primary partition on the USB drive to FAT32.
The solution to this problem is to delete all existing partitions on USB and create a new FAT32 partition:
Step 1.В Connect USB to PC and open Disk Management.
Step 2.В Locate and right-click the primary partition on USB and select «Delete Volume», click «Yes» to confirm.
Step 3. Right-click on the logical partition on the USB drive, select «Delete Volume».
Step 4.В Click «Yes» to confirm.В
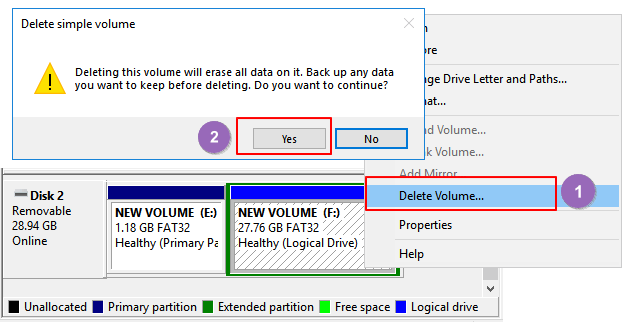
Step 5.В The logical partition will become free space, right-click on it and select «Delete Partition», click «Yes» to confirm.
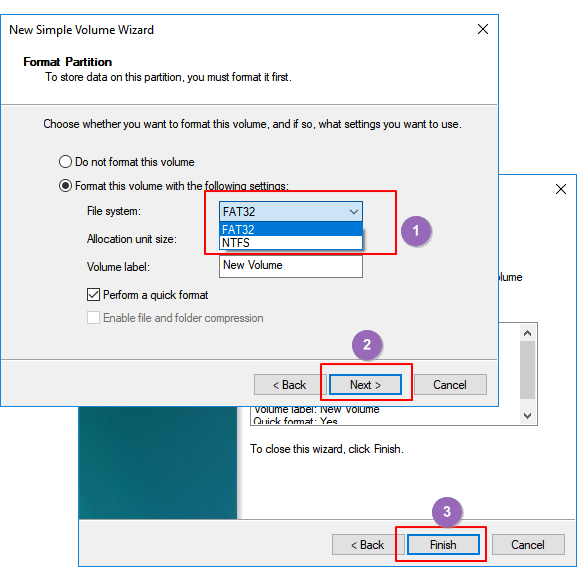
Step 6.В When the USB becomes unallocated, right-click on the unallocated space and select «New Simple Volume» > «Next».
Step 7.В Follow the on-screen instructions to specify volume size, drive letter, and set file system to FAT32, click «Next» > «Finish» to complete.
After this, you’ve successfully converted your USB or external hard drive to FAT32 and you don’t need to format this drive again.
Fix 3. Select NTFS as the file system or split USB larget partition to smaller FAT32 partitions
As shown in the chart at the beginning, the max size of the FAT32В partition is 32GB, which means you can only format devices smaller than 32GB into this file system.
In other words, when your USB drive partition is larger than 32GB, you can’t format it into FAT32. There are three solutions to this issue:
- Method 1. Apply EaseUS Partition Master to format USB to FAT32
Unlike Windows built-in tools, EaseUS Partition Master can simply format your USB drive even bigger than 32GB to FAT32 with ease. All you need is to go back to the partition manager to directly format your USB to FAT32 without any limitation.
- Method 2. Set NTFS as the file system of your USB drive
NTFS supports saving a single file that is larger than 4GB and supports creating a partition larger than 32GB.В
If you only want to keep one partition on the USB drive, make full use of the drive space, the best choice is to set the NTFS as your USB drive.В
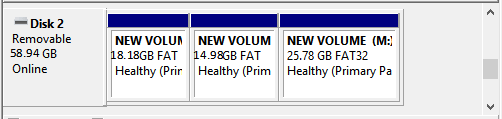
Method 3. Divide USB partition into small ones (less than 32GB) with FAT32
The other way is to split the USB partition into small ones and format them into FAT32:
Pre-conditions: Windows system (versions after 8.1) and USB drive both support two or more partitions.
Step 1. Use Disk Management to delete the USB partition.
Step 2.В Create two or more partitions smaller than 32GB with the FAT32 file system.В
Fix 4. Remove USB write protection and format USB to FAT32
When the USB drive is write-protected or locked with a password, you can’t directly format it into FAT32. Here are the detailed steps to resolve this problem:
Step 1.В Remove USB write protection and unlock USB
You can refer to this link to remove USB write protection on Windows 10/8/7. Or you can try to use EaseUS M Tool to simply remove the USB lock in 3 steps:
If you are not professional in computing management and not familiar with command lines, don’t worry. EaseUS R&D team has promoted a fresh kit for helping you resolve the write-protection issue on your hard drive, external hard drive, USB or SD card, etc., devices.
EaseUS Tools M is a practical computer fixing tool that is safe and light-weighted. It’s a perfect alternative to the command line.В
Use this one-click tool to solve the write-protection issues on your own:
Step 1: оњљ DOWNLOADВ and install EaseUS Tools MВ for free.
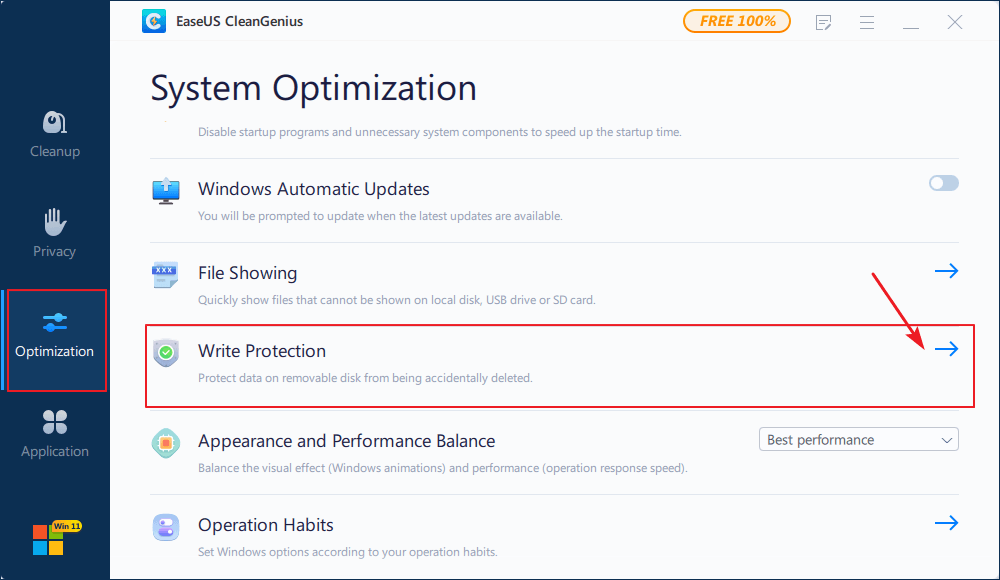
Step 2: Run EaseUS Tools M on your PC, choose the «Write Protection» mode.
Step 3: Select the device which is now «Write-Protected» and click «Disable» to remove the protection.
Step 2. Format USB to FAT32
After removing the USB write protection, you can apply any one of the above-provided solutions in Part 1 to format your USB drive to FAT32.
Final Word
This page tells how to format a USB or external hard drive into FAT32 and resolve the issue of being unable to format USB to FAT32. It also includes helpful solutions in formatting devices bigger than 32GB into FAT32 without data loss.
If you want to convert devices into NTFS without formatting, refer to How to Convert FAT to NTFS for help.


