Форматирование флешки в Linux
Большинство пользователей активно задействуют съемные накопители, поэтому логично, что иногда возникает надобность форматировать их. Такая задача считается достаточно простой и может быть выполнена разными методами, однако у неопытных юзеров операционных систем, основанных на базе ядра Linux, иногда возникают трудности. Сегодня мы бы хотели показать, как осуществляется процедура форматирования флешки разными методами. Приведенные ниже инструкции универсальны и подойдут для каждого дистрибутива.
Форматируем флешку в Linux
Существует большое количество дополнительных программ и утилит для управления накопителями, но разбирать их все просто не имеет смысла, ведь уже давно одни из них стали фаворитами, значительно превосходя конкурентов. Поэтому давайте остановимся на двух простых способах, а для начала упомянем стандартное средство. Оно используется редко, поскольку по своей функциональности уступает другим методам, но определенной категории пользователей такой вариант может пригодиться.
- Запустите консоль и введите там sudo fdisk -l . Такая команда поможет определить название флешки, чтобы выполнить ее форматирование.

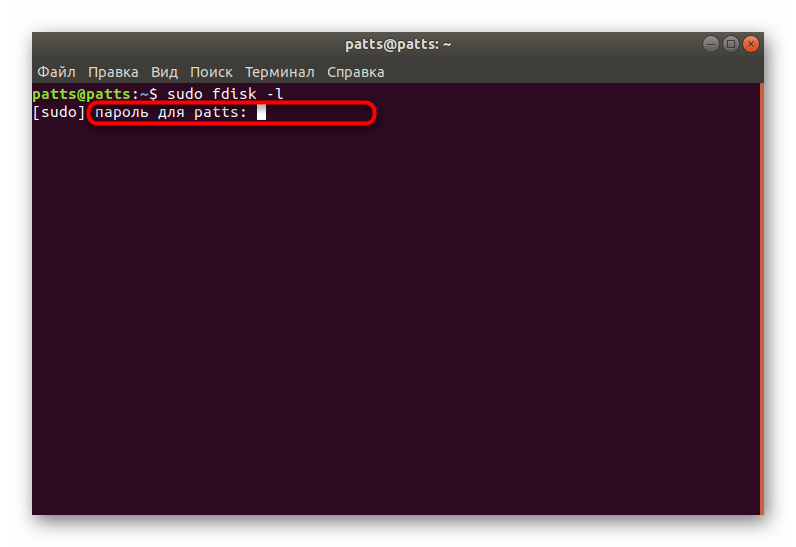
Ознакомьтесь со списком накопителей. Найти необходимый пункт можно по его размеру.

Смонтированный флеш-накопитель форматировать не получится, для начала размонтируйте его командой sudo umount /dev/sdb1 , где /dev/sdb1 — название флешки.


Как видите, утилита mksf подходит для форматирования, но осуществлять эту задачу через нее не очень удобно. Если вам такой метод не подходит или кажется сложным, советуем обратиться к следующим инструкциям.
Способ 1: Gparted
Дополнительное программное обеспечение под названием Gparted считается одним из лучших для работы с разделами жестких дисков или флешек. Доступен этот инструмент во всех дистрибутивах, но сначала его нужно установить.
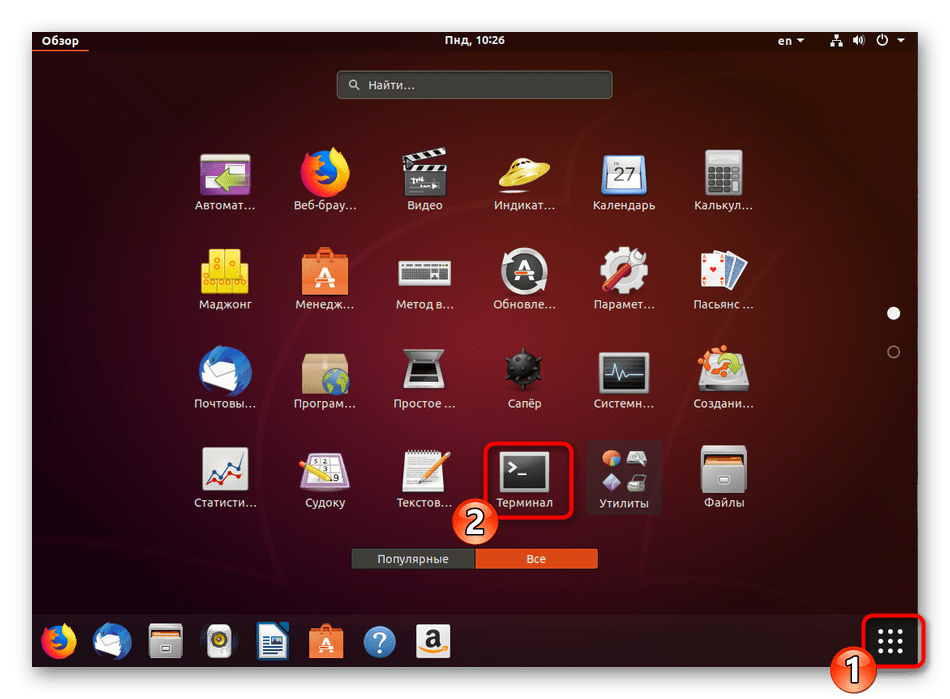
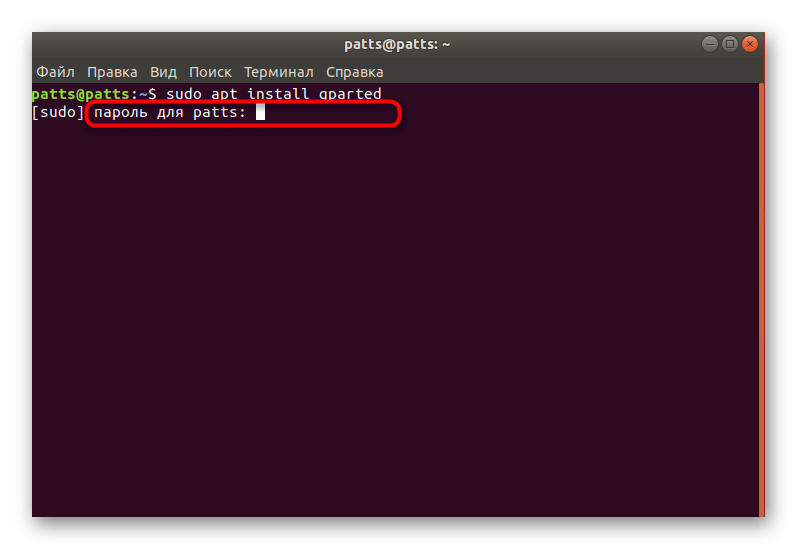
- Запустите «Терминал», например, через меню или зажав горячую клавишу Ctrl + Alt + T.
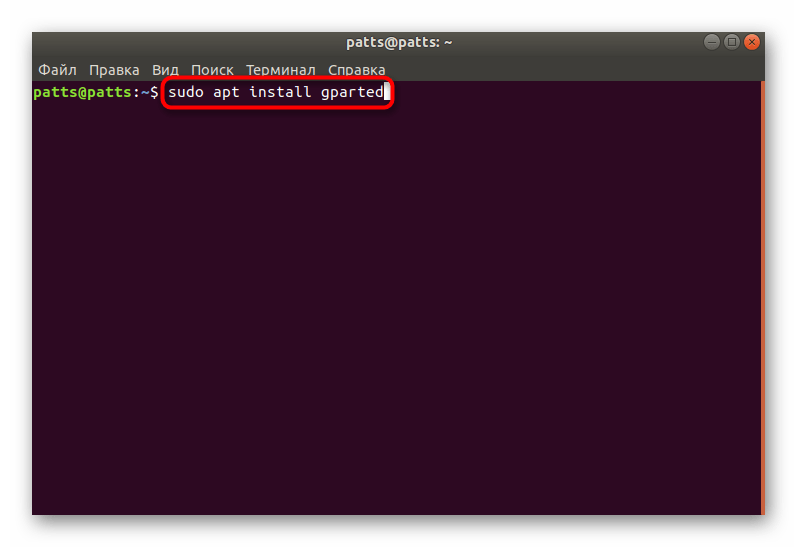
Выполнение инсталляции будет запущено только после подтверждения подлинности суперпользователя. При вводе пароля символы в строке не отображаются.
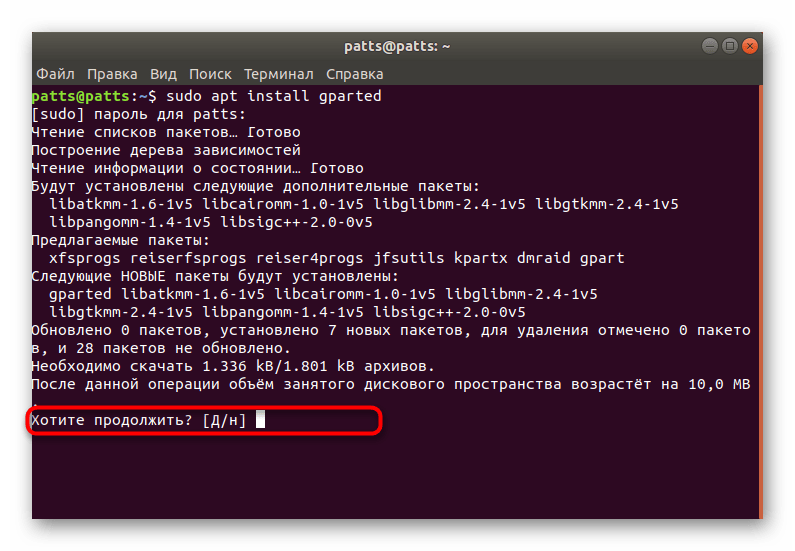
Подтвердите добавление новых пакетов, нажав Д.
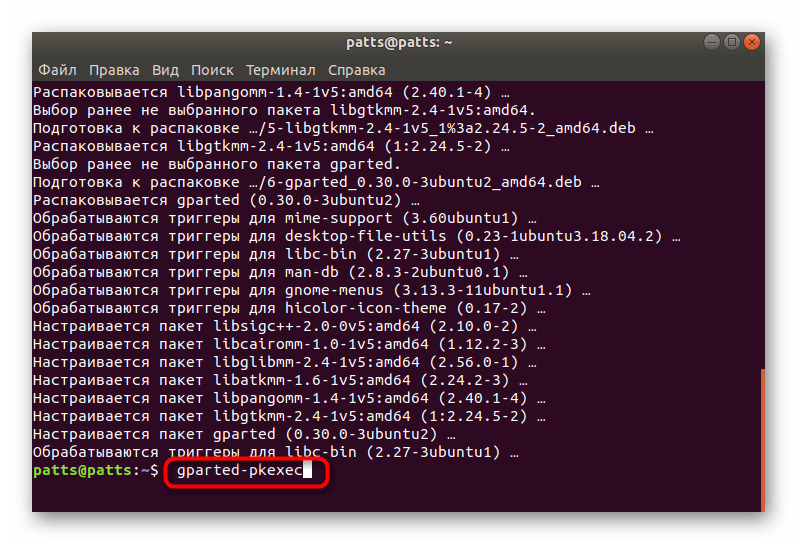
Запустите инструмент через меню или вписав команду gparted-pkexec .
В графическом интерфейсе инструмента для начала осуществляется переключение между накопителями. Выберите подходящий вариант из всплывающего меню.

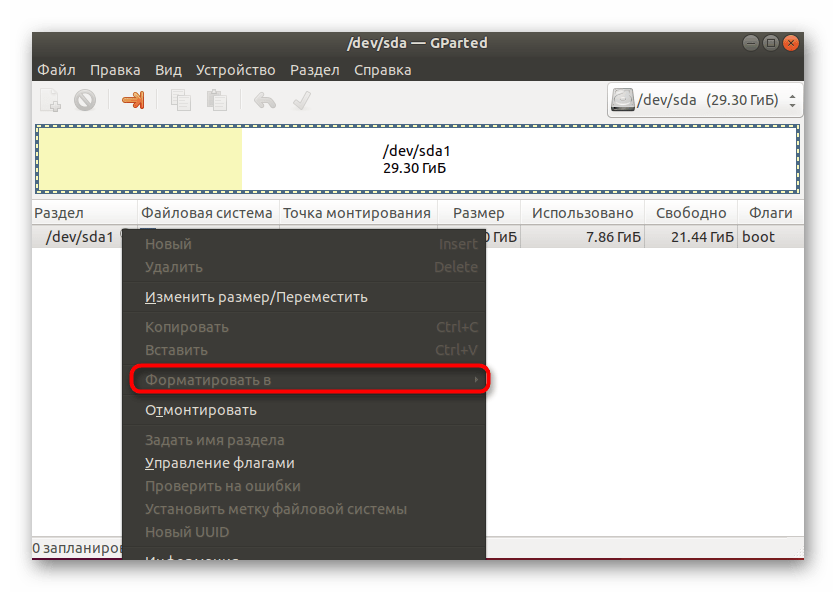
Другие действия с флешкой станут доступны только после ее размонтирования. Поэтому щелкните по ней ПКМ и выберите пункт «Отмонтировать».
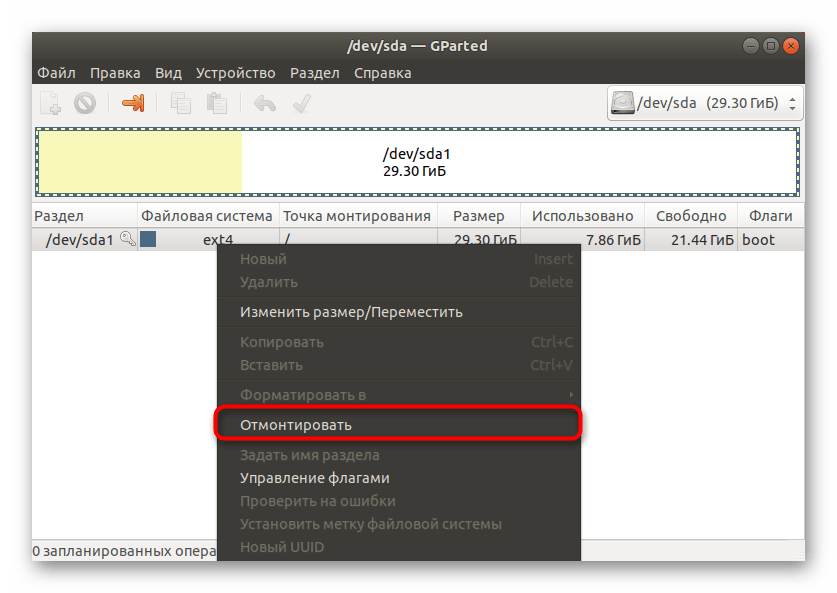
Осталось только щелкнуть на пункте «Форматировать в» и выбрать подходящую файловую систему.
После завершения форматирования флешки она станет не только полностью свободна, но и приобретет указанный ранее формат файловой системы, что будет полезно при дальнейшей работе с ней. Единственный недостаток этого варианта заключается в том, что программа Gparted не входит в стандартный набор обеспечения, а для ее установки потребуется активное подключение к интернету.
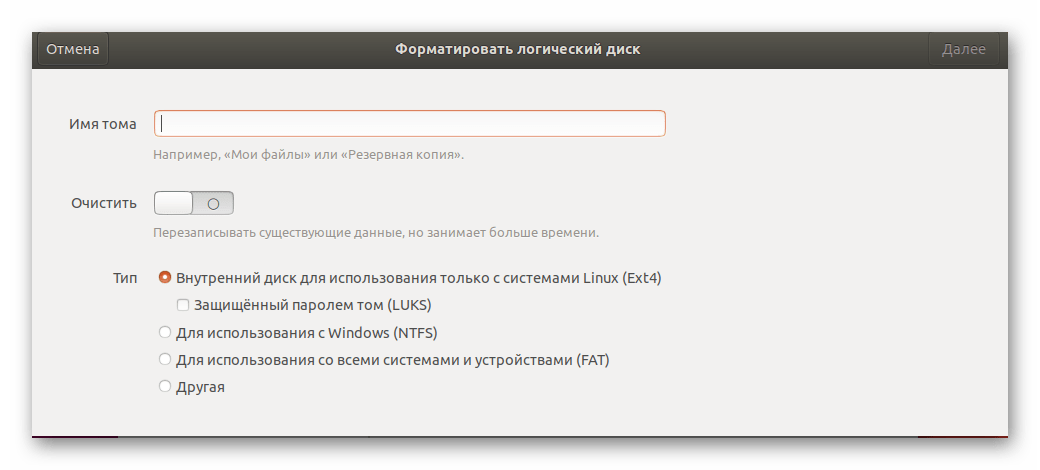
Способ 2: Управление дисками (Только для Gnome)
Одной из самых популярных графических оболочек считается Gnome. В ней присутствует множество самых разнообразных инструментов, позволяющих совершать управление системой. Доступен и инструмент по взаимодействию с подключенными накопителями. К сожалению, такой способ подойдет только тем, у кого установлена Gnome, этим юзерам следует выполнить такие действия:
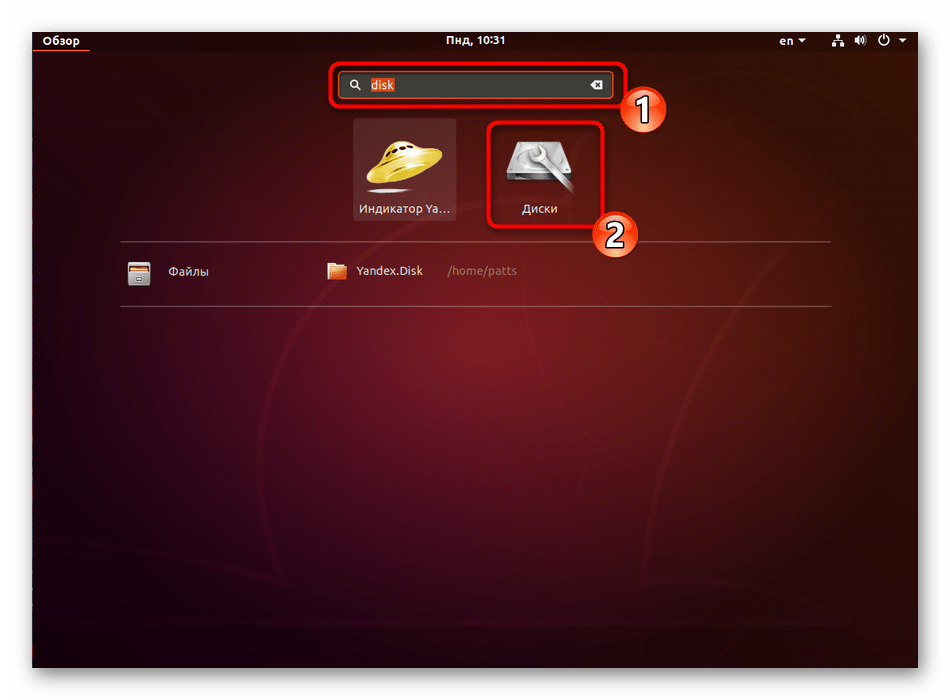
- Откройте меню и через поиск найдите инструмент «Диски» или «Disk Utility». Запустите программу двойным щелчком ЛКМ по ее значку.
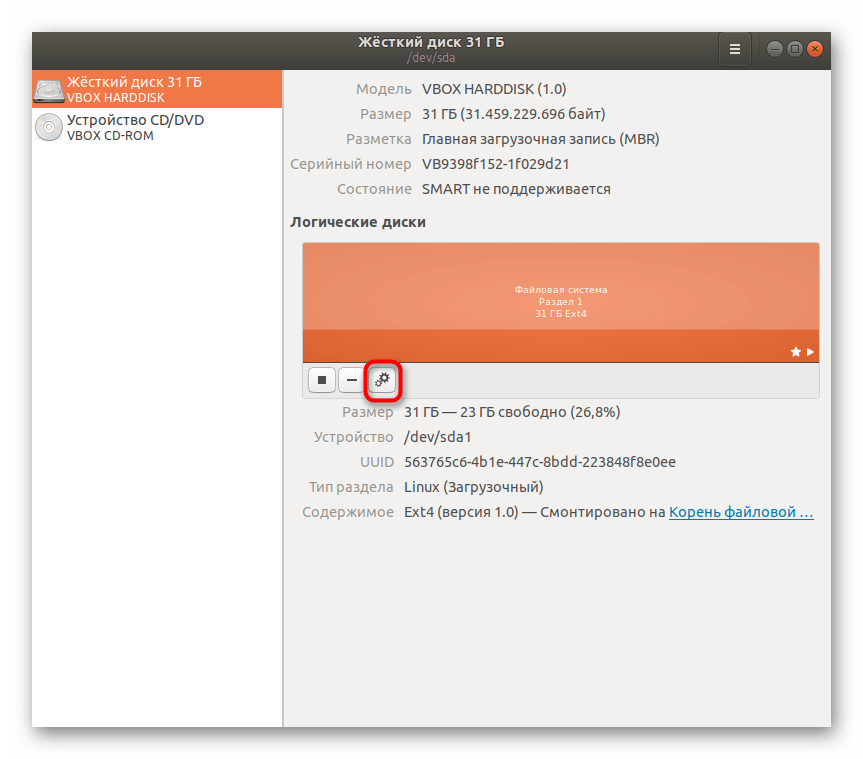
В меню слева выберите необходимое устройство и нажмите на кнопку в виде шестеренок.
Кликните на пункте «Форматировать раздел».
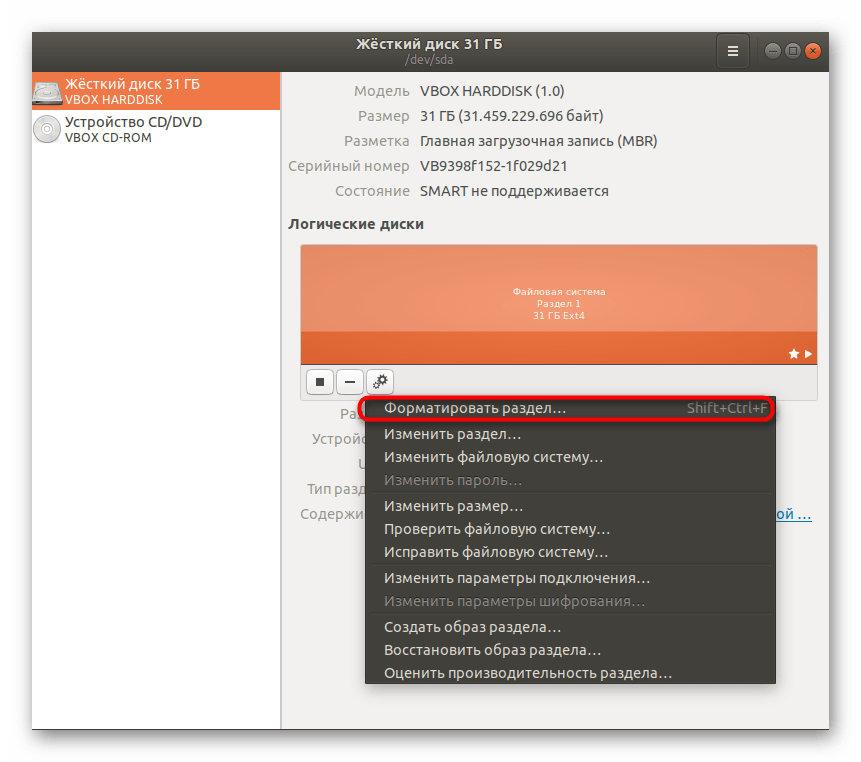
Осталось только выбрать файловую систему, задать дополнительные параметры и запустить процедуру очистки.
Как видите, все приведенные выше методы имеют отличия и будут максимально полезны в определенных ситуациях. Перед выполнением форматирования настоятельно рекомендуем проверять содержимое флешки, чтобы случайно не удалить нужную информацию.Это обусловлено тем, что не всегда восстановление удаленных файлов дает положительный результат, из-за чего данные можно потерять навсегда.
Помимо этой статьи, на сайте еще 12315 инструкций.
Добавьте сайт Lumpics.ru в закладки (CTRL+D) и мы точно еще пригодимся вам.
Отблагодарите автора, поделитесь статьей в социальных сетях.
Источник
how to easily format USB drives (flash drive) from linux command line
USB Drives or Flash drives are mostly just like any other drive like a hard drive. Occasionally you will want to format USB drives just as any other drive. Most commercially available USB drives are PC and Mac compliant, in that it is easy enough to reformat them on those operating systems, usually with a graphical interface with interactivity.
There are several reasons why you may want to re-format or format USB drives. Sometimes, a previous outdated formatting may require you to reformat the disk. If you had used the flash drive as a boot-able drive before, then the drive may be improperly formatted for normal usage. Also, if you used dd command to copy a smaller size image into the drive then you will need to reformat so as to restore the original size of the drive.
Theoretically, you can format USB drives using any of the file systems. But, it may not be a wise decision, unless you plan to use the drive exclusively on supported machines. Most systems (thinking Windows and Mac) will identify only FAT, vfat or FAT32 file systems. Fortunately, almost all Linux systems does have the ability to read FAT file systems, so you can use FAT or FAT32 file systems while formatting as well.
There are two main concepts that you should be aware of when you format USB drives: partition table and file system. A typical store bought flash drive will typically have the msdos partition table with the vfat file system on it. Unfortunately it is still a MS world and it is the most commonly used flash disk format which is supported by most operating systems and devices.
Note: All the following commands will need to be executed as the super user or root. You can either use sudo with each of these commands or login as root before executing them.
Using fdisk and mkfs commands
Once you have inserted the drive, you need to first identify the file system or device that you want to format. You can do that by using either the fdisk or mount commands.
Once you have identified the device, unmount it before formatting.
bash$ umount /dev/sdc1
The above command will unmount the file system mounted on /dev/sdc1. Now, you can use the mkfs command to create a new file system on the drive. You will specify the desired file system type as a command line argument to the mkfs command using -t.
The following command will create a ext3 file system in the USB drive. You can format usb drives using any of the supported file systems such as ext3, ext4, vfat etc.
bash$ mkfs -t ext3 /dev/sdc1
If you plan to use the USB drive, on all different operating systems, then you will need to format it using the FAT32 file system. The following command will re-format the drive using FAT32.
bash$ mkfs -t vfat -L «My USB» /dev/sdc1
The -L command line argument is optional. You can use it to set a label for the drive.
Using dd
Sometimes, just reformatting will not suffice. You might want to recreate the partition table as well. You can use dd command to wipe it clean and start over. The dd command will wipe out the partition table, which will allow you to start afresh.
bash$ dd if=/dev/zero of=/dev/sdc bs=1024
Once you have successfully rewrote everything on the disk, you can start out by creating a new partition table. To create a new partition table, use the fdisk command.
The fdisk command will walk you through the process of creating the new partition table. You can press m for help anytime to see all the available options.
bash$ fdisk /dev/sdc
You can run the fdisk command by specifying the device with no other argument as shown above. Then follow the steps shown below.
The following is a step by step process to create the partition table.
- press n to create a new table
- press p for partition table
- press 1 to select the first partition
- press to select the default first sector (which is usually 2048)
- press to select the default last sector
- press t
- press 6
- press w to write and commit the changes to disk
Once you have created the partition table, you can then format the USB drive by creating a file system using the mkfs command as described in the previous section.
Using parted
parted is a command line utility that is used to partition drives and disks. It is a partition editor which helps you with the exact partitions that you need. You can use this instead of the fdisk command.
bash$ parted -l
or
bash$ parted /dev/sdc print
So, you can use parted to create a new partition table, format and clean your USB drive just as with the mkfs, dd and fdisk commands. In order to start parted on the device, use the following command which brings you to a parted prompt…
bash$ parted /dev/sdc
Let’s first see how the utility identifies the drive, which is always a good idea…
The next step is to create a new partition table. You can also skip this step, if you just want to continue to use the current table. You can use the gpt table if you plan to use the drive only on Linux machines. You can also specify the msdos if you plan to use it elsewhere…
(parted) mklabel msdos
Now, we want to create a new partition on the disk. Almost always, you will use a single partition for data unless you have specific requirements.
Choose primary partition for the partition type….
Partition type? primary/extended? primary
Choose the msdos as the file system type. (You can use other file systems such as ext3 or ext4 if you prefer). Now, choose the start as 2048 and the end as -1 which corresponds to a reasonable value for the start and end. You can also use 1 and -1 as start and end.
Now, you can use the mkfs command to format USB drives and the new partition as described in the previous section.
bash$ mkfs -t vfat -L «My USB» /dev/sdc1
There are three different parted commands that you will commonly use that you need to familiar with.
mklabel: This creates a new disk label or partition table on the disk with out creating any partitions itself.
mkpart: This creates a new partition on the disk with out a file system on that partition.
mkpartfs: This creates a new partition with the specified file system, such as fat32 or ext4.
mkfs: This makes a “new” file system on the specified partition by destroying all the data on that partition.
Using gparted
gparted is a user interface built on top of the parted command. This software makes it easy to partition and format USB drives. If you have access to an X interface, then using gparted is a good idea. parted command is still the best option from the command line.
I am not going to go into the details of how to use gparted here, as it is beyond the scope of this post. It is pretty intuitive in how you would use it, once you know how to use parted and how formatting works.
Источник


