- Форматирование накопителей в Windows 10
- Отформатируйте жесткий диск в Windows 10
- Отформатируйте жесткий диск без раздела в Windows 10
- How to format a new hard drive on Windows 10
- How to format existing partition using Disk Management
- How to create and format partition using Disk Management
- More Windows 10 resources
- The Dell XPS 15 is our choice for best 15-inch laptop
- Halo: MCC’s live service elements make it better, not worse
- Microsoft’s Surface Duo is not ‘failing up’
- These are the best PC sticks when you’re on the move
Форматирование накопителей в Windows 10
В Windows 10 рекомендуется отформатировать жесткий диск, чтобы стереть текущие данные, и убедиться, что настроена поддерживаемая файловая система, которую операционная система может понять для чтения и записи данных. Кроме того, использование функции «Форматирование» может помочь удалить все ваши личные данные, когда вы планируете избавиться от диска, чтобы у кого-то еще не было легкого доступа к вашим файлам.
Раньше для форматирования жесткого диска требовалось использовать инструмент управления дисками, командную строку или PowerShell, но после сборки 20197 в Windows 10 появились новые возможности, встроенные в параметры хранилища, чтобы упростить управление дисками и разделами.
В этом руководстве вы узнаете, как отформатировать жесткий диск (внутренний или внешний) с помощью настроек «Управление дисками и томами», доступных в Windows 10.
Отформатируйте жесткий диск в Windows 10
Чтобы отформатировать жесткий диск с помощью параметров управления дисками и томами, выполните следующие действия:
Важно: процесс форматирования удалит все на диске. Поэтому перед продолжением рекомендуется сделать резервную копию всех важных данных.
- Откройте Настройки в Windows 10.
- Щелкните Система.
- Щелкните Хранилище.
- В разделе «Дополнительные настройки хранилища» выберите параметр «Управление дисками и томами».

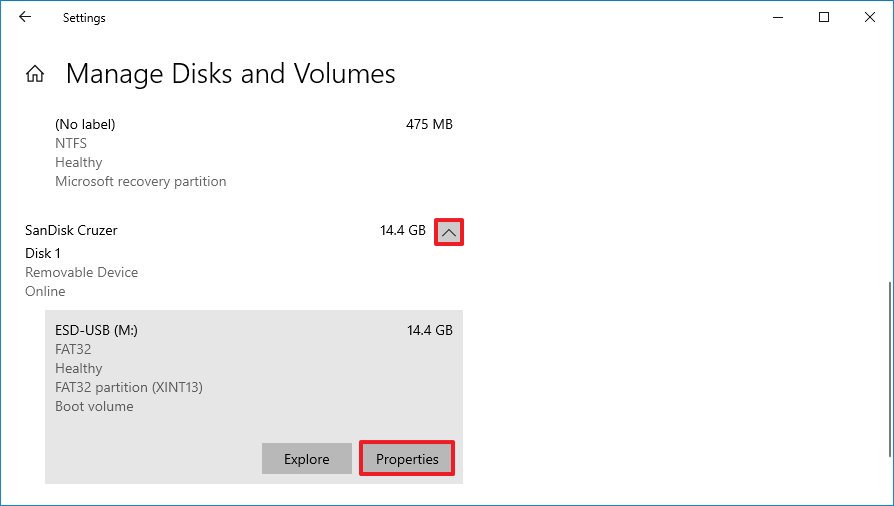
- Выберите жесткий диск с разделом, который вы хотите отформатировать.
- Нажмите кнопку со стрелкой в правом верхнем углу, чтобы просмотреть доступные разделы (если применимо).
- Выберите раздел.
- Щелкните кнопку Свойства.
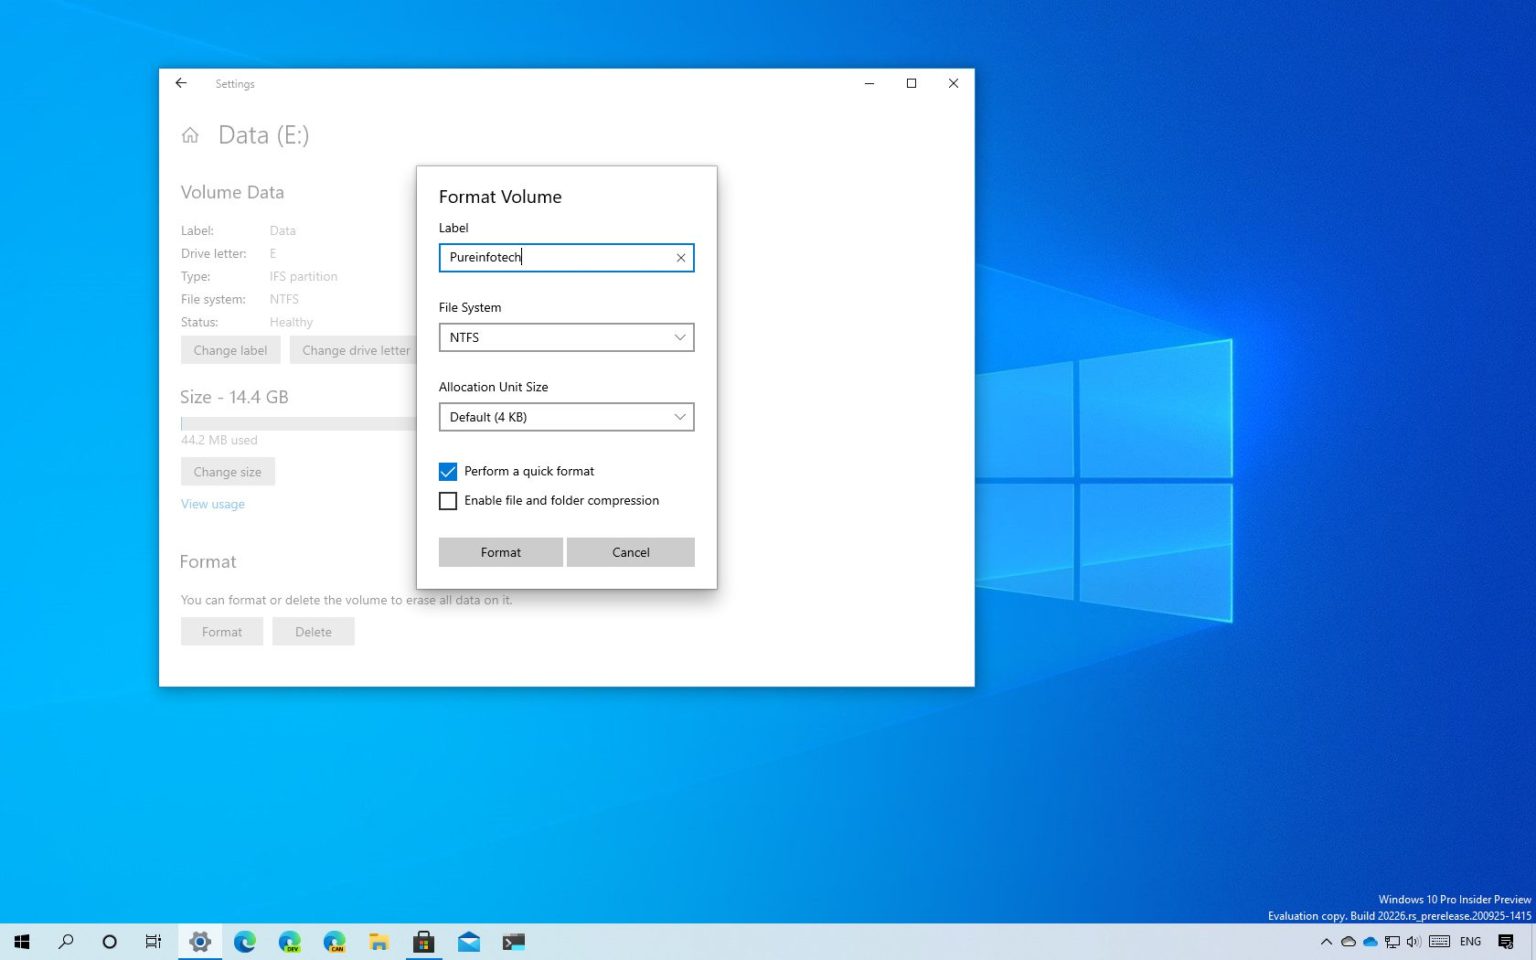
- В разделе «Формат» нажмите кнопку «Форматировать».
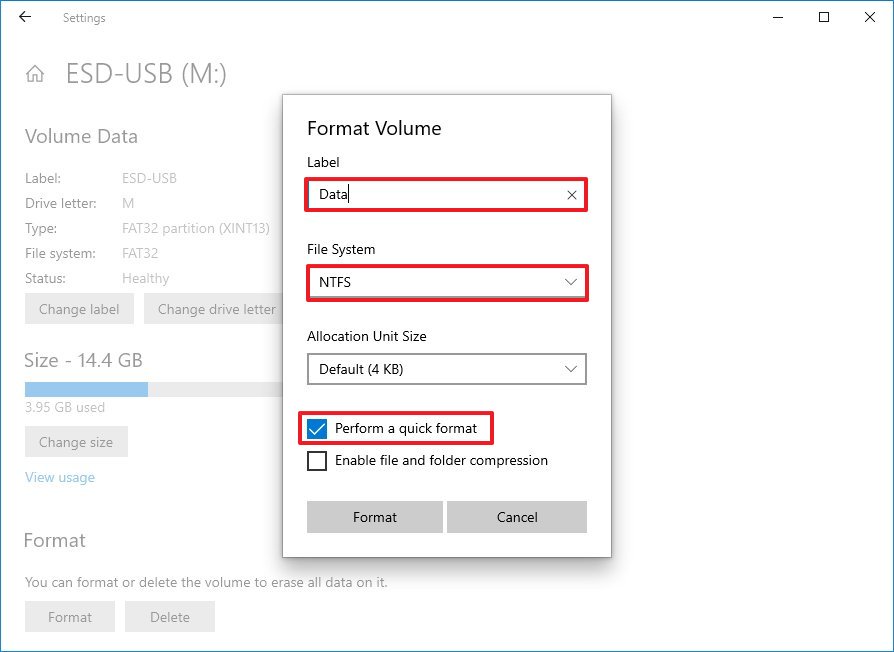
- В поле «Метка» укажите имя, которое будет отображаться для жесткого диска в проводнике.
- Используйте раскрывающееся меню «Файловая система» и выберите параметр NTFS.Настройки формата жесткого диска
Совет: если вы форматируете флеш-накопитель, который вы будете использовать в разных операционных системах, вы можете рассмотреть возможность использования файловой системы exFAT. - Используйте значение по умолчанию для размера единицы распределения.
- (Необязательно) Снимите флажок «Выполнить быстрое форматирование», чтобы выполнить полное форматирование. Однако, в зависимости от размера жесткого диска, это может занять много времени. Обычно вы можете использовать эту опцию, если вы выводите устройство хранения из эксплуатации.
- (Необязательно) Установите флажок Включить сжатие файлов и папок, если вы хотите сэкономить место при хранении файлов. Использование этого параметра может незначительно повлиять на производительность диска, так как процесс сжатия и распаковки будет происходить по мере использования хранилища.
- Нажмите кнопку «Форматировать».

После того, как вы выполните эти шаги, раздел жесткого диска будет отформатирован. Вы не увидите никаких визуальных элементов, показывающих прогресс форматирования, но кнопка «Форматировать» будет неактивна до завершения процесса.
Отформатируйте жесткий диск без раздела в Windows 10
Если на устройстве хранения нет раздела, вам необходимо создать новый раздел, а затем отформатировать диск.
Чтобы создать и отформатировать внешний или внутренний жесткий диск, выполните следующие действия:
- Откройте настройки.
- Щелкните Система.
- Щелкните Хранилище.
- В разделе «Дополнительные настройки хранилища» выберите параметр «Управление дисками и томами».
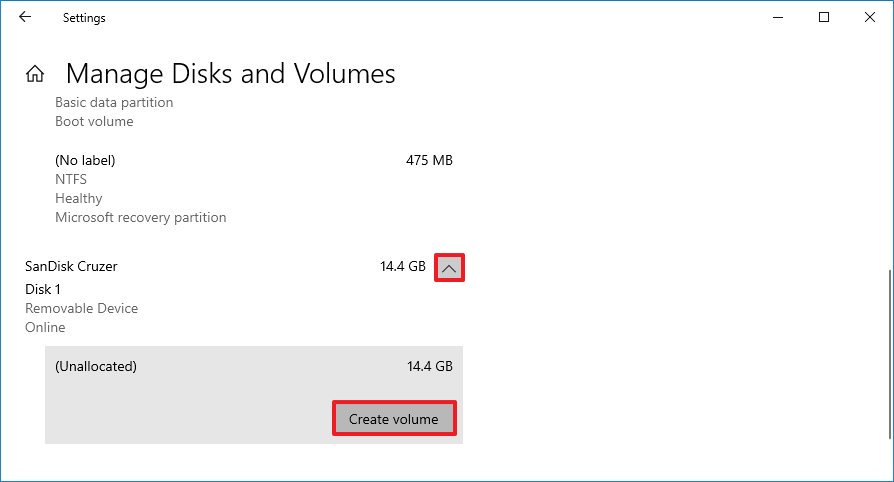
- Выберите жесткий диск, который хотите отформатировать.
- Нажмите кнопку со стрелкой в правом верхнем углу , чтобы просмотреть доступное хранилище (если применимо).
- Выберите Незанятое пространство.
- Нажмите кнопку Создать том.
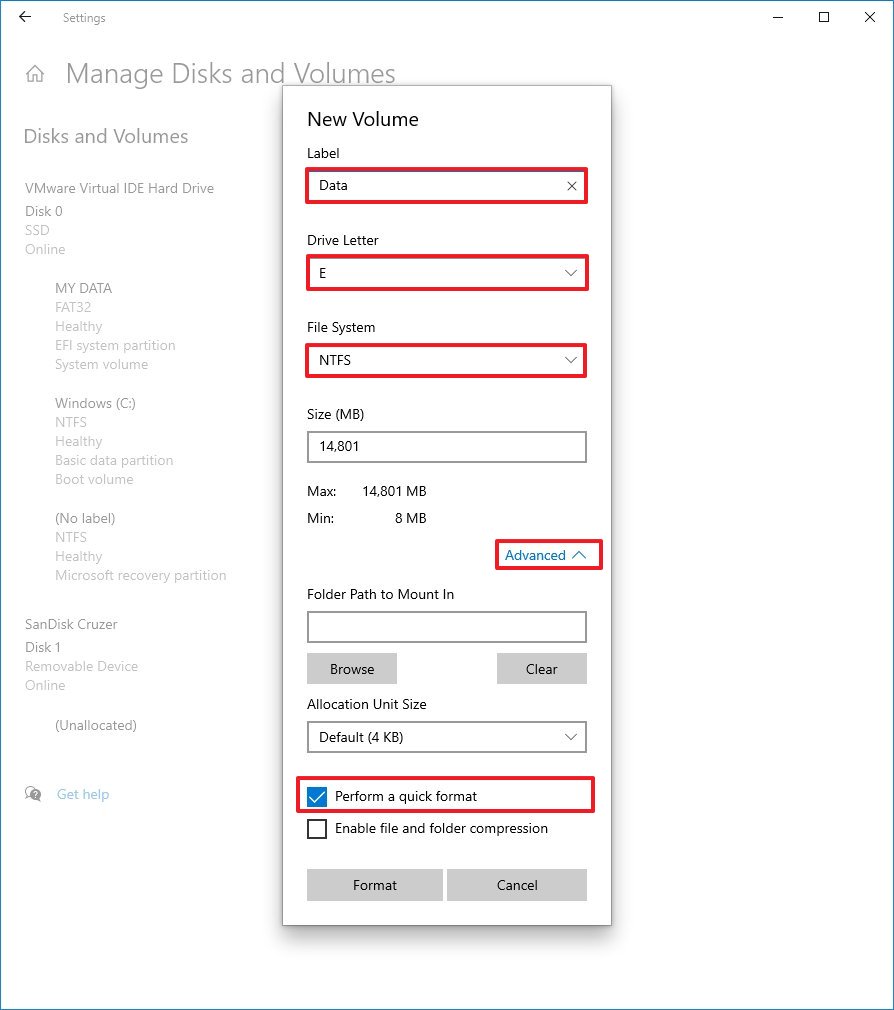
- В поле «Метка» укажите имя, которое вы хотите отображать для жесткого диска.
- Используйте Drive Letter выпадающего меню, чтобы назначить букву для диска.
- Используйте раскрывающееся меню «Файловая система» и выберите параметр NTFS.
- (Необязательно) В поле «Размер» укажите размер раздела в мегабайтах. Если вы планируете использовать один раздел для хранения данных, вам не нужно изменять этот параметр.
- Щелкните опцию Advanced.
- (Необязательно) В поле «Путь к папке для подключения» укажите путь к папке, в которую вы хотите подключить диск. (Это необычный вариант для обычных пользователей.)
- Используйте значение по умолчанию для размера единицы распределения.
- (Необязательно) Снимите флажок «Выполнить быстрое форматирование», чтобы выполнить полное форматирование, но в зависимости от размера жесткого диска это может занять много времени.
- (Необязательно) Установите флажок Включить сжатие файлов и папок, если вы хотите сэкономить место при хранении файлов. Использование этого параметра может незначительно повлиять на производительность диска, так как процесс сжатия и распаковки будет происходить по мере использования хранилища.
- Нажмите кнопку «Форматировать».
После выполнения этих шагов новый раздел будет создан и отформатирован в соответствии с указанной вами файловой системой. После завершения процесса вы можете начать сохранять файлы с помощью проводника.
Процесс может занять некоторое время. Вы не увидите никаких визуальных эффектов, но вы получите уведомления, когда форматирование будет завершено, и диск появится в проводнике.
Если вы не видите параметры «Управление дисками и томами», скорее всего, вы не используете версию Windows 10, которая включает эту функцию. На момент написания эта функция доступна в сборке 20197 и более поздних версиях.
How to format a new hard drive on Windows 10
 Source: Windows Central
On Windows 10, when connecting a new internal or external hard drive, it’s important to spend the time to format it before storing files. You want to do this to make sure that the drive is empty, working as expected, and free of malware that might otherwise harm the current setup and files. It’s also important to format the storage to ensure that it’s using the proper settings to avoid compatibility problems.
Whenever you format a hard drive, the data will be deleted, since part of the process includes purging the file system table that tracks the locations of the files written on disk. The process will then define the area where files will be stored, and a compatible file system (such as NTFS, FAT32, or exFAT) will be applied to organize the new content. The system will continue to detect the previous data, but it’ll identify that information as available space to store new data.
Windows 10 includes many methods to format a hard drive, but using Disk Management is perhaps one of the best options for most users.
In this Windows 10 guide, we’ll walk you through the steps to properly format a traditional hard drive or Solid-State Drive (SSD), whether it already has a partition or was never initialized.
How to format existing partition using Disk Management
When you’re dealing with a drive that already has a partition, you can format the existing partition to delete its files and start with a clean storage.
To format a partition using Disk Management, use these steps:
- Open Start.
- Search for Create and format hard disk partitions and click the top result to open the Disk Management console.
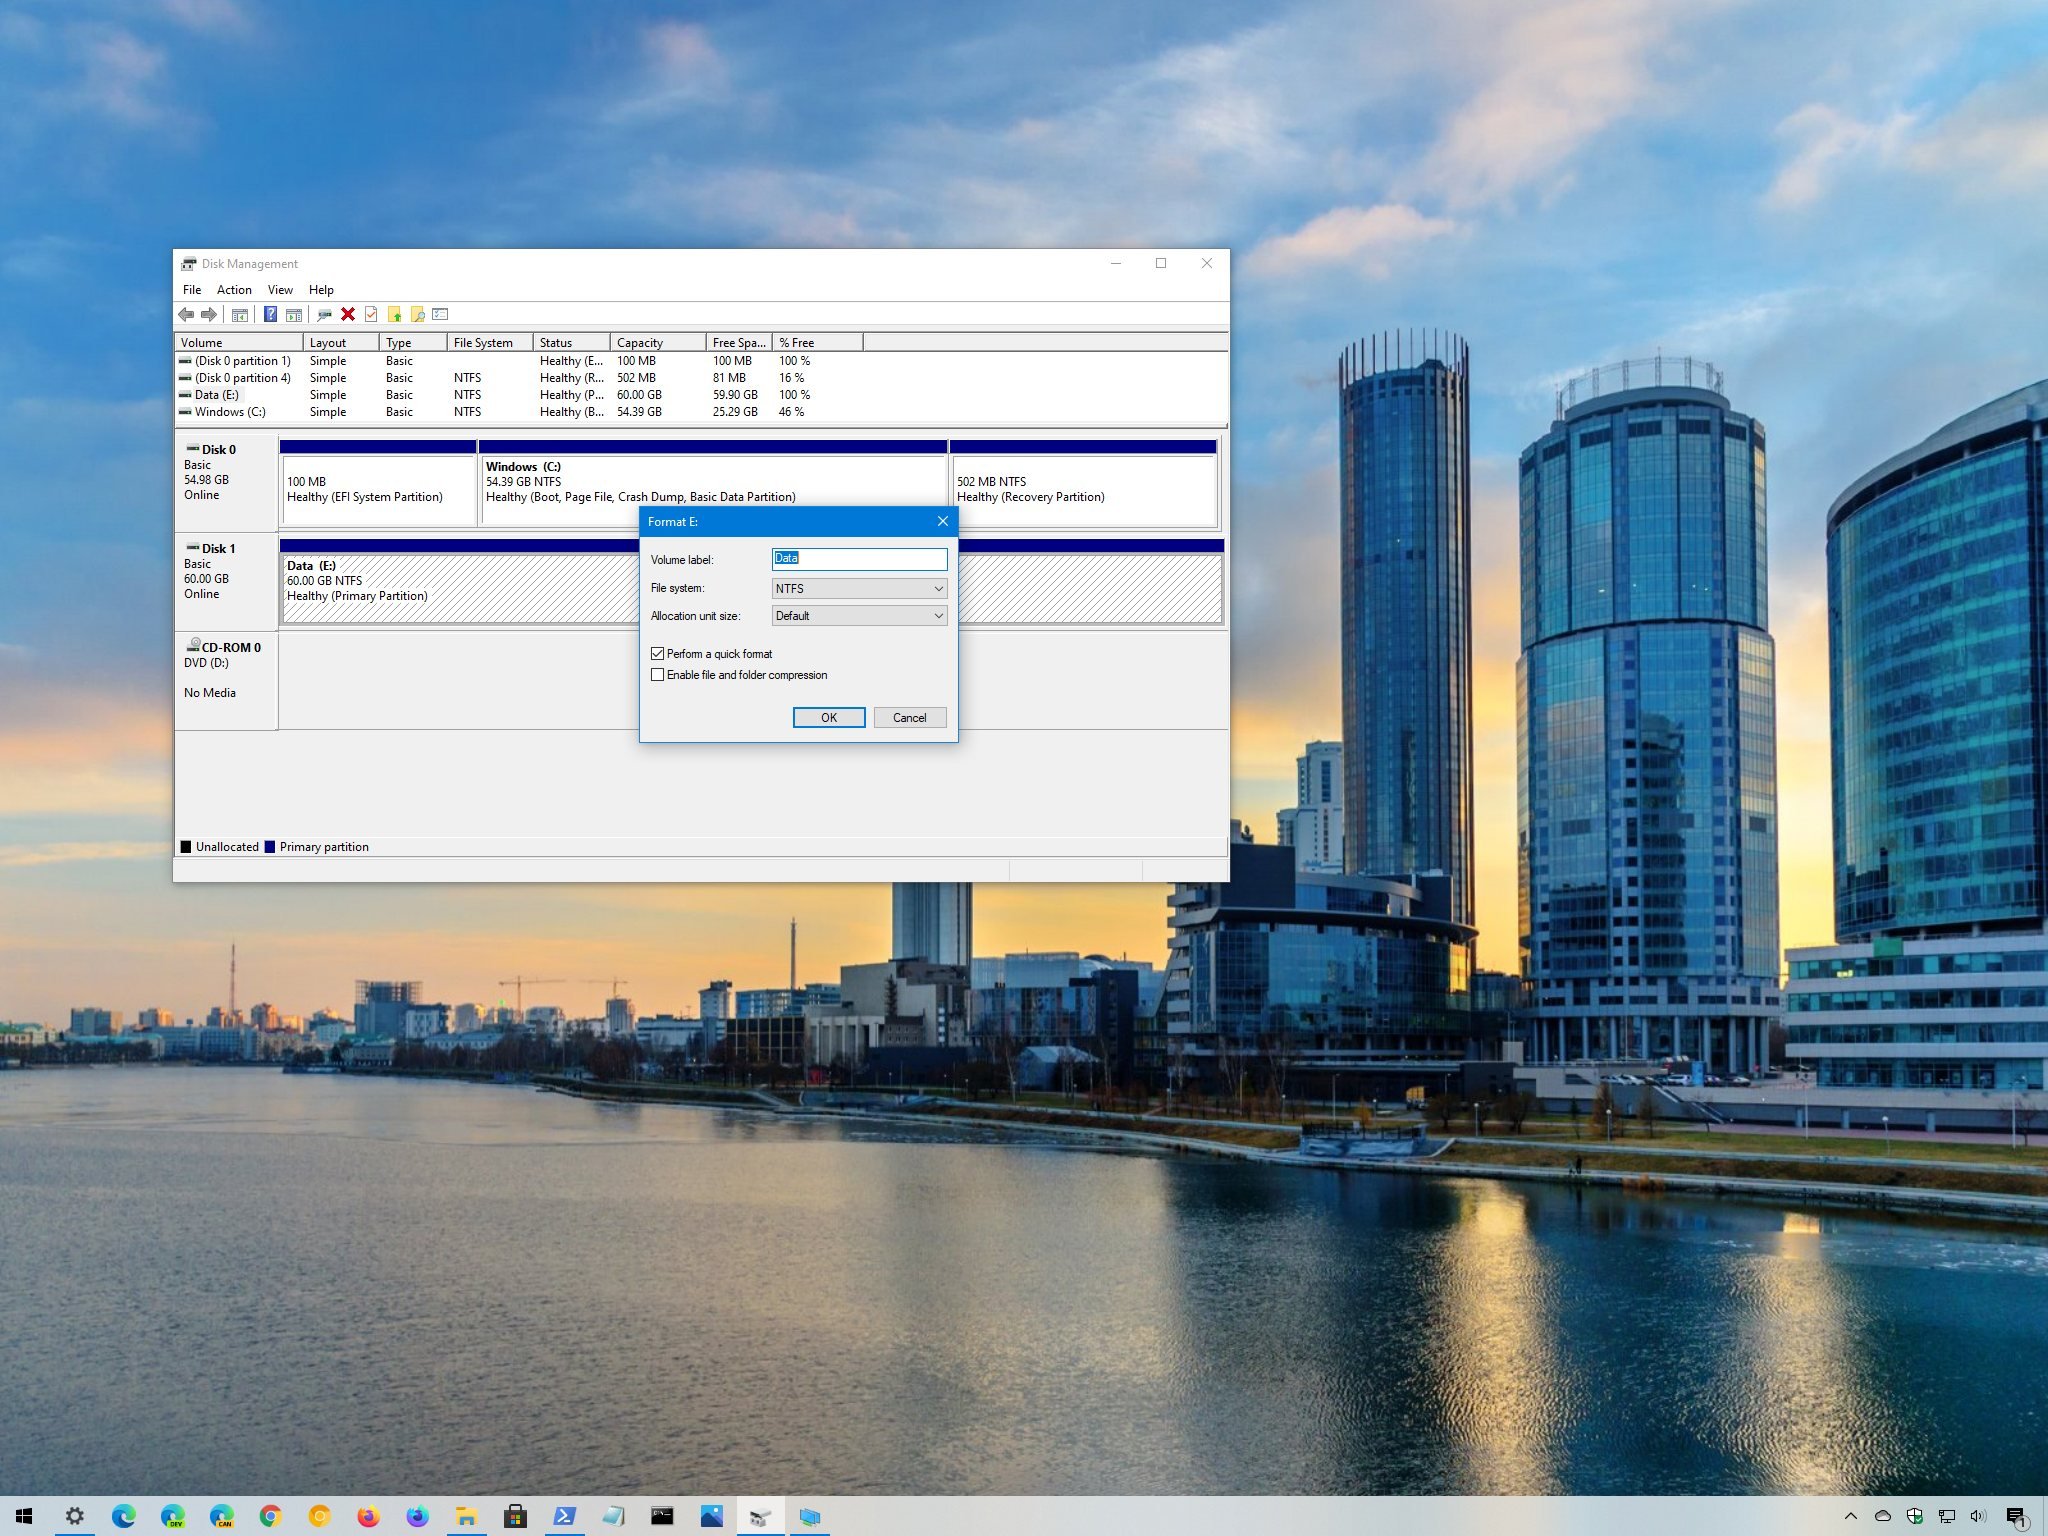
Right-click the new hard drive and select the Format option.
 Source: Windows Central
Check the Perform a quick format option.
Source: Windows Central
Quick tip: The quick format option wipes the drive fast, but it doesn’t check for problems. On the other hand, when clearing the option, a full format will be performed, which not only wipes the drive clean, but it’ll also check for bad sectors. It’s an option that could take many hours depending on the size, but it’s a good practice to make sure the drive is in working conditions.
Once you complete the steps, the tool will format the selected partition on the drive, and then you can begin storing files.
How to create and format partition using Disk Management
In the case that you have a hard drive that was never partitioned and formatted, it will not appear in File Explorer, and you’ll have to initialize, create a new partition, and then format it before you can use it.
Usually, you can tell a hard drive doesn’t have a partition, because it will not appear in File Explorer, and on Disk Management, it’ll show up as unallocated space.
To set up a new hard drive with raw space on Windows 10, use these steps:
- Open Start.
- Search for Create and format hard disk partitions and click the top result to open the Disk Management console.
Right-click the hard drive marked as «Unknown» and «Not Initialized» and select the Initialize Disk option.
Source: Windows Central
Select the partition style:
- Master Boot Record (MBR) for hard drives smaller than 2TB in size.
- GUID Partition Table (GPT) for hard drives larger than 2TB in size.
Source: Windows Central
Right-click the Unallocated space part of the storage, and select the New Simply Value option.
Source: Windows Central
Under the «Simple volume size in MB» section, leave the default size if you’re planning to use the entire hard drive to store files. Otherwise, specify the amount of space in megabytes you want to allocate for the partition.
 Source: Windows Central
Use the «Assign the following drive letter» drop-down menu to select a new drive letter.
Source: Windows Central
Check the Perform a quick format option.
Source: Windows Central
Quick tip: To perform a full format that includes a disk check, clear the quick format option. If you use the full format option, remember that it can take many hours to complete depending on the size.
After you complete the steps, the new hard drive will be initialized, partitioned, and properly formatted.
If the drive is exhibiting problems using the Disk Management tool, as a result of data corruption or another issue, you can use the DiskPart command-line tool to resolve the problem.
We’re focusing this guide on Windows 10, but these instructions should also work on Windows 8.1 and Windows 7.
More Windows 10 resources
For more helpful articles, coverage, and answers to common questions about Windows 10, visit the following resources:
![]()
The Dell XPS 15 is our choice for best 15-inch laptop
For a lot of people, a 15-inch laptop is a perfect size that offers enough screen for multitasking, and in a lot of cases, some extra performance from powerful hardware. We’ve rounded up the best of the best at this size.
![]()
Halo: MCC’s live service elements make it better, not worse
Halo: The Master Chief Collection is more popular than ever, but some fans don’t agree with the live service approach 343 Industries has taken with it. Here’s why those elements are, at the end of the day, great for the game and for Halo overall.
![]()
Microsoft’s Surface Duo is not ‘failing up’
Microsoft announced this week that it was expanding Surface Duo availability to nine new commercial markets. While Surface Duo is undoubtedly a work in progress, this is not a sign of a disaster. It’s also doesn’t mean that Surface Duo is selling a ton either. Instead, the reason for the expansion is a lot more straightforward.
![]()
These are the best PC sticks when you’re on the move
Instant computer — just add a screen. That’s the general idea behind the ultra-portable PC, but it can be hard to know which one you want. Relax, we have you covered!


