- How To Convert Files from Linux/Unix Format to Windows and Vice Versa
- Converting Files from Linux/UNIX format to Windows Format
- The dos2unix and unix2dos command
- The awk command
- The tr command
- Using the Visual Editor (Vi)
- Using File Transfer Protocol Programs
- Conclusion
- How to Format and Wipe Linux Disk Using Commands
- Can’t seem to clear your Linux disk space or not sure about disk formatting? Read this informative post about the working of different Linux commands to wipe or format the disk.
- Why Do We Need to Format and Wipe Linux Disk?
- How to Format a Linux Hard Drive?
- Step 1 Create a partition of the disk
- Step 2 Format the disk
- Step 3 Mount the file system (optional)
- How to Wipe a Hard Drive on Linux?
- 1 wipe
- 2 shred
- 4 scrub
- Tips for Formatting and Wiping Linux Disk
- Video Tutorial on How to Recover Data from Hard Disk After Disk Wipe
- What disk format does Linux use?
- Does a full format wipe data?
- How do I wipe Linux and install Windows?
- Does formatting remove Bitlocker?
How To Convert Files from Linux/Unix Format to Windows and Vice Versa

If you’ve ever transferred a text file from a UNIX based system to a Windows system directly, you know that when you open the text file on the Windows system, it is usually not displayed correctly. Windows based text reader programs (like Notepad) may not be able to display the text. In most cases, when you open the text file, all the words get displayed on a single giant line, without any breaks. This is because there is a slight difference in the way a text document is written (and read) on Windows and UNIX.
If a file was written on a Windows based system and is opened by a text editor on a UNIX system, it is very common for the “Ctrl-M” characters (^M) to be displayed at the end of each line of text. If a file was written on a UNIX system and opened by a text editor on a Windows system, the line break character (EOL) may not be displayed correctly. The carriage return character is also different for both UNIX and Windows.
While dealing with files, you don’t want to be limited by whether the file was created on Linux or Windows. So how do you convert a file from UNIX to Windows (or vice versa) without having the formatting go all crazy? We’ll walk you through the steps.
Converting Files from Linux/UNIX format to Windows Format
If you’re using a UNIX based system to transfer the files to a Windows system, there are some commands that let you convert the text file(s) you are transferring to a format Windows can understand.
The dos2unix and unix2dos command

You can use command line to safely convert files from UNIX to Windows and vice versa. To convert a Windows text file to a UNIX text file, enter this:
The above command converts and replaces “windows.txt” file to “unix.txt”. To convert a UNIX text file to a Windows text file, enter this command:
The above command will convert a UNIX created text file called “unix.txt” to a Windows compatible text file called “windows.txt”.
The awk command
The awk command also lets you convert a file from UNIX to Windows and vice versa. To convert a Windows file to a UNIX file, enter the following command:
To convert a UNIX text file called “unix.txt” to a Windows text file called “windows.txt”, enter the following command:
The tr command

The tr command (transliterate) can be used to remove the carriage return characters and the “Ctrl-Z” characters from a Windows file. This can only be done if you are converting a file from Windows to UNIX. The command will be written as follows:
The tr command transliterates one character with another. In this case, it is helping you omit unnecessary characters.
Using the Visual Editor (Vi)
If you are using the Visual Editor to view a file created on a Windows system, you can remove the carriage return characters by typing the following command line:
To get the computer to input the ^M character, you need to hit “Ctrl + v” and then press Return.
Using File Transfer Protocol Programs
File Transfer Protocol (FTP) programs are available both for UNIX and Windows system. If you need to convert a lot of files from Windows to UNIX (or the other way around), then it’s a good idea to download a FTP program. There are many available for free on the Internet. The Hummingbird FTP is one of the more popular FTP programs out there. It is secure and easy to use.
Most FTP programs will transfer files from UNIX to Windows in the ASCII format. Sometimes you have to specify the format for yourself (if you are using command line based FTP programs). To do that, just enter this in the command line:
Conclusion
The easiest way to convert a file from a UNIX format to Windows (and the other way around) is to use an FTP program. The conversion commands are your next best bet. If you are looking for additional commands that perform the same task, you can search for perl and sed commands. However, do keep in mind that these commands may not work across all systems.
I’m a techie with over a decade of programming experience, spread across a wide range of interesting, path breaking technologies. Now I’m sharing my passion for technology, and making tech easier, with everyone! Hope you enjoy reading about, and playing with technology, as much as I do!
Источник
How to Format and Wipe Linux Disk Using Commands
Can’t seem to clear your Linux disk space or not sure about disk formatting? Read this informative post about the working of different Linux commands to wipe or format the disk.

Theo Lucia
Sep 14, 2021 • Filed to: Answer Hard Drive Problems • Proven solutions
If you also own a Linux system, which is running on low disk space, then you might be facing a similar situation. Although Linux is one of the most popular open-source operating systems, it can be a bit complicated at times. For instance, there is no direct solution to do a Linux format disk using a dedicated GUI feature. Don’t worry – you can still erase the disk on Linux with the help of the right commands. Read on and clear your Linux disk space by following this extensive guide.
Content
Why Do We Need to Format and Wipe Linux Disk?
Before we get to know different ways to format a disk on Linux, it is vital to understand the reasons behind it. Ideally, there could be the following major reasons for wiping or formatting a disk on a Linux system:
- If your system is running low on free space, then you can choose to wipe the data of a partition or a disk.
- Sometimes, a system can become slow by having limited free space. By formatting its Linux drive, you can improve its performance as well.
- If your system has been corrupted by malware, then you can wipe the hard disk of your Linux to resolve this.
- Mostly, users prefer to do a Linux format disk before reselling their systems. This helps themВ protect their data.
- There could be an issue with the firmware or the system storage, which can be fixed after wiping a Linux disk.
How to Format a Linux Hard Drive?
Unlike Windows or macOS, there is not a dedicated disk management tool that can help us partition or format the disk. Therefore, we need to take the assistance of certain commands to format a Linux disk. If you are connecting your drive for the first time to your Linux system, then you need to create a partition beforehand. To implement this, you can enter the fdisk command. Once a partition is created, you can use the «mkfs.ext4» command to format the disk. Here’s a simple solution to format a disk on a Linux system.
Step 1 Create a partition of the disk
Firstly, connect the disk to your Linux system if you haven’t already and launch the Terminal window on it. You can enter the following command to check it:
sudo fdisk –l.
Now, to create a partition, enter the command «fdsk» in the following format:
sudo fdisk /dev/sdb.
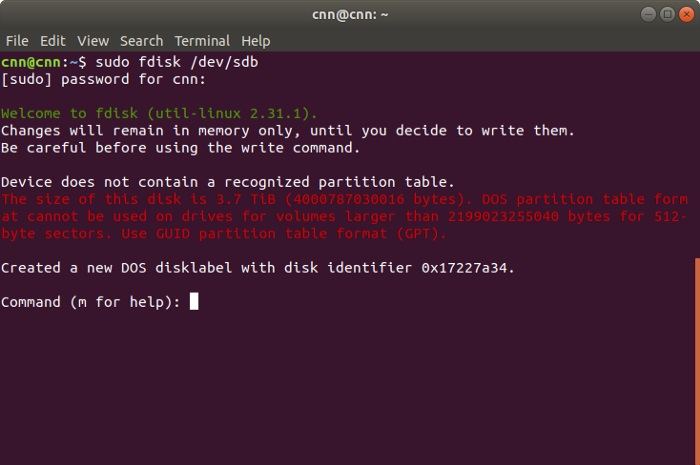
This will launch the results of the fdisk command. If you want, you can type «m» to get help. It will display a list of the supported parameters. You can type «n» to create a new partition, «d» to delete the partition, «p» to check the partition table, and so on.
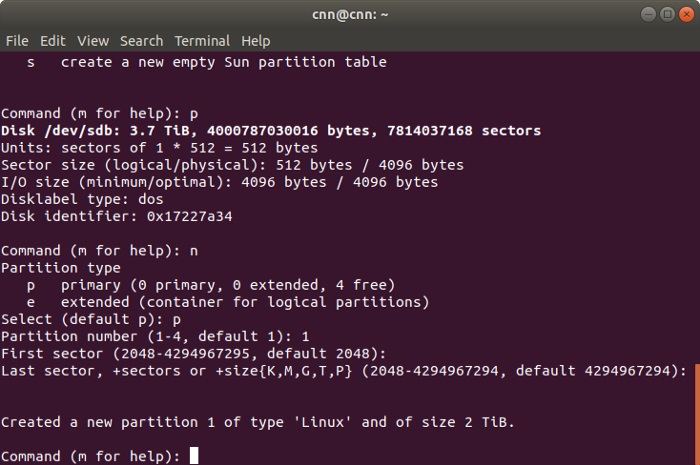
Firstly, press «p» and enter to view the partition table. This will let you know about the disk identifier and the sector space. Subsequently, enter the «n» command to create a new partition. You will be given an option to create a primary or an extended partition. Press «p» to create a new primary partition and give it a number from 1 to 4. If you want to create a single partition, then enter «1».
Step 2 Format the disk
Great! Once you have created the relevant partition on your Linux system, you can format it by entering the command –
sudo mkfs.ext4 /dev/sdb.
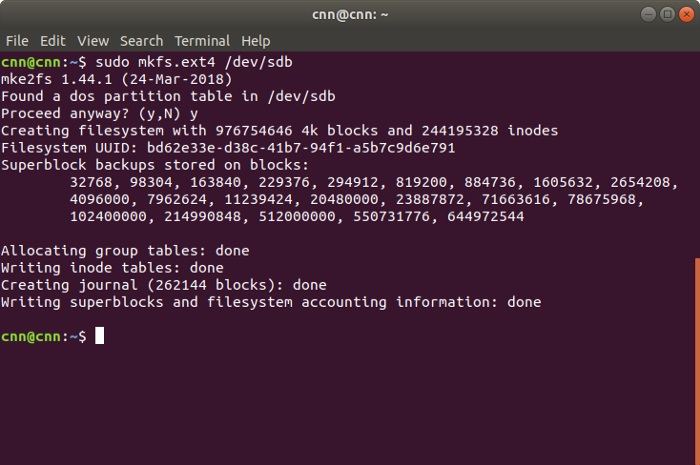
This will make the system look for the available partitions on the drive. When you are asked to confirm your choice, just press «y». Afterward, wait for a while as the selected partitions would be formatted on the Linux system.
Step 3 Mount the file system (optional)
If you want, you can mount the file system as well. To do this, you can use the «mkdir /data» command to make a directory. After that, end the following command to mount it:
mount /dev/sdb1 /data.
How to Wipe a Hard Drive on Linux?
If you are planning to resell your system or are concerned about your privacy, then you should consider wiping the drive instead. Unlike formatting a disk, wiping it will erase the data and make the recovery process harder than before. Thankfully, there are multiple commands to do Linux wipe the disk. Here are some simple solutions to wipe a hard drive on Linux.
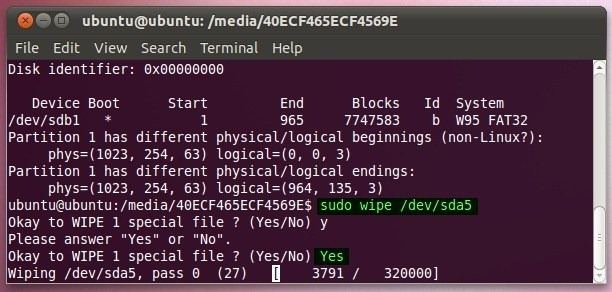
1 wipe
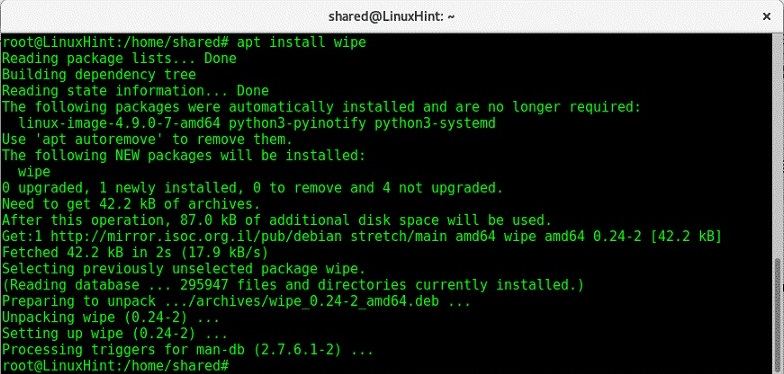
As the name suggests, the command is used to wipe data from a magnetic disk. Though, a lot of Linux systems do not have the command readily installed. In this case, you can use the apt install command first.
# apt install wipe.
Once it is done, just use the «wipe» command in the format — wipe [options] target. For instance, to wipe a partition, simply enter the command:
Confirm your choice, by entering «yes» and wait as the selected partition would be wiped.
2 shred
This is one of the best ways to protect your private data on a Linux system. Ideally, this works as a dedicated shredder – that would overwrite your data with something else, making the recovery process harder. This Linux based command has the following syntax:
shred [option] target
As you know, «target» would specify the location you wish to shred. It can be a partition, folder, or file name. Subsequently, it can have the following options.
- -n: To overwrite data «n» times
- -f: To change permission and allow the writing operation
- -u: Truncates the files after shredding them
- -s: To provide the size to shred
- -u: To remove the file after shredding
- -v: To enable the verbose mode
- -z: To add zeros to the final overwriting process
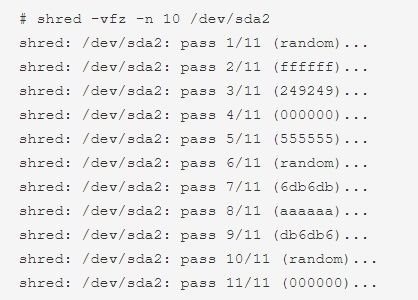
Therefore, you can wipe the Linux disk, by entering a command like this:
# shred -vfz -n 10 /dev/sda2.
This will follow ten passes of overwriting on the provided location, making it impossible for a recovery tool to retrieve data from it.
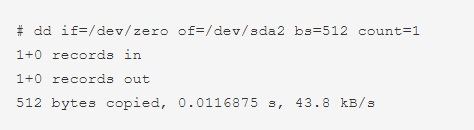
If you are running short on time, then consider using the «dd» command to erase disk on a Linux system. Instead of generating random data, it will overwrite the entire disk with strings of zeros. Therefore, it will take less time to wipe the disk and protecting your information. Although, it provides certain options that you can use to customize the process.
dd if=source of=target [Options].
Make sure that you run the command prompt and as a super-user. Here’s a simple demonstration of the same.
# dd if=/dev/zero of=/dev/sda2 bs=512 count=1.
The command will overwrite the target location with a string of zeros, as specified in the source. Also, this will copy 512 bytes in a single count. One of the major advantages of this is the time taken by the dd command is lesser than shred.
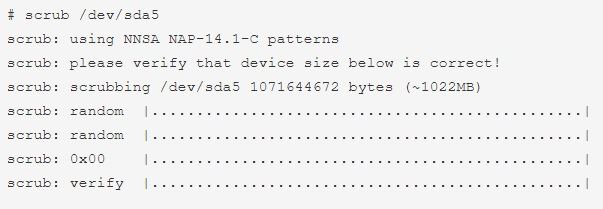
4 scrub
Lastly, you can also take the assistance of the «scrub» command to overwrite your disk with specific patterns. Sometimes, the patterns can be randomly generated by the system too. Since the command is not present in every Linux system by default, you might need to install it first. To do this, you can use the apt install command.
Once it is done, just enter the command in the following syntax:
scrub [option]В target.
Even if you don’t provide an option and just specifies the target location to wipe, the command will work. Though, you would be asked to verify your choice to erase disk on Linux entirely. Here’s a quick example of the same:
Tips for Formatting and Wiping Linux Disk
After getting to know about these popular commands to create new disk space on Linux, you would certainly be able to format or wipe it. Besides that, you can consider following these tips to format or wipe the Linux disk successfully.
- Make sure that you have logged in as a super-user (administrator) while wiping a disk. This will make the entire process a whole lot easier.
- Not every command might be installed on your system. Therefore, you can consider checking its status or installing it beforehand.
- Although there are third-party applications available to shred and wipe a disk, it is recommended to use reliable commands. If you use a readily available tool, then make sure it is from a trusted source with a positive reputation in the industry.
- Always double-check the command before entering it (particularly the syntax and the location). One small error and you might end up causing irrevocable damage to your system.
- Most importantly, take a backup of your important files before wiping the Linux disk. This will make sure that you have a second copy of your vital data in advance.
Video Tutorial on How to Recover Data from Hard Disk After Disk Wipe
Recent Videos from Recoverit
That’s a wrap, folks! Now when you know how to format or wipe disk on Linux, you can easily meet your requirements. In case if you have accidentally deleted your data or have formatted a drive, then use a reliable data recovery solution likeВ Wondershare Recoverit. Using it, you can just attach your Linux device to a PC and later extract the lost or inaccessible content from it. Go ahead and try some of these methods and feel free to share your shortcuts or tips in the comments below.
What disk format does Linux use?
Linux is a very versatile operating system and has its own disk format which is EXT, which can be presented in its EXT2, EXT3 and EXT4 versions. However, this is not the only file system that can be supported by this operating system; FAT32 and NTFS systems are fully supported as well as HFS.
Does a full format wipe data?
Not necessarily. Although the information will not be accessible through Windows file explorer. This does not mean that the information is not physically stored on disk yet. Formatting a disk is equivalent to giving disk permission to overwrite where information previously was. Eventually, the residual information will be completely overwritten.
How do I wipe Linux and install Windows?
If you want to remove Linux and install Windows, the procedure is quite simple. First, back up your information. Once you have done this, you will need to insert your bootable DVD or flash drive that has the Windows installer on it. Then you have to follow the steps and in the type of installation, you will choose «custom», then you will erase the partition where Linux is installed and you will be able to install Windows.
Does formatting remove Bitlocker?
As part of Windows security and protection mechanisms, BitLocker has been developed. For security reasons, BitLocker can only be removed by typing its password or, in case you forgot it, the recovery key. If you do not have any of them, it is suggested to format the device, since this process will delete all the information –including BitLocker— contained to reset all settings to the factory default.
Источник


