- Create and format a hard disk partition
- Format
- Syntax
- Parameters
- Remarks
- Examples
- 4 Free Disk Formatting Utility to Format Hard Drive in Windows 10, 8, 7
- When you will need a disk formatting utility?
- 4 Free disk formatting utilities for Windows 10/8/7
- в–Њ Option 1. Disk Management
- в–Њ Option 2. Windows File Explorer
- в–Њ Option 3. Command Prompt
- в–Њ Option 4. Free AOMEI Partition Assistant Standard (Recommended)
- Summary
Create and format a hard disk partition
To create a partition or volume (the two terms are often used interchangeably) on a hard disk, you must be logged in as an administrator, and there must be either unallocated disk space or free space within an extended partition on the hard disk.
If there is no unallocated disk space, you can create some by shrinking an existing partition, deleting a partition, or by using a third-party partitioning program.
Open Computer Management by selecting the Start button. The select Control Panel > System and Security > Administrative Tools, and then double-click Computer Management.
In the left pane, under Storage, select Disk Management.
Right-click an unallocated region on your hard disk, and then select New Simple Volume.
In the New Simple Volume Wizard, select Next.
Enter the size of the volume you want to create in megabytes (MB) or accept the maximum default size, and then select Next.
Accept the default drive letter or choose a different drive letter to identify the partition, and then select Next.
In the Format Partition dialog box, do one of the following:
If you don’t want to format the volume right now, select Do not format this volume, and then select Next.
To format the volume with the default settings, select Next.
Review your choices, and then select Finish.
Note: When you create new partitions on a basic disk, the first three will be formatted as primary partitions. Beginning with the fourth, each one will be configured as a logical drive within an extended partition.
Format
Applies to: Windows 10, Windows Server 2016
Formats a disk to accept Windows files. You must be a member of the Administrators group to format a hard drive.
You can also use the format command, with different parameters, from the Recovery Console. For more information about the recovery console, see Windows Recovery Environment (Windows RE).
Syntax
Parameters
| Parameter | Description |
|---|---|
| Specifies the mount point, volume name, or drive letter (followed by a colon) of the drive that you want to format. If you do not specify any of the following command-line options, format uses the volume type to determine the default format for the disk. | |
| /fs: | Specifies the type of file system (FAT, FAT32, NTFS). |
| /v: | Specifies the volume label. If you omit the /v command-line option or use it without specifying a volume label, format prompts you for the volume label after the formatting is complete. Use the syntax /v: to prevent the prompt for a volume label. If you use a single format command to format more than one disk, all of the disks will be given the same volume label. |
| /a: | Specifies the allocation unit size to use on FAT, FAT32, or NTFS volumes. If you don’t specify unitsize, it’s chosen based on volume size. Default settings are strongly recommended for general use. The following list presents valid values for NTFS, FAT, and FAT32 unitsize:
FAT and FAT32 also support 128K and 256K for a sector size greater than 512 bytes. |
| /q | Performs a quick format. Deletes the file table and the root directory of a previously formatted volume, but does not perform a sector-by-sector scan for bad areas. You should use the /q command-line option to format only previously formatted volumes that you know are in good condition. Note that /q overrides /p. |
| /f: | Specifies the size of the floppy disk to format. When possible, use this command-line option instead of the /t and /n command-line options. Windows accepts the following values for size:
|
| /t: | Specifies the number of tracks on the disk. When possible, use the /f command-line option instead. If you use the /t option, you must also use the /n option. These options together provide an alternative method of specifying the size of the disk that is being formatted. This option is not valid with the /f option. |
| /n: | Specifies the number of sectors per track. When possible, use the /f command-line option instead of /n. If you use /n, you must also use /t. These two options together provide an alternative method of specifying the size of the disk that is being formatted. This option is not valid with the /f option. |
| /p: |
Remarks
The format command creates a new root directory and file system for the disk. It can also check for bad areas on the disk, and it can delete all data on the disk. To be able to use a new disk, you must first use this command to format the disk.
After formatting a floppy disk, format displays the following message:
Volume label (11 characters, ENTER for none)?
To add a volume label, type up to 11 characters (including spaces). If you do not want to add a volume label to the disk, press ENTER.
When you use the format command to format a hard disk, a warning message similar to the following displays:
To format the hard disk, press Y; if you do not want to format the disk, press N.
FAT file systems restrict the number of clusters to no more than 65526. FAT32 file systems restrict the number of clusters to between 65527 and 4177917.
NTFS compression is not supported for allocation unit sizes above 4096.
Format will immediately stop processing if it determines that the previous requirements can’t be met using the specified cluster size.
When formatting is complete, format displays messages that show the total disk space, the spaces marked as defective, and the space available for your files.
You can speed up the formatting process by using the /q command-line option. Use this option only if there are no bad sectors on your hard disk.
You shouldn’t use the format command on a drive that was prepared by using the subst command. You can’t format disks over a network.
The following table lists each exit code and a brief description of its meaning.
| Exit code | Description |
|---|---|
| 0 | The format operation was successful. |
| 1 | Incorrect parameters were supplied. |
| 4 | A fatal error occurred (which is any error other than 0, 1, or 5). |
| 5 | The user pressed N in response to the prompt «Proceed with Format (Y/N)?» to stop the process. |
You can check these exit codes by using the ERRORLEVEL environment variable with the if batch command.
Examples
To format a new floppy disk in drive A using the default size, type:
To perform a quick format operation on a previously formatted floppy disk in drive A, type:
To format a floppy disk in drive A and assign it the volume label DATA, type:
4 Free Disk Formatting Utility to Format Hard Drive in Windows 10, 8, 7
In this article, we would like to share you with 4 free yet effective disk formatting utilities for Windows 10, 8, 7. You can easily format a hard drive for your own requirements.

By Emily  / Last Updated March 29, 2021
When you will need a disk formatting utility?
Formatting is a process of creating a file system on a volume/partition so that the operating system can store and retrieve data on that volume. And a file system offers a way of organizing and retrieving information written to a hard disk or any other storage medium. It is created when the volume is formatting. And a professional disk formatting tool will be necessary to format a partition in the following cases:
•When you install a new hard drive to your computer, you will be required to initialize the disk and partition and format it before using it for data storage.
•If your disk becomes read-only because of the corrupted file system and you cannot add any data to it, formatting the disk is one of the effective ways to remove the write-protection.
•When the disk is infected by malware or viruses, you have to format it for normal reuse.
•If the current file system of the disk is not compatible with your current device or OS, you can reformat it to another different file system.
•When you want to clean the disk or free up space on the drive, formatting the disk is always the method you can adopt.
4 Free disk formatting utilities for Windows 10/8/7
No matter why you need to format a hard drive in Windows 10/8/7, you can try the following 4 disk format tools. Since any data stored on the disk would be erased with disk formatting, please back up necessary files to ensure data security before going any further.
The first three hard drive formatting tools (Disk Management, File Explorer and Command Line) are Windows built-in tools. The last one is a free hard drive formatting tool. Below we will introduce them one by one. Then you can choose one based on the actual situation and requirements.
в–Њ Option 1. Disk Management
Disk Management is a Microsoft Windows utility first introduced in Windows XP as a replacement for the fdisk command. It allows users to view and manage the disk drives installed in their computer. Take the below steps to format hard drives:
1.1. Right-click “My computer”/ “This PC”>”Manage”, and select “Disk Management” under “Storage”.
1.2. Right-click the target volume and select “Format”.
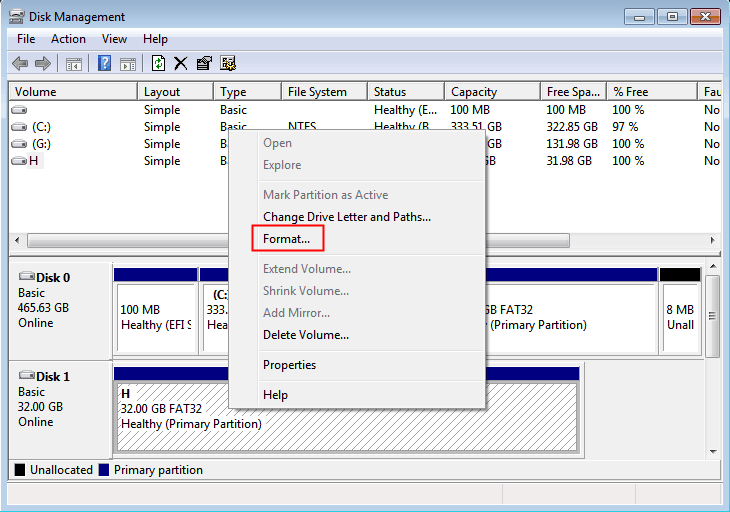
1.3. In the next window, choose the desirable file system and click “OK”.
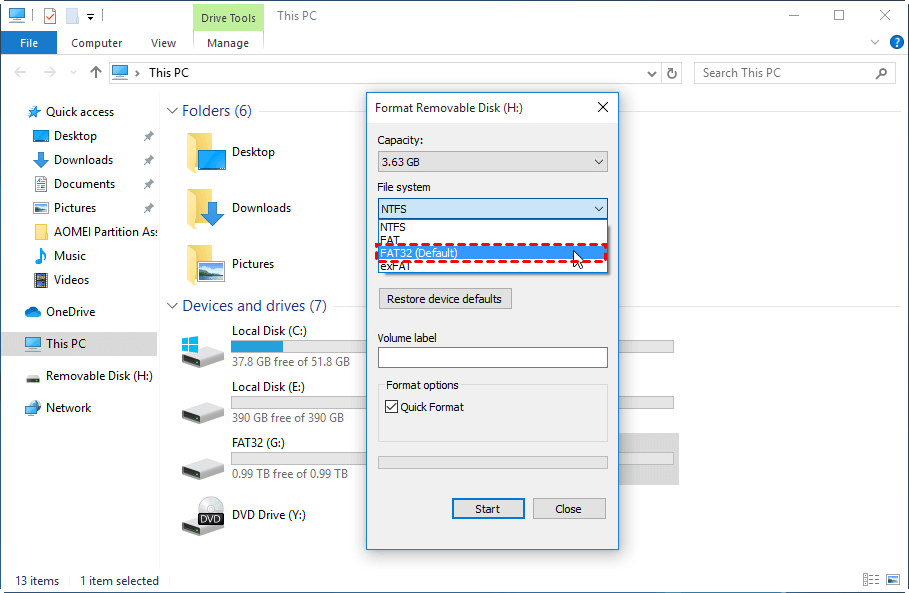
в–Њ Option 2. Windows File Explorer
To make use of Windows File Explorer to format hard drive in Windows 10, you can right-click “My computer/This PC” —> “Open” to enter into the File Explorer, then right-click the disk you wish to format, select “Format. ”, then select a proper file system and click “Start”.
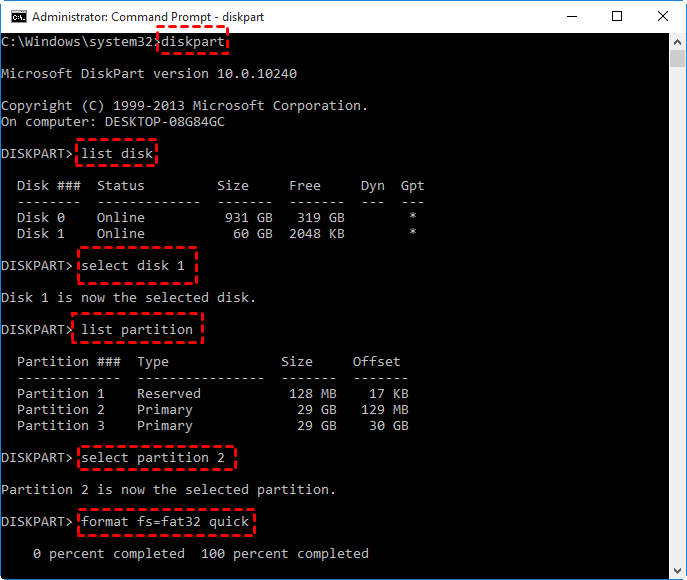
в–Њ Option 3. Command Prompt
Command Prompt is a command line interpreter application, which is available in most Windows operating systems. It can execute entered commands to perform advanced administration functions, and troubleshoot some Windows issues. It is relatively proper for computer experts and professionals due to its complexity.
3.1. Open the command Prompt clicking Start and typing “cmd”, right-clicking it and selecting “Run as Administrator”.
3.2. In the elevated Command Prompt window, first type “diskpart” and press “Enter” to launch diskpart.exe tool.
3.3. Then execute the following command:
list disk: get a detaied list of all disks on your computer.
select disk #
list partition: all the partitions will be displayed.
select partition #: the partition you want to format will be selected.
format fs=fat32 quick or other desired file system.
Then, the disk will be formatted.
Limitations of Windows native disk formatting utility:
в—Џ They cannot format a large hard drive (which is bigger than 32GB) to FAT32 file system.
в—Џ They cannot format an internal hard drive to exFAT file system while exFAT is generally ideal for flash drives.
в—Џ They cannot format a drive successfully when its file system is corrupted, and becomes RAW file system or write protected.
в–Њ Option 4. Free AOMEI Partition Assistant Standard (Recommended)
As mentioned above, the Windows built-in formatting tools sometimes y simply do not work quite well. If you get “Windows was not able to complete the format” error message or “The volume is too big for FAT32”, or if the “Format” option becomes greyed out and not clickable, you need to turn to a third-party disk formatting tool. Here we share a professional disk formatting utility named AOMEI Partition Assistant Standard. It is free yet more powerful and versatile than Windows native formatting tools. For example:
вњ” It is able to format hard drive to FAT32 even though it is larger than 32GB.
вњ” It can format both internal and external hard drive to exFAT file system without any hassle.
вњ” It can format hard drive to Ext4/Ext3/Ext2 Linux file system under Windows environment.
вњ” It can force format RAW or read only volume successfully.
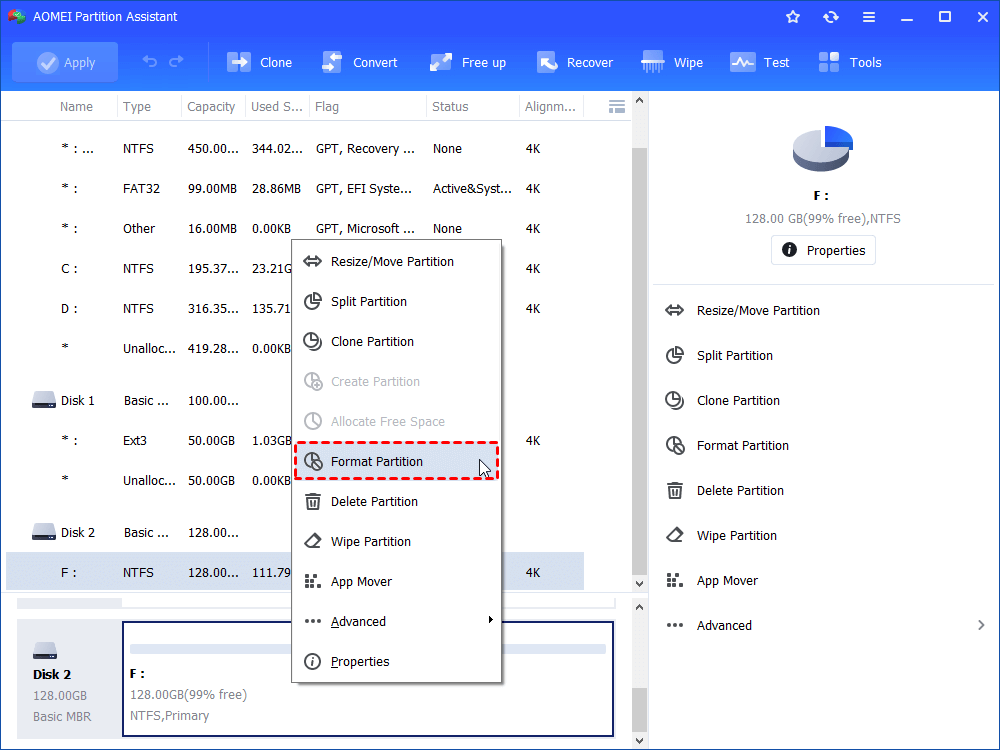
1. Free download, install and run the hard disk formatting software. Right-click a partition on the disk you want to format and select “Format Partition”.
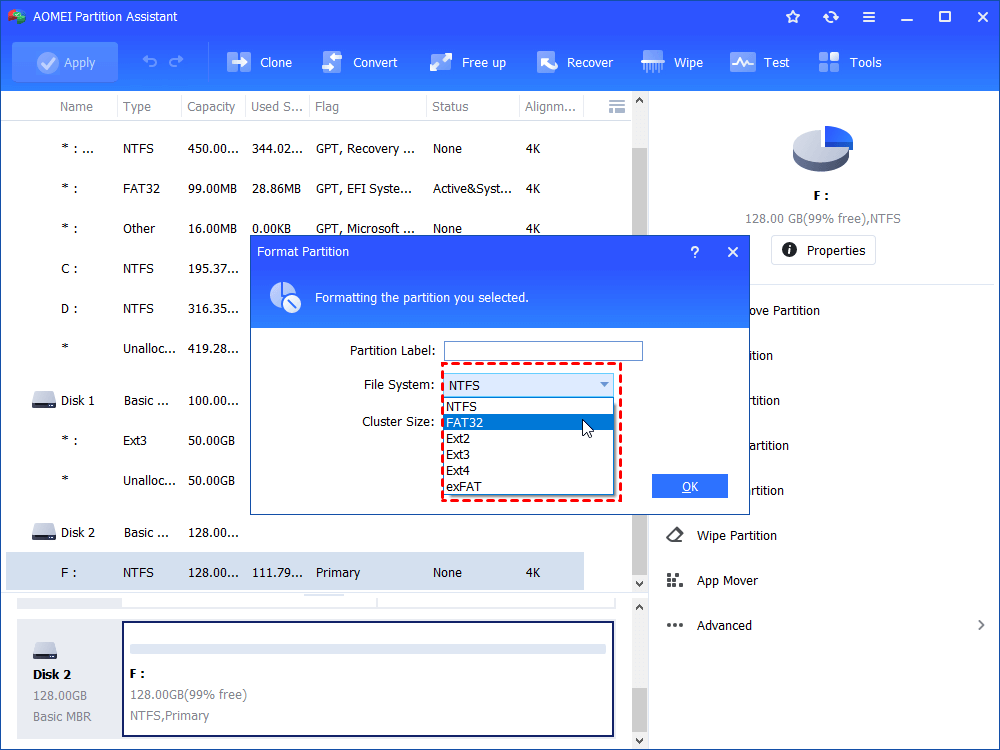
2. Set the partition label, cluster size and file system as you like, and click “OK”.
3. Begin to format the hard disk by clicking “Apply” in the main interface.
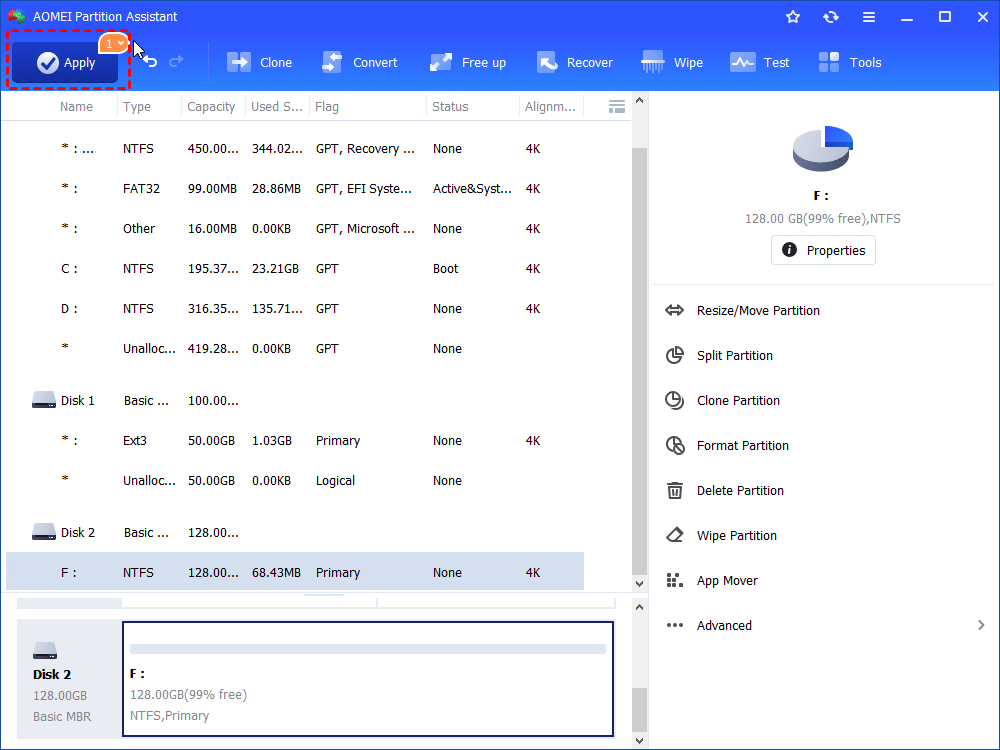
Only with three steps, you can successfully format the disk partition, even the partition is write-protected.
вњЄвњЄвњЄBonus feature: Convert FAT32 to NTFS and vice versa without data loss
As mentioned above, the formatting process will erase all data existing on the disk which needs to be formatted. But the AOMEI Partition Assistant offers an amazing function: NTFS to FAT32 Converter . It can help you convert file system between FAT32 and NTFS without losing data. Below is the tutorial.
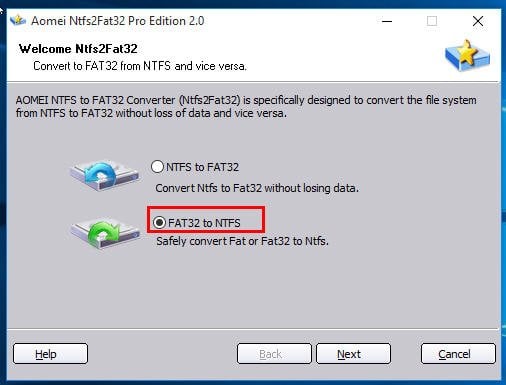
(1) Open AOMEI Partition Assistant. Select “NTFS to FAT32 Converter” on the left volume under “Wizards”.
(2) In the pop-up window, tick “FAT32 to NTFS” or “NTFS to FAT32”, click on “Next” and follow the hints to finish the conversion.
FAQ: Does formatting a disk erase everything?
For users who plan to get rid of the current hard disk and purchase a new one, it is necessary to ensure everything on the disk has been gone before throwing away the old one. For this task, most users will be more likely to choose to format the disk. But formatting a disk deleting everything completely?
The answer is “NO”. The formatting process does not erase the data on the disk, only the address tables. The deleted files still reside on the hard drive and a data recovery programs will allow anyone to recover that data. Luckily, there is a more secure way to remove all data from the hard disk permanently: wiping the hard drive.
To perform this task, you can use AOMEI Partition Assistant Standard as well, which allows you wipe HDD and write zeros to each sector.
Summary
With these 4 disk formatting utilities introduced, now you can choose one according to your actual situation and requirements. To deal with tough partition/disk management tasks, AOMEI Partition Assistant Standard is a better choice. It is far more than a hard drive formatting software, it is also capable of copying partition, moving partition, merging partition, cloning hard disk, etc.
Moreover, you can upgrade to Pro edition for other more amazing features like recovering lost partitions, aligning partitions, migrating OS to SSD. If you are running Windows Server 2003, 2008 (R2), 2012 (R2), 2016 and SBS 2003, 2008, 2011, the Server edition is highly recommended.


