- You cannot select or format a hard disk partition when you try to install Windows
- Symptoms
- Cause
- Resolution 1: Verify that partition is compatible with Windows
- Resolution 2: Update drivers for the hard disk controller
- Resolution 3: Provide correct drivers for hard disk controller
- Resolution 4: Examine Setupact.log file to verify that partition is active
- Resolution 5: Check for firmware updates and for system BIOS updates
- Resolution 6: Verify that system BIOS correctly detects hard disk
- Resolution 7: Use Chkdsk.exe to check for problems
- Resolution 8: Use Diskpart.exe to clean disk and rerun Windows Setup
- How to Make Partition in Windows 7/8/10?
- Overview on creating partition
- How to make partition in Windows 7/8/10?
- Method 1: Make partition in Windows Disk Management
- Method 2: Make and manage partition with DiskGenius Free
- Method 3: Create partition by way of DiskPart
- Conclusion
You cannot select or format a hard disk partition when you try to install Windows
This article provides solutions to an issue where you fail to select or format a hard disk partition when you try to install Windows.
Original product version: В Windows 7 Service Pack 1, Windows Server 2012 R2
Original KB number: В 927520
Support for Windows Vista without any service packs installed ended on April 13, 2010. To continue receiving security updates for Windows, make sure you’re running Windows Vista with Service Pack 2 (SP2). For more information, see Support is ending for some versions of Windows.
Dynamic discs are only supported for:
- Windows Vista Business
- Windows Vista Enterprise
- Windows Vista Ultimate.
- Windows 7 Enterprise
- Windows 7 Professional
- Windows 7 Ultimate
- Windows Server 2008 R2 Datacenter
- Windows Server 2008 R2 Enterprise
- Windows Server 2008 R2 Standard
- Windows Web Server 2008 R2
They are not supported for Windows Vista Home Basic, Windows Vista Home Premium, Windows 7 Home Basic, Windows 7 Starter, and Windows 7 Home Premium.
There is one exception. When you upgrade your computer from Windows XP Media Center Edition to Windows Vista Home Premium, some dynamic discs are handled and supported.
Symptoms
When you try to install Windows Vista, Windows 7 or Windows Server 2008 R2, you may experience one or more of the following symptoms:
The hard disk on which you want to install Windows Vista, Windows 7, or Windows Server 2008 R2is not listed.
You cannot select a hard disk partition on which to install Windows Vista, Windows 7, or Windows Server 2008 R2.
You cannot format a hard disk partition or partitions.
You cannot set the correct size for a hard disk partition.
You receive the following error message:
Windows is unable to find a system volume that meets its criteria for installation
Cause
This problem may occur for one of the following reasons:
- Windows is incompatible with a mass storage controller or a mass storage driver.
- A mass storage controller or a mass storage driver is outdated.
- The hard disk on which you want to install Windows Vista, Windows 7 or Windows Server 2008 R2 is a dynamic disk.
- A data cable in the computer is loose, or another hardware issue has occurred.
- The hard disk or the Windows file system is damaged.
- You tried to select a FAT32 partition or another type of partition that is incompatible with Windows Vista, Windows 7 or Windows Server 2008 R2.
To resolve this problem, use one or more of the following methods.
Resolution 1: Verify that partition is compatible with Windows
You cannot install Windows on a FAT32 partition. Additionally, you must correctly configure dynamic disks for use with Windows. To verify that the partition is compatible with Windows Vista, Windows 7 or Windows Server 2008 R2, follow these steps:
For a dynamic disk that has a simple volume, use the Diskpart.exe utility to configure the disk as an active disk. For more information about how to use the Diskpart.exe utility, see DiskPart Command-Line Options.
For a FAT32 partition, reformat the partition, or convert the partition to an NTFS file system partition by using the Convert.exe command.
When you format a partition, all data is removed from the partition. This data includes all the files on the partition.
Resolution 2: Update drivers for the hard disk controller
If you want to install Windows Vista Windows 7 or Windows Server 2008 R2 as an upgrade, update the drivers for the hard disk controller to the latest drivers.
Windows Setup provides a feature to migrate current drivers to the new operating system. Therefore, Windows Setup may use the drivers that are currently installed on the computer. If the computer does not have the latest drivers installed, the Setup program may use the outdated drivers. In this case, you may experience compatibility problems.
Resolution 3: Provide correct drivers for hard disk controller
If you are trying to perform a clean installation of Windows, you must provide the correct drivers for the hard disk controller. When you are prompted to select the disk on which to install Windows, you must also click to select the Load Driver option. Windows Setup will guide you through the rest of the process.
Resolution 4: Examine Setupact.log file to verify that partition is active
If you receive the following error message, verify that the partition is active by examining the Setupact.log file:
Windows is unable to find a system volume that meets its criteria for installation
- If you install Windows Vista, Windows 7 or Windows Server 2008 R2 as an upgrade, the Setupact.log file is located in the Drive:$WINDOWS.
BT\Sources\Panther folder. Drive represents the drive that contains the existing Windows installation.
To verify that the partition is active, follow these steps:
Insert the DVD into the DVD drive.
On the disk selection screen, press SHIFT+F10. A Command Prompt (CMD) window opens.
Change the directory to locate the Setupact.log file, and then open the Setupact.log file.
Locate the DumpDiskInformation section. This section contains information about partition mapping.
In the DumpDiskInformation section, locate the log entry that resembles the following.
Disk [0] partition [1] is an active partition
If this log entry appears after an entry that resembles the following, the hard disk may not be configured to use a Windows-based operating system.
In this case, use the Diskpart.exe utility to configure a different partition as active.
This step prevents a third-party operating system from starting.
Close the Command Prompt window.
Resolution 5: Check for firmware updates and for system BIOS updates
For firmware updates and for system BIOS updates, contact the manufacturer of the hardware in the computer.
Resolution 6: Verify that system BIOS correctly detects hard disk
For information about how to verify that the system BIOS correctly detects the hard disk, contact the manufacturer of the computer hardware.
Resolution 7: Use Chkdsk.exe to check for problems
Run the Chkdsk.exe utility to check for disk problems. Replace the hard disk if it is damaged.
Resolution 8: Use Diskpart.exe to clean disk and rerun Windows Setup
If you have tried all the methods that are listed in this section and the problem persists, use the Diskpart.exe utility to clean the disk, and then run Windows Setup again.
Use this method only if you want to perform a clean installation of Windows. When you clean the hard disk, it is formatted. All partitions and all data on the hard disk are permanently removed. We strongly recommend that you back up the files on the hard disk before you clean the disk.
To use the Diskpart.exe utility to clean the hard disk, follow these steps:
- Insert the DVD into the DVD drive.
- On the disk selection screen, press SHIFT+F10. A Command Prompt window opens.
- Type diskpart, and then press ENTER to open the diskpart tool.
- Type list disk , and then press ENTER. A list of available hard disks is displayed.
- Type sel disk number , and then press ENTER. number is the number of the hard disk that you want to clean. The hard disk is now selected.
- Type det disk , and then press ENTER. A list of partitions on the hard disk is displayed. Use this information to verify that the correct disk is selected.
- Make sure that the disk does not contain required data, type clean all , and then press ENTER to clean the disk. All the partitions and all the data on the disk is permanently removed.
- Type exit , and then press ENTER to close the diskpart tool.
- Close the Command Prompt window.
- Click the Refresh button to update the disk selection screen. This step lists the disk.
- Run Windows Setup to perform a clean installation of Windows.
—>
How to Make Partition in Windows 7/8/10?
Position: How Tos — Partition Management — How to Make Partition in Windows 7/8/10?
Summary
DiskGenius — Free partition manager to create, delete, format, resize, extend, clone or image partition.
Table of Contents:
Overview on creating partition
What is a partition? A partition is created on storage devices such as hard drive or USB drives, and it contains a period of contiguous disk space. Windows manages partitions separately and assigns a unique drive letter for each partition except for hidden partition. A single disk can be partitioned into one or multiple partitions. Partitions are able to separate Windows operating system from other data if you install system on a separated drive.
You can create backup for each partition to protect data against data loss or damage. If one partition gets corrupted, files stored on other partitions won’t be disturbed. Thus, partition your storage device is an effective method to manage data, system or software, especially when your disk has very large capacity.
Since disk partitioning has so many benefits, the first thing to be done after installing a new disk is to partition it. This means you need to create one or more partitions based on your needs. Fortunately, it is quite easy and straightforward to partition a disk. This guide will show you how to make partitions in Windows 7, Windows 8 and Windows 10 via multiple methods.
How to make partition in Windows 7/8/10?
It sounds like a complicated thing to make partitions in Windows, don’t worry, creating partition is very quick and easy. We’ll present three methods to help you make partition on hard drive: Disk Management, DiskPart command and third-party partition manager software.
Disk Management: It is a Windows built-in bool and it becomes quite powerful since Windows 7. It enables you do many basic operations on partition, such as create, delete or format partition. Besides, you can also perform some advanced tasks like attach VHDs, convert to dynamic / basic disk, etc. As to making partition, it is able to create new partition from unallocated / free disk space and process is easy to follow.
DiskPart: It is powerful command line utility in Windows. It is a set of commands ran in Command Prompt and it is started by tying «diskpart» in Command Prompt, after which you can continue to type other commands to mange disk and partition. It is also able to manage disk and volumes with features that are not available in Disk Management. DiskPart is more suitable for advanced users, as it is not that easy to use. You need to make sure commands are done to correct drive in case of data loss.
Third-party partition manager software: This can be the best solution to manage disk space and partitions. It is effective and intuitive to use, for instance DiskGenius. DiskGenius is free partition manager software and it includes all features that Disk Management can do, and it also provides many advanced functions such as split partition, convert primary/logical partition, convert GPT/MBR or convert dynamic to basic disk without data loss, clone partition, image disk, wipe hard drive, etc.
Method 1: Make partition in Windows Disk Management
Note: Steps and screenshots in this guide are made from Windows 10 system, but the process in Windows 7 and 8 in much the same.
Step 1 Launch Disk Management. The easiest way to open Disk Management is right-clicking Start button and selecting Disk Management.
Another way to launch it is typing «partition» in searching box and selecting «Create and format hard disk partitions».
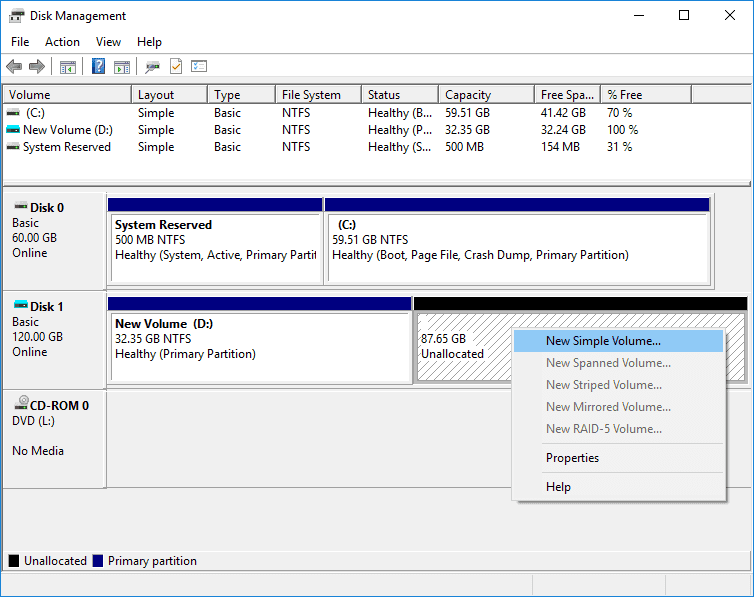
Step 2 Find out and right-click on Unallocated (Free) disk space and select New Simple Volume option.
If no free space is available on your hard drive and you still want to make partition on the disk, you’ll have to either shrink a partition or delete existing partition to get free space. However, deleting partition will removes all data on it and you need to back up data in advance. Alternatively, you can use DiskGenius to complete the task, as it is able to create new partition from existing partition without data loss.
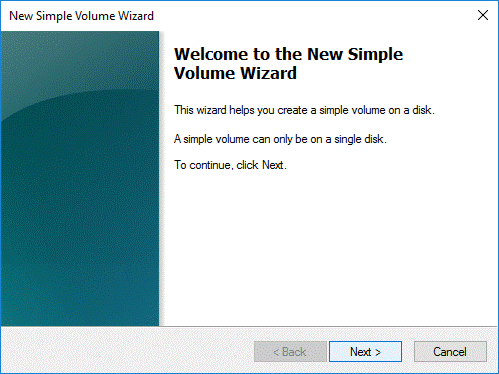
Step 3 «New Simple Volume Wizard» shows up and click «Next» button to continue.
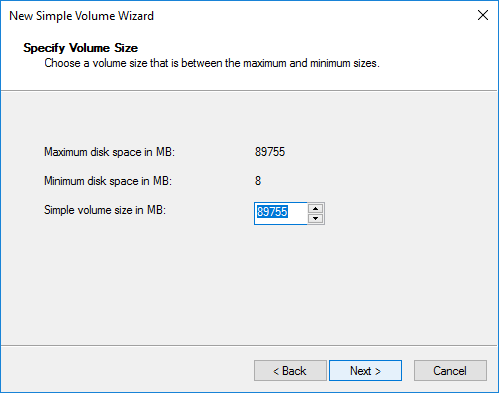
Step 4 Specify partition size and click Next button.
The wizard asks to enter a size for the partition and you can enter the value between the maximum and minimum available free space. Please note the value here is in megabytes instead of gigabytes.
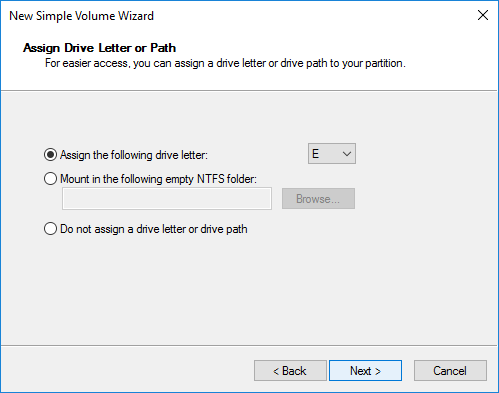
Step 5 Assign a drive letter or path for the partition you are creating and click Next.
There are three options available here: Assign the follow drive letter, Mount in the following empty NTFS folder, and Do not assign a drive letter or drive path. The default selection is «Assign the follow drive letter» with a selected drive letter, so that the partition can be access in File Explorer. If you do not have special requirements or do not have idea on these options, follow the default setting and click Next.
Step 6 Choose whether to format the partition and click Next.
On this step you need to choose how to format the partition. A new partition should be formatted before it can be used to store data. You can choose file system types from NTFS, exFAT and FAT32. The default and preferred file system for hard drive or external hard drive is NTFS in Windows in order to guarantee performance and security. If you want to create ext4, ext3 or ext2 Linux partition, you can use DiskGenius to do the task.
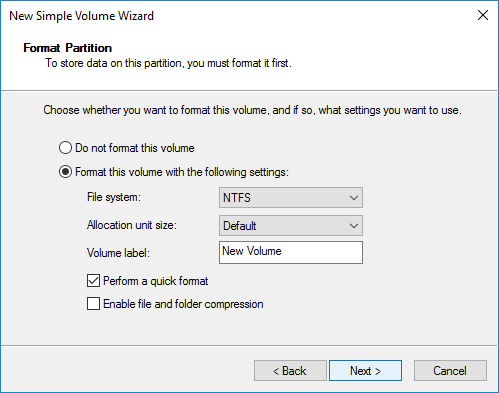
Formatting the partition is a better choice. Choose NTFS as the file system and select Default for Allocation unit size. It is also advised to set a volume name so that the partition can be recognized more easily, as it is displayed in File Explorer next to drive letter.
The next wizard makes a summary of setting you’ve chosen in previous steps. Click Finish button to complete the process. When the wizard is closed, you turn to Disk Management window again and the new partition will be formatted automatically. Formatting process will complete in a couple of seconds, after which the partition will be listed with other partitions.
Limitations on creating partition in Disk Management
The process of making new partition in Windows Disk Management is easy due to the wizard, but there are limitations that may hinder the task. For example, there is not unallocated (free) space on the disk, and you cannot create partition directly. However, in some cases, partition cannot be created even though there is free space. For instance, there are already 4 primary partitions on the hard drive which is partitioned with MBR partition table, and you still want to create new partition on the disk. You are likely to receive error messages as follows:
«You cannot create a new volume in this unallocated space because the disk already contains the maximum number of partitions.»
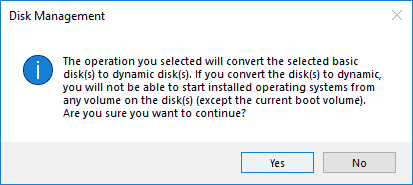
«The operation you selected will convert the selected basic disk(s) to dynamic disk(s). If you convert the disk(s) to dynamic, you will not be able to start installed operating systems from any volume on the disk(s) (except the current boot volume). Are you sure you want to continue?»
How to make partition in Windows 7 without converting disk to dynamic?
It is recommended to use DiskGenius to create new partition. DiskGenius is able to convert primary partition to logical partition without data loss, resize partition, extend C drive, allocate free disk space to existing partition without disturbing data, etc. With this tool, you’ll have multiple solutions to make full use of disk space.
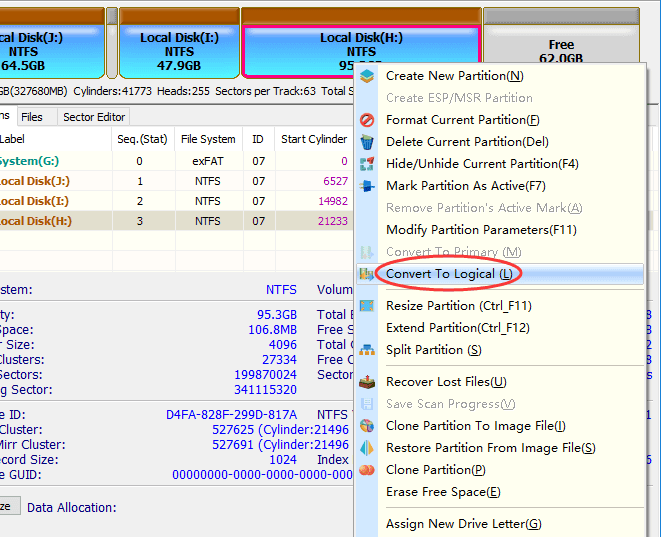
Step 1 Convert two primary partitions to logical partitions without losing data.
Right-click on primary partition and select Convert To Logical, as below; perform same operation on another primary partition; then click Save All button to save changed on partition table. The converting does not cause data loss.
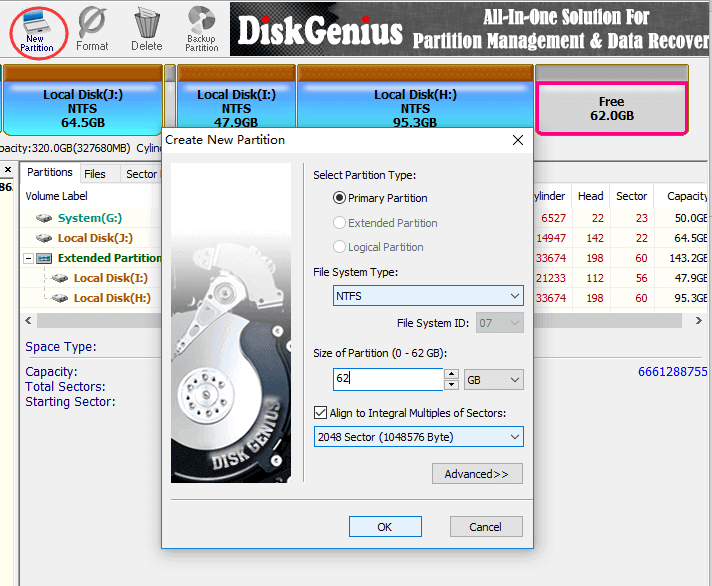
Step 2 Select free disk space and click New Partition button. Then select partition type, file system type, partition size and click OK button.
Step 3 Click Save All partition and DiskGenius formats the new partition. Once the partition is formatted, you can access it and store data.
Till now, you can create new partition from free disk space without data loss even though there are already 4 primary partitions (or three primary partitions and one extended partition). Another way to deal with unallocated disk space is to allocate it any existing partition: right-click on free disk space and choose Allocate Free Space To, and you can select a partition to merge the free space.
Method 2: Make and manage partition with DiskGenius Free
DiskGenius Free is able to make partition in Windows without data loss when the disk does not have any free space. That is to say, you can use this tool to increase partition without deleting any data or partition. Let’s see how to make partition in Windows 7, Windows 8 or Windows 10 with DiskGenius Free.
Create new partition on existing partition without data loss
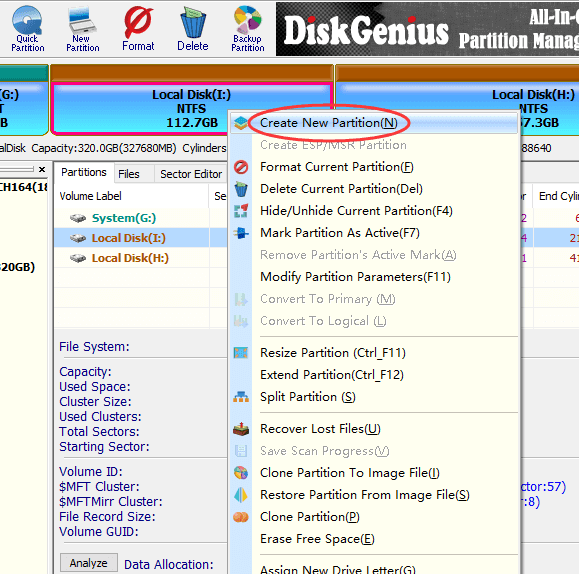
Step 1 Launch DiskGenius and select a partition which contains large free space. Right-click on the partition and select Create New Partition, as follows:
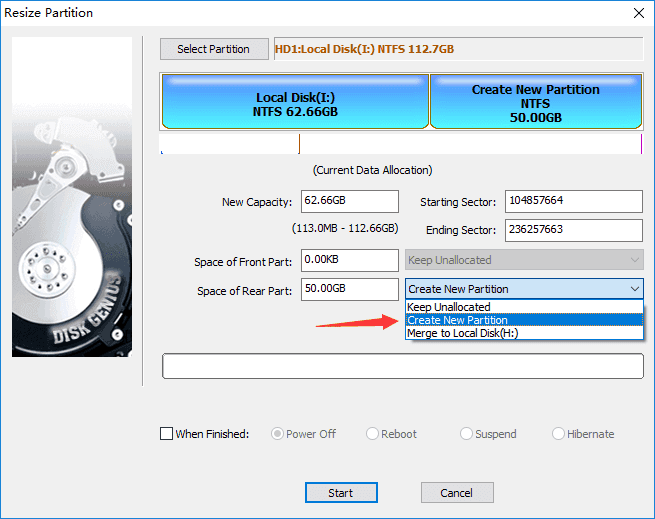
Step 2 Set partition size and select «Create New Partition» from dropdown list. Then click Start button.
Step 3 DiskGenius lists operations to be done and things you should pay attention to. Click Yes to continue. Wait for a while and the new partition will be created.
Create ext4/ext3/ext2 Linux partition
Apart from NTFS, exFAT and FAT partition, DiskGenius is also able to make and access Linux partition. Ext4, ext3 or ext2 partition is not supported by Windows, and it cannot be created or managed by Windows Disk Management or DiskPart utility. However, many users would like to dual boot computer with Windows and Linux systems, thus a Linux partition will be necessary. How to create, format or manage ext4 partition in Windows?
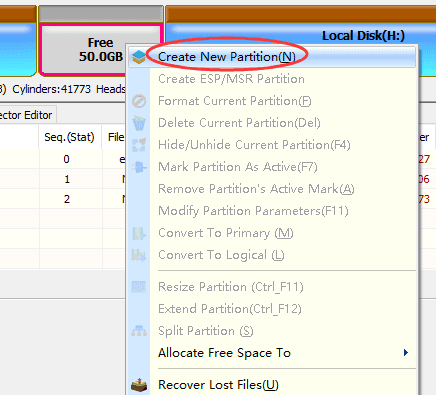
Step 1 Right-click on free disk space from DiskGenius and choose Create New Partition option.
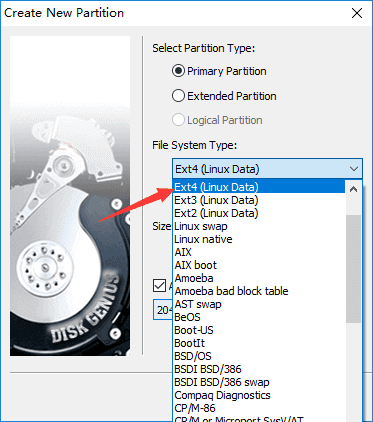
Step 2 Set files system and click OK button. There are quite a few file system types available in the software and you can choose the file system type you need, such as Ext4, Ext3, Ext2, etc.
Step 3 Click Save All button and click Yes from pop-up message box. Then the newly created partition will be formatted.
Method 3: Create partition by way of DiskPart
If you prefer the command line instead of easier methods mentioned above, you can try diskpart in Command Prompt (or PowerShell in Windows 10). Here is how to make partition via Windows command line.
Step 1 Launch Command Prompt and run it as administrator. Right-click Start button and select Windows PowerShell (Admin)
Step 2 Type following commands and press Enter key after each command.
diskpart
list disk (this command lists all disks installed on your computer. Identify the number of the disk on which you want to make partition)
select disk # (replace # with the number of the disk where you want to create partition)
create partition primary size = X (replace X with exact partition size. Note: X is the amount of space in MB)
assign letter = X (replace X with the drive letter you want to use for the new partition)
format fs=ntfs quick (this command will perform a quick format and format the partition to NTFS file system.)
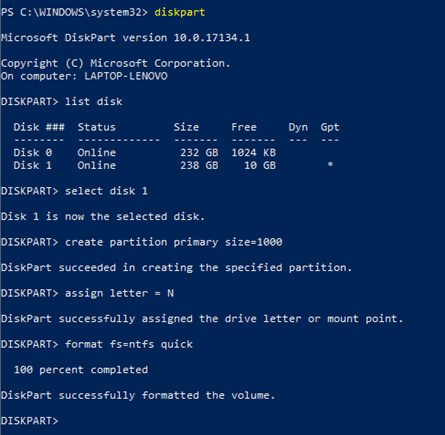
Step 3 Close PowerShell and you can open File Explorer to use the new partition.
Conclusion
To draw a conclusion, this guide presents how to make a partition in Windows 7/8/10 no matter whether there is free space on the hard drive. This instruction includes 3 methods and you can use any based on actual requirement and personal preference. DiskGenius is much more effective when creating partition or managing disk space and it helps keep your PC/server running at its best. Pease feel free to leave a comment or contact our support team if you have any question or suggestion on the product.
DiskGenius — Top partition manager to partition HDD, resize partition, recover data, clone disk, etc.


