- Подключение Linux Ubuntu 20.04, 20.10, 21.04 к Forti VPN
- Предыстория
- Решение
- Альтернативное решение
- Install FortiClient VPN Client on Ubuntu 20.04/Ubuntu 18.04
- Install FortiClient VPN Client on Ubuntu 20.04/Ubuntu 18.04
- Installing FortiClient VPN Client on Ubuntu 20.04/Ubuntu 18.04 using DEB file
- Install FortiClient VPN Client from Fortinet Ubuntu Repos
- Install FortiClient VPN Client from Fortinet Ubuntu Repos on Ubuntu 18.04
- Connecting to VPN using FortiClient VPN client
- StayGeo
- Search This Blog
- SSL VPN: Configuring and Using Forticlient on Ubuntu, creating a Launcher
- Obtaining Forticlient
- Using Forticlient
- Files Extraction
- Launching
- Connecting to the remote computer
- Creating a Unity Launcher
- PieterScheffers / install_forticlient_linux.sh
- This comment has been minimized.
- ghost commented Aug 20, 2018
- This comment has been minimized.
- windowsxp811203 commented Jan 13, 2020
- This comment has been minimized.
- yogeshalgo commented Dec 9, 2020 •
- This comment has been minimized.
- hidarraga commented Mar 18, 2021
- Моя внешняя память
Подключение Linux Ubuntu 20.04, 20.10, 21.04 к Forti VPN
Предыстория
Так уж получилось, что для удаленного доступа к работе приходится использовать Forti VPN.
В Windows за подключение отвечает отдельное приложение, а в Ubuntu 18.04 раньше использовал пакет из репозитория openfortivpn и GUI клиент с сайта https://hadler.me/linux/openfortigui/ .
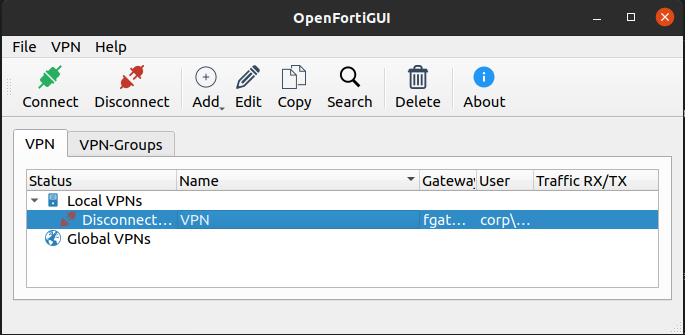 Интерфейс OpenFortiGUI
Не феншуйно, но работало. Времени искать более правильное решение не было.
Сейчас, когда только-только вышла Ubuntu 20.04 работающего без ошибок GUI Forti VPN клиента еще не выпустили.
Прежде всего в репозитории я нашел для GNOME пакет network-manager-fortisslvpn-gnome. В результате его установки в настройках подключения появился пункт настройки VPN и возможность выбора типа подключения.
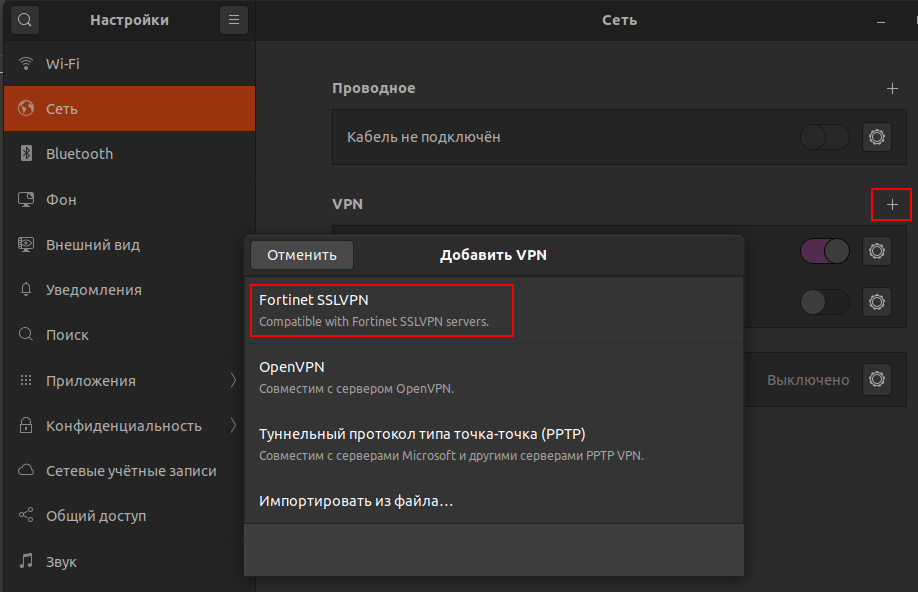 Добавление нового подключения Fortinet VPN
Безусловно это вселяло надежду, что получится отказаться от громоздкого GUI приложения.
После создания и настройки нового подключения появляется соответствующий пункт в панели управления.
Но вот незадача, не подтягиваются DNS сервера от DHCP сервера. После многих часов поиска ответа на вопрос что же происходит привели меня к следующему выводу. Оказалось, что наш VPN-cервер Forti использует SSL для шифрования, а его использование по умолчанию отключено в systemd.
Решение
Итого, чтобы настроить подключение к Forti VPN с шифрованием SSL и корректным использованием DNS серверов нужно:
1 — Установить network-manager-fortisslvpn-gnome
sudo apt-get install network-manager-fortisslvpn-gnome
2 — Открываем файл /etc/systemd/resolved.conf . Далее ищем строчку DNSOverTLS, раскомментируем ее и присваиваем значение opportunistic. Потом раскомментируем строку Domains и прописываем доменное имя DNS-сервера. После чего дописываем DNS.
[Resolve]
DNS=X.X.X.X
DNS=Y.Y.Y.Y
#FallbackDNS=
Domains=corp.yourdomain.com
#LLMNR=no
#MulticastDNS=no
#DNSSEC=no
DNSOverTLS=opportunistic
#Cache=yes
#DNSStubListener=yes
#ReadEtcHosts=yes
3. Перезапускаем systemd
sudo systemctl daemon-reload
sudo systemctl restart systemd-networkd
sudo systemctl restart systemd-resolved
Затем переподключаем соединение или для избежания доп проблем вообще перезагружаемся.
Все, при новом подключении к VPN серверу DNS серверы должны начать использоваться системой.
Альтернативное решение
Есть всегда альтернативный способ прописать DNS-серверы вручную и для этого нужно:
1 — Установить resolvconf
sudo apt-get install resolvconf
2 — Затем открыть один из файлов в папке /etc/resolvconf/resolv.conf.d (head или tail)
3 — После чего прописать в файл информацию о DNS серверах.
Источник
Install FortiClient VPN Client on Ubuntu 20.04/Ubuntu 18.04
In this tutorial, you will learn how to install FortiClient VPN Client on Ubuntu 20.04/Ubuntu 18.04. FortiClient VPN allows you to create a secure and an encrypted Virtual Private Network (VPN) connection tunnel using IPSec or SSL VPN “Tunnel Mode” connections between your device and the FortiGate Firewall.
Install FortiClient VPN Client on Ubuntu 20.04/Ubuntu 18.04
FortiClient VPN client can be installed on Ubuntu systems using the DEB binary or directly from the Fortinet Ubuntu repos.
Installing FortiClient VPN Client on Ubuntu 20.04/Ubuntu 18.04 using DEB file
To install FortiClient VPN Client on Ubuntu 20.04/Ubuntu 18.04 or other Ubuntu releases using the DEB binary file, navigate to FortiClient downloads page and grab the DEB binary installer.
You can as well simply get the link to the DEB installer and pull it using wget utility tool as follows;
Note that this specifically installs FortiClient 6.4.0.0851. Be sure to get the latest version from the downloads page.
Once the installer is downloaded, install FortiClient VPN as follows;
To avoid having to deal with the required package dependencies, simply run the command below instead.
FortiClient VPN application should now be present on your system.
Install FortiClient VPN Client from Fortinet Ubuntu Repos
Fortinet provides repos from which you can easily install FortiClient VPN Client from. However, as of this writing, the repos are not available for Ubuntu 20.04 Focal Fossa. Thus, use the method above to install FortiClient VPN on Ubuntu 20.04.
Install FortiClient VPN Client from Fortinet Ubuntu Repos on Ubuntu 18.04
To install Fortinet VPN from Fortinet Ubuntu repos, you first need to install the repository GPG signing key.
Next, create the Fortinet Ubuntu 18.04 repo;
Next, update the package repos;
Check the available version of
As you can see the Fortinet repos do not provide the latest version of the FortiClient VPN as of this writing. Hence, better use the first method above instead.
Connecting to VPN using FortiClient VPN client
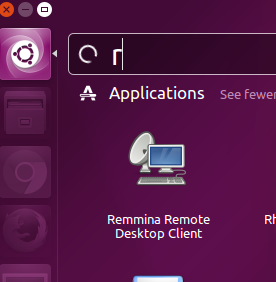
Launch FortiClient VPN client by searching it from Ubuntu activities menu;
When you first run it, being a free version, it prompts you accept that it doesn’t come with any support. Accept the disclaimer to continue using the application.
To setup the VPN connection profile, click Configure VPN .
Setup your SSL VPN connection details;
Click Save to add the connections.
Enter you VPN connection credentials.
Click Connect to connect to the VPN.
You can click the three menu lines to add a new, edit or delete the existing connection.
Upon successful connection to the VPN, you should see such connection status.
You can always disconnect from the VPN by clicking Disconnect.
And that is how easy it is to install FortiClient VPN client on Ubuntu 20.04/Ubuntu 18.04.
Источник
StayGeo
Be down to earth!
Search This Blog
SSL VPN: Configuring and Using Forticlient on Ubuntu, creating a Launcher
- Is your primary OS at home Linux and do you use Windows only to connect to your work PC over VPN or to attend meetings?
- Do you often wish to connect to your work VPN from a Linux PC?

Obtaining Forticlient

Using Forticlient
Files Extraction
Once you have the file (the name would be forticlientsslvpn_linux_ .tar.gz), extract it to the location of your choice on your Linux PC (I’m on Ubuntu 16.04 LTS).
Launching
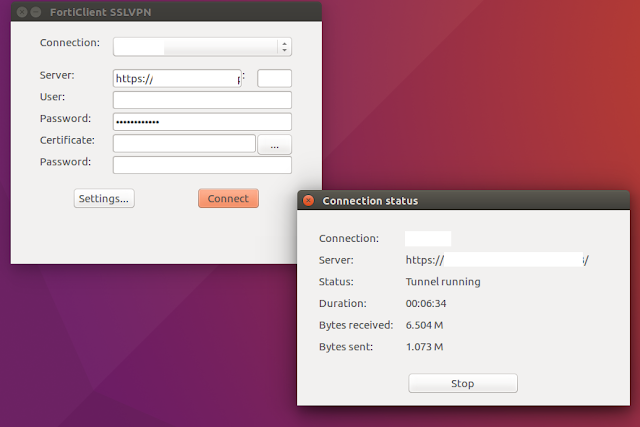
You can launch the Forticlient using the terminal after navigating to the path. You need to launch the script as superuser only the first time you run it.
Accept the license agreement and you will have the client running immediately after that —

Enter the details provided by your administrator in terms of the URL, port number etc. and click connect to establish the connection. If you don’t use a certificate you can leave the fields blank. A warning dialog to this effect would be shown while connecting on which you can click ‘Continue’.
To avoid entering details every time, you can save the connection details which will persist between sessions. Click ‘Settings’ for this —

Connecting to the remote computer
Click on ‘New’ and save your machines details. You can select various color depth values; quality, sound (in Advanced tab) to improve your connection experience.

Once done, click ‘Connect’.
Creating a Unity Launcher
Create a .desktop file which will act as a launcher with the following content.
You can pin the launcher to Unity Launcher if necessary.
Источник
PieterScheffers / install_forticlient_linux.sh
| # install ubuntu in virtual machine |
| # https://ubuntuforums.org/showthread.php?t=1481300 |
| # Get arch type of ubuntu |
| # i686 = 32 bit |
| # x86_64 = 64 bit |
| uname -m |
| # download forticlient |
| https://hadler.me/linux/forticlient-sslvpn-deb-packages |
| # install (get error on missing dependencies) |
| sudo dpkg -i forticlient.deb |
| # https://askubuntu.com/questions/40011/how-to-let-dpkg-i-install-dependencies-for-me |
| # install dependencies |
| sudo apt-get -f install |
| # install forticlient |
| sudo dpkg -i forticlient.deb |
| # https://askubuntu.com/questions/81797/nslookup-finds-ip-but-ping-doesnt |
| sudo apt-get remove libnss-mdns |
| # start forticlient |
| cd /opt/forticlient-sslvpn |
| sudo ./fortisslvpn.sh |
| # https://github.com/adrienverge/openfortivpn |
| # https://askubuntu.com/questions/793443/forticlient-on-ubuntu-1404-tunnel-running-but-no-ip |
This comment has been minimized.
Copy link Quote reply
ghost commented Aug 20, 2018
this will work on a no graphical interface ?
This comment has been minimized.
Copy link Quote reply
windowsxp811203 commented Jan 13, 2020
root@instance-1:/opt/forticlient-sslvpn/64bit# ./forticlientsslvpn_cli
usage:./forticlientsslvpn_cli [—proxy proxyaddress:proxyport] —server vpnserve raddress:vpnport [—proxyuser proxyuser] [—vpnuser vpnuser] [—pkcs12 pkcs12pat h] [—keepalive]
this will work on a no graphical interface ?
This comment has been minimized.
Copy link Quote reply
yogeshalgo commented Dec 9, 2020 •
This works, thanks.
This comment has been minimized.
Copy link Quote reply
hidarraga commented Mar 18, 2021
Hi, i tried to execute the command line ./forticlientsslvpn_cli . and i got the message
Please run /opt/forticlient-sslvpn/64bit/./helper/setup to do the initial setup
I initial the setup and when i accept the license i got the error:
Do you agree with this license ?[Yes/No]Yes
touch: cannot touch ‘/etc/ppp/options’: No such file or directory
Please install pppd, it is required by FortiClient SSLVPN!
/opt/forticlient-sslvpn/64bit/./helper//setup: 76: exit: Illegal number: -1
I tryed to install the pppd package but it didn’t locate on the ubuntu 20.04 that i have.
Do you know what can i do to use the forticlient?
Источник
Моя внешняя память
Forticlient имеет избыточный функционал, который иногда мешает (быстрая перезагрузка системы). Поэтому я заменил его консольным вариантом openfortivpn (установить его просто, описывать не буду). У меня есть сертификат формата pkcs12, логин, пароль, хост и порт. Всё это подходит для Forticlient, но openfortivpn не понимает такой сертификат. Вынем из контейнера нужные нам сертификат и ключ.
openssl pkcs12 -in client.pfx -clcerts -nokeys -out client.crt
openssl pkcs12 -in client.pfx -nocerts -nodes -out client.key
openssl спросит пароль.
В итоге мы получаем 2 файла:
client.crt и client.key
Теперь нам надо отредактировать конфиг /etc/openfortivpn/config
host = vpn-host
port = 443
username = user
password = pass # если хотите вводить пароль при каждом запуске, то закоментируйте эту строчку
#trusted-cert =
user-cert = /etc/openfortivpn/client.crt
user-key = /etc/openfortivpn/client.key
# openfortivpn -c /etc/openfortivpn/config
Первый запуск выдаст нам недостающий параметр — trusted-cert. Скопируйте его значение в вставьте в конфиг, затем раскомментируйте соответствующую строку:
ERROR: Gateway certificate validation failed, and the certificate digest is not in the local whitelist. If you trust it, rerun with:
ERROR: —trusted-cert 2ffcb45a91862………
ERROR: or add this line to your config file:
ERROR: trusted-cert = 2ffcb45a91862……..
Запустите повторно, должно выдать что-то похожее:
INFO: Connected to gateway.
INFO: Authenticated.
INFO: Remote gateway has allocated a VPN.
Using interface ppp0
Connect: ppp0 /dev/pts/2
INFO: Got addresses: [172.10.0.10], ns [11.12.12.17, 172.10.0.11]
INFO: Negotiation complete.
INFO: Negotiation complete.
local IP address 172.11.0.10
remote IP address 192.168.0.1
INFO: Interface ppp0 is UP.
INFO: Setting new routes…
INFO: Adding VPN nameservers…
INFO: Tunnel is up and running.
Работает быстро и не нагружает систему лишним функционалом, который от VPN-клинта никак не ждёшь.
Источник


