- How to Change Startup Programs in Windows 7, 8 And 10
- Dillion Megida
- In Windows 7
- Open the Startup Apps Control Panel
- Disable/Enable Startup App
- Add Startup App
- In Windows 8
- Open the Startup Apps Control Panel
- Disable/Enable Startup App
- Add Startup App
- In Windows 10
- Open the Startup Apps Control Panel
- Disable/Enable Startup Apps
- Add Startup App
- Wrap Up
- Dillion Megida
- How to find auto startup folder in Windows 10 (Where is it)?
- Under Windows 10, the startup folder in the Start menu is no longer in the form that you would expect from older Windows versions.
- 1.) . Find and Open the Startup Folder! 2.) . Startup programs and APPs in Windows-10 Task Manager!
- 1.) Find and Open the Startup Folder!
- 2.) Startup programs and APPs in Windows-10 Task Manager!
- Windows 10 Startup Folder [Location, Access, Items]
- Where is the Startup folder in Windows 10?
- How to Open the Startup Folder With Run
- How to Add Software to the Startup Folder
- How to Remove Software From the Startup Folder
How to Change Startup Programs in Windows 7, 8 And 10

Dillion Megida

Startup programs are programs which run automatically when a system is booted. This is a good practice for programs which you use frequently. It saves you the stress of looking for those programs, or, in some cases, manually setting them up.
Some programs also have this feature by default when they are newly installed.
But if you have too many startup programs it can slow down the boot process. This has a negative effect especially on systems with small capabilities or less processing power.
In this article, we’ll learn how to open the startup apps control panel, how to enable and disable startup apps, and finally how to add our desired startup programs in Windows 7, 8 and 10.
In each of these Windows versions, there is a Control Panel for Startup Apps which shows a list of applications that can be run automatically on startup. These applications are either enabled for startup or disabled.
So let’s look at the process for each Windows version.
In Windows 7
Open the Startup Apps Control Panel
Open the windows startup menu, then type «MSCONFIG«. When you press enter, the system configuration console is opened. Then click the «Startup» tab which will display some programs that can be enabled or disabled for startup.
Disable/Enable Startup App
The checkboxes beside the applications indicate the status. If checked, it is enabled for startup, otherwise, it is disabled.
To disable an enabled app, simply uncheck the checkbox and click apply.
To enable a disabled app, check the checkbox and click apply.
These two processes require the system to be restarted before the changes are applied on the applications.
Add Startup App
To add an app, you’ll need to explore the Startup Folder. To do this, try any of the following methods;
- Open the start menu and type «Startup» (to search for it). When found, right-click and select Explore to open the folder.
- Open the start menu, select «All Programs» and scroll down the list until you find the Startup Folder. When found, Explore it.
Create a shortcut of your desired program, then copy it and paste it in this folder. After this, the program will automatically be added to the panel with a status of «enabled«.
In Windows 8
Open the Startup Apps Control Panel
To open the panel, try any of the following;
- Open «Task Manager» and select the «Startup» tab
- Open windows startup menu, and type «Startup» to search for the program. Then select any of the options provided.
Disable/Enable Startup App
To disable a startup app which is enabled, right-click on the app and select «Disable«.
To enable a startup app which is disabled, right-click on the app and select «Enable«.
Add Startup App
Press the window and letter R key to open the Run dialog. Then enter %AppData%. This will open a roaming folder.
Navigate to \Microsoft\Windows\Start Menu\Programs\Startup. In this folder, paste the shortcut of your desired app. This will make it a startup application with a status of «enabled».
In Windows 10
Open the Startup Apps Control Panel
- Open the start menu, type «Startup Apps» (to search for it) and click any of the results.
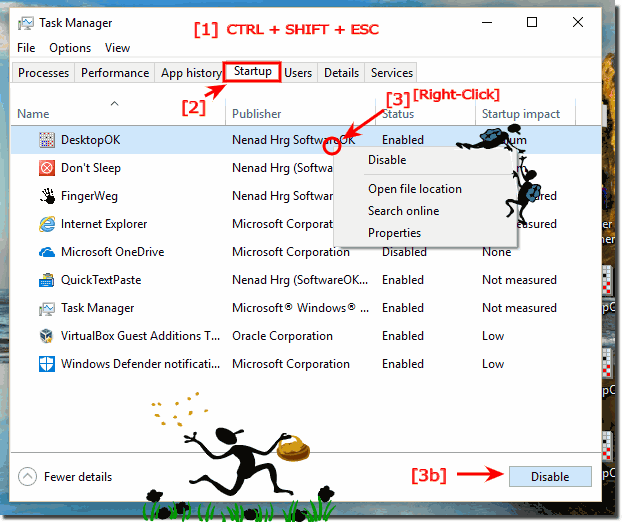
- Open «Task Manager«, then select the «Startup» tab
Disable/Enable Startup Apps
To disable a startup app, right-click on any app in the list with a status of «enabled» and select «disable«.
To enable a startup app in the list which is disabled, right-click on the app and select «enable«.
Add Startup App
Hold the windows and letter R key on the keyboard. In the run dialog, enter «shell:startup«.
In the folder, you can add any application of your choice which you’d want to run at startup. They’ll be added to the list so when you access your Startup Apps, you can disable or enable them.
Wrap Up
If there’s any application which you always run when you boot up your system, it is good practice to make it a startup program.
When your system becomes slow to boot, it’s most likely because startup programs are responsible. Now you know how to disable or reduce them.
Dillion Megida
Frontend Web Engineer and Technical Writer. I love teaching what I know. Javascript / ReactJS / NodeJS
If you read this far, tweet to the author to show them you care. Tweet a thanks
Learn to code for free. freeCodeCamp’s open source curriculum has helped more than 40,000 people get jobs as developers. Get started
freeCodeCamp is a donor-supported tax-exempt 501(c)(3) nonprofit organization (United States Federal Tax Identification Number: 82-0779546)
Our mission: to help people learn to code for free. We accomplish this by creating thousands of videos, articles, and interactive coding lessons — all freely available to the public. We also have thousands of freeCodeCamp study groups around the world.
Donations to freeCodeCamp go toward our education initiatives, and help pay for servers, services, and staff.
How to find auto startup folder in Windows 10 (Where is it)?
Under Windows 10, the startup folder in the Start menu is no longer in the form that you would expect from older Windows versions.
1.) . Find and Open the Startup Folder!
2.) . Startup programs and APPs in Windows-10 Task Manager!
However, you do not need any additional software to edit the files or a Quad-Explorer in Windows 10 for fast Startup edit. All you have to do is open the Windows 10 Task Manager there is no folder left. So you can easily see which programs start automatically when booting up ergo restart your computer.
1.) Find and Open the Startup Folder!
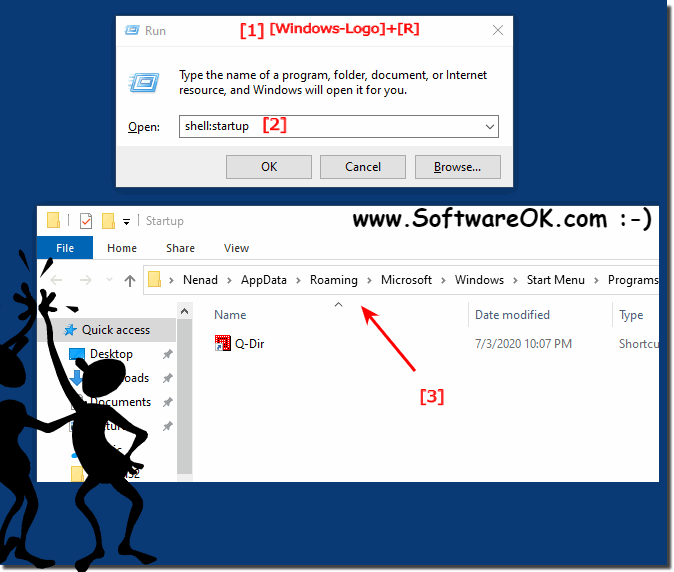
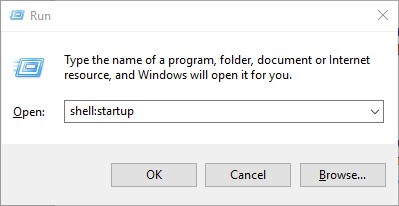
The best way to open the Startup folder in Windows 10 is with the address shell:startup, you can enter this path in address bar of MS Explorer.
Or use the Run-Dialog Box [Windows-logo] + [R] in Windows-10 and enter the command shell:startup
(. see Image-1 Arrow-1)
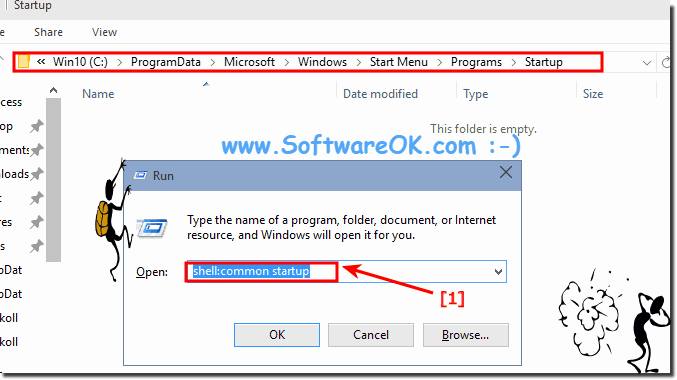
The second startup folder in Windows 10 shell:common startup is responsible for all users, when here, an entry is created, or deleted, this is valid for all users on the Windows-10 PC. (. see Image-2 Arrow-1)
Here is the alternative addresses, this can you use to create a new Windows 10 desktop shortcut.
Autostart for currently logged-on user:
shell:startup = %appdata%\Roaming\Microsoft\Windows\Start Menu\Programs\Startup
And startup folder all users:
shell:common startup = %programdata%\Microsoft\Windows\Start Menu\Programs\Startup
Tip
shell:start menu = start menu in Windows-10
shell:common start menu = all user start menu in Windows-10
| (Image-1) auto startup folder in Windows 10 current user! |
 |

| (Image-2) Windows-10 all User auto startup folder! |
 |
2.) Startup programs and APPs in Windows-10 Task Manager!
| (Image-3) Auto startup programs and APPs in Windows-10! |
 |
If you want to accelerate the start of Windows 10, you can remove and disable programs in the startup. It is also possible to add new startup programs. We’ll show you how both processes work. What can I do if I still have problems when » edit autostart » is a frequently asked question Restart the Windows operating system, please perform a proper Windows reboot.
Windows 10 Startup Folder [Location, Access, Items]

- The Task Manager’s Startup tab provides you enough insights on what exactly are the apps that launch at startup. But this tool comes in handy for inspection purposes only and you’ll need to find other ways to add programs for example.
- You can do this by adding software directly to the Startup folder. If you’re wondering how to find it, look no further, we have it sorted out for you right here.
- Check out more handy fixes on our Windows 10 Guides.
- Don’t be shy to explore the Tutorials Hub as well for more tech tricks and tips.
Windows 10’s Task Manager utility includes a Startup tab. That is Windows 10’s default startup manager with which users can disable startup software.
However, the Task Manager’s tab doesn’t include any options for users to add programs to the startup. So, some users might look for startup settings on software windows to add new programs to the system startup.
Yet, Windows 10 includes a Startup folder to which users can add programs and files. All software and programs within that folder will run automatically when Windows starts. That folder is buried within a series of subfolders.
Consequently, some users might wonder found to find it exactly.
Where is the Startup folder in Windows 10?
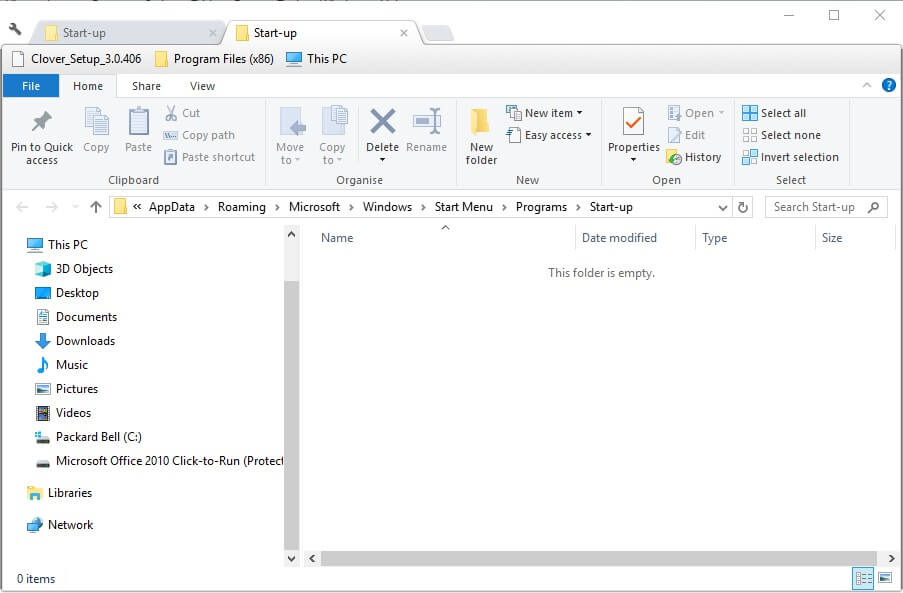
For most users, the Startup folder is located at this address:
There is also a second All Users Startup folder that should be located under:
How to Open the Startup Folder With Run
As you can see, the full path for the Startup folder is this:
Users will need to replace USERNAME with their actual user account name, and then enter that path in File Explorer. That path will open the folder shown in the snapshot directly below.
However, it’s better to open the Startup folder with Run. To do that, press the Windows key + R hotkey. Then enter shell:startup in the Run text box. That will open the Startup folder when users press the OK button.
To open the all user Startup folder, enter shell:common startup in Run and click OK.
How to Add Software to the Startup Folder
With the Startup folder open in File Explorer, users can now add new program shortcuts to the system startup. In addition, users can also include file shortcuts within that folder.
Then the files the Startup folder includes will usually open with their default software. This is how users can add shortcuts to the Windows Startup folder.
- Right-click an empty space within the Startup folder and select New >Shortcut.
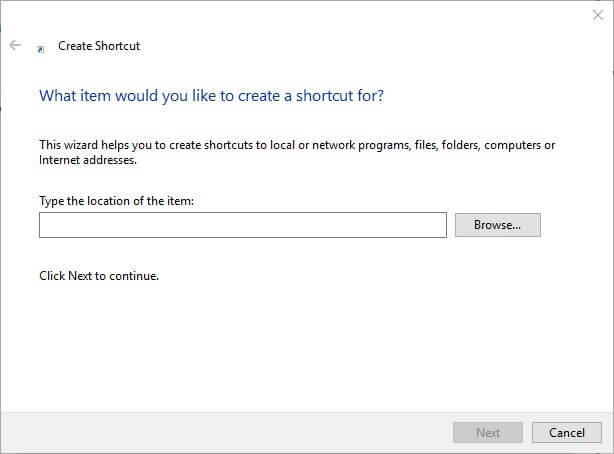
- Click the Browse button to open the window in the snapshot directly below.
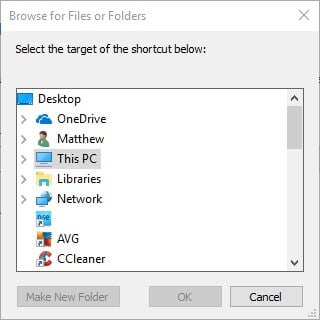
- Select a program or document to include in the startup, and press the OK button.
- Press the Next button.
- Then press the Finish button. The Startup folder will now include the selected software or file.
- The software in the Startup folder will open after you’ve restarted Windows.
How to Remove Software From the Startup Folder
Users can remove programs in the Startup folder by deleting them. To do that, select a program in that folder and click the Delete button. That will probably erase the shortcut to the Recycle Bin.
Users can also press the Ctrl + A keyboard shortcut to select all shortcuts within the Startup folder. Then press File Explorer’s Delete button to erase them. Task Manager’s Start-up tab in Windows 10 will also list the programs that users have added to the Startup folder.
Therefore, users can disable the programs with that utility by right-clicking the taskbar and selecting Task Manager.
Click the Start-up tab on that utility’s window. Then users can select the required program and click Disable. 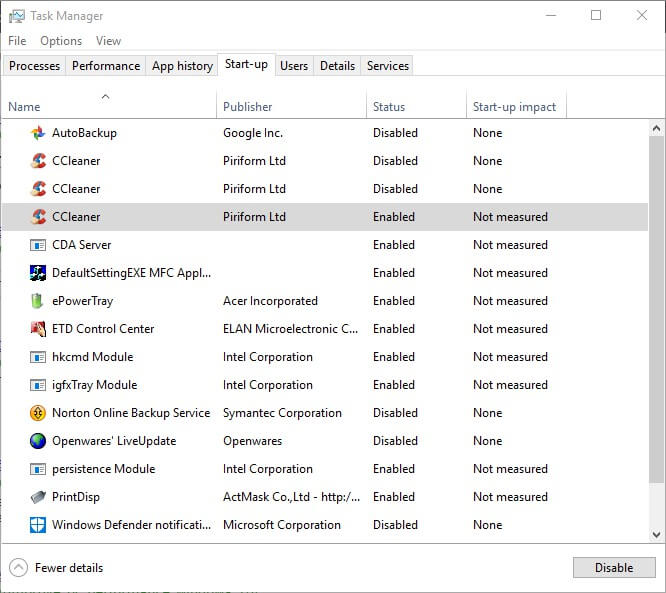
Note: Task Manager doesn’t include a Start-up tab in Windows 7. However, Win 7 users can open the startup manager by entering msconfig in Run and clicking OK. Then select the Startup tab on the System Configuration window.
Windows 7 users can uncheck the item checkboxes on that tab to disable programs starting during startup. So, that’s how users can add new software and files to Windows’ Startup folder.
However, filling that folder up will slow down the system startup. Lots of startup software will also drain system resources. Therefore, don’t add too many things to the folder.
There you go, these solutions should help you manage the startup folder adequately. Let us know if you found them useful by hitting the comments section below.
Note: You will need to replace the USERNAME value with your actual user account name.
- What is Startup folder?
The Startup folder is an in-built Windows feature (first introduced in Windows 95) that allows users to set up those particular apps and programs that will automatically run when Windows starts.


