- Custom Window Frame Using DWM
- Introduction
- Extending the Client Frame
- Removing the Standard Frame
- Drawing in the Extended Frame Window
- Enabling Hit Testing for the Custom Frame
- Appendix A: Sample Window Procedure
- Appendix B: Painting the Caption Title
- Appendix C: HitTestNCA Function
- In every issue you’ll find.
- Fine Homebuilding Project Guides
- Framing
- How to Frame Walls Plumb and Straight
- When carpenters use consistent and efficient methods for framing a house, it makes the entire build go much more smoothly.
- The right time
- Where to start?
- More about framing:
- How Much Does It Cost To Build A Wall?
- Typical Range: $985 — $2 904
- How We Get This Data
- Are you a Home Improvement or Service Pro?
- Costs to Build a Wall
- On This Page:
- Wall Installation Cost Calculator
- Want the most accurate estimates for your project?
- Want the most accurate estimates for your project?
- Costs to Frame an Interior Wall Per Linear Foot
- Framing a Load Bearing Wall
- Wood vs. Metal Framing
- Walls with a Door, Window or Pass Through
- Average Prices by Material to Put Up New Walls
- Stud Wall with Plaster & Lath Installation
- Drywall
- Glass Walls
- Brick, Stone & Concrete Walls
- Wood or Upholstery Paneling
- Average Cost to Add a Partition Wall to Divide a Room
- Skyfold, Accordion, Panel & Other Temporary, Commercial Office Walls
- Half Walls
- Building Exterior vs. In-House Walls
- Construction Cost Considerations
- Paneling and Texturing
- Electrical & Plumbing Considerations
- Red Tape
- Cleanup
- DIY vs. Hiring a Contractor
- How much does it cost to put an arch in a wall?
- What are the best dividing walls for basements or garages?
- What are the costs and factors for building a demising or party wall?
- How much does it cost to remove and replace, or move a wall?
Custom Window Frame Using DWM
This topic demonstrates how to use the Desktop Window Manager (DWM) APIs to create custom window frames for your application.
Introduction
In WindowsВ Vista and later, the appearance of the non-client areas of application windows (the title bar, icon, window border, and caption buttons) is controlled by the DWM. Using the DWM APIs, you can change the way the DWM renders a window’s frame.
One feature of the DWM APIs is the ability to extend the application frame into the client area. This enables you to integrate a client UI element—such as a toolbar—into the frame, giving the UI controls a more prominent place in the application UI. For example, Windows Internet Explorer 7 on Windows Vista integrates the navigation bar into the window frame by extending the top of the frame as shown in the following screen shot.

The ability to extend the window frame also enables you to create custom frames while maintaining the window’s look and feel. For example, Microsoft Office Word 2007 draws the Office button and the Quick Access toolbar inside the custom frame while providing the standard Minimize, Maximize, and Close caption buttons, as shown in the following screen shot.

Extending the Client Frame
The functionality to extend the frame into the client area is exposed by the DwmExtendFrameIntoClientArea function. To extend the frame, pass the handle of the target window together with the margin inset values to DwmExtendFrameIntoClientArea. The margin inset values determine how far to extend the frame on the four sides of the window.
The following code demonstrates the use of DwmExtendFrameIntoClientArea to extend the frame.
Note that the frame extension is done within the WM_ACTIVATE message rather than the WM_CREATE message. This ensures that frame extension is handled properly when the window is at its default size and when it is maximized.
The following image shows a standard window frame (on the left) and the same window frame extended (on the right). The frame is extended using the previous code example and the default Microsoft Visual Studio WNDCLASS/WNDCLASSEX background (COLOR_WINDOW +1).

The visual difference between these two windows is very subtle. The only difference between the two is that the thin black line border of the client region in the window on the left is missing from the window on the right. The reason for this missing border is that it is incorporated into the extended frame, but the rest of the client area is not. For the extended frames to be visible, the regions underlying each of the extended frame’s sides must have pixel data with an alpha value of 0. The black border around the client region has pixel data in which all color values (red, green, blue, and alpha) are set to 0. The rest of the background does not have the alpha value set to 0, so the rest of the extended frame is not visible.
The easiest way to ensure that the extended frames are visible is to paint the entire client region black. To accomplish this, initialize the hbrBackground member of your WNDCLASS or WNDCLASSEX structure to the handle of the stock BLACK_BRUSH. The following image shows the same standard frame (left) and extended frame (right) shown previously. This time, however, hbrBackground is set to the BLACK_BRUSH handle obtained from the GetStockObject function.

Removing the Standard Frame
After you have extended the frame of your application and made it visible, you can remove the standard frame. Removing the standard frame enables you to control the width of each side of the frame rather than simply extending the standard frame.
To remove the standard window frame, you must handle the WM_NCCALCSIZE message, specifically when its wParam value is TRUE and the return value is 0. By doing so, your application uses the entire window region as the client area, removing the standard frame.
The results of handling the WM_NCCALCSIZE message are not visible until the client region needs to be resized. Until that time, the initial view of the window appears with the standard frame and extended borders. To overcome this, you must either resize your window or perform an action that initiates a WM_NCCALCSIZE message at the time of window creation. This can be accomplished by using the SetWindowPos function to move your window and resize it. The following code demonstrates a call to SetWindowPos that forces a WM_NCCALCSIZE message to be sent using the current window rectangle attributes and the SWP_FRAMECHANGED flag.
The following image shows the standard frame (left) and the newly extended frame without the standard frame (right).

Drawing in the Extended Frame Window
By removing the standard frame, you lose the automatic drawing of the application icon and title. To add these back to your application, you must draw them yourself. To do this, first look at the change that has occurred to your client area.
With the removal of the standard frame, your client area now consists of the entire window, including the extended frame. This includes the region where the caption buttons are drawn. In the following side-by-side comparison, the client area for both the standard frame and the custom extended frame is highlighted in red. The client area for the standard frame window (left) is the black region. On the extended frame window (right), the client area is the entire window.

Because the entire window is your client area, you can simply draw what you want in the extended frame. To add a title to your application, just draw text in the appropriate region. The following image shows themed text drawn on the custom caption frame. The title is drawn using the DrawThemeTextEx function. To view the code that paints the title, see Appendix B: Painting the Caption Title.

When drawing in your custom frame, be careful when placing UI controls. Because the entire window is your client region, you must adjust your UI control placement for each frame width if you do not want them to appear on or in the extended frame.
Enabling Hit Testing for the Custom Frame
A side effect of removing the standard frame is the loss of the default resizing and moving behavior. For your application to properly emulate standard window behavior, you will need to implement logic to handle caption button hit testing and frame resizing/moving.
For caption button hit testing, DWM provides the DwmDefWindowProc function. To properly hit test the caption buttons in custom frame scenarios, messages should first be passed to DwmDefWindowProc for handling. DwmDefWindowProc returns TRUE if a message is handled and FALSE if it is not. If the message is not handled by DwmDefWindowProc, your application should handle the message itself or pass the message onto DefWindowProc.
For frame resizing and moving, your application must provide the hit testing logic and handle frame hit test messages. Frame hit test messages are sent to you through the WM_NCHITTEST message, even if your application creates a custom frame without the standard frame. The following code demonstrates handling the WM_NCHITTEST message when DwmDefWindowProc does not handle it. To see the code of the called HitTestNCA function, see Appendix C: HitTestNCA Function.
Appendix A: Sample Window Procedure
The following code sample demonstrates a window procedure and its supporting worker functions used to create a custom frame application.
Appendix B: Painting the Caption Title
The following code demonstrates how to paint a caption title on the extended frame. This function must be called from within the BeginPaint and EndPaint calls.
Appendix C: HitTestNCA Function
The following code shows the HitTestNCA function used in Enabling Hit Testing for the Custom Frame. This function handles the hit testing logic for the WM_NCHITTEST when DwmDefWindowProc does not handle the message.
In every issue you’ll find.

- Expert insights on techniques and principles
- Unbiased tool reviews
- Step-by-step details to master the job
- Field-tested advice and know-how
Subscribe Now!
Fine Homebuilding Project Guides
Framing
How to Frame Walls Plumb and Straight
When carpenters use consistent and efficient methods for framing a house, it makes the entire build go much more smoothly.
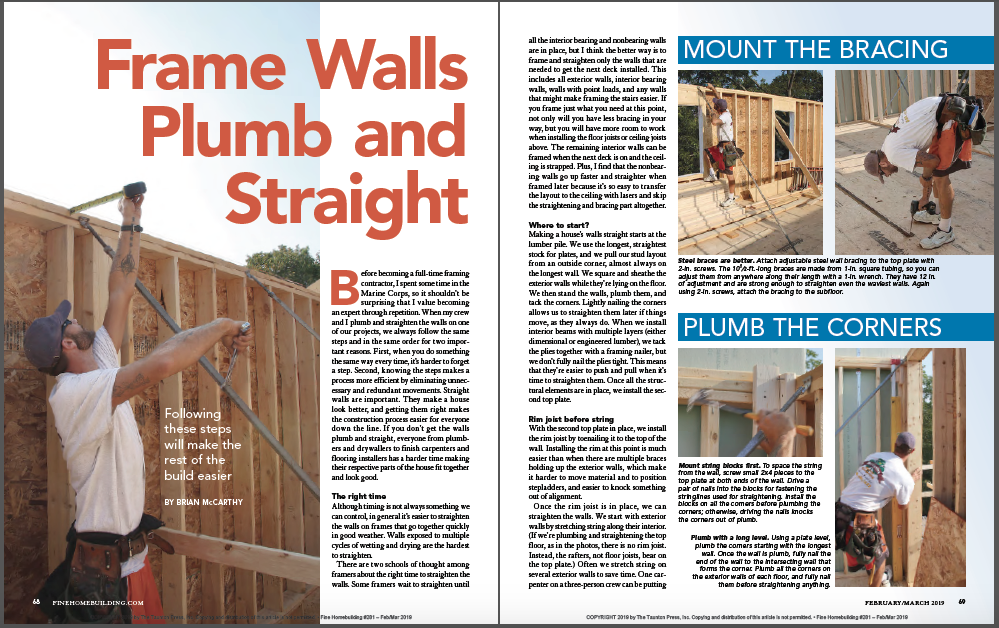
Synopsis: Straight walls are important—for making a house look better and for making the construction process easier for everyone from plumbers and drywallers to finish carpenters and flooring installers. In this article, contractor Brian McCarthy describes his step-by-step process for making walls plumb and straight, including the right time to frame and straighten walls; the best lumber stock to use; and the sequence of mounting the bracing, plumbing the corners, and straightening the outside and inside.
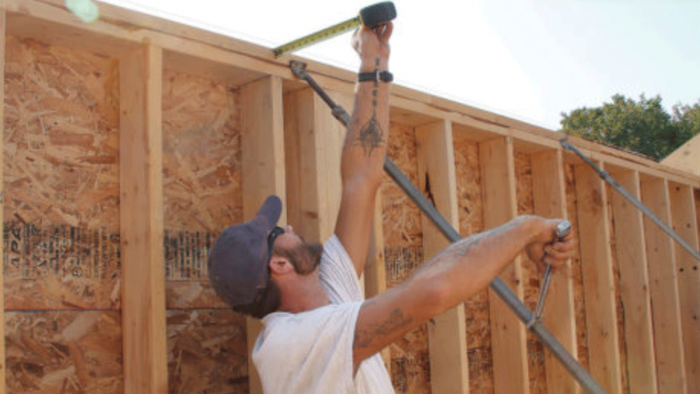
Before becoming a full-time framing contractor, I spent some time in the Marine Corps, so it shouldn’t be surprising that I value becoming an expert through repetition. When my crew and I plumb and straighten the walls on one of our projects, we always follow the same steps and in the same order for two important reasons. First, when you do something the same way every time, it’s harder to forget a step. Second, knowing the steps makes a process more efficient by eliminating unnecessary and redundant movements. Straight walls are important. They make a house look better, and getting them right makes the construction process easier for everyone down the line. If you don’t get the walls plumb and straight, everyone from plumbers and drywallers to finish carpenters and flooring installers has a harder time making their respective parts of the house fit together and look good.
The right time
Although timing is not always something we can control, in general it’s easier to straighten the walls on frames that go together quickly in good weather. Walls exposed to multiple cycles of wetting and drying are the hardest to straighten.
There are two schools of thought among framers about the right time to straighten the walls. Some framers wait to straighten until all the interior bearing and nonbearing walls are in place, but I think the better way is to frame and straighten only the walls that are needed to get the next deck installed. This includes all exterior walls, interior bearing walls, walls with point loads, and any walls that might make framing the stairs easier. If you frame just what you need at this point, not only will you have less bracing in your way, but you will have more room to work when installing the floor joists or ceiling joists above. The remaining interior walls can be framed when the next deck is on and the ceiling is strapped. Plus, I find that the nonbearing walls go up faster and straighter when framed later because it’s so easy to transfer the layout to the ceiling with lasers and skip the straightening and bracing part altogether.
Where to start?
Making a house’s walls straight starts at the lumber pile. We use the longest, straightest stock for plates, and we pull our stud layout from an outside corner, almost always on the longest wall. We square and sheathe the exterior walls while they’re lying on the floor. We then stand the walls, plumb them, and tack the corners. Lightly nailing the corners allows us to straighten them later if things move, as they always do. When we install interior beams with multiple layers (either dimensional or engineered lumber), we tack the plies together with a framing nailer, but we don’t fully nail the plies tight. This means that they’re easier to push and pull when it’s time to straighten them. Once all the structural elements are in place, we install the second top plate.
 From Fine Homebuilding #281
To view the entire article, please click the View PDF button below.
More about framing:
- Setting the Stage for Wall Framing
- Avoiding Common Framing Errors
- Anatomy of a Stud-Framed Wall
Sign up for eletters today and get the latest how-to from Fine Homebuilding, plus special offers.
How Much Does It Cost To Build A Wall?
Typical Range: $985 — $2 904
How We Get This Data
Are you a Home Improvement or Service Pro?
Reviewed & approved on December 2, 2020 by Cati O’Keefe, Expert Home Building & Sustainability Contributor.
Written by HomeAdvisor.
Costs to Build a Wall
Installing a new wall will run an average of $1,860 with a typical range of $985 and $2,904. Due to the complexities of some homes, the cost can reach as high as $8,000. Installing walls seems easy to do but is ultimately a long, messy affair typically involving framing, electrical work and drywall.
Though there are several types of walls including glass, brick, and temporary partitions, most projects involve wood or metal stud framing with drywall (gypsum board). This project isn’t usually a DIY job. For professional results, hire a carpenter to ensure correct installation and a beautiful finish.
On This Page:
Wall Installation Cost Calculator
Let’s calculate cost data for you. Where are you located?
| National Average | $ 1 860 |
| Typical Range | $ 985 — $ 2 904 |
| Low End — High End | $ 350 — $ 14 000 |
Want the most accurate estimates for your project?

We are still gathering data for this location.
Want the most accurate estimates for your project?
Costs to Frame an Interior Wall Per Linear Foot
Framing costs $7 to $16 per square foot to install top and bottom plates with studs. When including drywall, you’ll spend $20 to $30 per linear foot. Framing costs change slightly for load bearing walls, with the type of material used, and for door and window openings.
Framing a Load Bearing Wall
Framing load bearing walls can cost slightly more than non-load bearing ones because of stud spacing requirements — load bearing walls need more studs throughout. External walls need additional studs at the corners, plus insulation.
Walls supporting an entire floor plus a roof and ceiling made from 2x4s require stud spacing at 16 inches on center rather than 24 inches on center thus increasing material costs by 30%. Loads over windows, doors and pass-throughs require a beam for support, further increasing costs. Most require minor electrical work to meet code requirements for switch and outlet spacing.
Wood vs. Metal Framing
Wood prices have recently risen to meet metal framing costs at $2 to $4 per square foot. Wood sits at $1 to $5 per square foot. Wood is easier to work with and a better choice for those seeking a DIY solution. However, metal is quickly gaining popularity due to it’s durability.
Walls with a Door, Window or Pass Through
Framing for a window or door opening costs $120 to $200 per opening. You’ll need king and jack studs plus saddle (or sill) pieces in addition to the standard studs. For the doors and windows, expect to spend $50 to $500 in materials alone. A multiple window installation costs an average of $5,700.
Hire a contractor to install a wall in your home
Average Prices by Material to Put Up New Walls
Most walls are made of drywall, which is a board made of layers of material bonded to a gypsum plaster core. Other wall materials range from plaster, glass, brick, stone and concrete.
| Material | Per Square Foot |
|---|---|
| Drywall | $1 — $3 |
| Plaster | $3 — $10 |
| Glass | $25 — $75 |
| Brick/Brick Veneer | $5 — $45 |
| Stone/Stone Veneer | $10 — $80 |
| Concrete | $5 — $12 |
Stud Wall with Plaster & Lath Installation
Plaster installation prices range from $3 to $5 per square foot though it can be as high as $10 per square foot in some areas. Though drywall is by far the most common type of wall, plaster is handy for both curved interior walls and for decorative touches.
Drywall
Prices for hanging drywall run $2 per square foot of drywall. Gypsum board installation runs $65 per panel. A typical panel is 4 feet by 8 feet or 32 square feet. Interior walls framed with drywall run $20 to $30 per linear foot though actual costs will vary by region. Other material costs include the following.
- Special screws: $25 per 1,000
- Joint compound or «mud»: $6 per 3.5-quart pail
- Joint tape: $5 for 500 feet
Pricing remains about the same regardless of framing material or pass throughs.
Drywall is the most common type of wall. Buying the drywall sheets for your walls (and ceilings if you are doing them at the same time) will be a bulk of the price to install. Drywall is heavy and installation usually requires at least two workers.
Glass Walls
You can expect to pay anywhere from $25 to $75 per square foot for a tempered glass wall installation. Adding a glass door adds another $1,000 to $3,000 or more. Labor rates run anywhere from $35 to $150 per hour in glass wall installation costs. Prices vary wildly between one location and another.
For smaller walls or to fill openings in bathrooms, glass blocks are a more economical solution. Glass blocks cost $450 to $1,000 per project on average. Always get at least three quotes before choosing an installation contractor.
Brick, Stone & Concrete Walls
Brick and stone costs run an average of $4,400 for both solid and veneers. Poured concrete walls cost an average of $5,000. For interior brick walls, you would use a thin veneer brick, which runs $5 to $15 per square foot.
| Material | Per Square Foot |
|---|---|
| Brick | $27 — $45 |
| Brick Veneer | $5 — $15 |
| Stone | $25 — $80 |
| Stone Veneer | $10 — $25 |
| Concrete | $5 — $12 (+$1 for exposed finishes like polishing & stamped) |
Wood or Upholstery Paneling
Wood, vinyl and upholstery paneling are cost-effective ways to personalize the design of your home.
- Wood paneling: $7-$35 per square foot.
- Wood flooring and siding styles like tongue and groove and shiplap siding cost between $3 to $7 per square foot and are quickly becoming a popular way to create accent and feature walls.
- Vinyl panels: $20 per 4-foot by 8-foot sheet. They’re cheap and easy to clean making them great finishes for basements, laundry rooms and garages.
Consult with a pro to plan your wall installation
Average Cost to Add a Partition Wall to Divide a Room
Costs to add a partition wall vary greatly depending on the type and size. Options include skyfold walls, accordion or panel walls and half walls that don’t reach the ceiling.
Skyfold, Accordion, Panel & Other Temporary, Commercial Office Walls
- Skyfold: $ varies. Fully automated accordion style walls that fold into the ceiling. They are custom designed for each application with numerous features and designs. Contact a professional contractor for rates for your project.
- Everblock Systems: $4 per block with a 26 pack for $150. They’re very similar to large Lego blocks for use in both commercial and residential settings.
- Loftwall: $35-$50+ per square foot. Offering modular and moveable walls for professional and home use. They offer standalone and fastened options in metal, melamine and acrylic.
- Custom Built: $400-$3,500. Besides premade walls, temporary walls can always be created with a simple 2×4 or 2×2 frame and some type of paneling. A DIY job can run as little as $150 for supplies.
Offices, event centers, conference rooms, hotels and most other large commercial venues make use of moveable and retractable walls. There are many brand options to choose from for premade and temporary walls. Speak with your local contractor for the best option for your project.
Half Walls
Half wall pricing depends on the type of materials used. Since most are drywall finished, you’ll spend about $10 to $20 per linear foot. They extend only part of the way from the floor to ceiling, creating a visible boundary without impeding light or air flow.
Most interior half walls have some type of finished top ledges — usually finished wood or a railing. In large, open spaces, you’ll often find them between two support pillars dividing the space without losing any of the visual appeal of an open concept.
Types of Half Walls:
- Half walls: This is a partition used along stairs, in bathrooms and in open concepts to distinguish between the kitchen, dining and living areas.
- Pony walls: This non-load bearing option is generally three feet tall.
- Stem walls: A short, concrete wall, this connects the concrete footings of a home to either the floor joists or the concrete slab.
- Cripple Wall: Sometimes referred to as a sleeper wall, this is a short, load-bearing wall found in slab construction.
- Attic Knee Wall: This is any wall in the attic that runs from the floor to the roof rafters. It is usually under three feet tall and is finished to create useable attic space.
- Retaining or Sleeper Wall: This type is generally considered a cripple wall in the United States.
Building Exterior vs. In-House Walls
Though framing costs are almost identical for both interior and exterior walls, all other aspects of finishing them are different. Exterior load-bearing walls use house wrap and insulation and usually include windows, doors and some type of siding.
| Type | Interior/Exterior | Additional Cost |
|---|---|---|
| Load Bearing (extra studs & bracing) | Both | $1 — $2 per square foot |
| House Wrap | Exterior | $0.50 — $1 per square foot |
| Insulation costs | Exterior | $0.50 — $2 per square foot |
| Wood & Vinyl Siding prices | Exterior | $2 — $15 per square foot |
| Stone & Brick Siding costs | Exterior | $9 — $30 per square foot |
| Window prices | Exterior | $300 — $1,200 per project |
| Doors | Both | $1,000 per door |
| Drywall prices | Interior | $2 per square foot |
Construction Cost Considerations
Beyond straightforward labor and materials, other considerations like wall finishes, size of the project and electrical and plumbing installation can all affect the price.
Paneling and Texturing
Texturing is fast fading out of style but it’s still a quick and cheap way to finish a wall. 500 square feet will run about $550, or just over $1 per square foot. You also have the option to install paneling at $5 to $25 per square foot. Choose vinyl or wood paneling depending on your homes aesthetics.
Bids are determined based on the size of the project. Bigger spaces mean more materials and longer work time for professionals, all of which can increase the price to install a wall.
Electrical & Plumbing Considerations
Electrical work costs about $300 for the project or somewhere between $50 to $100 per hour with the first hour slightly higher at $150. Outlet and switch spacing and placement are governed by building code. Most walls will need some minor electrical work.
If you’re installing walls for a new kitchen or bath, you’ll need to consider the cost to hire a plumber. Plumbing rough -in costs run between $350 to $1,850. Most small projects will fall on the lower end of that range.
Red Tape
The National Association of Home Builders attributes an estimated 25% of new home construction costs to complex regulator policies. Part of these costs includes building permits averaging $1,000 per new home build. For simple interior walls, you can expect to pay closer to $100 to $300 in permits depending on your location. These prices vary greatly from state to state. Despite your location, permits are required for almost all stages of construction, even if you need to knock down the old walls first.
Cleanup
Installation pricing almost always includes cleanup. Wall installation is a messy job and something that your pro should clean up before leaving. It’s smart to double check that your contractor includes cleanup in the bid.
Get a Quote From a Contractor
DIY vs. Hiring a Contractor
It’s almost always a good idea to hire a contractor for building walls of any type. Though it may seem a straightforward job, you need to consider all code requirements, permitting, electrical and plumbing installation, load-bearing needs, and finish work. Constructing one without all parts of it done correctly could diminish the value of your home.
Improperly installed walls are possible structural issues causing massive and costly damage to your entire home. Fire and flood hazards from improperly installed plumbing and electrical work pose serious safety concerns and could lead to thousands of dollars in damage.
Before starting any building project, get a professional consultation. They’re usually free opportunities to understand all the requirements for your project and weigh contractor costs against DIY ambitions.
How much does it cost to put an arch in a wall?
A wall arch costs between $1,000 and $5,000 depending on the arch size and whether it is purely aesthetic or load-bearing. For very large projects, budgets will run considerably higher.
What are the best dividing walls for basements or garages?
The best dividing walls depend on your use. If you want a permanent wall, spend the $20 to $30 per linear foot for a stud and drywall-finished look. Typical garages aren’t finished to the same level as an interior house wall. They usually have just two layers of joint compound over the tape with the fastener heads and corner beads covered.
For permanent walls between garages and homes, code requires the use of a fire-rated wall, usually 5/8-inch fire-rated gypsum board. You’ll spend about 20% more for this type of wall cover. Sheetrock makes Firecode Core and Fireguard, both rated with differing thicknesses. Other manufacturers offer fire-rated products as well. Check with your contractor or local building department to make sure you are meeting local fire codes.
What are the costs and factors for building a demising or party wall?
Demising walls, also known as a party or common wall, cost as much as any other interior wall or about $20 to $30 per linear foot. A demising wall separates tenant spaces from shared areas. They are typically found in commercial spaces like a shopping mall.
How much does it cost to remove and replace, or move a wall?
The cost to remove a wall falls anywhere from $300 to $10,000 or more depending on the size of the wall and whether it was load-bearing. Removing or moving load-bearing walls is labor-intensive and requires shifting the load to another support during construction.


