- Free up drive space in Windows 10
- 5 Ways to Free Up Disk Space on a Dedicated Windows Server
- Why Does Your Server Disk Get Full?
- 1. Delete Outdated Backups
- 2. Optimize SQL Databases
- 3. Clean Up IIS Log Files
- 4. Uninstall Third-Party Software
- 5. Add More Server Disk Space
- Get More Disk Space on Your Dedicated Server
- Jake Fellows
Free up drive space in Windows 10
If your PC is running low on free space, you might not be able to install important Windows updates, and your PC’s performance may be affected. Here are some ways to free up space so you can keep your PC up to date and running smoothly. These suggestions are listed in order, so start with the first one, see if that helps, and then continue to the next one if it doesn’t.
To check the total disk space left on your Windows 10 device, select File Explorer from the taskbar, and then select This PC on the left. The available space on your drive will appear under Devices and drives.
Note: If you follow the steps below and continue to have trouble updating Windows because of low disk space, resetting or reinstalling Windows might help. For more info, see Reinstall Windows 10.
If you used Disk Cleanup to free up space on your device and then see a Low Disk Space error, it’s possible that your Temp folder is quickly filling up with application (.appx) files that are used by Microsoft Store. For more info, see Low Disk Space error due to a full Temp folder.
Storage Sense can automatically free up drive space for you by getting rid of items that you don’t need, like temporary files and items in your Recycle Bin. For more info, see Manage drive space with Storage Sense.
If your system doesn’t have Storage sense, you can use the Disk Cleanup tool to delete temporary files and system files from your device.
In the search box on the taskbar, type disk cleanup, then select itfrom the results.
Select the check box next to the type of files you want to delete. (To view a description of each type of file, select the name.) By default, Downloaded Program Files, Temporary Internet Files, and Thumbnails are selected. Be sure to clear those check boxes if you don’t want to delete those files.
To free up even more space, select Clean up system files, and then select the type of system files you want to delete. Disk Cleanup will take a few moments to calculate the amount of space that can be freed up.
Note: If it’s been fewer than 10 days since you upgraded to Windows 10, your previous version of Windows will be listed as a system file you can delete. If you need to free up drive space, you can delete it, but keep in mind that you’ll be deleting your Windows.old folder, which contains files that give you the option to go back to your previous version of Windows. If you delete your previous version of Windows, this can’t be undone. (You won’t be able to go back to your previous version of Windows.)
After you’ve selected the types of files you want to delete, select OK, and then select Delete files in the confirmation window to start the cleanup.
There’s also an option in Disk Cleanup to Compress your OS drive. Selecting this option compresses the drive on which Windows is installed, helping you gain extra space to install important updates. This action does not delete the contents of this drive, and you shouldn’t experience problems opening and saving files from the compressed drive.
After you install the update, you can manually decompress the OS drive at any time. To do this, select File Explorer from the taskbar, and in the left pane, select This PC. Right-click or tap and hold the OS drive (usually disk C), and then select Properties on the shortcut menu. Clear the Compress this drive to save disk space check box, and then select Apply > OK.
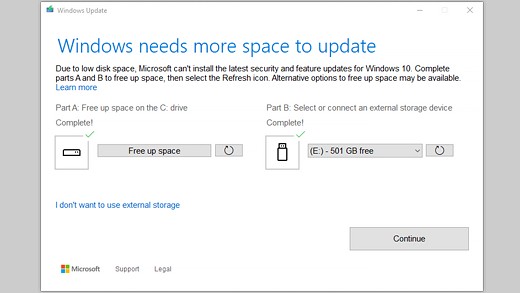
Windows 10 may indicate that it needs more space to get the latest Windows 10 feature update. You can use an external storage device to help you complete the update.
Note: You may need to use a micro-USB adapter if your device doesn’t have a standard USB port.
Personal files such as videos, music, photos, and documents can take up a lot of space on your device. To see which files are using the most space:
Select File Explorer from the taskbar and find the files you want to move.
Under This PC in the menu on the left, select a folder to see what files are saved in it. The Videos, Music, Pictures, and Downloads folders usually contain the largest files that you’ve saved to your device.
To see the size of the files in a folder, select View > Details. Right-click in the open space and then select Sort by > Size to show the largest files at the top of the list.
If there are files you no longer need on your device, you can either delete them or move them to an external storage device like a USB drive or an SD card.
Note: If you delete any files, remember to empty the Recycle Bin to completely remove them from your device and free up space.
To move photos, music, videos, or other files that you want to keep but don’t use very often, consider saving them to an external storage device like a USB drive or an SD card. You’ll still be able to use them when the drive is connected, but they won’t take up space on your PC.
Connect an external storage device like a USB drive or SD card to your PC.
Select File Explorer from the taskbar and go to the folder that contains the files you want to move.
Select the files, select the Home tab, and then select Move to > Choose location.
Select the external storage device you connected in the location list, and then select Move.
Saving new files to another drive will help prevent low space problems on that drive in the future, so you won’t have to move your files to another drive repeatedly. Instead of saving all your new files to the default drive, you can save some of them to a different drive that has more free space.
Under More storage settings, select Change where new content is saved.
For each content type, select a drive from the drop-down menu. If the drive you want to use isn’t listed there, make sure it’s connected to your PC.
Note: OneDrive Files On-Demand requires Windows 10 version 1709 or later and OneDrive client version 17.3.7064.1005 or later. To see which version of Windows you’re running, select Start > Settings > System > About . To see which version of the OneDrive client you have installed, see Which version of OneDrive am I using?
Open About settings
You can save space by turning on OneDrive Files On-Demand, which stores a smaller placeholder file on your hard drive instead of the full-size file that’s stored in your OneDrive account in the cloud. You’ll be able to get to your OneDrive files from your PC without having to use up hard-drive space downloading full-size versions of them all. See Learn about OneDrive Files On-Demand for more info.
Sometimes a virus or other malware can consume significant hard-drive space by corrupting your system files. If you suspect your PC is infected with malware, use an antivirus program like Windows Defender to run a virus scan and cleanup. If this doesn’t fix the problem, you might need to reset your PC.
If you’ve followed the instructions here but still need help freeing up space on your device, you can contact Microsoft support to chat with a support agent. This is also recommended if your attempts to free up drive space trigger particular error codes that you need help resolving.
The following questions concern low disk space and Windows Update specifically. Learn more about Windows Update.
When there isn’t enough free space available to install an update, a pop-up notification will prompt you that additional space is required to install the update.
When you select Fix issues, you’ll be informed about how much additional space is needed. You’ll also be notified that you can use an external storage device so that you don’t need to free up quite as much space on your system drive. Learn how to free up space to install Windows updates.
The total free disk space your device requires to complete an update varies. Typically, feature updates require 6 GB–11 GB or more of free space, while quality updates require 2 GB–3 GB or more. Learn about the difference between a feature update and a quality update.
You need disk space to download the update, download new versions of any optional features and languages that are currently installed, and to apply the update. Additional space is temporarily required to support removal of the update (typically for 10 days). This space can be reclaimed after the update is completed. To do this, Select Start > Settings > System > Storage > Free up space now.
Open Storage settings
The update is compressed to reduce download size.
Note: For devices with reserved storage, an update will first use the reserved storage space before using other disk space. For more info, see How reserved storage works in Windows 10.
The space required to complete a feature update depends on two factors: which update path is followed and the size of optional content and other updates that apply to your PC when the feature update is installed.
Note: For devices with reserved storage, an update will first use the reserved storage space before using other disk space. For more info, see How reserved storage works in Windows 10.
Windows follows three different feature update paths, depending on the amount of disk space currently available.
1. For PCs with plenty of free disk space
Windows automatically tries to complete more of the update process in the background while you use your PC. This significantly reduces the time your PC will be offline (or unusable) during the update, although it might temporarily use more disk space to complete the update. Learn more about our efforts to reduce offline time during updates (English only at this time).
2. For PCs with limited free space but still enough to complete the update automatically
Windows will automatically optimize for reducing the amount of free disk space required to install the update. This will result in a longer offline install time.
3. For PCs that don’t have enough space to automatically install the update
Windows will prompt you to free up disk space or use external storage to temporarily extend the storage on your PC. If you use an external storage device, Windows won’t need as much free space on the system drive as it temporarily uses your external storage.
Across each of these update paths, the total amount of free disk space required will vary, depending on the optional content installed and other updates that apply to your PC. For example:
Optional features. Many optional features available for Windows are pre-installed or acquired on demand by the system, or manually by you. You can see which ones are installed on your PC by going to Settings > Apps > Apps & features > Manage optional features.
Open Optional features settings
These features range in size from less than 1 MB to almost 2 GB for the Windows Mixed Reality portal. You can reduce the amount of space required to install a feature update on your PC by uninstalling optional features you aren’t using.
Languages installed. Windows is localized into many languages. Although many people only use one language at a time, some people switch between two or more languages. You can see which languages are installed on your PC by selecting Start > Settings > Time & Language > Language .
Open Language settings
During each update, all language resources and any associated typing, text-to-speech, speech-to-text, and handwriting recognition resources must be updated. The content for each language can range from about 175 MB to more than 300 MB. You can reduce the amount of space required to install a feature update on your PC by uninstalling languages you aren’t using.
Driver updates. OEMs and other hardware partners sometimes publish new graphics, networking, audio, and other drivers in conjunction with the new OS update. The size of these drivers can vary significantly, depending on your PC and on which drivers have been updated.
OS quality updates. During a feature update, Windows tries to download and automatically install the latest quality update so that your PC is fully up to date when you start using it. Shortly after the feature update is released, the quality update for that feature update could be as small as a few hundred MB, but as more quality and security changes are implemented, the quality update can increase in size to 1 GB or more.If your PC is short on disk space, you can download and install the quality update after the feature update is complete.
Finally, Windows Update will temporarily disable hiberfile.sys, pagefile.sys, and other system files in order to use the space these files typically consume to apply the feature update. Any files that are disabled to apply the update will be automatically re-enabled when the update is complete. Because these files vary in size depending on how you use your PC and the amount of RAM your PC has, even in cases where two different PCs have the exact same OS image, the amount of free disk space required to complete an update may vary.
The combination of update path and features means there’s a wide range of free disk space required to complete an update. Here are a few examples for PCs updating to Windows version 1803:
Optimized for reduced offline time
Optimized for minimal disk space
Optimized for minimal disk space with external storage
Minimal optional features, languages, and updates
5 Ways to Free Up Disk Space on a Dedicated Windows Server
How often do you think about your Windows-based dedicated server running out of disk space? Yet having enough free storage is critical to maintaining stellar server performance.В
Without it, not only will you see the immediate reduction in speed, but other automatic processes, such as backups, also wouldn’t be able to run properly.
Let’s walk through some examples of what could be taking up space on your server disk and what you could do to free it up.
Why Does Your Server Disk Get Full?
Depending on the size of the SSDs you selected when you set up your dedicated server, running out of space could be either a rare mishap or near regular occurrence. In case you’re self-managing your server, you might not even realize it’s low on space unless you’ve configured specific notifications or frequently check the state of your backups.
Backups do tend to take up lots of storage and will eventually max out your capacity if not managed properly. Likewise, log files, temp files, and databases can accumulate indefinitely, either on your disk or in the Recycle Bin.
To make sure your dedicated server is always performing at its best, schedule regular server disk space checks (e.g., every month or so) and go through the suggested checklist of actions below.

1. Delete Outdated Backups
If you’ve never deleted server backups before, you might be able to free up gigabytes of space by deleting older backups.В
The key here is for your company to decide on its backup strategy (do you need to keep files for a week, month, year?) to follow.
On your Windows server, check the C:\Backups folder to see the list of all backups made so far, and delete any that you don’t need.
Additionally, if you’re running an SQL Server, you might want to find its backups, too and then either delete outdated ones or at least compress them in a zip folder.
2. Optimize SQL Databases
Speaking of SQL Servers, depending on the amount of information being kept in your databases, you can explicitly shrink your databases too:
- Right-click on the database and select Tasks вћ™ Shrink вћ™ Files
- Choose «Reorganize pages before releasing unused space»
- Set «Shrink file to» to the minimum amount indicated
However, before proceeding with any modifications to your SQL Server, make sure all the information is safely backed up.
3. Clean Up IIS Log Files
Just like backups and databases, Internet Information Services (IIS) log files can take up most of the available server space over time. But there are a few things you can do.
By default, IIS logs are saved in the LogFiles folder, which you can find at %SystemDrive%\inetpub\logs\LogFiles.В
If your server has more than one hard drive, you should probably store the LogFiles folder on the largest one and preferably put it somewhere close to the root to not forget about it.
Another thing you can do is compress the IIS logs folder. Luckily, you can shrink it down significantly, to just about a few percent of the original size. To do so:
- Right-click on the folder and choose Properties
- Navigate to the General tab вћ™ Advanced
- Check «Compress contents to save disk space»
- Click OK вћ™ Apply вћ™ OK again
Finally, you can simply delete old IIS log files, either by writing a script and creating a recurring task in the Server Manager вћ™ Tools вћ™ Task Scheduler, using a specific IIS log cleaner tool, or doing so manually.
4. Uninstall Third-Party Software
It’s likely that, over time, the way you use your server has changed, which could mean that some programs you thought you needed in the beginning are no longer relevant for your situation. That means you may have unused software that can be removed to save disk space.
To remove unused software:
- Launch Control Panel by using the Windows + X shortcut
- Open Uninstall a Program
- Go through the list and click Uninstall on anything you don’t need
After you go through the first four steps of optimizing backups, databases, IIS log files, and third-party software, remember the most important step of all — emptying your Recycle Bin.
Since you can’t see the $Recycle.Bin folder by default:
- Open Windows Explorer вћ™ Folder Options
- Switch to the View tab
- Click to «Show hidden files, folders, and drives»
- Uncheck «Hide protected operating system files» and «Hide extensions for known file types»
Now that you can see C:\$Recycle.Bin, open it, select all the files inside and delete them.
5. Add More Server Disk Space
While cleaning the hard drive on your server regularly will help your company become more efficient and improve overall performance, at some point, the amount of storage you have will simply become insufficient for your growing needs.
Fortunately, adding more disk space to your dedicated server is easy and can be done at any time with immediate results.
Get More Disk Space on Your Dedicated Server
Need a bit more guidance on the best way to manage your server storage capacity? Contact one of the Liquid Web technicians today for a truly tailored and scalable approach to your dedicated server setup.
Jake Fellows
Jake Fellows is an Associate Product Manager for Liquid Web’s Managed Hosting products and services. He has over 10 years experience involving several fields of the technology industry including hosting, healthcare, and IT system architecture. On his time off, he can be found in front of some form of screen enjoying movies, video games and researching into one of his many technical side projects.
Join our mailing list to receive news, tips, strategies, and inspiration you need to grow your business


