- Freeing Virtual Memory
- Free Memory Optimizers & RAM Boosters for Windows 10
- Free Memory Optimizers for Windows PC
- CleanMem
- Memory Washer
- WinUtilities Memory Optimizer
- How to find and fix Memory Leaks in Windows 10
- Memory Leaks in Windows 10
- Why is it bad
- Locating the leak
- Memory allocation
- Preventing memory leaks
- Monitoring habits
- Microsoft tools to diagnose memory leaks
- Usage Tips
- Troubleshooting memory leaks in Windows
- 1] Close processes and restart.
- 2] Memory Diagnostic Tools
- 3] Check for Driver updates
- 4] Optimize performance
- 5] Disable Programs running on Startup
- 6] Defrag Hard Drive
- 7] ClearPage File at shutdown
- 9] Disable Superfetch
- 10] Check for malware
- 7 Ways to Clear Memory and Boost RAM on Windows
- Why Computers Slow Down
- 1. RAM Hogs: Low Hanging Fruit
- 2. Clean Up Startup Programs
- 3. Clear Page File at Shutdown
- 4. Check for Device Driver Issues
- 5. Reduce Windows Visual Effects
- 6. Flush Memory Cache
- 7. Add More RAM
- Memory Is Important
Freeing Virtual Memory
The VirtualFree function decommits and releases pages according to the following rules:
- Decommits one or more committed pages, changing the state of the pages to reserved. Decommitting pages releases the physical storage associated with the pages, making it available to be allocated by any process. Any block of committed pages can be decommitted.
- Releases a block of one or more reserved pages, changing the state of the pages to free. Releasing a block of pages makes the range of reserved addresses available to be allocated by the process. Reserved pages can be released only by freeing the entire block that was initially reserved by VirtualAlloc.
- Decommits and releases a block of one or more committed pages simultaneously, changing the state of the pages to free. The specified block must include the entire block initially reserved by VirtualAlloc, and all of the pages must be currently committed.
After a memory block is released or decommitted, you can never refer to it again. Any information that may have been in that memory is gone forever. Attempting to read from or write to a free page results in an access violation exception. If you require information, do not decommit or free memory containing that information.
To specify that the data in a memory range is no longer of interest, call VirtualAlloc with MEM_RESET. The pages will not be read from or written to the paging file. However, the memory block can be used again later.
Free Memory Optimizers & RAM Boosters for Windows 10
When your computer freezes occasionally, web pages refuse to load, and some programs just fail to startup, chances are your system is losing out on memory. Under such situations, Memory Optimizers may help. Now let clear initially itself, that most consider the role of RAM optimizers suspects. Even from my personal experience, I can say most of them do not work as advertised.
Free Memory Optimizers for Windows PC
While they were popular in the pre-Windows XP days, their use after Windows Vista has dwindled. Nevertheless, for those who may be interested, here is a list of some free Memory Optimizers for Windows 10/8/7 that you may want to have a look at.
- CleanMem
- Memory Washer
- WinUtilities Memory Optimizer
- Mem Reduct
- Mz RAM Booster.
CleanMem
One program many recommend and which works with a difference is CleanMem.
CleanMem adds a task in the Task Scheduler to run every 15 minutes after startup and after the task is created or modified. Once the task is triggered, it runs the CleanMem.exe file, provided the system is idle.
As one of our forum club members writes:
CleanMem doesn’t clean the memory from the processes itself! It asks Windows to do that. When the program starts up it grabs a list of running processes. It then grabs the ID of each process and calls the Windows API EmptyWorkingSet for each processes, CleanMem of course checks the ignore list and skips those processes. Then Windows cleans the process, and once all the processes have been cleaned Cleanmem closes itself.
You can also run it on demand from the context menu.
You can download CleamMem from its home page.
Memory Washer
Another program which looks good is Memory Washer from the makers of AntiTracks Free. The memory and process management program helps you increase your computer’s available physical memory and make better use of its vital resources. It pinpoints unnecessary processes, letting you remove them and manage startup applications, Windows services, and more.
Moreover, the software lets you access processes manager features that allow you to investigate which programs are using up the most memory and disable them if needed. Its AutoFree RAM function automatically frees up RAM on your computer. You can set up predefined levels based on time intervals or let Memory Washer automatically free RAM whenever your memory reaches a threshold. You can download it here.
WinUtilities Memory Optimizer
WinUtilities Memory Optimizer is another freeware to optimize and free up your PC’s memory. The latest version of WinUtilities Memory Optimizer will optimize memory only during system idle time, to minimize interruptions during normal computer use. You can download it here. Make sure you click on the small Direct Download link below the large green Download Now button.
Date: March 19, 2019 Tags: Memory, Optimizers
How to find and fix Memory Leaks in Windows 10
A Memory Leak is a misplacement of resources in a computer program due to faulty memory allocation. It happens when a RAM location not in use remains unreleased. A memory leak is not to be confused with a space leak, which refers to a program using more RAM than necessary. A memory leak on a Windows 10/8/7 system is said to have taken place when the memory is just not accessible despite not being in use.
Memory Leaks in Windows 10
Before you begin, you should know that Memory leak is a software issue to debug – for example in Java, JavaScript, C/C++, Windows, etc. Physically replacing RAM or hard disk isn’t required.
Why is it bad
It is obvious a memory leak is bad because it is a bug, a flaw in the system. But let’s find out how exactly it affects the system:
- Since the memory is not freed even when not in use, it results in memory depletion.
- Exhaustion of the memory results in software aging.
- Reduced available memory leads to increased response time and poor performance by the system.
- An unchecked memory leak can eventually lead to the crash of an application.
In order to identify a memory leak, a programmer needs to have access to the source code of the program.
Locating the leak
In order to solve a problem, we need to identify it first. The basic steps to locate a memory leak are:
- Affirmation: Determining whether a leak has occurred.
- Finding Kernel-mode memory leak: Locating a leak caused by a kernel-mode driver component.
- Finding User-mode memory leak: Locating a leak caused by a user-mode driver or app.
Memory allocation
There are different modes in which applications allocate RAM. If space is not freed after use, the memory leak will occur irrespective of the mode of allocation. Some common allocation patterns are:
- HealAlloc function for heap memory allocation. The C/C++ runtime equivalents are malloc and new.
- VirtualAlloc function for direct allocation from OS.
- Kernel32 APIs to hold kernel memory for the app. Example, CreateFile, CreateThread.
- User32 APIs and Gdi32 APIs.
Preventing memory leaks
We all know prevention is better than cure so here are some ways to prevent a memory leak.
Monitoring habits
You need to keep an eye out for abnormal RAM usage by individual programs and applications. You can go to the Windows Task Manager by pressing CTRL+SHIFT+ESC and add the columns like Handles, User Objects, GDI Objects, etc.
This will help you easily monitor resource usage.
Microsoft tools to diagnose memory leaks
Various tools diagnose memory leaks for various allocation modes:
- Application Verifier diagnoses heap leaks.
- UMDH ( a component of Windows Debugging Tools) diagnoses leaks for individual processes by monitoring heap memory allocations.
- Trace Capture for a thorough analysis of RAM usage.
- Xperf too tracks heap allocation patterns.
- CRT Debug Heap not only tracks heap allocations but also enables coding practices to minimize leaks.
- JavaScript Memory Leak Detector debugs memory leaks in codes.
Usage Tips
- Use kernel HANDLEs and other smart pointers for Win32 resources and heap allocations.
- Get classes for automatic resource management for kernel allocations from the ATL library. C++ standard has auto_ptr for heap allocations.
- Encapsulate COM interface pointers within “smart pointers” with the help of _com_ptr_t or _bstr_t or _variant_t.
- Monitor the .NET code for abnormal memory usage.
- Avoid multiple exit paths for functions to let allocations be freed from variables in most blocks by the end of a function.
- Use native exceptions only after freeing all allocations in the _finally block. Wrap all heap and handle allocations into smart pointers in order to use C++ exceptions.
- Always call the PropVariantClear function before reinitializing or discarding a PROPVARIANT object.
Troubleshooting memory leaks in Windows
Just like the various ways to prevent memory leaks, there are various ways to stop memory leaks. But before you begin, remember to create a system restore point first.
1] Close processes and restart.
If you see an unnecessary process is taking up too much RAM, you can end the process in the Task Manager. You will need to restart the device so that the freed space is available for use by other processes. Without a Restart memory leak issue won’t be solved. One particular process that has bugs to slow down the PC is Runtime Broker. Try if disabling that alone works.
2] Memory Diagnostic Tools
To access the inbuilt Memory Diagnostic Tool for Windows:
- Save all your important work.
- Press Win + R to open the Run window.
- Type the command mdsched.exe in the Run window.
- Restart the PC.
- After a restart, perform a basic scan or go for the ‘Advanced’ options like ‘Test mix’ or ‘Pass count’.
- Press F10 to start the test.
These are still temporary fixes.
3] Check for Driver updates
Outdated drivers cause memory leaks. Keep all drivers updated:
- Press Win + R and open the Run window. Type devmgmt.msc and press Enter. It will take you to the Device Manager.
- Check for outdated drivers and update them all.
- For updates, you might have missed, check in Windows Update.
This was simple.
4] Optimize performance
Adjusting Windows for performance will manage everything including processor scheduling and memory usage to stop memory leaks. Follow these steps:
- Right-click on ‘This PC’ and select ‘Advanced’ settings on the left pane.
- Under the ‘Advanced’ tab, go to ‘Performance’, followed by ‘Settings’.
- Check ‘Adjust for best performance’ and click OK.
- Restart and check if the issue is solved.
If this simple solution did not work, try the next solution.
5] Disable Programs running on Startup
Disabling the troublesome programs is the only way to get rid of the memory leak issue. Go to Task Manager and disable the troublemaking program. If you don’t know which programs are creating the trouble, do this:
- Go to ‘Task Manager’.
- Go to ‘Startup’.
- Disable the startup programs you don’t need to run by default.
6] Defrag Hard Drive
Although Windows 10 does this for you automatically, you may need to do defrag the hard drives occasionally to optimize performance:
- Go to ‘This PC’ or ‘My Computer’.
- Right-Click the system hard drive (usually C: drive).
- Go to ‘Tools‘ under ‘Properties‘ and select ‘Optimize’.
- Select the drive to defrag and select ‘Analyze’.
Restart your computer after the new fragmentation.
7] ClearPage File at shutdown
It is getting complex now – but don’t worry. Here’s how to clear the Page File at every shutdown:
- Type regedit on Search to launch the Registry Editor.
- Enter this path:
- Change the value of ClearPageFileAtShutDown to ‘1’.
- Save the changes and Restart the device.
This ought to do it. Do remember that your shutdown process will take a little more time.
9] Disable Superfetch
This Windows Service optimizes performance by minimizing boot time. It lets Windows manage RAM usage. Life after disabling Superfetch is not convenient but do it if you must. At least try this alone to isolate the problem:
- Search services.msc and go to Services Manager.
- Look for ‘Superfetch’ and right-click it to go to ‘Properties’.
- Select ‘Stop’.
- Also ‘Disable’ the service from the drop-down menu.
- Restart the PC and check if the performance has improved.
Enable Superfetch if this one didn’t work.
10] Check for malware
Use a third-party antivirus software or Windows 10’s in-house Windows Defender to scan and eliminate malware. Make sure the antivirus is updated to support your OS so that it doesn’t end up becoming the reason for the memory leak.
Every solution you might ever need to find or prevent memory leaks is right here. You can read more about memory leaks on MSDN and Microsoft.
7 Ways to Clear Memory and Boost RAM on Windows
Plus the reason why computers slow down
There are few things quite as annoying as a computer that’s starting to run slow.
As good as the Windows 10 operating system is, Windows computers still have the problem of running much more slowly over time.
In this article, you’ll learn seven of the most effective ways to clear out old memory and boost available RAM in a Windows machine that’s suffering from performance issues.

Also, if you want a quick run-down, check out our YouTube video from our sister site, Online Tech Tips. If you like the video, make sure to subscribe to the channel!
Why Computers Slow Down
If you’ve owned your computer for a while, there are any number of issues that can cause it to slow down. Many of these are out of your control, but a few aren’t.
These issues include:
- Memory leaks from software you’ve installed
- Power surges and normal usage degrading system components
- Bad hard drive sectors or bad memory chips due to age and use
- Not installing enough RAM
- Excessive software launching at startup
- Malware and viruses consuming system resources
Even though you can’t control the effects of normal aging, there’s a lot you can do to speed up your computer. These include things like defragmenting your hard drive, performing virus scans, and disabling the User Account Control (UAC).
However, the most significant effect you can have on system performance is making sure your memory usage is fully optimized.
1. RAM Hogs: Low Hanging Fruit
The fastest and easiest way to clear up memory that’s being used is to make sure there are no system processes consuming all the system resources.
This is an easy problem to develop over time, especially if you’re in the habit of installing a lot of software. There’s also a very easy solution.
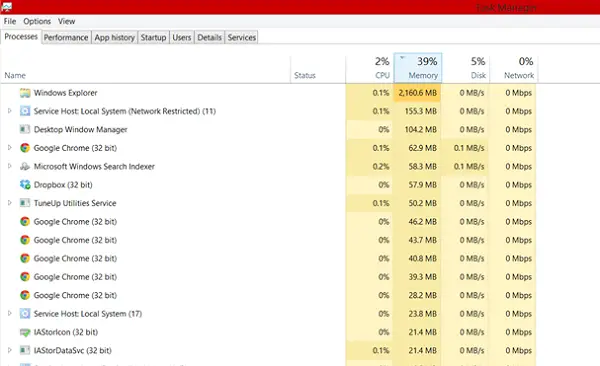
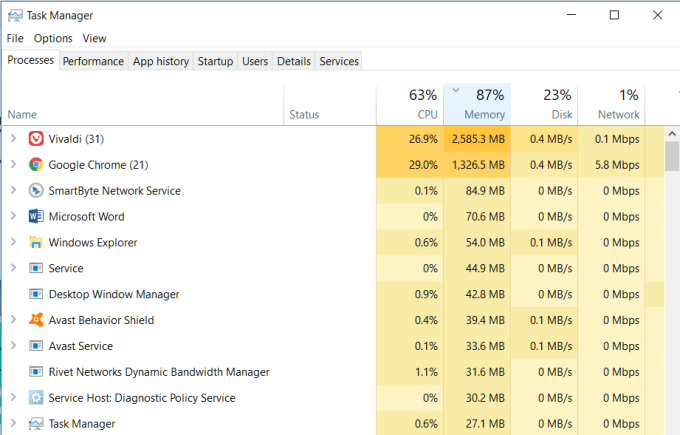
Check the system processes listed in the Task Manager and look for problem applications you don’t recognize that are consuming excessive RAM.
- Right click the Windows task bar and select Task Manager.
- Click on the Processes tab.
- Sort the processes by Memory and look for programs at the top of the list that you don’t recognize.
If you spot any problem applications, go into the Control Panel, click on Programs and Features, and uninstall those problem applications.
2. Clean Up Startup Programs
Unfortunately, resolving memory issues and freeing up your RAM is not usually that easy. Over time, software you’ve installed and forgotten about can get embedded into your system but may not consume RAM constantly.
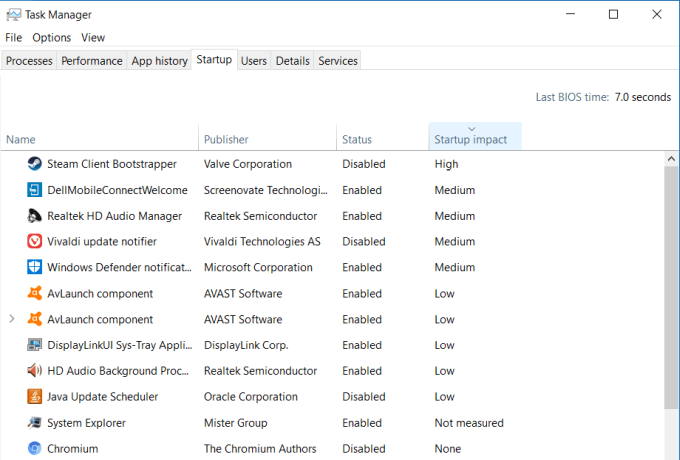
In these cases, these programs won’t show up at the top of the list in the Task Manager. However, they are part of the list of programs that launch every time your computer starts and contribute to chewing away at your available RAM.
- Still in the Task Manager, click on the Startup tab.
- Sort the list by the Startup impact field.
- Identify applications you don’t recognize or don’t need.
- Right-click on the application and select Disable.
When each of these programs launch, they devour a bit of memory individually. They all run in the background and consume your RAM. Disabling them from running at startup prevents this from happening.
3. Clear Page File at Shutdown
![]()
Whenever you shut down your computer, the system RAM is always cleared. However, the page file that’s stored on the hard drive isn’t.
The page file is an area of the physical hard drive that the operating system uses as extra RAM when the physical RAM is full. Ensuring that the page file is cleared just like RAM is will keep things clean and efficient the next time you start your computer.
You can enable this by setting the ClearPageFileAtShutdown registry key to 1. Windows 10 has this set to 0 by default. Enabling this is easy.
- Click the start menu and type Regedit. Click on the Regedit run command.
- This will open the Registry Editor. Navigate to HKEY_LOCAL_MACHINE\SYSTEM\CurrentControlSet\Control\Session Manager\Memory Management.
- Double-click on the ClearPageFileAtShutdown key on the right.
- Set the Value data field to 1 and click OK.
The next time you restart your computer, the page file will clear.
4. Check for Device Driver Issues
Over time, device drivers become updated, and various Windows updates could lead to corrupt driver files or driver conflicts. These issues can sometimes lead to memory leaks and the longer your computer is running, could lead to excessive RAM consumption.
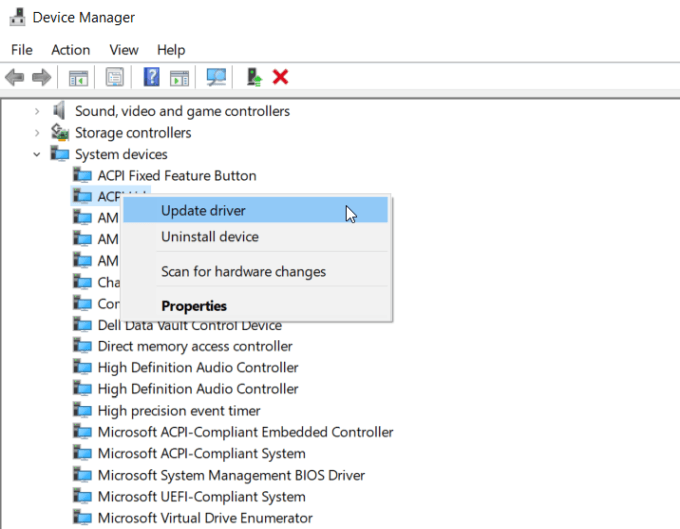
It’s important to make sure your system is clear of device driver issues. You can check this quickly by using the Device Manager.
- Open the Control Panel and double click Device Manager.
- Expand each branch inside the Device Manager and look for a yellow explanation mark icon. This is an alert for a driver issue.
- If you see an alert, right click on the device and select Update driver.
Try to let the system look for latest drivers online if you can. Otherwise you’ll need to visit the manufacturer website and download the latest driver.
Keeping any device issues clear and all your drivers updated will ensure your system is running smoothly and drivers aren’t causing memory issues.
5. Reduce Windows Visual Effects
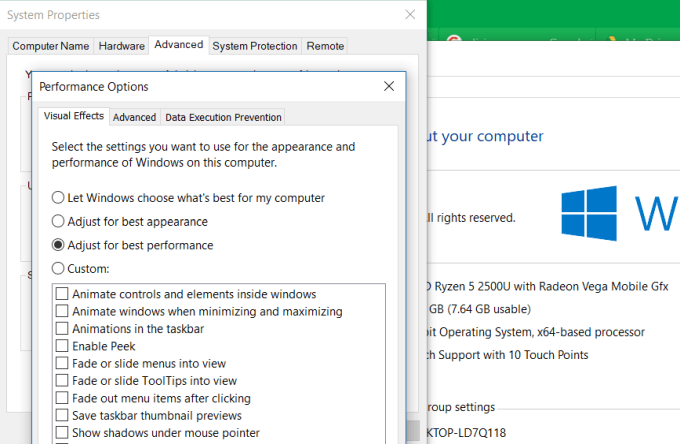
Windows 10 comes with a lot of busy visual effects for windows, menus, tooltips and more. If you have plenty of RAM, these visual effects aren’t an issue.
But if you’re running with a bare minimum of available RAM, disabling these effects can significantly increase available memory.
To disable Windows visual effects:
- Open File Explorer, right-click on This PC, and click on Properties.
- On the left side of this window, click on Advanced system settings.
- In the Performance section, click the Settings button.
- In the Performance Options window, select Adjust for best performance.
You’ll notice that all the animated features are disabled with this setting. If you want, you can instead select Custom, and then enable any of the visual effects that you can’t live without.
6. Flush Memory Cache

When you open and close applications frequently, sometimes certain programs don’t properly release system memory when closing. Over time, these orphan threads consume RAM and lead to slow system performance.
There is a very simple shortcut you can create that’ll flush the memory cache and clean out all those old cobwebs of lost memory.
This shortcut is:
If you’re not sure how to configure this shortcut, you can read a guide to flushing the memory cache that’ll walk you through all of the steps.
7. Add More RAM

Of course, one of the easiest ways to free up more memory is to boost the existing amount of RAM you have.
If you’re not sure what kind of memory your computer takes, you can use the Crucial Advisor to run a scan on your PC and find the best memory to buy.
Scans are fast and easy, and the resulting web page will list all memory cards that are available for your system.
Memory Is Important
Of all the things you can do to boost your old computer’s performance, there is nothing as effective as clearing out or boosting your available RAM.
The less your computer needs to rely on your hard drive and the page file because the physical RAM is full, the faster your computer will behave.
Ryan has been writing how-to and other technology-based articles online since 2007. He has a BSc degree in Electrical Engineering and he’s worked 13 years in automation engineering, 5 years in IT, and now is an Apps Engineer. Read Ryan’s Full Bio


