- FreeRADIUS
- Настройка сервера Radius в Windows Server 2016
- Fast, feature-rich, modular, and scalable.
- Get started with the world’s most widely deployed RADIUS server:
- Version <
> has been released. - Welcome to the FreeRADIUS project, the open source implementation of RADIUS, an IETF protocol for AAA (Authorisation, Authentication, and Accounting).
- FreeRADIUS is responsible for authenticating one third of all users on the Internet.
- Get involved with The FreeRADIUS Server Project
- Connect with us
- Freeradius server для windows
FreeRADIUS
FreeRADIUS — свободный RADIUS-сервер с открытым исходным кодом.
Это альтернатива других коммерческих RADIUS-серверов, поскольку он модульный и функциональный на сегодняшний день. Кроме того, он входит в пятёрку RADIUS-серверов мира с точки зрения развёртывания и количества пользователей, которых этот сервер авторизует ежедневно.
FreeRADIUS может работать на встраиваемых системах с небольшим количеством памяти, обслуживая несколько миллионов пользователей. FreeRADIUS быстрый, гибкий, настраиваемый, а также поддерживает больше протоколов аутентификации, чем многие коммерческие серверы. Сервер поставляется вместе с инструментом управления через веб-интерфейс Dialup Admin, который написан на PHP. В настоящее время FreeRADIUS используется как основа для разработки коммерческих RADIUS-серверов.
FreeRADIUS был основан в августе 1999 года Аланом ДеКоком и Микуэлом ван Смуренбергом. Микуэл ранее написал Cistron RADIUS-сервер, который получил широкое распространение. С того момента сервер Livingston больше не поддерживается. Командой FreeRADIUS было начато создание нового RADIUS-сервера, использующего модульную конструкцию, которая будет способствовать более активному участию сообщества.
Модули ядра сервера поддерживают LDAP, MySQL, PostgreSQL, Oracle и многие другие базы данных. Он поддерживает все популярные типы аутентификации EAP (англ. Extensible Authentication Protocol, включая PEAP (англ. Protected Extensible Authentication Protocol) и EAP-TTLS. Для обеспечения совместимости с широким спектром устройств NAS в него включены более 100 словарей поставщиков.
В версии 2.0.0 была добавлена поддержка виртуального хостинга, IPv6, VMPS, и новой языковой политики, что упрощает многие сложные конфигурации.
Исследование, проведённое в 2006 году, показало, что количество его пользователей составляет 100 миллионов человек.
Настройка сервера Radius в Windows Server 2016
В этой статье мы покажем, как настроить сервер централизованной аутентификации, авторизации и аккаунтинга (RADIUS) на операционной системе Windows Server 2016, а также как настроить Radius-аутентификацию на Cisco устройствах с помощью службы Политики сети и доступа (Network Policy Server).
RADIUS (англ. Remote Authentication in Dial-In User Service) — протокол для реализации аутентификации, авторизации и сбора сведений об использованных ресурсах, разработанный для передачи сведений между центральным севером и различными сетевым оборудованием и клиентами.
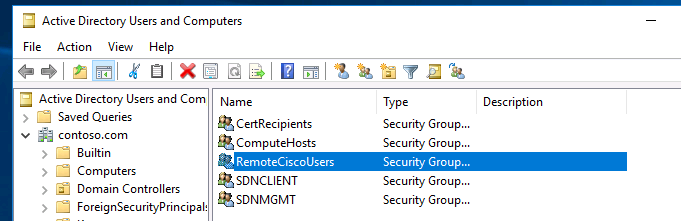
В первую очередь создайте в домене Active Directory группу безопасности AllowRemoteCiscoUsers, в которую нужно добавить пользователей, которым будет разрешена аутентификации на маршрутизаторах и коммутаторах Cisco.
Далее нужно установить на сервере, с помощью которого будет выполнятся аутентификация клиентов и назначаться права доступа, роль RADIUS сервера. Для этого на сервере Windows Server 2016 откройте оснастку Server Manager и вызовите мастер добавления ролей — Add Roles and features.
В открывшемся мастере на шаге выбора ролей отметьте роль Network Policy and Access Services. На шаге выбора служб роли в нашей ситуации достаточно будет выбрать только службу Network Policy Server.
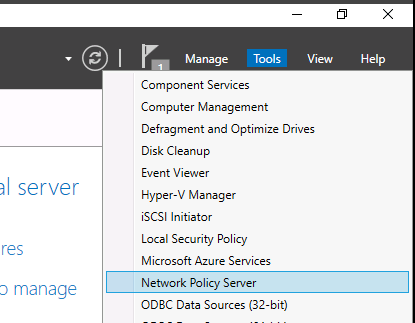
В консоли Server Manager выберите меню Tools и откройте консоль Network Policy Server (nps.msc).
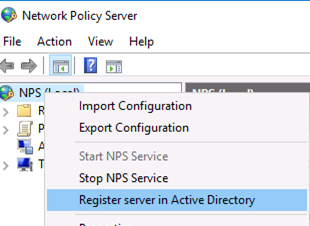
Для полноценного использования NPS-сервера в домене необходимо зарегистрировать его в домене Active Directory. В оснастке на NPS, щелкните ПКМ по вашему NPS узлу и выберите Register server in Active Directory.
Подтвердите регистрацию сервера в Active Directory:
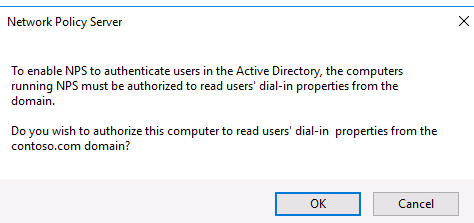
При этом мы должны предоставите серверу полномочия на чтение свойств учётных записей пользователей, касающихся удалённого доступа. Сервер при этом будет добавлен во встроенную доменную группу RAS and IAS Servers.

Теперь можно добавить клиента Radius. Для этого в дереве консоли NPS разверните раздел RADIUS Clients and Servers и на элементе RADIUS Clients выберите пункт New. 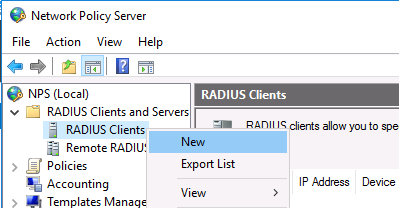
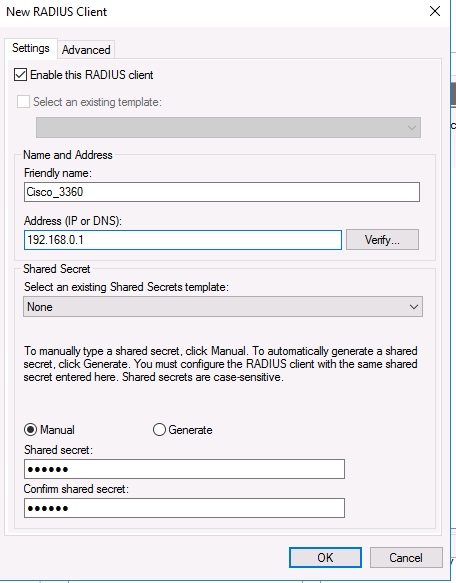
На вкладке Settings заполните поля Friendly name, Client address (можно указать IP адрес или DNS имя подключающегося сетевого устройства) и пароль — Shared Secret + Confirm shared (этот пароль вы будете использовать в настройках коммутатора или маршрутизатора Cisco для установления доверительных отношений с Radius сервером).
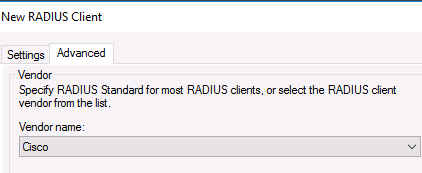
Во вкладке Advanced выберите в поле Vendor name — Cisco.
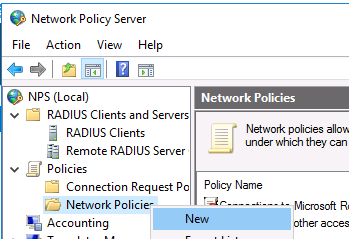
Теперь нужно создать политики доступа на сервере RADIUS. С помощью политик доступа мы свяжем клиента Radius и доменную группу пользователей.
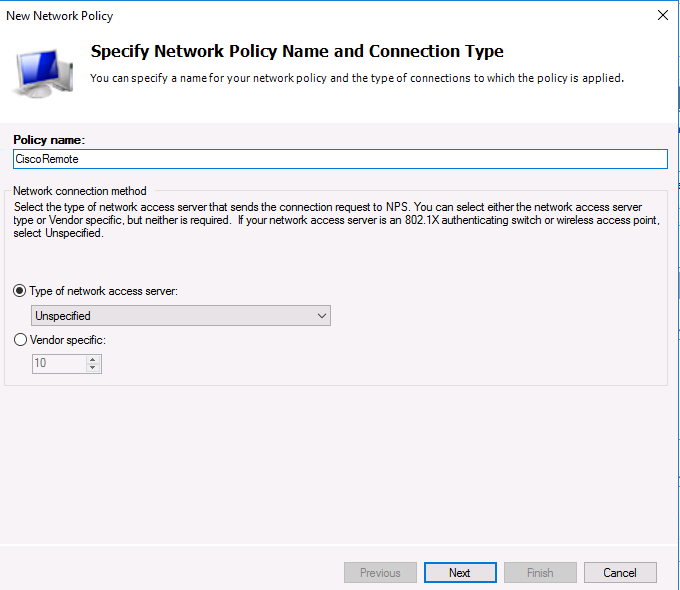
Раскройте ветку Policies —> Network Policies, и выберите пункт меню New:
Укажите Имя политики (Policy name). Тип сервера доступа к сети (Type of network access server) оставьте без изменения (Unspecified):
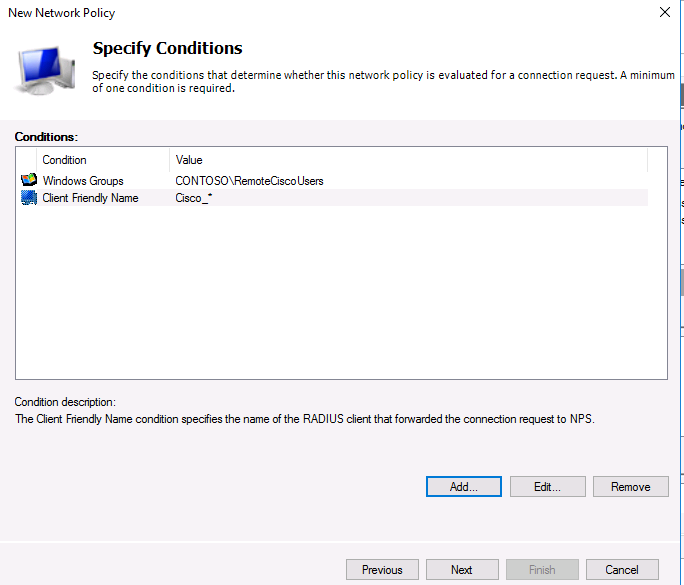
На следующем шаге Specify conditions нам нужно добавить условия, при которых будет применяться данная политика RADIUS. Добавим два условия: вы хотите, что для успешной авторизации пользователь входил в определенную доменную группу безопасности, и устройство, к которому осуществляется доступ, имело определённое имя. С помощью кнопки Add добавим сначала условие, выбрав тип Windows Group (добавьте группу RemoteCiscoUsers) и укажите Client Friendly Name (Cisco_*).
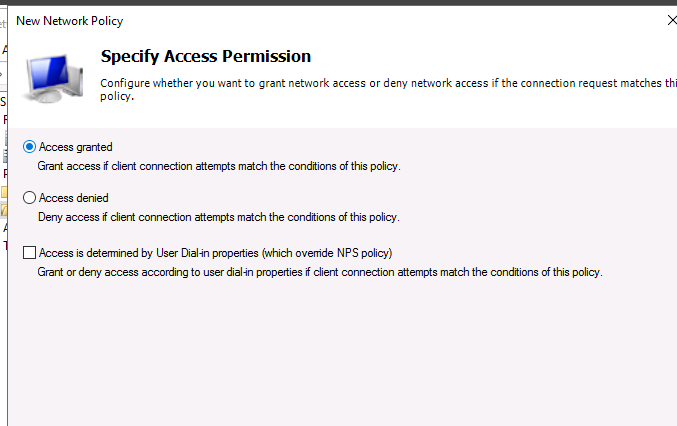
На следующем выберите значение Доступ разрешен (Access Granted).
Т.к. наш коммутатор Cisco поддерживает только метод аутентификации Unencrypted authentication (PAP, SPAP), снимите все остальные флажки. 
Следующий шаг настройки ограничений (Constraints) мы пропустим.
В разделе Configure Settings перейдите секцию RADIUS Attributes -> Standard. Удалите имеющиеся там атрибуты и нажмите кнопку Add.
Выберите Access type -> All, затем Service-Type->Add. Укажите Others=Login. 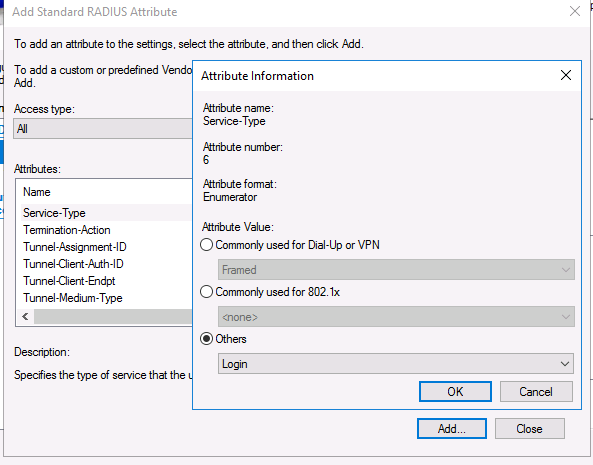
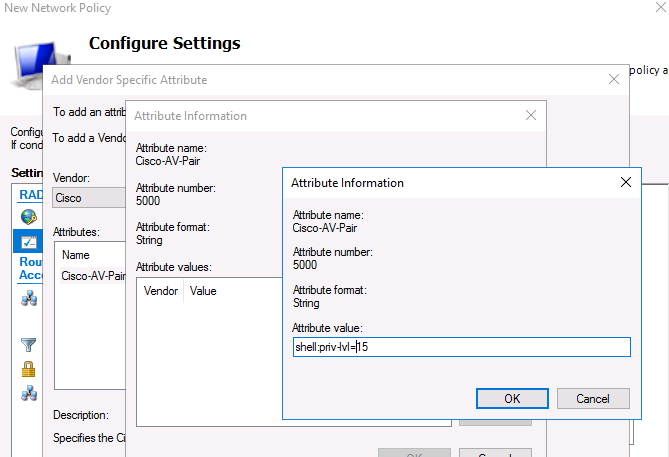
Теперь в секции RADIUS Attributes -> Vendor Specific добавьте новый атрибут. В пункте Vendor, найдите Cisco и нажмите Add. Здесь нужно добавить сведения об атрибуте. Нажмите Add и укажите следующее значение атрибута:
shell: priv-lvl = 15
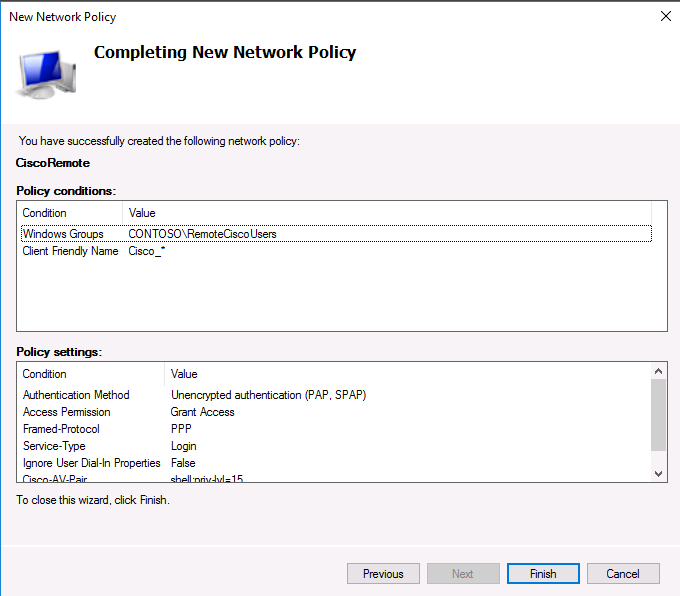
На последнем экране будут указаны все созданные вами настройки политики NPS. Нажмите Finish:
При создании и планировании политик обратите внимание на то, что имеет значение их порядок. Политики обрабатываются сверху вниз, и все условия очередной политике соблюдены, эта политика применяется к клиенту, а дальнейшая обработка других политик прекращается. То есть с точки зрения безопасности и разрешения конфликтов между политиками правильнее будет располагать политики в порядке возрастания административных полномочий.
После создания политики, можно переходить к настройке маршрутизаторов и коммутаторов Cisco для аутентификации на сервере Radius NPS.
AAA работает таким образом, что, если не получен ответ от сервера, клиент предполагает, что аутентификация не выполнена. Чтобы не потерять доступ к своим сетевым устройствам, которые вы переключаете на авторизацию на Radius сервера, обязательно создайте локальных пользователей на случай если RADIUS сервер станет недоступен по какой-либо причине.
Ниже пример конфигурации для авторизации на Radius (NPS) сервере для коммутатора Cisco Catalyst:
aaa new-model
aaa authentication login default group radius local
aaa authorization exec default group radius if-authenticated
radius-server host 192.168.1.16 key R@diu$pa$$
service password-encryption
На этом минимальная настройка коммутатора закончена и можно испытать новый механизм аутентификации и авторизации в действии.
Fast, feature-rich, modular, and scalable.
Get started with the world’s most widely deployed RADIUS server:


Version <> has been released. 

Welcome to the FreeRADIUS project, the open source implementation of RADIUS, an IETF protocol for AAA (Authorisation, Authentication, and Accounting).
The FreeRADIUS project maintains the following components: a multi protocol policy server (radiusd) that implements RADIUS, DHCP, BFD, and ARP; a BSD licensed RADIUS client library; a RADIUS PAM library; and an Apache RADIUS module.
We provide a step-by-step guide to radiusd -X . The guide breaks down the different pieces of the debug output, and explains what they mean. Often you can just look for ERROR or WARNING to solve many problems.

FreeRADIUS is responsible for authenticating one third of all users on the Internet.

Get involved with The FreeRADIUS Server Project
Our comprehensive support for protocols, data stores, directories, databases, and language integrations would not be possible without contributions from the community. Open your favourite editor and help us make FreeRADIUS better!

Develop new modules
API documentation, C code examples, and anything else you need to get up-to-speed and writing modules for FreeRADIUS.

Submit new modules
Developed your own module? Great! Submit your code back to the project and have it maintained by the community.

Found an issue? We accept patches for everything, from code, to documentation, and even to this website!
Connect with us
Feel free to reach out; we’re always happy to receive your feedback.
Freeradius server для windows
The FreeRADIUS server
![]()
![]()

The FreeRADIUS Server Project is a high performance and highly configurable multi-protocol policy server, supporting RADIUS, DHCPv4 DHCPv6 and VMPS. It is available under the terms of the GNU GPLv2. Using RADIUS allows authentication and authorization for a network to be centralized, and minimizes the number of changes that have to be done when adding or deleting new users to a network.
FreeRADIUS can authenticate users on systems such as 802.1x (WiFi), dialup, PPPoE, VPN’s, VoIP, and many others. It supports back-end databases such as MySQL, PostgreSQL, Oracle, Microsoft Active Directory, Apache Cassandra, Redis, OpenLDAP, and many more. It is used daily to authenticate the Internet access for hundreds of millions of people, in sites ranging from 10 to 10 million+ users.
Please see the documentation directory, which has full documentation for version 4.
Please also see https://freeradius.org and https://wiki.freeradius.org for additional documentation.
To install the server, please see the installation instructions document.
Configuring the server
We understand that the server may be difficult to configure, install, or administer. It is, after all, a complex system with many different configuration possibilities.
The most common problem is that people change large amounts of the configuration without understanding what they’re doing, and without testing their changes. The preferred method of operation is the following:
- Start off with the default configuration files.
- Save a copy of the default configuration: It WORKS. Don’t change it!
- Verify that the server starts — in debugging mode ( radiusd -X ).
- Send it test packets using «radclient», or a NAS or AP.
- Verify that the server does what you expect
- If it does not work, change the configuration, and go to step (3)
- If you’re stuck, revert to using the «last working» configuration.
- If it works, proceed to step (6).
- Save a copy of the working configuration, along with a note of what you changed, and why.
- Make a SMALL change to the configuration.
- Repeat from step (3).
This method will ensure that you have a working configuration that is customized to your site as quickly as possible. While it may seem frustrating to proceed via a series of small steps, the alternative will always take more time. The «fast and loose» way will be MORE frustrating than quickly making forward progress!
Debugging the Server
Run the server in debugging mode, ( radiusd -X ) and READ the output. We cannot emphasize this point strongly enough. The vast majority of problems can be solved by carefully reading the debugging output, which includes WARNINGs about common issues, and suggestions for how they may be fixed.
The debug output is explained in detail in the radiusd-X page on the wiki.
Many questions are answered on the Wiki:
Read the configuration files. Many parts of the server are documented only with extensive comments in the configuration files.
Search the mailing lists. For example, using Google, searching «site:lists.freeradius.org » will return results from the FreeRADIUS mailing lists.
Instructions for what to post on the mailing list are on the wiki. Please note that we DO recommend posting the output of radiusd -X . We do NOT recommend posting the configuration files.
Feedback, Defects, and Community Support
If you have any comments, or are having difficulty getting FreeRADIUS to do what you want, please post to the ‘freeradius-users’ list (see the URL above). The FreeRADIUS mailing list is operated, and contributed to, by the FreeRADIUS community. Users of the list will be more than happy to answer your questions, with the caveat that you have read the documentation relevant to your issue first.
If you suspect a defect in the server, would like to request a feature, or submit a code patch, please use the GitHub issue tracker for the freeradius-server repository. However, it is nearly always best to raise the issue on the mailing lists first to determine whether it really is a defect or missing feature.
Instructions for gathering data for defect reports can be found in here or on the wiki.
Under no circumstances should the issue tracker be used for support requests, those questions belong on the user’s mailing list. If you post questions related to the server in the issue tracker, the issue will be closed and locked. If you persist in positing questions to the issue tracker you will be banned from all FreeRADIUS project repositories on GitHub.
Please do NOT complain that the developers aren’t answering your questions quickly enough, or aren’t fixing the problems quickly enough. Please do NOT complain if you’re told to go read documentation. We recognize that the documentation isn’t perfect, but it does exist, and reading it can solve most common questions.
FreeRADIUS is the cumulative effort of many years of work by many people, and you have gotten it for free. No one is getting paid to answer your questions. This is free software, and the only way it gets better is if you make a contribution back to the project ($$, code, or documentation).
Technical support, managed systems support, custom deployments, sponsored feature development and many other commercial services are available from Network RADIUS.


