- Set up a Webcam with Linux
- Namespaces
- Page actions
- Contents
- Try it
- Install cheese
- Check the Setup
- Troubleshooting
- SUSE Linux 11.0 and earlier
- Ubuntu
- Other webcams
- Use it
- record video
- video conferencing
- watch it
- Testbed
- Ubuntu Documentation
- Introduction
- 1. Choosing a Webcam
- 2. Testing Your Webcam Using Cheese
- 3. Webcam Software
- 3.1. Configuring Webcam Software
- 3.2. VLC
- 3.2.1. Using the GUI
- 3.2.2. Using the Command Line
- 3.3. FFmpeg
- 3.3.1. Recording Video
- 3.4. MPlayer
- 3.4.1. Recording Video
- 3.5. MEncoder
- 3.5.1. Recording Video
- 3.6. Skype
- 3.7. streamer
- 4. Identifying Your Webcam
- 5. Driver installation
- 6. See Also
- 7. External Links
Set up a Webcam with Linux
Namespaces
Page actions
You want to set up your webcam with Linux, see a video stream from it and learn which applications you can use with it, right? Then this article is for you.
Contents
Try it
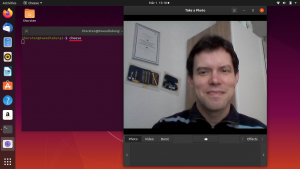
First let’s try if it works out of the box, so, connect your webcam (if it’s not inbuilt), open a terminal and start the application cheese:
This should switch on your webcam and you should see what it’s recording.
Ok, you are reading on, so there is still something left, maybe:
- terminal says «command not found», you need to install cheese. Read on at Install Cheese.
- cheese does not show the camera’s content -> read on at Check the Setup.
- you want to #record_a_video with your webcam.
Install cheese
To install cheese, you need to know your distribution. Here is how to find out your distribution.
- for Debian, Raspbian, Ubuntu, Kubuntu, Flubuntu, Xubuntu, GEUbuntu, Edubuntu, .
- for SUSE:
Check the Setup
If cheese starts, but does not find a webcam, you need to dig deeper.
- open a console and list your video4linux devices:
- you will find an output like this:
In this example your webcam device is named /dev/video0. If you have no /dev/video file, read #Troubleshooting. If you have several video4linux devices, for example a tv card your webcam may show up as /dev/video1 or whatever. But the time (in this case Nov 11 09:06) will be the time when you plugged it in.
You can also test your webcam the following ways:
- if you have vlc installed you can start it and choose Media -> Open Capture Device -> Video device name = /dev/video0 -> Play
- if you have mplayer installed you can use the command
Troubleshooting
Troubleshooting heavily depends on the distribution and version you are using. If you have done cabling correctly and a device file /dev/video* does not appear, your kernel probably does not know the hardware. In this case you may have to install the device driver separately because it may not be part of the kernel.
SUSE Linux 11.0 and earlier
This has been tested with SUSE Linux 11.0 x64 but should work with any earlier SUSE version. You will need to log in as user root. To find out what driver you need, open a console and call
If a Logitech Quickcam Messenger is plugged in the answer will be like:
This means you can install and load the webcam driver like this:
Now you should see a video device:
That means you can install and start your webcam-viewer-software. We choose gqcam:
It works. You see a video what from what is going on in front of your webcam.
Ubuntu
This has been tested with Ubuntu 8.10 x32 but should work with any Ubuntu version. Find out the driver activation command of your webcam. For this, first install the software hwinfo. Open a console and type:
Then call hwinfo:
If a Logitech Quickcam Messenger is plugged in the response will be like: 04: USB 00.2: 0000 Unclassified device
Activate the driver:
Now you should be able to see the video device:
You can now test your webcam using the software cheese:
Other webcams
If you have another webcam, try the above nevertheless. If it does not work, exchange the driver gspca against uvcvideo:
and start gqcam again.
Use it
record video
to capture video streams you can use cheese, a nice program with a graphical user interface. It allows you to watch and record your camera output at the same time. It stores in a strange format (.webm), but vlc can play this.
You can also automate video recording so you can capture the camera stream with sitting in front of the computer. To do this you can
- use the software mencoder:
- or use the software streamer, example:
video conferencing
watch it
To watch your camera’s input, use cheese or mplayer:
Or use vlc. You can run vlc as root by the way. To watch your webcam /dev/video0, start vlc and select Media -> Open Capture Device -> Video device name = /dev/video0 -> Play
Testbed
The following webcams have been found working with this tutorial:
- Logitech Quickcam messenger
- Philips Webcam SPC220NC
A general list of working webcams can be found at http://mxhaard.free.fr/spca5xx.html.
The guide has been tested with SUSE Linux 11.4 till 13.2 and Ubuntu.
Источник
Ubuntu Documentation

Style Cleanup Required
This article does not follow the style standards in the Wiki Guide. More info.
Needs Updating
This article needs updating to include the latest versions of Ubuntu. More info.
Introduction
This document describes how to choose, setup and use a webcam in Ubuntu. If you are reading this page, you are probably in either/both of the following situations:
- Looking for information on which webcam to buy.
- Trying to setup and use your existing webcam.
Please note that this document is intended for the current release: Ubuntu 10.10 (Maverick Meerkat).
1. Choosing a Webcam
Webcam support in Linux is mainly provided by the Linux UVC Project’s UVC driver. This aims to provide a universal driver in the same way that a generic driver handles USB storage devices (memory sticks, hard drives etc). However, other drivers also exist that may allow more devices to be used. When looking to purchase a webcam for use with Ubuntu, you should look for a UVC compatible camera. The Linux-UVC project has a good list of UVC compatible webcams.
2. Testing Your Webcam Using Cheese
Ubuntu aims to provide ‘out-of-the-box’ or ‘just-works’ functionality for webcams. This means that you should be able to plug-in your webcam and use it straight away: no driver disks or installation. To test whether or not your webcam works in this way, install Cheese, a GNOME program for capturing video and stills from a webcam. It can also apply some special effects. Cheese is included in the Main repositories since Ubuntu 8.04 LTS (Hardy Heron). It uses the gstreamer library, which utlilizes the video4linux2 API.
Download and install Cheese using the following steps:
- Open a terminal window.
- Type in the following command:
- Run Cheese. Cheese should automatically detect your webcam and display live video stream.
To record video or take a snapshot, click either on photo or video and select Take a Photo or Start recording.
- If Cheese doesn’t display the output from your webcam, test that the problem is not with Cheese before trying anything else by using one of the programs in the next section.
If Cheese displays a garbled picture or one with poor colour/brightness/contrast, go to the Ubuntu wiki Webcam Troubleshooting page for steps to resolve this.
3. Webcam Software
This is a list of software that allows you to do a simple ‘plug-in-and-go’ test with your webcam. You should try one of these programs if Cheese didn’t display anything at all to make sure that Cheese is not causing the problem.
Empathy has been the default VoIP/Video Chat application since Ubuntu 9.10 (Karmic Koala), and can be used to establish whether or not your webcam is working.
3.1. Configuring Webcam Software
In some cases your media player (VLC, mplayer, amongst others) will need to know the video and audio device files for your webcam. Before you plug in your webcam, try the following two commands at a console:
Make a note of the devices appearing. Now plug in your webcam, allow the system a few seconds to register the device, and run the two commands again. The new appearances should belong to your webcam (for instance, /dev/video0 and /dev/audio2). If nothing new appears, you may need to switch your webcam on. For a built-in webcam, you may have a function key to do so.
3.2. VLC
3.2.1. Using the GUI
In VLC, choose ‘Open capture device’ from the file menu and enter the video and audio device files (see above) in video device name and audio device name, respectively. If you just want a ‘mirror’ (to see what the webcam is showing), click ‘OK’ and you’re done. If you wish to record, tick off ‘Stream/save’ in the ‘Advanced options’ section. Click the settings button right next to it. Tick ‘File’ off under ‘Outputs’ and enter a filename. Encapsulation method can be left at the default (MPEG TS). Under ‘Transcoding options’, tick ‘Audio codec’ and ‘Video codec’. These can also safely be left the defaults (obviously greater compression results in lower file sizes, so experiment). Click ‘OK’ in the Settings screen and once again in the main webcam screen (Video4linux). If you want to have more control, you can access several settings, including resolution, by clicking the Advanced options button.
3.2.2. Using the Command Line
A simple test of just the video from your webcam can be done as follows. This assumes the webcam is installed as ‘/dev/video0’.
If you wish to be able to quickly start a video session with your webcam, the resulting vlc command is printed in the Customize line at the bottom. You simply need to prepend ‘vlc’, e.g.
The recording instructions will similarly need to be appended. Copy the contents of the ‘Stream Output MRL’ box under ‘Settings’ and change «:sout=» to «—sout » and append it to your vlc command:, e.g.
To simple take a few snapshots, open the webcam without recording and choose ‘Snapshot’ under the ‘Video’ menu.
3.3. FFmpeg
FFmpeg is a cross-platform audio/video recording, conversion and streaming application.
3.3.1. Recording Video
- To record both video and audio using FFmpeg, first make sure it is installed:
- Run ffmpeg with arguments such as these:
With recent versions of Ubuntu (>= 12.10) you should use avconv instead of ffmpeg command:
3.4. MPlayer
MPlayer is capable of displaying a webcam video stream,
3.4.1. Recording Video
To record video from the command line:
- Open a terminal window and type the following:
This example assumes that your webcam device is at /dev/video0
The resolution (width=. & height=. ) should be chosen to match the output of your device.
3.5. MEncoder
The companion to MPlayer, MEncoder can record from a webcam to video files.
3.5.1. Recording Video
- Recording AVI, without audio:
- Recording AVI, with audio:
- Type ‘man mencoder’ for more info on the audio options.
/dev/dsp1 refers to the webcam USB Audio device.
/dev/dsp refers to the sound card.
You may need to install these programs with
Camera Monitor from chaos infinito shows a tray icon that lets you know when your webcam is on. It has been in the Universe repository since Ubuntu 10.10 (Maverick Meerkat) and is released under the GPL.
luvcview is a good program you can use to test that the camera is working. It has been in the Universe repository since Ubuntu 8.04 LTS (Hardy Heron). If it doesn’t work, you may need to update the UVC driver (see Manual install instructions below).
guvcview is based on luvcview and has a graphical user interface. It has been in the Universe repositories since Ubuntu 9.10 (Karmic Koala).
Camorama (not updated since 2007), xawtv, aMSN, and Kopete can all be used to test and use your webcam. They have been in the Universe repositories since Ubuntu 6.06 LTS (Dapper Drake) apart from Kopete, which is in the main repositories.
3.6. Skype
See the dedicated Skype and SkypeWebCams pages.
3.7. streamer
The streamer package provides a very simple command line interface for taking pictures:
The package can be installed as follows:
4. Identifying Your Webcam
Although webcams may look quite different from one another, they often share similar or identical major components. This means that drivers may work for many different makes and models with little or no modification.
To definitively identify your webcam, the following information will be of use:
- Make and Model Name/Number.
Any version or revision information. This is often printed on the device or its packaging and will read something similar to REV 01 or VER. 2.2. This information can be particularly useful.
The output of the lsusb. Type lsusb -v into a terminal window.
- This program prints information about the devices connected to the USB bus. If you scroll through it, you should find some information about your webcam.
Type lsusb -n into a terminal window. This version of the command lists the device’s USB ID; a number that is unique to every device.
5. Driver installation
Linux Webcam drivers are provided by several different projects. Although the Linux UVC project covers many devices, support for others is provided elsewhere. This section aims to help you install your webcam’s drivers if they have not been automatically installed by Ubuntu.
If the drivers for your webcam haven’t been loaded automatically by Ubuntu, you may have to install them manually.
ov51x — The Ubuntu wiki page is here.
ov51x-jpeg — This is a hacked driver by http://www.rastageeks.org/ and more info is available here.
Suported Hardware — A list of webcams supported by the rastageeks driver.
6. See Also
UVC — The Ubuntu wiki page for the Universal Video Class.
7. External Links
The Linux TV Project Homepage — This is the project responsible for the video4linux drivers for webcams and tv capture/tuner devices.
The linuxtv.org V4L-DVB Wiki Webcam Page — This page contains lots of information about webcam support in Linux.
The UVC Homepage — The home of the Universal Video Class for Linux project. This project aims to provide a universal driver for Linux webcams.
FFmpeg — This project develops the cross-platform recording, conversion and streaming solution for audio and video.
Webcam (последним исправлял пользователь ckimes 2017-08-23 23:00:23)
The material on this wiki is available under a free license, see Copyright / License for details
You can contribute to this wiki, see Wiki Guide for details
Источник


