- Move your data from a Windows PC to your Mac
- Before you begin
- Move your data
- How to move your information from a PC to your Mac
- After you move your data
- If you have issues moving your data
- What data can I transfer?
- Package a desktop application using the Desktop App Converter
- The DAC does more than just generate a package for you
- First, prepare your application
- Make sure that your system can run the converter
- Start the Desktop App Converter
- Set a few things up (apps with installers only)
- Package an app
- A quick look at command parameters
- Examples
- Package an application that has an installer (.msi) file
- Package an application that has a setup executable file
- Package an application that doesn’t have an installer
- Package an app, sign the app, and run validation checks on the package
- A quick look at optional parameters
- Parameter Reference
- Run the packaged app
- Modify the packaged app
- Delete unnecessary files and registry keys
- Fix corrupted PE headers
- Telemetry from Desktop App Converter
- Language support
- Known issues with the Desktop App Converter
- E_CREATING_ISOLATED_ENV_FAILED and E_STARTING_ISOLATED_ENV_FAILED errors
- New-ContainerNetwork: The object already exists error
- Your .NET application is compiled with the «AnyCPU» build option and fails to install
- Publishing public side-by-side Fusion assemblies won’t work
- Error found in XML. The ‘Executable’ attribute is invalid — The value ‘MyApp.EXE’ is invalid according to its datatype
- Corrupted or malformed Authenticode signatures
- Next steps
Move your data from a Windows PC to your Mac
Use Windows Migration Assistant to transfer your pictures, documents, and other data from a Windows PC to your Mac.
Windows Migration Assistant transfers your contacts, calendars, email accounts, and more from a PC. It migrates this data to the appropriate places on your Mac. After migrating data to your Mac, authorize your computer for iTunes Store purchases. It’s important to authorize before you sync or play content that you download from the iTunes Store.
If you’re migrating from one Mac to another Mac, follow the steps to move your content to a new Mac.
Before you begin
To prepare for a smooth migration:
- Make sure that Windows is up to date. Migration Assistant works with Windows 7 and later.
- Make sure that you know the name and password of an administrator account on your PC.
- Connect your Mac and PC to the same network, such as your home Wi-Fi network. Or connect an Ethernet cable between the ports on your Mac and PC to create a direct network connection. Some Mac models require an Ethernet adapter, such as the Belkin USB-C to Gigabit Ethernet Adapter or Apple Thunderbolt to Gigabit Ethernet Adapter.
- If you’re using Microsoft OneDrive on your PC, follow Microsoft’s instructions for uninstalling OneDrive before continuing. You can reinstall OneDrive after migration is complete.
Then use the check disk (chkdsk) utility on your PC to make sure that your Windows hard drive doesn’t have any issues:
- Right-click the Start button, then click Run.
- Type cmd and press Enter. Command Prompt opens.
- At the prompt, type chkdsk and press Enter.
- If the utility reports that it found problems, type the following, where drive is the letter that represents your Windows startup disk, such as D:
- Press Enter.
- At the prompt, type Y , then restart your PC.
- Repeat this process until the check disk utility reports no issues. If the utility can’t fix every issue that it finds, you might need to have your PC serviced. Then migrate your data to your Mac.
Move your data
This section guides you through migration, post-migration, and what to do if the steps don’t work for you.
How to move your information from a PC to your Mac
- On your PC, download and install the appropriate Windows Migration Assistant, based on the version of macOS on your Mac:
- Windows Migration Assistant for macOS Big Sur
- Windows Migration Assistant for macOS Mojave and macOS Catalina
- Windows Migration Assistant for macOS Sierra and High Sierra
- Windows Migration Assistant for OS X El Capitan or earlier
- Quit any open Windows apps.
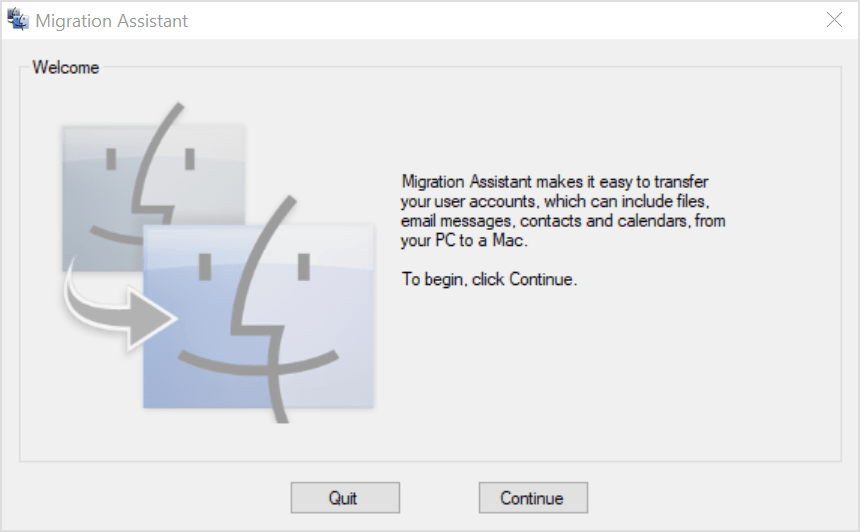
- Open Windows Migration Assistant, then click Continue.

- Start up your Mac. Setup Assistant automatically opens the first time you turn on your Mac. If you’ve already set up your Mac, open Migration Assistant, which is in the Utilities folder of your Applications folder.
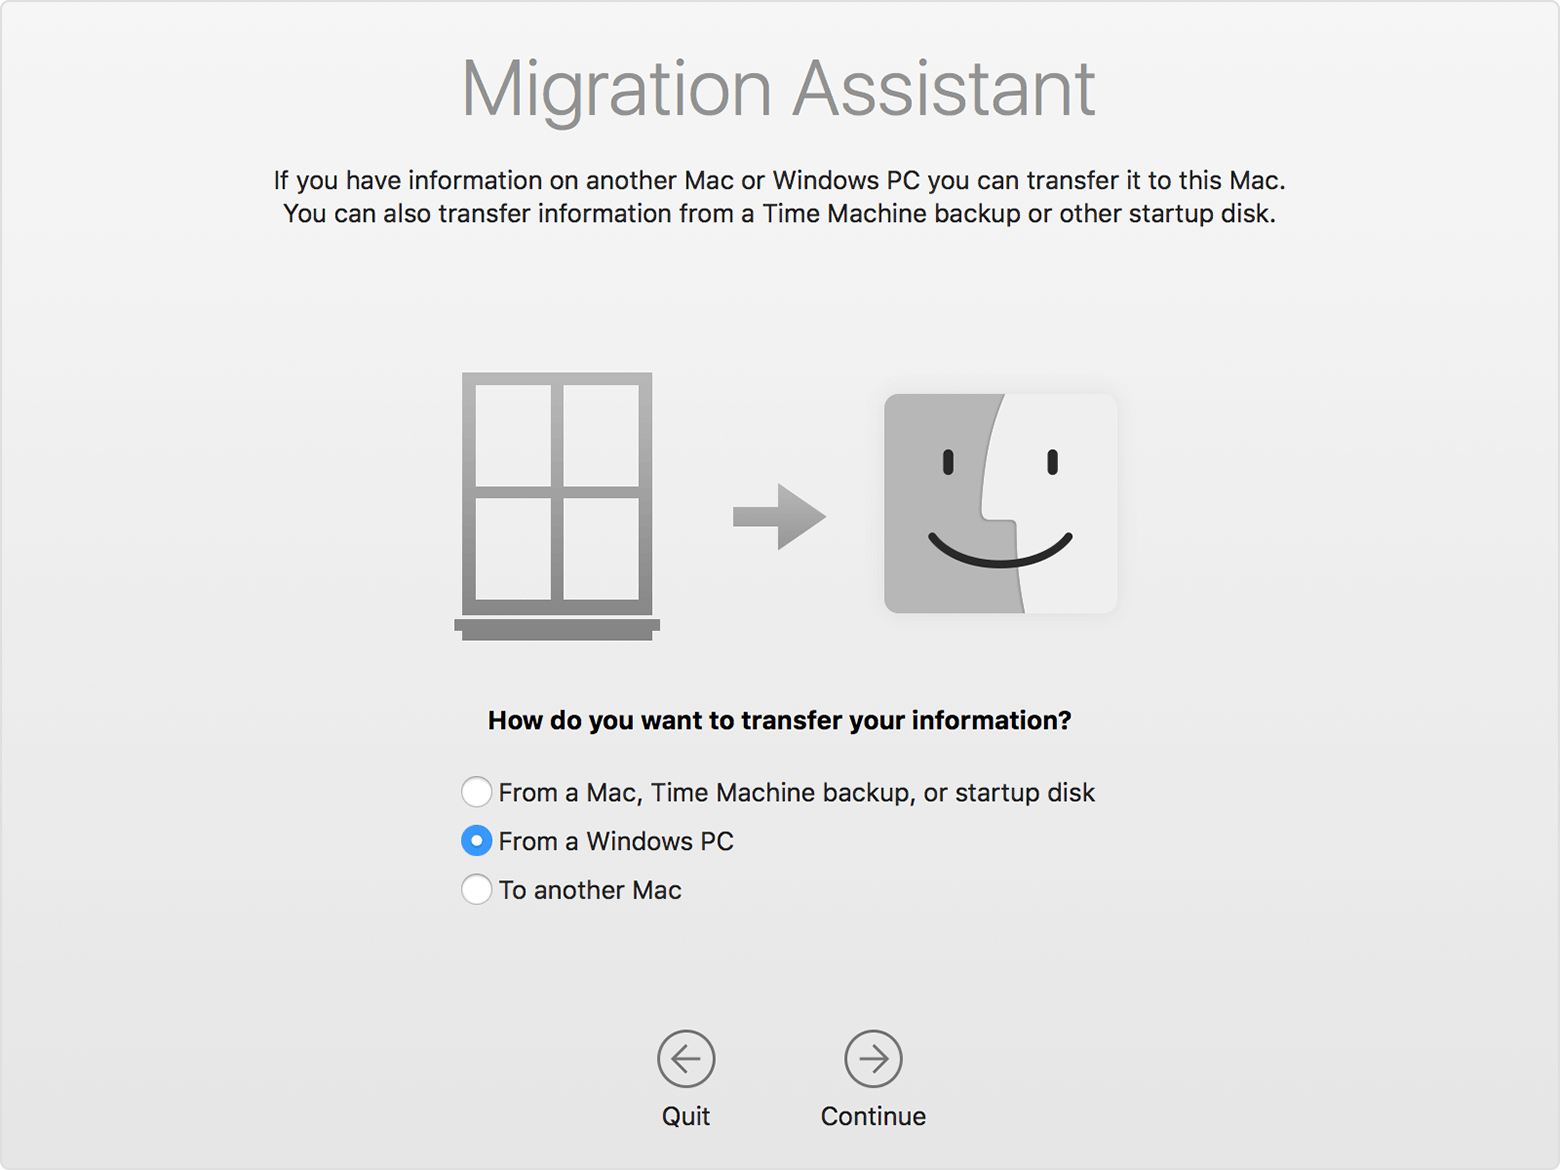
- On your Mac, follow the onscreen prompts until you get to the migration pane of the assistant. Select the option to transfer your information “From a Windows PC,” then click Continue.
- When prompted, enter an administrator name and password.
- Click Continue to close any other open apps.
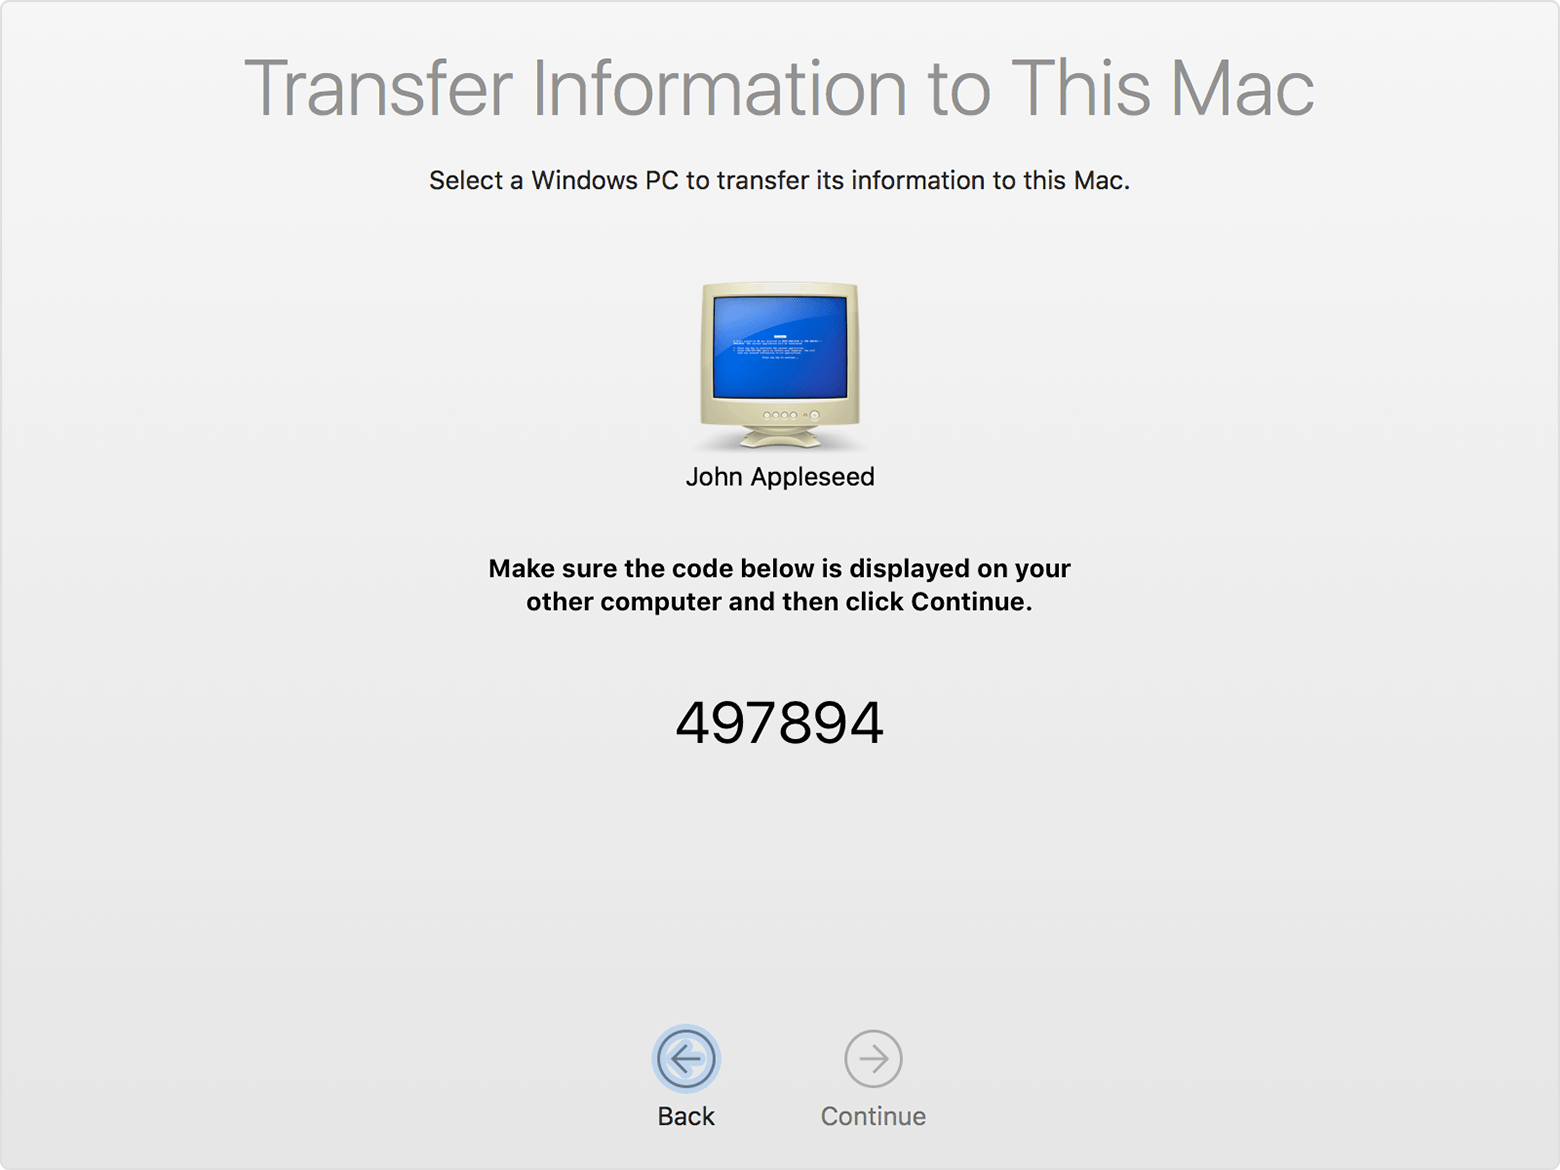
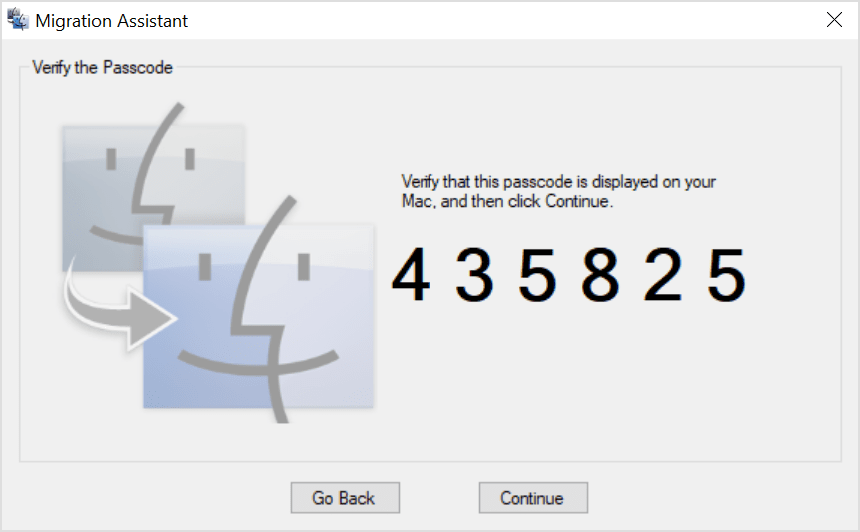
- In the migration window on your Mac, select your PC from the list of available computers. Then wait for the PC to show the same passcode that your Mac shows.
- When both computers display the same passcode, click Continue on your PC and Mac.
- Your Mac scans the drives on your PC to build a list of information to migrate. When the scan completes, select the information that you want to migrate to your Mac and click Continue. Learn about some of the data that you can transfer.
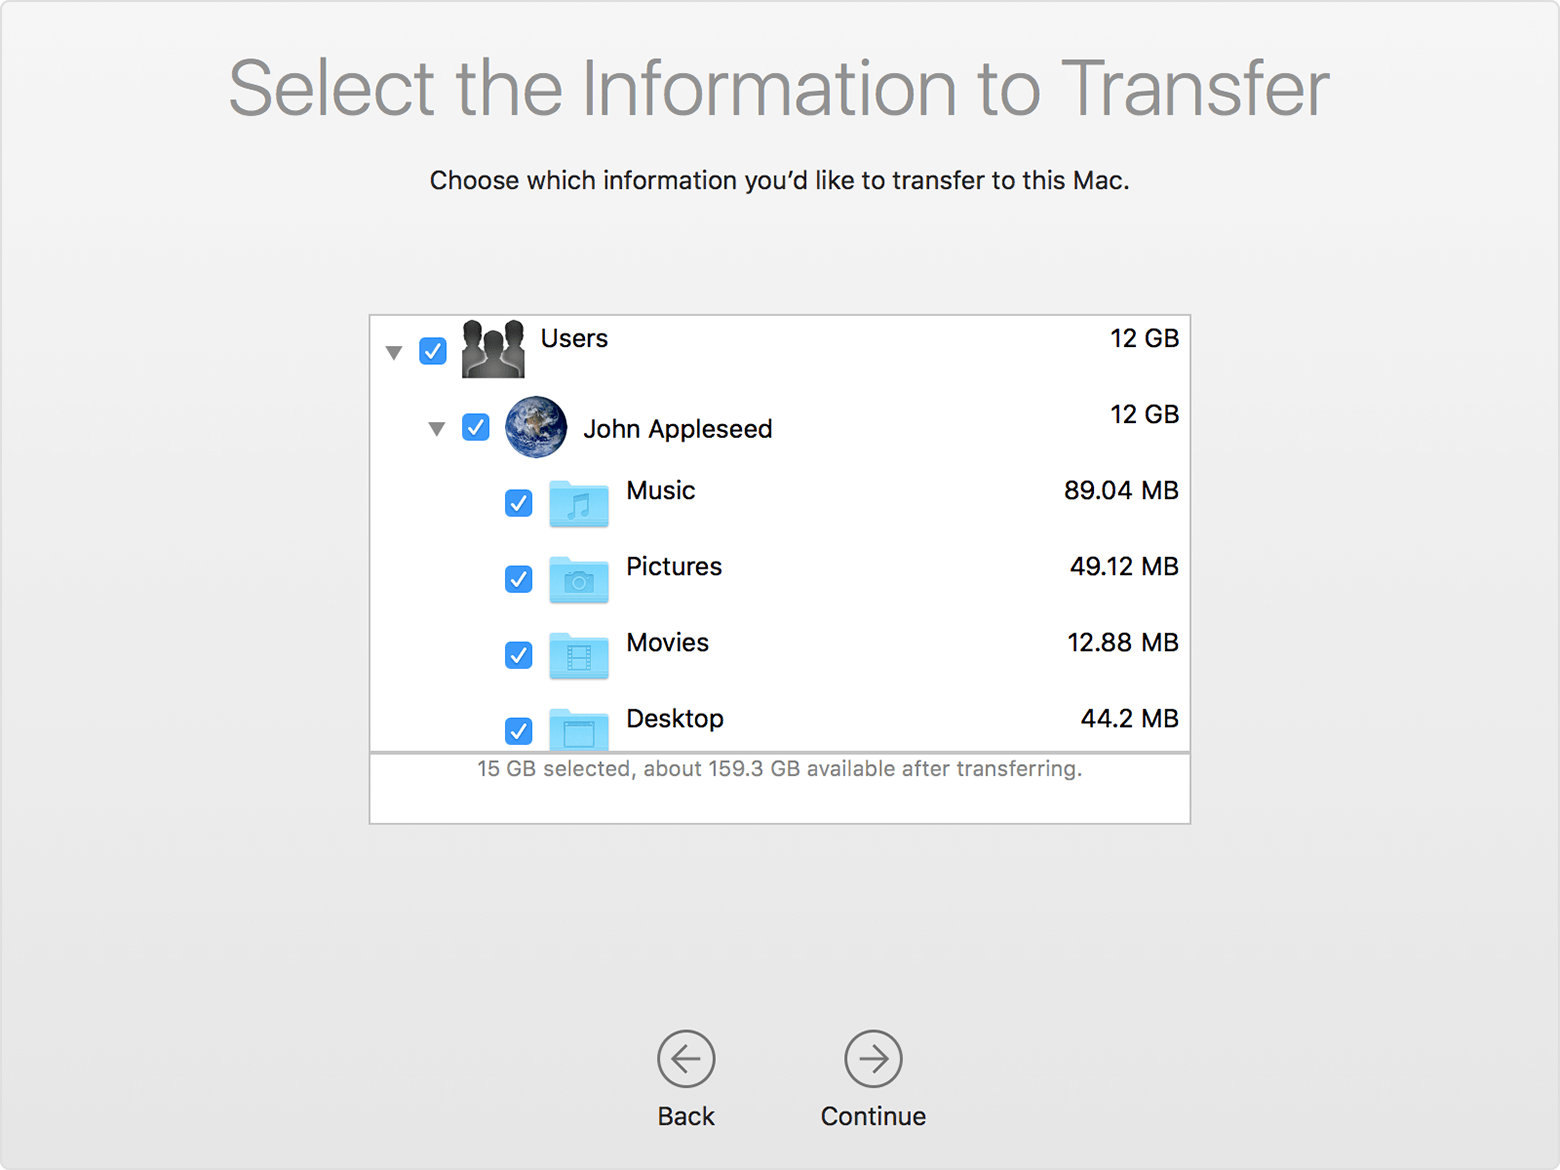
You can watch the progress and estimated time remaining on both the PC and your Mac. They tell you when migration is complete.
After you move your data
When migration completes, close Windows Migration Assistant on your PC. Then log in to the new user account on your Mac. The first time you log in to a user account migrated from your PC, you’re asked to set a password. You can use the same password that you used on your PC, or create a new password.
After logging in to the user account that you migrated, authorize your computer for iTunes Store purchases. It’s important to authorize before you sync or play content downloaded from the iTunes Store.
If you have issues moving your data
- Quit all open apps on your PC, then try migrating your content again. For example, you can press Alt-Tab to choose an open application, then press Alt-F4 to quit it.
- If your PC doesn’t appear in the Setup Assistant or Migration Assistant window on your Mac, make sure the computers are connected to the same network. You can create a network by connecting a single Ethernet cable between your Mac and PC. If that doesn’t help, check for firewall software on your PC and turn it off. After migration completes, you can turn firewall software on again.
- If Migration Assistant doesn’t open on your PC, turn off any antivirus software on your PC. Then try to open Migration Assistant again. After migration completes. You can turn that software on again.
- If you still can’t migrate your information successfully, you can use an external drive or file sharing to manually copy important data to your Mac.
What data can I transfer?
Migration Assistant lets you choose the data to move to your Mac. Here’s what moves over for specific apps and data types:
Email, contacts, and calendar information
Email messages, email-account settings, contacts, and appointments move based on which version of Windows you’re using and which accounts you have.
Outlook 1
Data from 32-bit versions of Outlook in Windows 7 and later move as follows:
- People move to Contacts 2
- Appointments move to the Calendar app
- IMAP and Exchange settings and messages move to the Mail app
- POP settings and messages move to Mail 2
Windows Live Mail
Data from Windows Live Mail in Windows 7 and later moves as follows:
- IMAP settings and messages move to Mail
- POP settings and messages move to Mail 2
Windows Mail
Data from Windows Mail in Windows 7 and later (excluding Windows 8) move as follows:
- IMAP settings and messages move to Mail
- POP settings and messages move to Mail 2
- People move to Contacts
Bookmarks
Bookmarks from Internet Explorer, Safari for Windows, and Firefox move to Safari.
System settings
Language and location settings, and custom desktop pictures move to System Preferences. Your web browser homepage moves to Safari preferences.
Pictures
Photos and other images move to your home folder. You can then add them to Photos, or open Photos and let it search your Mac for photos to import.
iTunes content
Migration Assistant transfers your iTunes media as follows: music to the Apple Music app, videos to the Apple TV app, podcasts to the Apple Podcasts app, and audiobooks to the Apple Books app.
Other files
Migration Assistant also moves these files:
- Files from the top-level folder of the currently logged-in user’s home directory
- Non-system files located in the Windows or Program Files folders
- Top-level folders located on the Windows system disk and other attached disks
1. Migration Assistant doesn’t support 64-bit versions of Outlook. You can manually migrate Mail, Contacts, or Calendars from Outlook 2013 or Outlook 2016 by signing in and entering the content on your Mac manually.
2. Migration Assistant transfers only the Mail or Contacts data that belongs to the logged-in Windows user. To transfer data from another user account, use Migration Assistant again while you’re logged in to another Windows account. Each time you migrate, your Mac creates a new user account.
Information about products not manufactured by Apple, or independent websites not controlled or tested by Apple, is provided without recommendation or endorsement. Apple assumes no responsibility with regard to the selection, performance, or use of third-party websites or products. Apple makes no representations regarding third-party website accuracy or reliability. Contact the vendor for additional information.
Package a desktop application using the Desktop App Converter
The Desktop App Converter tool is deprecated. We recommend that you use the MSIX Packaging Tool instead.

The Desktop App Converter (DAC) creates packages for desktop applications to integrate with the latest Windows features, including distribution and servicing via the Microsoft Store. This includes Win32 apps and apps that you’ve created by using .NET 4.6.1.
While the term «Converter» appears in the name of this tool, it doesn’t actually convert your app. Your application remains unchanged. However, this tool generates a Windows app package with a package identity and the ability to call a vast range of WinRT APIs.
You can install that package by using the Add-AppxPackage PowerShell cmdlet on your development machine.
The converter runs the desktop installer in an isolated Windows environment by using a clean base image provided as part of the converter download. It captures any registry and file system I/O made by the desktop installer and packages it as part of the output.
Desktop App Converter is supported on Windows 10, version 1607, and later. It can only be used in projects that target Windows 10 Anniversary Update (10.0; Build 14393) or a later release in Visual Studio.
The DAC does more than just generate a package for you
Here’s a few extra things it can do for you.
Windows 10 Creators Update
вњ”пёЏ Automatically register your preview handlers, thumbnail handlers, property handlers, firewall rules, URL flags.
вњ”пёЏ Automatically register file type mappings that enable users to group files by using the Kind column in File Explorer.
вњ”пёЏ Register your public COM servers.
Windows 10 Anniversary Update or later
вњ”пёЏ Automatically sign your package so that you can test your app.
вњ”пёЏ Validate your application against packaged app and Microsoft Store requirements.
To find a complete list of options, see the Parameters section of this guide.
If you’re ready to create your package, let’s start.
First, prepare your application
Review this guide before you begin creating a package for your application: Prepare to package a desktop application.
Make sure that your system can run the converter
Make sure that your system meets the following requirements:
- Windows 10 Anniversary Update (10.0.14393.0 and later) Pro or Enterprise edition.
- 64 bit (x64) processor
- Hardware-assisted virtualization
- Second Level Address Translation (SLAT)
- Windows Software Development Kit (SDK) for Windows 10.
Start the Desktop App Converter
Download and install the Desktop App Converter.
Run the Desktop App Converter as an administrator.

A console window appears. You’ll use that console window to run commands.
Set a few things up (apps with installers only)
You can skip ahead to the next section if your application doesn’t have an installer.
Identify the version number of your operating system.
To do that, type winver in the Run dialog box, and then choose the OK button.

You’ll find the version of your Windows build in the About Windows dialog box.

Make sure that the version number that appears in the name of the file matches the version number of your Windows build.
If you’re using build number 15063, and the minor version of that build is equal to or greater than .483 (For example: 15063.540), make sure to download the BaseImage-15063-UPDATE.wim file. If the minor version of that build is less than .483, download the BaseImage-15063.wim file. If you’ve already setup an incompatible version of this base file, you can fix it. This blog post explains how to do that.
Place the downloaded file anywhere on your computer where you’ll be able to find it later.
In the console window that appeared when you started the Desktop App Converter, run this command: Set-ExecutionPolicy bypass .
Set up the converter by running this command: DesktopAppConverter.exe -Setup -BaseImage .\BaseImage-1XXXX.wim -Verbose .
Restart your computer if you’re prompted to do so.
Status messages appear in the console window as the converter expands the base image. If you don’t see any status messages, press any key. This can cause the contents of the console window to refresh.

When the base image is fully expanded, move to the next section.
Package an app
To Package your app, run the DesktopAppConverter.exe command in the console window that opened when you started the Desktop App Converter.
You’ll specify the package name, publisher and version number of the application by using parameters.
If you’ve reserved your app name in the Microsoft Store, you can obtain the package and publisher names by using Partner Center. If you plan to sideload your app onto other systems, you can provide your own names for these as long as the publisher name that you choose matches the name on the certificate you use to sign your app.
A quick look at command parameters
Here are the required parameters.
You can read about each one here.
Examples
Here’s a few common ways to package your app.
Package an application that has an installer (.msi) file
Point to the installer file by using the Installer parameter.
There are two important things to keep in mind here. First, make sure that your installer is located in an independent folder and that only files related to that installer are in the same folder. The converter copies all of the contents of that folder to the isolated Windows environment.
Secondly, if Partner Center assigns an identity to your package that begins with a number, make sure that you also pass in the -AppId parameter, and use only the string suffix (after the period separator) as the value of that parameter.
If your installer includes installers for dependent libraries or frameworks, you might have to organize things a bit a differently. See Chaining multiple installers with the Desktop Bridge.
Package an application that has a setup executable file
Point to the setup executable by using the Installer parameter.
If Partner Center assigns an identity to your package that begins with a number, make sure that you also pass in the -AppId parameter, and use only the string suffix (after the period separator) as the value of that parameter.
The InstallerArguments parameter is an optional parameter. However, because the Desktop App Converter needs your installer to run in unattended mode, you might have to use it if your application needs silent flags to run silently. The /S flag is a very common silent flag, but the flag that you use might be different depending on which installer technology you used to create the setup file.
Package an application that doesn’t have an installer
In this example, use the Installer parameter to point to the root folder of your application files.
Use the AppExecutable parameter to point to your apps executable file.
If Partner Center assigns an identity to your package that begins with a number, make sure that you also pass in the -AppId parameter, and use only the string suffix (after the period separator) as the value of that parameter.
Package an app, sign the app, and run validation checks on the package
This example is similar to first one except it shows how you can sign your application for local testing, and then validate your application against packaged app and Microsoft Store requirements.
If Partner Center assigns an identity to your package that begins with a number, make sure that you also pass in the -AppId parameter, and use only the string suffix (after the period separator) as the value of that parameter.
The Sign parameter generates a certificate and then signs your application with it. To run your app, you’ll have to install that generated certificate. To learn how, see the Run the packaged app section of this guide.
You can validate you application by using the Verify parameter.
A quick look at optional parameters
The Sign and Verify parameters are optional. There are many more optional parameters. Here are some of the more commonly used optional parameters.
You can read about all of them in the next section.
Parameter Reference
Here’s the complete list of parameters (organized by category) that you can use when you run the Desktop App Converter.
You can also view the entire list by running the Get-Help command in the app console window.
| Setup parameters | Required or optional? | Description |
|---|---|---|
| -Setup [ ] | Required | Runs DesktopAppConverter in setup mode. Setup mode supports expanding a provided base image. |
| -BaseImage | Required | Full path to an unexpanded base image. This parameter is required if -Setup is specified. |
| -LogFile | Optional | Specifies a log file. If omitted, a log file temporary location will be created. |
| -NatSubnetPrefix | Optional | Prefix value to be used for the Nat instance. Typically, you would want to change this only if your host machine is attached to the same subnet range as the converter’s NetNat. You can query the current converter NetNat config by using the Get-NetNat cmdlet. |
| -NoRestart [ ] | Required | Don’t prompt for reboot when running setup (reboot is required to enable the container feature). |
| Conversion parameters | ||
| -AppInstallPath | Optional | The full path to your application’s root folder for the installed files if it were installed (e.g., «C:\Program Files (x86)\MyApp»). |
| -Destination | Required | The desired destination for the converter’s appx output — DesktopAppConverter can create this location if it doesn’t already exist. |
| -Installer | Required | The path to the installer for your application — must be able to run unattended/silently. No-installer conversion, this is the path to the root directory of your application files. |
| -InstallerArguments | Optional | A comma-separated list or string of arguments to force your installer to run unattended/silently. This parameter is optional if your installer is an msi. To get a log from your installer, supply the logging argument for the installer here and use the path , which is a token that the converter replaces with the appropriate path. NOTE: The unattended/silent flags and log arguments will vary between installer technologies. An example usage for this parameter: -InstallerArguments «/silent /log \install.log» Another example that doesn’t produce a log file may look like: -InstallerArguments «/quiet», «/norestart» Again, you must literally direct any logs to the token path if you want the converter to capture it and put it in the final log folder. |
| -InstallerValidExitCodes | Optional | A comma-separated list of exit codes that indicate your installer ran successfully (for example: 0, 1234, 5678). By default this is 0 for non-msi, and 0, 1641, 3010 for msi. |
| -MakeAppx [ ] | Optional | A switch that, when present, tells this script to call MakeAppx on the output. |
| -MakeMSIX [ ] | Optional | A switch that, when present, tells this script to package the output as an MSIX Package. |
| Package identity parameters | ||
| -PackageName | Required | The name of your Universal Windows App package. If Partner Center assigns an identity to your package that begins with a number, make sure that you also pass in the -AppId parameter, and use only the string suffix (after the period separator) as the value of that parameter. |
| -Publisher | Required | The publisher of your Universal Windows App package |
| -Version | Required | The version number for your Universal Windows App package |
| Package manifest parameters | ||
| -AppExecutable | Optional | The name of your application’s main executable (eg «MyApp.exe»). This parameter is required for a no-installer conversion. |
| -AppFileTypes | Optional | A comma-separated list of file types which the application will be associated with. Example usage: -AppFileTypes «‘.md’, ‘.markdown'». |
| -AppId | Optional | Specifies a value to set Application Id to in the Windows app package manifest. If it is not specified, it will be set to the value passed in for PackageName. In many cases, using the PackageName is fine. However, if Partner Center assigns an identity to your package that begins with a number, make sure that you also pass in the -AppId parameter, and use only the string suffix (after the period separator) as the value of that parameter. |
| -AppDisplayName | Optional | Specifies a value to set Application Display Name to in the Windows app package manifest. If it is not specified, it will be set to the value passed in for PackageName. |
| -AppDescription | Optional | Specifies a value to set Application Description to in the Windows app package manifest. If it is not specified, it will be set to the value passed in for PackageName. |
| -PackageDisplayName | Optional | Specifies a value to set Package Display Name to in the Windows app package manifest. If it is not specified, it will be set to the value passed in for PackageName. |
| -PackagePublisherDisplayName | Optional | Specifies a value to set Package Publisher Display Name to in the Windows app package manifest. If it is not specified, it will be set to the value passed in for Publisher. |
| Cleanup parameters | ||
| -Cleanup [ ] | Required | Runs cleanup for the DesktopAppConverter artifacts. There are 3 valid options for the Cleanup mode. |
| -Cleanup All | Deletes all expanded base images, removes any temporary converter files, removes the container network, and disables the optional Windows feature, Containers. | |
| -Cleanup WorkDirectory | Required | Removes all the temporary converter files. |
| -Cleanup ExpandedImage | Required | Deletes all the expanded base images installed on your host machine. |
| Package architecture parameters | ||
| -PackageArch | Required | Generates a package with the specified architecture. Valid options are ‘x86’ or ‘x64’; for example, -PackageArch x86. This parameter is optional. If unspecified, the DesktopAppConverter will try to auto-detect package architecture. If auto-detection fails, it will default to x64 package. |
| Miscellaneous parameters | ||
| -ExpandedBaseImage | Optional | Full path to an already expanded base image. |
| -LogFile | Optional | Specifies a log file. If omitted, a log file temporary location will be created. |
| -Sign [ ] | Optional | Tells this script to sign the output Windows app package by using a generated certificate for testing purposes. This switch should be present alongside the switch -MakeAppx . |
| Required | This cmdlet supports the common parameters: Verbose, Debug, ErrorAction, ErrorVariable, WarningAction, WarningVariable, OutBuffer, PipelineVariable, and OutVariable. For more info, see about_CommonParameters. | |
| -Verify [ ] | Optional | A switch that, when present, tells the DAC to validate the app package against packaged app and Microsoft Store requirements. The result is a validation report «VerifyReport.xml», which is best visualized in a browser. This switch should be present alongside the switch -MakeAppx . |
| -PublishComRegistrations | Optional | Scans all public COM registrations made by your installer and publishes the valid ones in your manifest. Use this flag only if you want to make these registrations available to other applications. You don’t need to use this flag if these registrations will be used only by your application. Review this article to make sure that your COM registrations behave as you expect after you package your app. |
Run the packaged app
There’s two ways to run your app.
One way is to open a PowerShell command prompt, and then type this command: Add-AppxPackage –Register AppxManifest.xml . It’s probably the easiest way to run your application because you don’t have to sign it.
Another way is to sign your application with a certificate. If you use the sign parameter, the Desktop App Converter will generate one for you, and then sign your application with it. That file is named auto-generated.cer, and you can find it in the root folder of your packaged app.
Follow these steps to install the generated certificate, and then run your app.
Double-click the auto-generated.cer file to install the certificate.

If you’re prompted for a password, use the default password «123456».
In the Certificate dialog box, choose the Install Certificate button.
In the Certificate Import Wizard, install the certificate onto the Local Machine, and place the certificate into the Trusted People certificate store.

In root folder of your packaged app, double click the Windows app package file.

Install the app, by choosing the Install button.

Modify the packaged app
You’ll likely make changes to your packaged application to address bugs, add visual assets, or enhance your application with modern experiences such as live tiles.
After you make your changes, you don’t need to run the converter again. In most cases, you can just repackage your application by using the MakeAppx tool and the appxmanifest.xml file the DAC generates for your app. See Generate a Windows app package.
If you modify any of the visual assets of your app, generate a new Package Resource Index file, and then run the MakeAppx tool to generate a new package. See Generate a Package Resource Index (PRI) file.
If you want to add icons or tiles that appear on the Windows taskbar, task view, LT+TAB, snap assist, and the lower right corner of Start tiles, see (Optional Add Target-based unplated assets.
If you make changes to registry settings that your installer makes, you will have to run the Desktop App Converter again to pick up those changes.
The following two sections describe a couple of optional fix-ups to the packaged application that you might consider.
Delete unnecessary files and registry keys
The desktop App Converter takes a very conservative approach to filtering out files and system noise in the container.
If you want, you can review the VFS folder and delete any files that your installer doesn’t need. You can also review the contents of Reg.dat and delete any keys that are not installed/needed by the app.
Fix corrupted PE headers
During the conversion process, the DesktopAppConverter automatically runs the PEHeaderCertFixTool to fixup any corrupted PE headers. However, you can also run the PEHeaderCertFixTool on a UWP Windows app package, loose files, or a specific binary. Here’s an example.
Telemetry from Desktop App Converter
Desktop App Converter may collect information about you and your use of the software and send this info to Microsoft. You can learn more about Microsoft’s data collection and use in the product documentation and in the Microsoft Privacy Statement. You agree to comply with all applicable provisions of the Microsoft Privacy Statement.
By default, telemetry will be enabled for the Desktop App Converter. Add the following registry key to configure telemetry to a desired setting:
- Add or edit the DisableTelemetry value by using a DWORD set to 1.
- To enable telemetry, remove the key or set the value to 0.
Language support
The Desktop App Converter does not support Unicode; thus, no Chinese characters or non-ASCII characters can be used with the tool.
Known issues with the Desktop App Converter
E_CREATING_ISOLATED_ENV_FAILED and E_STARTING_ISOLATED_ENV_FAILED errors
If you receive either of these errors, make sure that you’re using a valid base image from the download center. If you’re using a valid base image, try using -Cleanup All in your command. If that does not work, please send us your logs at converter@microsoft.com to help us investigate.
New-ContainerNetwork: The object already exists error
You might receive this error when you setup a new base image. This can happen if you have a Windows Insider flight on a developer machine that previously had the Desktop App Converter installed.
To resolve this issue, try running the command Netsh int ipv4 reset from an elevated command prompt, and then reboot your machine.
Your .NET application is compiled with the «AnyCPU» build option and fails to install
This can happen if the main executable or any of the dependencies were placed anywhere in the Program Files or Windows\System32 folder hierarchy.
To resolve this issue, try using your architecture-specific desktop installer (32 bit or 64 bit) to generate a Windows app package.
Publishing public side-by-side Fusion assemblies won’t work
During install, an application can publish public side-by-side Fusion assemblies, accessible to any other process. During process activation context creation, these assemblies are retrieved by a system process named CSRSS.exe. When this is done for a converted process, activation context creation and module loading of these assemblies will fail. The side-by-side Fusion assemblies are registered in the following locations:
- Registry: HKEY_LOCAL_MACHINE\SOFTWARE\Microsoft\Windows\CurrentVersion\SideBySide\Winners
- File System: %windir%\SideBySide
This is a known limitation and no workaround currently exists. That said, Inbox assemblies, like ComCtl, are shipped with the OS, so taking a dependency on them is safe.
Error found in XML. The ‘Executable’ attribute is invalid — The value ‘MyApp.EXE’ is invalid according to its datatype
This can happen if the executables in your application have a capitalized .EXE extension. Although, the casing of this extension shouldn’t affect whether your application runs, this can cause the DAC to generate this error.
To resolve this issue, try specifying the -AppExecutable flag when you package, and use the lower case «.exe» as the extension of your main executable (For example: MYAPP.exe). Alternately you can change the casing for all executables in your application from uppercase to lowercase (For example: from .EXE to .exe).
Corrupted or malformed Authenticode signatures
This section contains details on how to identify issues with Portable Executable (PE) files in your Windows app package that may contain corrupted or malformed Authenticode signatures. Invalid Authenticode signatures on your PE files, which may be in any binary format (e.g. .exe, .dll, .chm, etc.), will prevent your package from being signed properly, and thus prevent it from being deployable from an Windows app package.
The location of the Authenticode signature of a PE file is specified by the Certificate Table entry in the Optional Header Data Directories and the associated Attribute Certificate Table. During signature verification, the information specified in these structures is used to locate the signature on a PE file. If these values get corrupted then it is possible for a file to appear to be invalidly signed.
For the Authenticode signature to be correct, the following must be true of the Authenticode signature:
- The start of the WIN_CERTIFICATE entry in the PE file cannot extend past the end of the executable
- The WIN_CERTIFCATE entry should be located at the end of the image
- The size of the WIN_CERTIFICATE entry must be positive
- The WIN_CERTIFICATEentry must start after the IMAGE_NT_HEADERS32 structure for 32-bit executables and IMAGE_NT_HEADERS64 structure for 64-bit executables
Note that SignTool.exe can output a list of the corrupted or malformed binaries when attempting to sign an Windows app package. To do this, enable verbose logging by setting the environment variable APPXSIP_LOG to 1 (e.g., set APPXSIP_LOG=1 ) and re-run SignTool.exe.
To fix these malformed binaries, ensure they conform to the requirements above.
Next steps
Find answers to your questions
Have questions? Ask us on Stack Overflow. Our team monitors these tags. You can also ask us here.
Run your application / find and fix issues


